作者选择了 维基媒体基金会作为 写给捐赠计划的一部分接受捐赠。
介绍
基础设施作为代码(IaC)是通过在代码中定义资源状态及其关系来自动化基础设施部署和修改的做法,然后执行该代码在云中创建或修改实际资源。 IaC允许工程师使用一个IaC工具,如 Terraform(由 HashiCorp)提供基础设施。
您可以将代码存储在版本控制中(如 Git)以保留基础设施状态的历史记录,您可以通过更高级别的工具(如自助服务 internal developer platform (IDP))进一步自动化部署过程。
Terraform 是一个受欢迎的平台-agnostic IaC 工具,由于其对许多平台的广泛支持,包括 GitHub, Cloudflare,和 DigitalOcean. 大多数 Terraform 配置是用一个称为 HashiCorp 配置语言(HCL)的声明语言写的。
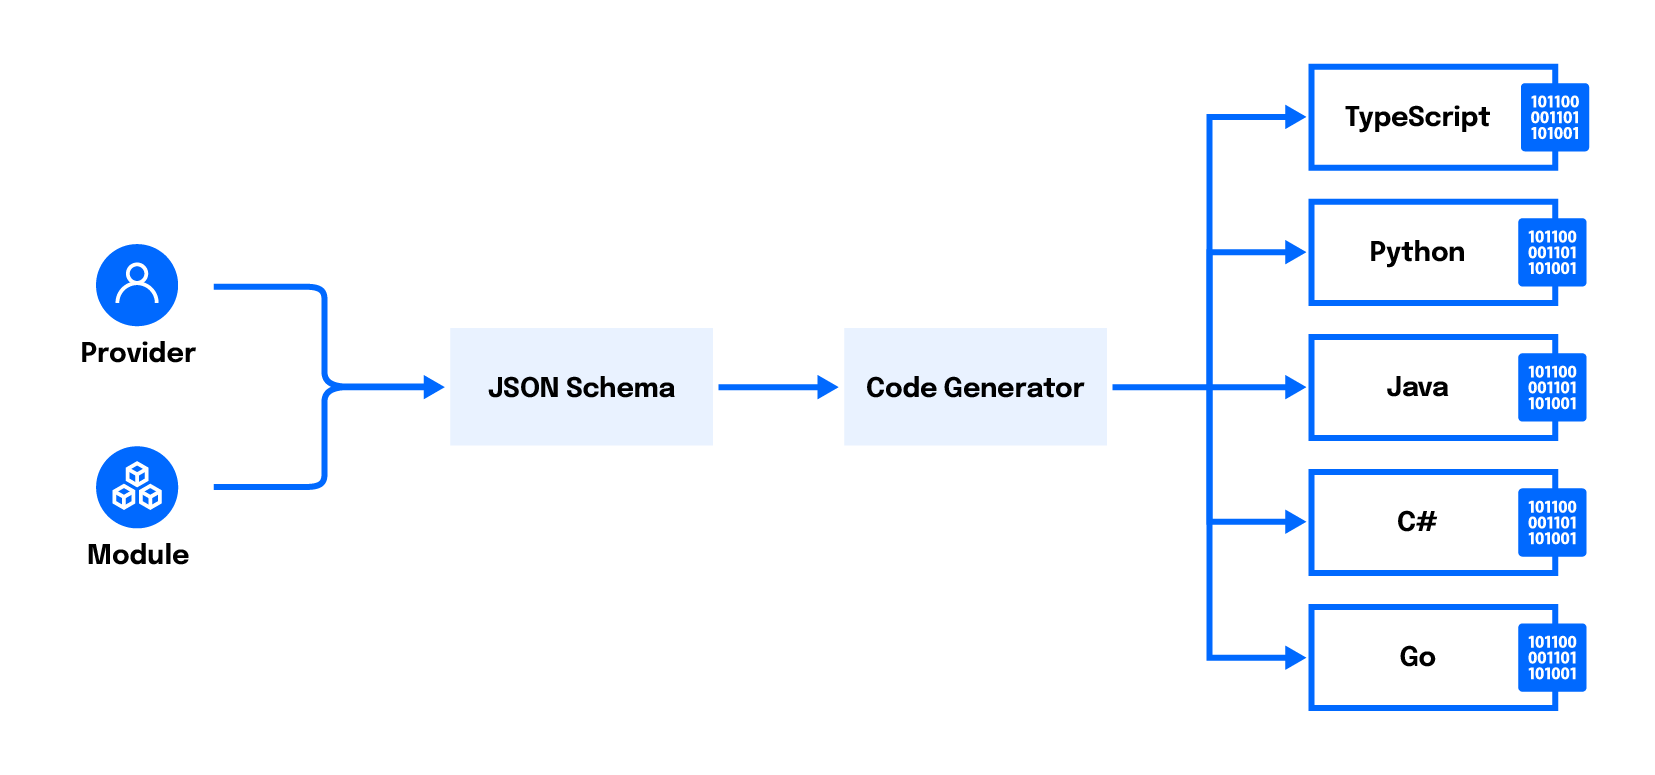
[Cloud Development Kit for Terraform] (https://github.com/hashicorp/terraform-cdk) (CDKTF) 是一个基于Terraform上方而建的工具,它允许您使用熟悉的编程语言定义基础设施(如 [TypeScript] (https://www.digitalocean.com/community/tutorial_series/how-to-code-in-typescript), [Python] (https://www.digitalocean.com/community/tutorial_series/how-to-code-in-python-3), 或 [GO] (https://www.digitalocean.com/community/tutorial_series/how-to-code-in-go)) 而不是HCL. 这个工具可以为不熟悉HCL的开发者提供更浅的学习曲线,同时允许开发者使用诸如回路,变量,和函数等本土编程特征.
在本教程中,您将通过安装)工具开始。然后,您将在TypeScript中创建一个CDKTF项目,并用两个NGINX服务器定义该项目,这些服务器由负载平衡器(https://www.digitalocean.com/products/load-balancer/)进行负载平衡。您将使用cdktf来部署基础设施。本教程结束时,您将有一个CDKTF项目,您可以从中构建以扩展您的基础设施。
注意:本教程已使用CDKTF 0.11.2和Terraform 1.2.2进行测试。
前提条件
要完成本教程,您将需要:
- 对基础设施的现成守则有很好的了解。 您可以在 [代码解释的基础设施] (https://www.digitalocean.com/community/conceptual_articles/infrastructure-as-code-explained) 中了解IaC。
- 数字海洋账户。 如果没有,则签入新账户。
- DigitalOcean个人访问Token,您可以通过DigitalOcean控制台创建. 在如何生成个人访问Token中可找到关于如何做到这一点的说明。
- 已添加到您的 DigitalOcean 账户中的无密码 SSH 密钥 。 您可以通过遵循 [如何使用带数字海洋滴放器的 SSH 密钥( https://andsky.com/tech/tutorials/how-to-use-ssh-keys-with-digitalocean-droplets )来添加此内容。 当您在账户中添加密钥时, 请记住您给它的名称, 因为您需要它在此教程中 。 CDKTF要接受您的密钥名称,它必须从字母或下划线开始,并且可能只包含字母,数字,下划线和破折号.
- Terrorform安装在您本地的机器上,您可以在 [How To Use Terraform with DigitalOcean] (https://andsky.com/tech/tutorials/how-to-use-terraform-with-digitalocean# step-1-installing-terraform)中用"Sept 1 - 安放Terrorform"来设置.
- 安装在本地机器上的节点。 您可以在 [如何安装节点.js并创建本地开发环境] (https://www.digitalocean.com/community/tutorial_series/how-to-install-node-js-and-create-a-local-development-environment ) 系列中找到此指令 。
- 联合国 与JavaScript进行自在编程. 为了培养技能,请检查[JavaScript中如何编码 (https://www.digitalocean.com/community/tutorial_series/how-to-code-in-javascript)系列.
- 联合国 使用TypeScript的基本特性来自在. 如果您对 TypeScript 感到不适,则 [TypeScript 中如何编码 (https://www.digitalocean.com/community/tutorial_series/how-to-code-in-typescript) 教程系列是一个很好的资源,可以让你提升速度.
- 支持TypeScript的代码编辑器或集成开发环境(IDE). 如果您目前没有使用, 请尝试 [ Visual Studio Code] (https://code.visualstudio.com/) 。 您可以在 [Visual Studio Code 中 How To Work with TypeScript] (https://andsky.com/tech/tutorials/how-to-work-with-typescript-in-visual-studio-code) 上阅读。 .
步骤 1 — 安装cdktf CLI
首先,您将安装cdktf命令行工具。
如果你在 npmjs.com,你会发现两个类似的名称的包: cdktf和 cdktf-cli。
从概念上讲,CDKTF是Terraform上面的抽象层,由两个部分组成:
- 包含一套用于定义基础设施的语言内在结构(如功能和类)的图书馆。 这一部分被封装在 [
cdktf' (https://www.npmjs.com/package/cdktf) npm 包中。 例如,在以下CDKTF项目样本中,可以看到cdktf包中的App'和`TerraformStack'类的使用:
从 cdktf 导入{ App, TerraformStack} ;
类 APIStack 扩展 地平板电脑
const app = 新 App ();
新的 APIStack( 应用程序,) ;
app.synth (); (中文(简体) ).
``. ,
- 一个适配器,在 CDKTF 项目内解析构造并把它们简化为一组 JSON 文件,然后以同样的方式被摄入 Terraform 中 HCL 。 这个适配器被封入由[
cdktf-cli'(https://www.npmjs.com/package/cdktf-cli)包提供的称为cdktf'的CLI工具. .
要安装cdktf CLI 工具,您需要cdktf-cli包. 您可以使用npm,yarn或您选择的包管理器在全球范围内安装此包。
若要安装cdktf-cli与npm,请执行以下操作:
1npm install --global [email protected]
<$>[注] 注: 在本文发布后,可能会有更新的版本的「cdktf-cli」包。你可以尝试使用最新版本的教程来运行「npm install --global cdktf-cli@latest」,但要注意一些输出可能会略有不同。
或者,您可以在 macOS 或 Linux 上使用 Homebrew 来安装 cdktf CLI 作为 cdktf 公式:
1brew install cdktf
要验证安装成功,请在没有参数的情况下运行cdktf命令:
1cdktf
您将看到类似于以下的输出:
 1[secondary_label Output]
 2Please pass a command to cdktf, here are all available ones:
 3cdktf
 4
 5Commands:
 6  cdktf init Create a new cdktf project from a template.
 7  cdktf get Generate CDK Constructs for Terraform providers and modules.
 8  cdktf convert Converts a single file of HCL configuration to CDK for Terraform.
 9  cdktf deploy [stacks...]  Deploy the given stacks
10  cdktf destroy [stacks..]  Destroy the given stacks
11  cdktf diff [stack]        Perform a diff (terraform plan) for the given stack
12  cdktf list List stacks in app.
13  cdktf login Retrieves an API token to connect to Terraform Cloud.
14  cdktf synth Synthesizes Terraform code for the given app in a directory.
15  cdktf watch [stacks..]    [experimental] Watch for file changes and automatically trigger a deploy
16  cdktf output [stacks..]   Prints the output of stacks
17  cdktf debug Get debug information about the current project and environment
18  cdktf completion generate completion script
19
20Options:
21      --version Show version number
22      --disable-logging Dont write log files. Supported using the env CDKTF_DISABLE_LOGGING.
23      --disable-plugin-cache-env Dont set TF_PLUGIN_CACHE_DIR automatically.
24      --log-level Which log level should be written.
25  -h, --help Show help
26
27Options can be specified via environment variables with the "CDKTF_" prefix (e.g. "CDKTF_OUTPUT")
在本教程的其余部分中,您将获得使用cdktf init,cdktf get,cdktf deploy和cdktf destroy的经验。
现在你已经安装了cdktf CLI,你可以通过写一些TypeScript代码来定义基础设施。
第2步:创建一个新的CDKTF项目
在此步骤中,您将使用您刚刚安装的cdktf CLI 创建一个锅炉板 CDKTF 项目,您将在后续步骤中建立。
创建一个将托管 CDKTF 项目的目录,运行以下命令:
1mkdir infra
然后,导航到新创建的目录:
1cd infra/
使用cdktf init命令创建您将构建的 CDKTF 项目架构:
1cdktf init --template=typescript --project-name=base --project-description="Base architecture" --local
CDKTF 允许开发人员使用 TypeScript、Python、Java、C# 或 Go 来定义基础架构。
Terraform(因此CDKTF)通过在名为 Terraform state文件中记录其定义和状态来跟踪其管理的资源。
运行命令后,CLI 可能会要求您允许向 CDKTF 团队发送事故报告,以帮助他们改进产品:
1[secondary_label Output]
2? Do you want to send crash reports to the CDKTF team? See https://www.terraform.io/cdktf/create-and-deploy/configuration-file for
3 more information (Y/n)
如果您想同意,输入Y或N,如果您不同意,然后按ENTER。
然后,cdktf 会创建项目架构并安装这些包.当项目架构完成时,您将看到类似于以下的输出:
 1[secondary_label Output]
 2  Your cdktf typescript project is ready!
 3
 4  cat help Print this message
 5
 6  Compile:
 7    npm run get Import/update Terraform providers and modules (you should check-in this directory)
 8    npm run compile Compile typescript code to javascript (or "npm run watch")
 9    npm run watch Watch for changes and compile typescript in the background
10    npm run build Compile typescript
11
12  Synthesize:
13    cdktf synth [stack]   Synthesize Terraform resources from stacks to cdktf.out/ (ready for 'terraform apply')
14
15  Diff:
16    cdktf diff [stack]    Perform a diff (terraform plan) for the given stack
17
18  Deploy:
19    cdktf deploy [stack]  Deploy the given stack
20
21  Destroy:
22    cdktf destroy [stack] Destroy the stack
23
24  Test:
25    npm run test Runs unit tests (edit __tests__/main-test.ts to add your own tests)
26    npm run test:watch Watches the tests and reruns them on change
27
28  Upgrades:
29    npm run upgrade Upgrade cdktf modules to latest version
30    npm run upgrade:next Upgrade cdktf modules to latest "@next" version (last commit)
您还会看到一些新文件添加到infra目录.最重要的文件是cdktf.json和main.ts。
cdktf.json 是 CDKTF 项目的 配置文件。
 1[label cdktf.json]
 2{
 3  "language": "typescript",
 4  "app": "npx ts-node main.ts",
 5  "projectId": "28c87598-4343-47a9-bb5d-8fb0e031c41b",
 6  "terraformProviders": [],
 7  "terraformModules": [],
 8  "context": {
 9    "excludeStackIdFromLogicalIds": "true",
10    "allowSepCharsInLogicalIds": "true"
11  }
12}
app属性定义了将 TypeScript 代码合成为 Terraform 兼容的 JSON 的命令,该属性表示 main.ts 是 CDKTF 项目的入口点。
如果你打开main.ts文件,你会看到类似于以下的东西:
 1[label main.ts]
 2import { Construct } from "constructs";
 3import { App, TerraformStack } from "cdktf";
 4
 5class MyStack extends TerraformStack {
 6  constructor(scope: Construct, name: string) {
 7    super(scope, name);
 8
 9    // define resources here
10  }
11}
12
13const app = new App();
14new MyStack(app, "infra");
15app.synth();
在CDKTF语言中,相关基础设施资源的集合可以分为 stack。例如,构成 API 应用程序的资源,如 Droplets、负载平衡器和 DNS 记录,可以分为一个名为APIStack的单一堆栈。
一个 application 是用于多个堆栈的容器,例如,一个应用程序可以组合各种微服务的堆栈。
main.ts中生成的 CDKTF 项目堆栈包含一个名为 MyStack 的单一堆栈类,目前没有定义资源. 创建了一个名为 infra 的 MyStack 实例,包含在一个名为 app 的应用程序中。
创建项目后,下一步是使用 providers 配置 CDKTF 项目。
第3步:安装DigitalOcean提供商
在此步骤中,您将在CDKTF项目中安装DigitalOcean Provider。
Providers是向Terraform(由)提供有关如何在云提供商,SaaS提供商和其他平台上创建,更新和删除资源的说明书,暴露应用程序编程接口(API)。
例如,如果你要创建一个新的没有地平线的"数字海洋"(Digital Ocean Droplet),你就必须向 [Digital API (https://docs.digitalocean.com/reference/api/api-reference/) 的 ["/v2/droplets" (https://docs.digitalocean.com/reference/api/api-reference/# operation/create_droplet) 的终点发送"POST"请求. 通过Terraform,您将安装数字海洋提供者,并定义一个[`数字海洋-滴入'(https://registry.terraform.io/providers/digitalocean/digitalocean/latest/docs/resources/droplet)资源,类似于以下样本片段:
1new Droplet(this, 'web', {
2  image: 'ubuntu-20-04-x64',
3  name,
4  region: 'lon1',
5  size: 's-1vcpu-1gb',
6}
然后,您可以使用cdktf CLI 工具将此 TypeScript 代码翻译成 Terraform 兼容的 JSON,并将其传递给提供商,该提供商将为您创建 Droplet 进行适当的 API 调用。
现在你已经明白什么是提供商了,你可以为你的CDKTF项目设置DigitalOcean提供商。
打开cdktf.json文件并将字符串digitalocean/digitalocean添加到terraformProviders数组中:
 1[label cdktf.json]
 2{
 3  "language": "typescript",
 4  "app": "npx ts-node main.ts",
 5  "projectId": "28c87598-4343-47a9-bb5d-8fb0e031c41b",
 6  "terraformProviders": ["digitalocean/digitalocean"],
 7  "terraformModules": [],
 8  "context": {
 9    "excludeStackIdFromLogicalIds": "true",
10    "allowSepCharsInLogicalIds": "true"
11  }
12}
digitalocean/digitalocean 是 Terraform 注册表上的 DigitalOcean 提供商的标识符。
保存并关闭文件。
接下来,运行cdktf get来下载和安装提供商。
1cdktf get
cdktf get将下载提供商,提取方案,生成相应的TypeScript类,并在.gen/providers/下添加为TypeScript模块。
一旦cdktf get完成运行,您将看到类似于以下的输出:
1[secondary_label Output]
2Generated typescript constructs in the output directory: .gen
您还会看到一个名为.gen的新目录,其中包含提供商生成的代码。
在此步骤中,您已在项目中安装了digitalocean/digitalocean提供商,在下一步,您将配置DigitalOcean提供商以使用DigitalOcean API验证提供商所需的凭证。
步骤4 — 配置数字海洋供应商
在此步骤中,您将配置 DigitalOcean 提供商使用您的 DigitalOcean 个人访问令牌,这允许提供商代表您调用 DigitalOcean API。
不同提供商需要和支持不同的身份验证,以便通过上游API进行身份验证。对于DigitalOcean提供商,您需要提供您的DigitalOcean个人访问代币。
在终端中运行以下命令,为该终端会话设置环境变量。
1export DIGITALOCEAN_ACCESS_TOKEN="your_personal_access_token"
<$>[注] 注: 通过调用导出,您正在为该终端会话设置环境变量。如果您关闭并重新打开终端或在不同的终端运行cdktf命令,则需要重新运行导出命令,以便环境变量生效。
接下来,您将在MyStack类内指定提供商,这将允许您在您的堆栈中定义提供商提供的资源。
 1[label main.ts]
 2import { Construct } from "constructs";
 3import { App, TerraformStack } from "cdktf";
 4import { DigitaloceanProvider } from "./.gen/providers/digitalocean"
 5
 6class MyStack extends TerraformStack {
 7  constructor(scope: Construct, name: string) {
 8    super(scope, name);
 9
10    new DigitaloceanProvider(this, 'provider')
11
12  }
13}
14
15const app = new App();
16new MyStack(app, "infra");
17app.synth();
提供商的模块位于./.gen/providers/digitalocean,当您运行cdktf get时自动生成。
在此步骤中,您已配置了digitalocean/digitalocean提供商的凭据,接下来,您将开始定义构成本教程目标的一部分的基础设施。
步骤5 - 定义 Droplets 上的 Web 应用程序
在此步骤中,您将定义两个 NGINX服务器,每个服务不同的文件,部署在两个相同的Ubuntu 20.04 Droplets上。
您将从两个Dropplets的定义开始,以突出变化的方式更改main.ts:
 1[label main.ts]
 2...
 3import { DigitaloceanProvider, Droplet } from "./.gen/providers/digitalocean"
 4
 5class MyStack extends TerraformStack {
 6  constructor(scope: Construct, name: string) {
 7    ...
 8    const dropletNames = ['foo', 'bar']
 9    const droplets = dropletNames.map(name => new Droplet(this, name, {
10        image: 'ubuntu-20-04-x64',
11        name,
12        region: 'lon1',
13        size: 's-1vcpu-1gb',
14      })
15    )
16  }
17}
您使用的是 JavaScript 原生循环(Array.prototype.map())以避免代码的重复。
就像你在通过控制台创建Droplet一样,需要指定几个参数:
图像- 你 Droplet 将运行的 Linux 发行版和版本. *区域- 您 Droplet 将运行的数据中心. *尺寸- 将 CPU 和内存资源保留给 Droplet 的数量. *名称- 用于指向 Droplet 的独特名称。
)页面上找到所有支持的 Linux 发行版图像、Droplet 大小和区域的有效值(称为 slugs)。
添加 SSH 密钥
作为前提的一部分,您已将无密码的 SSH 公共密钥上传到您的 DigitalOcean 帐户并注明其名称,您现在将使用该名称获取 SSH 密钥的 ID,并将其传入您的 Droplet 定义中。
由于 SSH 密钥是手动添加到您的 DigitalOcean 帐户,它不是由当前 Terraform 配置管理的资源. 如果您尝试定义一个新的 digitalocean_ssh_key 资源,它将创建一个新的 SSH 密钥,而不是使用现有的。
相反,您将定义一个新的数字海洋-sh_key数据源。 在Terraform中,[data source] (https://www.terraform.io/language/data-sources)用于检索目前Terraform配置中没有管理的基础设施信息. 换句话说,它们提供了一种仅读取的视角,以了解先前存在的外部基础设施的状况。 一旦定义了数据源,您就可以使用您 Terraform 配置中其它部分的数据.
在):
 1[label main.ts]
 2...
 3import { DataDigitaloceanSshKey, DigitaloceanProvider, Droplet } from "./.gen/providers/digitalocean"
 4
 5class MyStack extends TerraformStack {
 6  constructor(scope: Construct, name: string) {
 7    ...
 8    const dropletNames = ['foo', 'bar']
 9    const sshKey = new DataDigitaloceanSshKey(this, 'sshKey', {
10      name: 'do_cdktf',
11    })
12    const droplets = dropletNames.map(name => new Droplet(this, name, {
13    ...
14  }
15}
16...
然后更新 Droplet 的定义以包括 SSH 密钥:
 1[label main.ts]
 2...
 3const droplets = dropletNames.map(name => new Droplet(this, name, {
 4  image: 'ubuntu-20-04-x64',
 5  name,
 6  region: 'lon1',
 7  size: 's-1vcpu-1gb',
 8  sshKeys: [sshKey.id.toString()]
 9}))
10...
当提供时,您可以使用私人SSH密钥而不是密码访问Droplet。
指定用户数据脚本来安装 NGINX
你现在已经定义了运行Ubuntu的两个相同的Dropplets,配置了SSH访问,下一个任务是在每个Dropplets上安装NGINX。
当一个Droplet被创建时,一个名为CloudInit的工具会启动服务器。CloudInit可以接受一个名为 _user data_的文件,可以修改服务器的启动方式。用户数据可以是服务器可以解释的任何cloud-config文件或脚本,例如Bash脚本。
在此步骤的其余部分中,您将创建一个 Bash 脚本,并将其指定为 Droplet 的 [用户数据] (https://docs.digitalocean.com/products/droplets/how-to/provide-user-data/). 脚本将安装NGINX,作为靴子拖曳过程的一部分. 此外,脚本还将将"/var/www/html/index.html"文件(由NGINX服务的默认文件)的内容替换为Droplet的主机名和IP地址,这将导致两个NGINX服务器服务不同的文件. 在下一步中,您将把这两个NGINX服务器放入负载平衡器后;通过服务不同的文件,可以显示负载平衡器是否正确分配请求.
在main.ts中,向 Droplet 的配置对象添加一个新的userData属性:
 1[label main.ts]
 2...
 3class MyStack extends TerraformStack {
 4  constructor(scope: Construct, name: string) {
 5    ...
 6    const droplets = dropletNames.map(name => new Droplet(this, name, {
 7      image: 'ubuntu-20-04-x64',
 8      name,
 9      region: 'lon1',
10      size: 's-1vcpu-1gb',
11      sshKeys: [sshKey.id.toString()],
12      userData: `#!/bin/bash
13
14apt-get -y update
15apt-get -y install nginx
16export HOSTNAME=$(curl -s http://169.254.169.254/metadata/v1/hostname)
17export PUBLIC_IPV4=$(curl -s http://169.254.169.254/metadata/v1/interfaces/public/0/ipv4/address)
18echo Droplet: $HOSTNAME, IP Address: $PUBLIC_IPV4 > /var/www/html/index.html
19`
20    }))
21  }
22}
<$>[警告] 警告: 确保在 shebang(# !)之前没有新行;否则,脚本可能无法执行。
当Droplet首次提供时,脚本将作为)来安装)来获取有关自身的信息,并将主机名称和IP地址写入index.html,由NGINX提供。
在此步骤中,您定义了运行Ubuntu的两个Dropplets,配置了每个以SSH访问,并使用用户数据功能安装了NGINX。
步骤6:定义负载平衡器
在此步骤中,您将定义一个 DigitalOcean Load Balancer 通过定义一个实例的 digitalocean_loadbalancer 资源。
在main.ts中,在MyStack构建器的末尾添加负载平衡器的下列定义:
 1[label main.ts]
 2...
 3import { App, Fn, TerraformStack } from "cdktf";
 4import { DataDigitaloceanSshKey, DigitaloceanProvider, Droplet, Loadbalancer } from "./.gen/providers/digitalocean"
 5
 6class MyStack extends TerraformStack {
 7  constructor(scope: Construct, name: string) {
 8    ...
 9    new Loadbalancer(this, 'lb', {
10      name: 'default',
11      region: 'lon1',
12      algorithm: 'round_robin',
13      forwardingRule: [{
14        entryProtocol: 'http',
15        entryPort: 80,
16        targetProtocol: 'http',
17        targetPort: 80,
18      }],
19      dropletIds: droplets.map((droplet) => Fn.tonumber(droplet.id))
20    })
21  }
22}
23...
forwardingRule参数告诉负载平衡器在端口80上听取HTTP请求,并将其转发到端口80上的每个Dropplets。
因此,您已经使用了 Fn.tonumber Terraform 函数将字符串 Droplet ID 值转换为一个数字。
<$>[注] 注: 您在这里使用了‘Fn.tonumber’ Terraform 函数,而不是 JavaScript 原始的‘parseInt’,因为在提供 Droplet 之前,‘droplet.id’ 的值是未知的。
保存并关闭文件。
你现在已经定义了两个Dropplets和一个负载平衡器,坐在它们前面。
 1[label main.ts]
 2import { Construct } from "constructs";
 3import { App, Fn, TerraformStack } from "cdktf";
 4import { DataDigitaloceanSshKey, DigitaloceanProvider, Droplet, Loadbalancer } from "./.gen/providers/digitalocean"
 5
 6class MyStack extends TerraformStack {
 7  constructor(scope: Construct, name: string) {
 8    super(scope, name);
 9
10    new DigitaloceanProvider(this, 'provider')
11
12    const dropletNames = ['foo', 'bar']
13    const sshKey = new DataDigitaloceanSshKey(this, 'sshKey', {
14      name: 'do_cdktf',
15    })
16    const droplets = dropletNames.map(name => new Droplet(this, name, {
17        image: 'ubuntu-20-04-x64',
18        name,
19        region: 'lon1',
20        size: 's-1vcpu-1gb',
21        sshKeys: [sshKey.id.toString()],
22        userData: `#!/bin/bash
23
24apt-get -y update
25apt-get -y install nginx
26export HOSTNAME=$(curl -s http://169.254.169.254/metadata/v1/hostname)
27export PUBLIC_IPV4=$(curl -s http://169.254.169.254/metadata/v1/interfaces/public/0/ipv4/address)
28echo Droplet: $HOSTNAME, IP Address: $PUBLIC_IPV4 > /var/www/html/index.html
29`
30      })
31    )
32
33    new Loadbalancer(this, 'lb', {
34      name: 'default',
35      region: 'lon1',
36      algorithm: 'round_robin',
37      forwardingRule: [{
38        entryProtocol: 'http',
39        entryPort: 80,
40        targetProtocol: 'http',
41        targetPort: 80,
42      }],
43      dropletIds: droplets.map((droplet) => Fn.tonumber(droplet.id))
44    })
45  }
46}
47
48const app = new App();
49new MyStack(app, "infra");
50app.synth();
在下一步中,您将使用cdktf CLI 工具来更新您的整个 CDKTF 项目。
第7步:提供您的基础设施
在此步骤中,您将使用cdktf CLI 工具提供您在上一步中定义的 Droplets 和负载平衡器。
请确保您位于infra/目录中,并为您的终端会话设置了DIGITALOCEAN_ACCESS_TOKEN环境变量,然后运行cdktf部署命令:
1cdktf deploy
你应该看到类似于以下的输出:
  1[secondary_label Output]
  2infra Initializing the backend...
  3infra Initializing provider plugins...
  4infra  - Reusing previous version of digitalocean/digitalocean from the dependency lock file
  5infra  - Using previously-installed digitalocean/digitalocean v2.19.0
  6infra Terraform has been successfully initialized!
  7infra Terraform used the selected providers to generate the following execution
  8       plan. Resource actions are indicated with the following symbols:
  9       + create
 10
 11       Terraform will perform the following actions:
 12infra    # digitalocean_droplet.bar (bar) will be created
 13         + resource "digitalocean_droplet" "bar" {
 14       + backups              = false
 15       + created_at           = (known after apply)
 16       + disk                 = (known after apply)
 17       + graceful_shutdown    = false
 18       + id                   = (known after apply)
 19       + image                = "ubuntu-20-04-x64"
 20       + ipv4_address         = (known after apply)
 21       + ipv4_address_private = (known after apply)
 22       + ipv6                 = false
 23       + ipv6_address         = (known after apply)
 24       + locked               = (known after apply)
 25       + memory               = (known after apply)
 26       + monitoring           = false
 27       + name                 = "bar"
 28       + price_hourly         = (known after apply)
 29       + price_monthly        = (known after apply)
 30       + private_networking   = (known after apply)
 31       + region               = "lon1"
 32       + resize_disk          = true
 33       + size                 = "s-1vcpu-1gb"
 34       + ssh_keys             = [
 35       + "34377800",
 36       ]
 37       + status               = (known after apply)
 38       + urn                  = (known after apply)
 39       + user_data            = "f9b1d9796d069fe504ce0d89439b6b664b14b1a1"
 40       + vcpus                = (known after apply)
 41       + volume_ids           = (known after apply)
 42       + vpc_uuid             = (known after apply)
 43       }
 44
 45         # digitalocean_droplet.foo (foo) will be created
 46         + resource "digitalocean_droplet" "foo" {
 47       + backups              = false
 48       + created_at           = (known after apply)
 49       + disk                 = (known after apply)
 50       + graceful_shutdown    = false
 51       + id                   = (known after apply)
 52       + image                = "ubuntu-20-04-x64"
 53       + ipv4_address         = (known after apply)
 54       + ipv4_address_private = (known after apply)
 55       + ipv6                 = false
 56       + ipv6_address         = (known after apply)
 57       + locked               = (known after apply)
 58       + memory               = (known after apply)
 59       + monitoring           = false
 60       + name                 = "foo"
 61       + price_hourly         = (known after apply)
 62       + price_monthly        = (known after apply)
 63       + private_networking   = (known after apply)
 64       + region               = "lon1"
 65       + resize_disk          = true
 66       + size                 = "s-1vcpu-1gb"
 67       + ssh_keys             = [
 68       + "34377800",
 69       ]
 70       + status               = (known after apply)
 71       + urn                  = (known after apply)
 72       + user_data            = "f9b1d9796d069fe504ce0d89439b6b664b14b1a1"
 73       + vcpus                = (known after apply)
 74       + volume_ids           = (known after apply)
 75       + vpc_uuid             = (known after apply)
 76       }
 77
 78         # digitalocean_loadbalancer.lb (lb) will be created
 79         + resource "digitalocean_loadbalancer" "lb" {
 80       + algorithm                        = "round_robin"
 81       + disable_lets_encrypt_dns_records = false
 82       + droplet_ids                      = (known after apply)
 83       + enable_backend_keepalive         = false
 84       + enable_proxy_protocol            = false
 85       + id                               = (known after apply)
 86       + ip                               = (known after apply)
 87       + name                             = "default"
 88       + redirect_http_to_https           = false
 89       + region                           = "lon1"
 90       + size_unit                        = (known after apply)
 91       + status                           = (known after apply)
 92       + urn                              = (known after apply)
 93       + vpc_uuid                         = (known after apply)
 94
 95       + forwarding_rule {
 96       + certificate_id   = (known after apply)
 97       + certificate_name = (known after apply)
 98       + entry_port       = 80
 99       + entry_protocol   = "http"
100       + target_port      = 80
101       + target_protocol  = "http"
102       + tls_passthrough  = false
103       }
104
105       + healthcheck {
106       + check_interval_seconds   = (known after apply)
107       + healthy_threshold        = (known after apply)
108       + path                     = (known after apply)
109       + port                     = (known after apply)
110       + protocol                 = (known after apply)
111       + response_timeout_seconds = (known after apply)
112       + unhealthy_threshold      = (known after apply)
113       }
114
115       + sticky_sessions {
116       + cookie_name        = (known after apply)
117       + cookie_ttl_seconds = (known after apply)
118       + type               = (known after apply)
119       }
120       }
121
122       Plan: 3 to add, 0 to change, 0 to destroy.
123
124       ─────────────────────────────────────────────────────────────────────────────
125
126       Saved the plan to: plan
127
128       To perform exactly these actions, run the following command to apply:
129       terraform apply "plan"
130
131Please review the diff output above for infra
132❯ Approve Applies the changes outlined in the plan.
133  Dismiss
134  Stop
注意:CDKTF仍在开发中,输出可能与上面显示的不同。
此显示器列出了cdktf计划创建、更新和破坏的所有资源和属性. 某些值,例如 Droplet ID,仅在资源提供后才会被知道。
查看资源列表,以确保它是您所期望的,然后使用箭头键选择批准选项,然后按输入。
您将看到类似于以下的输出:
1[secondary_label Output]
2infra digitalocean_droplet.foo (foo): Creating...
3       digitalocean_droplet.bar (bar): Creating...
4infra digitalocean_droplet.bar (bar): Still creating... [10s elapsed]
5infra digitalocean_droplet.foo (foo): Still creating... [10s elapsed]
6
71 Stack deploying 0 Stacks done 0 Stacks waiting
这个输出告诉你,cdktf正在与DigitalOcean API进行通信,以创建Droplet。cdktf首先创建Droplets,因为负载平衡器取决于Droplet的ID,直到Droplets提供为止,Droplets是未知的。
滴滴创建通常需要不到一分钟。一旦滴滴被提供,‘cdktf’将继续创建负载平衡器。
1[secondary_label Output]
2infra digitalocean_droplet.bar (bar): Creation complete after 54s [id=298041598]
3infra digitalocean_droplet.foo (foo): Creation complete after 55s [id=298041600]
4infra digitalocean_loadbalancer.lb (lb): Creating...
5infra digitalocean_loadbalancer.lb (lb): Still creating... [10s elapsed]
负荷平衡器可能需要更长时间,而负荷平衡器创建后,您将看到一个概述,显示堆栈已成功部署。
1[secondary_label Output]
2infra digitalocean_loadbalancer.lb (lb): Still creating... [1m30s elapsed]
3infra digitalocean_loadbalancer.lb (lb): Creation complete after 1m32s [id=4f9ae2b7-b649-4fb4-beed-96b95bb72dd1]
4infra
5       Apply complete! Resources: 3 added, 0 changed, 0 destroyed.
6
7No outputs found.
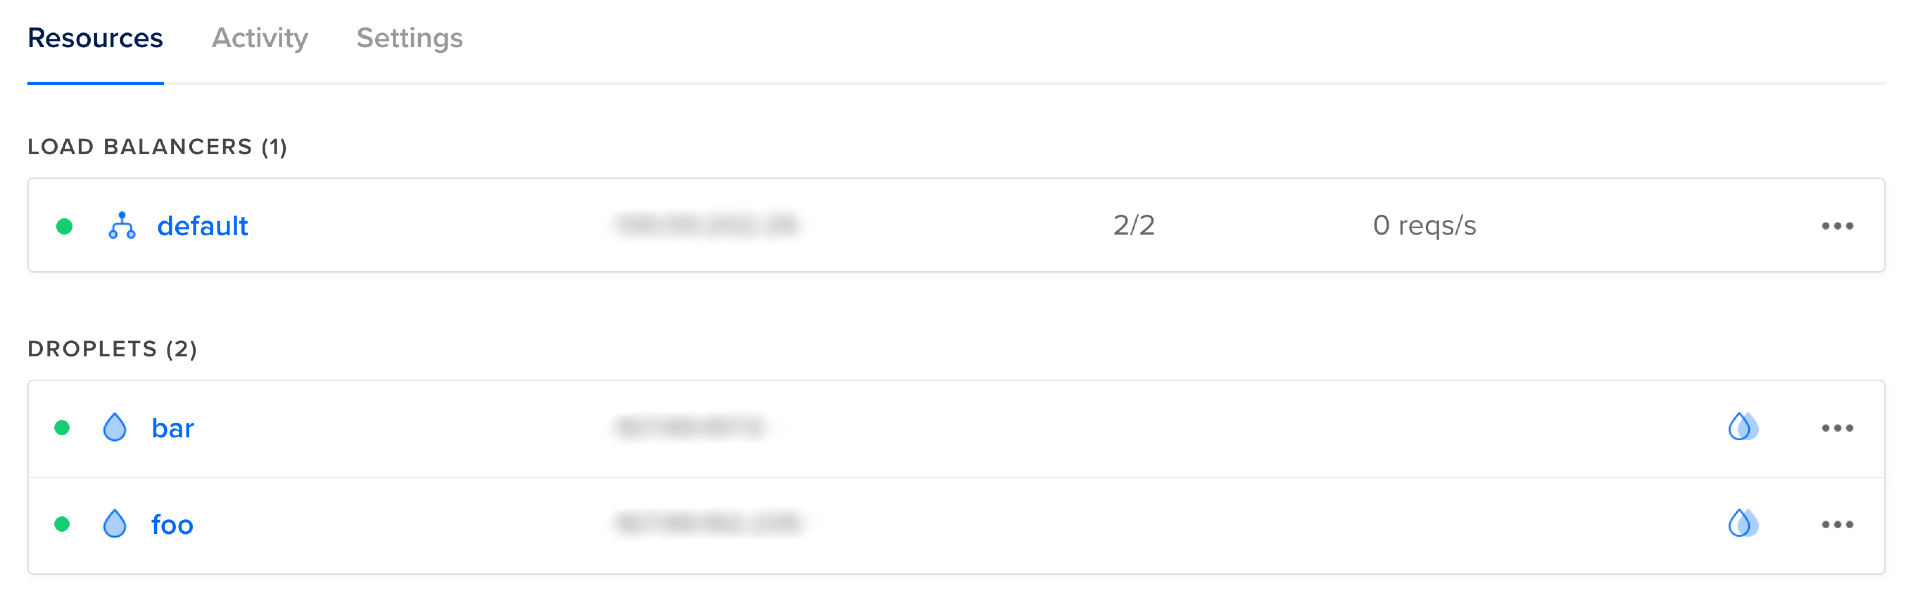
现在你可以访问DigitalOcean控制台(https://cloud.digitalocean.com),在那里你可以看到一个名为默认的负载平衡器和两个名为foo和bar的健康滴滴,每一个都作为负载平衡器的目标。
您可以通过访问每个 Droplet 的 IP 地址来测试 NGINX 是否正确运行和提供内容。
1Droplet: bar, IP Address: droplet_ip
如果您看不到该文本串或服务器没有响应,请检查您指定的用户数据是否正确,并且没有字符(包括新行)在 shebang (# !) 之前。
1ssh -i path_to_ssh_private_key root@droplet_ip
一旦您确认Dropplets正在上传并提供内容,您可以开始测试负荷平衡器。
从终端执行以下命令,将十个请求发送到负载平衡器:
1for run in {1..10}; do curl http://load_balancer_ip/; done
您应该看到类似于以下的输出,尽管显示的 IP 地址将不同:
 1[secondary_label Output]
 2Droplet: foo, IP Address: droplet_foo_ip
 3Droplet: bar, IP Address: droplet_bar_ip
 4Droplet: foo, IP Address: droplet_foo_ip
 5Droplet: bar, IP Address: droplet_bar_ip
 6Droplet: bar, IP Address: droplet_bar_ip
 7Droplet: foo, IP Address: droplet_foo_ip
 8Droplet: bar, IP Address: droplet_bar_ip
 9Droplet: foo, IP Address: droplet_foo_ip
10Droplet: bar, IP Address: droplet_bar_ip
11Droplet: foo, IP Address: droplet_foo_ip
它显示,对负载平衡器的请求被转发到每个Dropplet五次,表明负载平衡器正在工作。
注意:负载平衡器可能并不总是完美地平衡两个Dropplets之间;你可能会发现四个请求被发送到一个Dropplet和六个到另一个。
在此步骤中,您使用cdktf提供资源,然后使用DigitalOcean控制台发现您的Droplets和负载平衡器的IP地址,然后向每个Droplet和负载平衡器发送请求,以确认它们工作。
在下一步中,您将获得 Droplets 和负载平衡器的 IP 地址,而无需登录 DigitalOcean 控制台。
步骤8 - 输出信息
在之前的步骤中,您必须登录 DigitalOcean Console 以获取您的 Droplet 和负载平衡器的 IP 地址. 在此步骤中,您将稍微修改您的代码,以便在cdktf 部署命令的输出中打印此信息,从而节省您前往控制台的旅程。
Terraform 在状态文件中记录其管理资源的配置和状态. 对于您的infra堆栈,可以在infra/terraform.infra.tfstate找到状态文件. 您将能够在这个状态文件中找到 Droplets 和负载平衡器的 IP 地址。
然而,通过一个大文件进行排序可能是不方便的。CDKTF提供TerraformOutput构造,您可以使用它来输出变量并使它们在堆栈之外可用。
注意:虽然您在本教程中只使用输出来打印信息到控制台,但其真正的功率来自使用来自其他堆栈的输出作为输入的堆栈,一种称为 [跨堆栈引用]的功能(https://www.terraform.io/cdktf/concepts/stacks# cross-stack-references)。
更新「main.ts」文件以包括负载平衡器和Droplets IP 地址的输出:
 1[label main.ts]
 2import { Construct } from "constructs";
 3import { App, Fn, TerraformOutput, TerraformStack } from "cdktf";
 4import { DataDigitaloceanSshKey, DigitaloceanProvider, Droplet, Loadbalancer } from "./.gen/providers/digitalocean"
 5
 6class MyStack extends TerraformStack {
 7  constructor(scope: Construct, name: string) {
 8    ...
 9    const lb = new Loadbalancer(this, 'lb', {
10      ...
11    })
12
13    new TerraformOutput(this, "loadBalancerIP", {
14      value: lb.ip,
15    });
16
17    droplets.forEach((droplet, index) => new TerraformOutput(this, `droplet${index}IP`, {
18      value: droplet.ipv4Address
19    }))
20  }
21}
22...
保存并关闭文件。
运行cdktf部署以更新更改:
1cdktf deploy
在输出中,你应该看到类似于以下的东西:
 1[secondary_label Output]
 2─────────────────────────────────────────────────────────────────────────────
 3
 4Changes to Outputs:
 5+ droplet0IP     = "droplet_foo_ip"
 6+ droplet1IP     = "droplet_bar_ip"
 7+ loadBalancerIP = "load_balancer_ip"
 8
 9You can apply this plan to save these new output values to the Terraform
10state, without changing any real infrastructure.
11
12─────────────────────────────────────────────────────────────────────────────
此输出告知您不会对基础设施进行更改,只有从堆栈中输出。
使用箭头键选择批准,然后按输入。在终端输出的末尾,你应该看到类似的东西:
1[secondary_label Output]
2infra
3droplet0IP = droplet_foo_ip
4droplet1IP = droplet_bar_ip
5loadBalancerIP = load_balancer_ip
现在,每次运行cdktf 部署或cdktf 输出时,Droplets 的 IP 地址和负载平衡器都会在终端输出中打印出来,消除了需要从 DigitalOcean 控制台访问这些信息。
您可以使用您开发的 CDKTF 项目作为基础来定义更复杂的基础设施(您可以在 do-community / digitalocean-cdktf-typescript找到参考实现)。
如果你不打算使用创建的基础设施,你应该摧毁它. 在下一步和最后一步,你将通过摧毁在本教程中创建的资源来清理项目。
第9步:摧毁你的基础设施
在此步骤中,您将删除本教程中创建的所有资源。
在infra/目录中,运行cdktf destroy:
1cdktf destroy
你应该看到类似于以下的输出:
  1[secondary_label Output]
  2infra Initializing the backend...
  3infra Initializing provider plugins...
  4infra  - Reusing previous version of digitalocean/digitalocean from the dependency lock file
  5infra  - Using previously-installed digitalocean/digitalocean v2.19.0
  6infra Terraform has been successfully initialized!
  7infra digitalocean_droplet.bar (bar): Refreshing state... [id=298041598]
  8       digitalocean_droplet.foo (foo): Refreshing state... [id=298041600]
  9infra digitalocean_loadbalancer.lb (lb): Refreshing state... [id=4f9ae2b7-b649-4fb4-beed-96b95bb72dd1]
 10infra Terraform used the selected providers to generate the following execution
 11       plan. Resource actions are indicated with the following symbols:
 12       - destroy
 13
 14       Terraform will perform the following actions:
 15infra    # digitalocean_droplet.bar (bar) will be destroyed
 16         - resource "digitalocean_droplet" "bar" {
 17       - backups              = false -> null
 18       - created_at           = "2022-05-02T10:04:16Z" -> null
 19       - disk                 = 25 -> null
 20       - graceful_shutdown    = false -> null
 21       - id                   = "298041598" -> null
 22       - image                = "ubuntu-20-04-x64" -> null
 23       - ipv4_address         = "droplet_bar_public_ip" -> null
 24       - ipv4_address_private = "droplet_bar_private_ip" -> null
 25       - ipv6                 = false -> null
 26       - locked               = false -> null
 27       - memory               = 1024 -> null
 28       - monitoring           = false -> null
 29       - name                 = "bar" -> null
 30       - price_hourly         = 0.00744 -> null
 31       - price_monthly        = 5 -> null
 32       - private_networking   = true -> null
 33       - region               = "lon1" -> null
 34       - resize_disk          = true -> null
 35       - size                 = "s-1vcpu-1gb" -> null
 36       - ssh_keys             = [
 37       - "34377800",
 38       ] -> null
 39       - status               = "active" -> null
 40       - tags                 = [] -> null
 41       - urn                  = "do:droplet:298041598" -> null
 42       - user_data            = "f9b1d9796d069fe504ce0d89439b6b664b14b1a1" -> null
 43       - vcpus                = 1 -> null
 44       - volume_ids           = [] -> null
 45       - vpc_uuid             = "bed80b32-dc82-11e8-83ec-3cfdfea9f3f0" -> null
 46       }
 47
 48         # digitalocean_droplet.foo (foo) will be destroyed
 49         - resource "digitalocean_droplet" "foo" {
 50       - backups              = false -> null
 51       - created_at           = "2022-05-02T10:04:16Z" -> null
 52       - disk                 = 25 -> null
 53       - graceful_shutdown    = false -> null
 54       - id                   = "298041600" -> null
 55       - image                = "ubuntu-20-04-x64" -> null
 56       - ipv4_address         = "droplet_foo_public_ip" -> null
 57       - ipv4_address_private = "droplet_foo_private_ip" -> null
 58       - ipv6                 = false -> null
 59       - locked               = false -> null
 60       - memory               = 1024 -> null
 61       - monitoring           = false -> null
 62       - name                 = "foo" -> null
 63       - price_hourly         = 0.00744 -> null
 64       - price_monthly        = 5 -> null
 65       - private_networking   = true -> null
 66       - region               = "lon1" -> null
 67       - resize_disk          = true -> null
 68       - size                 = "s-1vcpu-1gb" -> null
 69       - ssh_keys             = [
 70       - "34377800",
 71       ] -> null
 72       - status               = "active" -> null
 73       - tags                 = [] -> null
 74       - urn                  = "do:droplet:298041600" -> null
 75       - user_data            = "f9b1d9796d069fe504ce0d89439b6b664b14b1a1" -> null
 76       - vcpus                = 1 -> null
 77       - volume_ids           = [] -> null
 78       - vpc_uuid             = "bed80b32-dc82-11e8-83ec-3cfdfea9f3f0" -> null
 79       }
 80
 81         # digitalocean_loadbalancer.lb (lb) will be destroyed
 82         - resource "digitalocean_loadbalancer" "lb" {
 83       - algorithm                        = "round_robin" -> null
 84       - disable_lets_encrypt_dns_records = false -> null
 85       - droplet_ids                      = [
 86       - 298041598,
 87       - 298041600,
 88       ] -> null
 89       - enable_backend_keepalive         = false -> null
 90       - enable_proxy_protocol            = false -> null
 91       - id                               = "4f9ae2b7-b649-4fb4-beed-96b95bb72dd1" -> null
 92       - ip                               = "load_balancer_ip" -> null
 93       - name                             = "default" -> null
 94       - redirect_http_to_https           = false -> null
 95       - region                           = "lon1" -> null
 96       - size_unit                        = 1 -> null
 97       - status                           = "active" -> null
 98       - urn                              = "do:loadbalancer:4f9ae2b7-b649-4fb4-beed-96b95bb72dd1" -> null
 99       - vpc_uuid                         = "bed80b32-dc82-11e8-83ec-3cfdfea9f3f0" -> null
100
101       - forwarding_rule {
102       - entry_port      = 80 -> null
103       - entry_protocol  = "http" -> nul
104infra l
105       - target_port     = 80 -> null
106       - target_protocol = "http" -> null
107       - tls_passthrough = false -> null
108       }
109
110       - healthcheck {
111       - check_interval_seconds   = 10 -> null
112       - healthy_threshold        = 5 -> null
113       - path                     = "/" -> null
114       - port                     = 80 -> null
115       - protocol                 = "http" -> null
116       - response_timeout_seconds = 5 -> null
117       - unhealthy_threshold      = 3 -> null
118       }
119
120       - sticky_sessions {
121       - cookie_ttl_seconds = 0 -> null
122       - type               = "none" -> null
123       }
124       }
125
126       Plan: 0 to add, 0 to change, 3 to destroy.
127
128       ─────────────────────────────────────────────────────────────────────────────
129
130       Saved the plan to: plan
131
132       To perform exactly these actions, run the following command to apply:
133       terraform apply "plan"
134
135Please review the diff output above for infra
136❯ Approve Applies the changes outlined in the plan.
137  Dismiss
138  Stop
这一次,而不是在每个资源旁边显示+,它显示-,表示CDKTF计划摧毁该资源。 审查所提出的更改,然后使用箭头键选择批准并按输入。
1[secondary_label Output]
2infra digitalocean_loadbalancer.lb (lb): Destroying... [id=4f9ae2b7-b649-4fb4-beed-96b95bb72dd1]
3infra digitalocean_loadbalancer.lb (lb): Destruction complete after 1s
4infra digitalocean_droplet.bar (bar): Destroying... [id=298041598]
5       digitalocean_droplet.foo (foo): Destroying... [id=298041600]
负荷平衡器首先被删除,因为它没有依赖性(没有其他资源在其输入中引用负荷平衡器)。
资源被摧毁后,您将在输出中看到下面的行:
1[secondary_label Output]
2Destroy complete! Resources: 3 destroyed.
结论
在本教程中,您使用CDKTF来提供和破坏一个负载均衡的网页,由两个DigitalOcean Droplets运行NGINX服务器组成,后面是一个负载均衡器。
CDKTF 是 Terraform 上面的抽象层。对 Terraform 的良好理解有助于了解 CDKTF. 如果您想了解更多关于 Terraform 的信息,您可以阅读 How To Manage Infrastructure with Terraform系列,该系列深入涵盖 Terraform。
您也可以查看官方 CDK for Terraform documentation 和 教程 了解更多有关 CDKTF 的信息。