介绍
MySQL 版本 5.7.8引入了一个 JSON 数据类型,允许您访问 JSON 文档中的数据。
SQL 数据库在设计上往往是僵硬的,由于其性质,结构化查询语言强制执行数据类型和大小限制。
相比之下,NoSQL数据库鼓励灵活的设计,在这些没有方案的数据库中,没有强加的结构限制,只需要保存数据。
MySQL中的JSON数据类型为您提供了这两种系统的优势,它允许您构建数据库的一些部分,让其他部分灵活。
本文的上半部分将设计一个使用 JSON 字段的数据库,它将通过使用 MySQL 可用的内置功能来创建,阅读,更新和删除行。
本文的下半部分将利用 Eloquent ORM 与 Laravel 与数据库进行通信,您将构建一个支持显示产品、添加新产品、修改现有产品和删除产品的管理面板。
前提条件
如果您想跟随这篇文章,您将需要:
- MySQL 5.7.8 或更高版本和 PHP 7.3.24 或更高版本. 您可以参阅 我们关于安装 Linux、Apache、MySQL 和 PHP 的教程 *一些熟悉 SQL 查询。 *一些熟悉 写 PHP。 *一些熟悉 Laravel。 *本教程使用 Laravel 安装通过 Composer在脑海中。 您可以参阅 我们安装 Composer 的教程.
<$>[注] 注: Laravel 现在提供了名为 Sail的工具,用于与 Docker 一起工作,该工具将配置使用 MySQL、PHP 和 Composer 的环境。
如果您在设置本地环境时遇到困难,这可能是一个替代选项 <$>
本教程已通过 MySQL v8.0.23, PHP v7.3.24, Composer v2.0.9 和 Laravel v8.26.1 进行验证。
步骤1 - 定义方案
对于本教程的目的,您将从定义销售各种电子产品的在线商店库存的方案中构建。
传统上,使用实体 - 属性 - 价值模型(EAV)(https://en.wikipedia.org/wiki/Entity%E2%80%93attribute%E2%80%93value_model)模式,允许客户比较产品的特性。
但是,使用 JSON 数据类型,这种用例可以不同的方法来处理。
该数据库将被命名为e_store,并分别包含三个名为品牌,类别和产品的表。
创建e_store数据库:
1CREATE DATABASE IF NOT EXISTS `e_store`
2DEFAULT CHARACTER SET utf8
3DEFAULT COLLATE utf8_general_ci;
4
5SET default_storage_engine = INNODB;
每个品牌和类别表将有ID和名称字段。
创建品牌表:
1CREATE TABLE `e_store`.`brands`(
2    `id` INT UNSIGNED NOT NULL auto_increment ,
3    `name` VARCHAR(250) NOT NULL ,
4    PRIMARY KEY(`id`)
5);
创建分类表:
1CREATE TABLE `e_store`.`categories`(
2    `id` INT UNSIGNED NOT NULL auto_increment ,
3    `name` VARCHAR(250) NOT NULL ,
4    PRIMARY KEY(`id`)
5);
接下来,添加一些样本品牌:
 1INSERT INTO `e_store`.`brands`(`name`)
 2VALUES
 3    ('Samsung');
 4
 5INSERT INTO `e_store`.`brands`(`name`)
 6VALUES
 7    ('Nokia');
 8
 9INSERT INTO `e_store`.`brands`(`name`)
10VALUES
11    ('Canon');
然后添加一些类别:
 1INSERT INTO `e_store`.`categories`(`name`)
 2VALUES
 3    ('Television');
 4
 5INSERT INTO `e_store`.`categories`(`name`)
 6VALUES
 7    ('Mobile Phone');
 8
 9INSERT INTO `e_store`.`categories`(`name`)
10VALUES
11    ('Camera');
接下来,创建一个产品表,其中包含id,名称,brand_id,category_id和属性字段:
 1CREATE TABLE `e_store`.`products`(
 2    `id` INT UNSIGNED NOT NULL AUTO_INCREMENT ,
 3    `name` VARCHAR(250) NOT NULL ,
 4    `brand_id` INT UNSIGNED NOT NULL ,
 5    `category_id` INT UNSIGNED NOT NULL ,
 6    `attributes` JSON NOT NULL ,
 7    PRIMARY KEY(`id`) ,
 8    INDEX `CATEGORY_ID`(`category_id` ASC) ,
 9    INDEX `BRAND_ID`(`brand_id` ASC) ,
10    CONSTRAINT `brand_id` FOREIGN KEY(`brand_id`) REFERENCES `e_store`.`brands`(`id`) ON DELETE RESTRICT ON UPDATE CASCADE ,
11    CONSTRAINT `category_id` FOREIGN KEY(`category_id`) REFERENCES `e_store`.`categories`(`id`) ON DELETE RESTRICT ON UPDATE CASCADE
12);
本表定义规定了brand_id和category_id字段的外钥限制,规定了它们分别参考品牌和类别表。
该属性字段的列类型已被宣布为JSON,这是现在在MySQL中可用的原始数据类型,这允许您在属性字段中使用MySQL中的各种JSON相关构件。
以下是创建数据库的实体关系图:
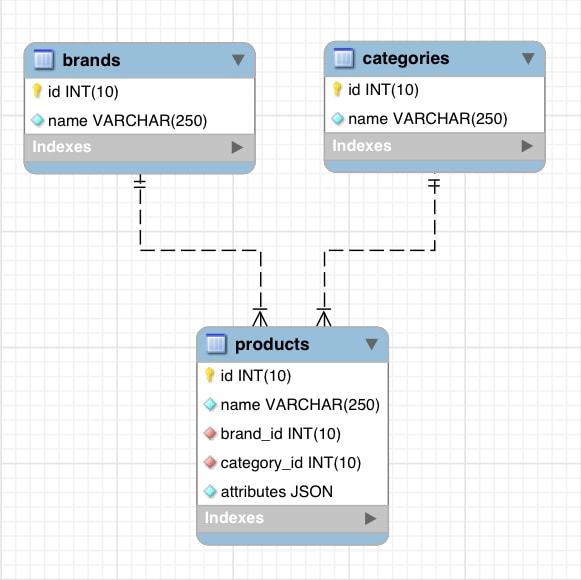
这种数据库设计在效率和准确性方面不是最好的,有一些常见的现实世界的使用案例没有被考虑到,例如,在产品表中没有价格列,并且没有支持产品在多个类别中。
步骤 2 — 在 JSON 字段中创建数据
现在,您将创建用于添加到数据库的产品,使用INSERT INTO和VALUES。
以下是使用有线JSON对象的屏幕大小、分辨率、端口和扬声器数据的电视的一些示例:
 1INSERT INTO `e_store`.`products`(
 2    `name` ,
 3    `brand_id` ,
 4    `category_id` ,
 5    `attributes`
 6)
 7VALUES(
 8    'Prime' ,
 9    '1' ,
10    '1' ,
11    '{"screen": "50 inch", "resolution": "2048 x 1152 pixels", "ports": {"hdmi": 1, "usb": 3}, "speakers": {"left": "10 watt", "right": "10 watt"}}'
12);
13
14INSERT INTO `e_store`.`products`(
15    `name` ,
16    `brand_id` ,
17    `category_id` ,
18    `attributes`
19)
20VALUES(
21    'Octoview' ,
22    '1' ,
23    '1' ,
24    '{"screen": "40 inch", "resolution": "1920 x 1080 pixels", "ports": {"hdmi": 1, "usb": 2}, "speakers": {"left": "10 watt", "right": "10 watt"}}'
25);
26
27INSERT INTO `e_store`.`products`(
28    `name` ,
29    `brand_id` ,
30    `category_id` ,
31    `attributes`
32)
33VALUES(
34    'Dreamer' ,
35    '1' ,
36    '1' ,
37    '{"screen": "30 inch", "resolution": "1600 x 900 pixles", "ports": {"hdmi": 1, "usb": 1}, "speakers": {"left": "10 watt", "right": "10 watt"}}'
38);
39
40INSERT INTO `e_store`.`products`(
41    `name` ,
42    `brand_id` ,
43    `category_id` ,
44    `attributes`
45)
46VALUES(
47    'Bravia' ,
48    '1' ,
49    '1' ,
50    '{"screen": "25 inch", "resolution": "1366 x 768 pixels", "ports": {"hdmi": 1, "usb": 0}, "speakers": {"left": "5 watt", "right": "5 watt"}}'
51);
52
53INSERT INTO `e_store`.`products`(
54    `name` ,
55    `brand_id` ,
56    `category_id` ,
57    `attributes`
58)
59VALUES(
60    'Proton' ,
61    '1' ,
62    '1' ,
63    '{"screen": "20 inch", "resolution": "1280 x 720 pixels", "ports": {"hdmi": 0, "usb": 0}, "speakers": {"left": "5 watt", "right": "5 watt"}}'
64);
这个例子宣布了五种不同的电视产品。
或者,您可以使用内置的JSON_OBJECT函数创建 JSON 对象。
JSON_OBJECT函数接受一个列表的密钥/值对在形式JSON_OBJECT(密钥1,值1,密钥2,值2,...密钥(n),值(n)),并返回一个JSON对象。
以下是使用JSON_OBJECT函数的移动电话的示例:
  1INSERT INTO `e_store`.`products`(
  2    `name` ,
  3    `brand_id` ,
  4    `category_id` ,
  5    `attributes`
  6)
  7VALUES(
  8    'Desire' ,
  9    '2' ,
 10    '2' ,
 11    JSON_OBJECT(
 12    	"network" ,
 13    	JSON_ARRAY("GSM" , "CDMA" , "HSPA" , "EVDO") ,
 14    	"body" ,
 15    	"5.11 x 2.59 x 0.46 inches" ,
 16    	"weight" ,
 17    	"143 grams" ,
 18    	"sim" ,
 19    	"Micro-SIM" ,
 20    	"display" ,
 21    	"4.5 inches" ,
 22    	"resolution" ,
 23    	"720 x 1280 pixels" ,
 24    	"os" ,
 25    	"Android Jellybean v4.3"
 26    )
 27);
 28
 29INSERT INTO `e_store`.`products`(
 30    `name` ,
 31    `brand_id` ,
 32    `category_id` ,
 33    `attributes`
 34)
 35VALUES(
 36    'Passion' ,
 37    '2' ,
 38    '2' ,
 39    JSON_OBJECT(
 40    	"network" ,
 41    	JSON_ARRAY("GSM" , "CDMA" , "HSPA") ,
 42    	"body" ,
 43    	"6.11 x 3.59 x 0.46 inches" ,
 44    	"weight" ,
 45    	"145 grams" ,
 46    	"sim" ,
 47    	"Micro-SIM" ,
 48    	"display" ,
 49    	"4.5 inches" ,
 50    	"resolution" ,
 51    	"720 x 1280 pixels" ,
 52    	"os" ,
 53    	"Android Jellybean v4.3"
 54    )
 55);
 56
 57INSERT INTO `e_store`.`products`(
 58    `name` ,
 59    `brand_id` ,
 60    `category_id` ,
 61    `attributes`
 62)
 63VALUES(
 64    'Emotion' ,
 65    '2' ,
 66    '2' ,
 67    JSON_OBJECT(
 68    	"network" ,
 69    	JSON_ARRAY("GSM" , "CDMA" , "EVDO") ,
 70    	"body" ,
 71    	"5.50 x 2.50 x 0.50 inches" ,
 72    	"weight" ,
 73    	"125 grams" ,
 74    	"sim" ,
 75    	"Micro-SIM" ,
 76    	"display" ,
 77    	"5.00 inches" ,
 78    	"resolution" ,
 79    	"720 x 1280 pixels" ,
 80    	"os" ,
 81    	"Android KitKat v4.3"
 82    )
 83);
 84
 85INSERT INTO `e_store`.`products`(
 86    `name` ,
 87    `brand_id` ,
 88    `category_id` ,
 89    `attributes`
 90)
 91VALUES(
 92    'Sensation' ,
 93    '2' ,
 94    '2' ,
 95    JSON_OBJECT(
 96    	"network" ,
 97    	JSON_ARRAY("GSM" , "HSPA" , "EVDO") ,
 98    	"body" ,
 99    	"4.00 x 2.00 x 0.75 inches" ,
100    	"weight" ,
101    	"150 grams" ,
102    	"sim" ,
103    	"Micro-SIM" ,
104    	"display" ,
105    	"3.5 inches" ,
106    	"resolution" ,
107    	"720 x 1280 pixels" ,
108    	"os" ,
109    	"Android Lollipop v4.3"
110    )
111);
112
113INSERT INTO `e_store`.`products`(
114    `name` ,
115    `brand_id` ,
116    `category_id` ,
117    `attributes`
118)
119VALUES(
120    'Joy' ,
121    '2' ,
122    '2' ,
123    JSON_OBJECT(
124    	"network" ,
125    	JSON_ARRAY("CDMA" , "HSPA" , "EVDO") ,
126    	"body" ,
127    	"7.00 x 3.50 x 0.25 inches" ,
128    	"weight" ,
129    	"250 grams" ,
130    	"sim" ,
131    	"Micro-SIM" ,
132    	"display" ,
133    	"6.5 inches" ,
134    	"resolution" ,
135    	"1920 x 1080 pixels" ,
136    	"os" ,
137    	"Android Marshmallow v4.3"
138    )
139);
这个例子宣布了五种不同的手机产品。
它还使用了JSON_ARRAY函数,当通过一组值时返回一个JSON数组。
如果您指定单个密钥多次,只保留第一个密钥 / 值对,这被称为 MySQL 术语中的 JSON 正常化,此外,作为正常化的一部分,对象密钥被排序,并删除密钥 / 值对之间的额外白空。
此外,您可以使用内置的JSON_MERGE_PRESERVE或JSON_MERGE_PATCH函数来创建 JSON 对象。
<$>[注]
**注:**在以前的MySQL版本中,您可以使用JSON_MERGE,但此函数已被淘汰。
1'JSON_MERGE' is deprecated and will be removed in a future release. Please use JSON_MERGE_PRESERVE/JSON_MERGE_PATCH instead
美元
对于本教程的目的,您将使用JSON_MERGE_PRESERVE函数,该函数需要多个JSON对象,并产生一个单一的聚合对象。
以下是使用JSON_MERGE_PRESERVE函数的一些示例相机:
 1INSERT INTO `e_store`.`products`(
 2    `name` ,
 3    `brand_id` ,
 4    `category_id` ,
 5    `attributes`
 6)
 7VALUES(
 8    'Explorer' ,
 9    '3' ,
10    '3' ,
11    JSON_MERGE_PRESERVE(
12    	'{"sensor_type": "CMOS"}' ,
13    	'{"processor": "Digic DV III"}' ,
14    	'{"scanning_system": "progressive"}' ,
15    	'{"mount_type": "PL"}' ,
16    	'{"monitor_type": "LCD"}'
17    )
18);
19
20INSERT INTO `e_store`.`products`(
21    `name` ,
22    `brand_id` ,
23    `category_id` ,
24    `attributes`
25)
26VALUES(
27    'Runner' ,
28    '3' ,
29    '3' ,
30    JSON_MERGE_PRESERVE(
31    	JSON_OBJECT("sensor_type" , "CMOS") ,
32    	JSON_OBJECT("processor" , "Digic DV II") ,
33    	JSON_OBJECT("scanning_system" , "progressive") ,
34    	JSON_OBJECT("mount_type" , "PL") ,
35    	JSON_OBJECT("monitor_type" , "LED")
36    )
37);
38
39INSERT INTO `e_store`.`products`(
40    `name` ,
41    `brand_id` ,
42    `category_id` ,
43    `attributes`
44)
45VALUES(
46    'Traveler' ,
47    '3' ,
48    '3' ,
49    JSON_MERGE_PRESERVE(
50    	JSON_OBJECT("sensor_type" , "CMOS") ,
51    	'{"processor": "Digic DV II"}' ,
52    	'{"scanning_system": "progressive"}' ,
53    	'{"mount_type": "PL"}' ,
54    	'{"monitor_type": "LCD"}'
55    )
56);
57
58INSERT INTO `e_store`.`products`(
59    `name` ,
60    `brand_id` ,
61    `category_id` ,
62    `attributes`
63)
64VALUES(
65    'Walker' ,
66    '3' ,
67    '3' ,
68    JSON_MERGE_PRESERVE(
69    	'{"sensor_type": "CMOS"}' ,
70    	'{"processor": "Digic DV I"}' ,
71    	'{"scanning_system": "progressive"}' ,
72    	'{"mount_type": "PL"}' ,
73    	'{"monitor_type": "LED"}'
74    )
75);
76
77INSERT INTO `e_store`.`products`(
78    `name` ,
79    `brand_id` ,
80    `category_id` ,
81    `attributes`
82)
83VALUES(
84    'Jumper' ,
85    '3' ,
86    '3' ,
87    JSON_MERGE_PRESERVE(
88    	'{"sensor_type": "CMOS"}' ,
89    	'{"processor": "Digic DV I"}' ,
90    	'{"scanning_system": "progressive"}' ,
91    	'{"mount_type": "PL"}' ,
92    	'{"monitor_type": "LCD"}'
93    )
94);
这个例子声明了五种不同的相机产品。
请注意,只有对象被传输到JSON_MERGE_PRESERVE函数中,其中一些是使用JSON_OBJECT函数构建的。
在JSON_MERGE_PRESERVE函数的情况下,如果一个密钥重复多次,则其值在输出中保留为数组。
例如,以下是一组具有相同网络密钥的 JSON 对象:
1SELECT JSON_MERGE_PRESERVE(
2    '{"network": "GSM"}' ,
3    '{"network": "CDMA"}' ,
4    '{"network": "HSPA"}' ,
5    '{"network": "EVDO"}'
6);
这将产生一系列价值:
1[secondary_label Output]
2{"network": ["GSM", "CDMA", "HSPA", "EVDO"]}
现在,您可以使用JSON_TYPE函数来验证查询,以显示字段值类型:
1SELECT JSON_TYPE(attributes) FROM `e_store`.`products`;
此查询将产生 15 个对象结果,代表所有产品 - 五台电视机,五台手机和五台摄像头。
现在,您可以在 JSON 字段中创建数据。
步骤 3 – 从 JSON 字段读取数据
现在,您在数据库中有一些产品可以使用,您可以尝试读取数据。
对于非 JSON 类型的典型 MySQL 值,您通常会依赖WHERE条款。
当您希望使用 JSON 字段选择行时,您应该熟悉路径表达式的概念。
当与JSON_EXTRACT函数相结合使用时,可以检索指定的列的值。
考虑一个场景,您对所有具有至少一个USB和一个HDMI端口的电视感兴趣:
1SELECT
2    *
3FROM
4    `e_store`.`products`
5WHERE
6    `category_id` = 1
7AND JSON_EXTRACT(`attributes` , '$.ports.usb') > 0
8AND JSON_EXTRACT(`attributes` , '$.ports.hdmi') > 0;
「JSON_EXTRACT」函数的第一个论点是使用 JSON 应用路径表达式,该路径表达式是「属性」列。「$」符号标记了要使用的对象。「$.ports.usb」和「$.ports.hdmi」路径表达式分别翻译为「接入 USB 键在端口下」和「接入 HDMI 键在端口下」。
一旦你提取了你感兴趣的密钥,你可以使用MySQL操作员,如大于符号(>)在它们上。
此查询将产生三个结果:

这三个电视机至少有一个USB端口和一个HDMI端口,Bravia和Proton模型不符合这些条件。
或者,JSON_EXTRACT函数具有代码->,您可以使用它来使查询更易于阅读。
查看之前的查询以使用->字符串:
1SELECT
2    *
3FROM
4    `e_store`.`products`
5WHERE
6    `category_id` = 1
7AND `attributes` -> '$.ports.usb' > 0
8AND `attributes` -> '$.ports.hdmi' > 0;
现在,您可以从 JSON 字段读取数据。
步骤 4 — 更新 JSON 字段中的数据
您可以使用JSON_INSERT、JSON_REPLACE和JSON_SET函数更新 JSON 字段中的数据,这些函数还需要一条路径表达式来指定要修改 JSON 对象的哪些部分。
首先,用JSON_INSERT更新 JSON 字段,为所有移动电话添加一个新的芯片集密钥,其值为Qualcomm:
1UPDATE `e_store`.`products`
2SET `attributes` = JSON_INSERT(
3    `attributes` ,
4    '$.chipset' ,
5    'Qualcomm'
6)
7WHERE
8    `category_id` = 2;
$.chipset路径表达式识别了chipset属性位于对象根位置的位置。
查看更新的手机类别,使用以下查询:
1SELECT
2    *
3FROM
4    `e_store`.`products`
5WHERE
6    `category_id` = 2
Qualcomm现在适用于所有手机:

现在,用JSON_REPLACE更新 JSON 字段,以更改所有移动电话的现有芯片集密钥,以Qualcomm Snapsdragon值:
1UPDATE `e_store`.`products`
2SET `attributes` = JSON_REPLACE(
3    `attributes` ,
4    '$.chipset' ,
5    'Qualcomm Snapdragon'
6)
7WHERE
8    `category_id` = 2;
Qualcomm现在被所有手机的Qualcomm Snapdragon取代:

最后,用JSON_SET更新 JSON 字段,为所有电视机添加一个新的body_color键,其值为红色:
1UPDATE `e_store`.`products`
2SET `attributes` = JSON_SET(
3    `attributes` ,
4    '$.body_color' ,
5    'red'
6)
7WHERE
8    `category_id` = 1;
红色色现在适用于所有电视机:

所有这些功能看起来相同,但它们的行为方式存在差异。
JSON_INSERT 函数只会将属性添加到对象中,如果它已经不存在。
JSON_REPLACE 函数仅在找到属性时取代属性。
JSON_SET函数将添加属性,如果没有找到它,否则取代它。
现在,您可以从 JSON 字段更新数据。
步骤 5 – 从 JSON 字段中删除数据
您可以使用JSON_REMOVE函数和DELETE函数删除 JSON 字段中的数据。
JSON_REMOVE 允许您从 JSON 列中删除特定密钥/值。
使用JSON_REMOVE函数,可以从所有相机中删除mount_type键/值对:
1UPDATE `e_store`.`products`
2SET `attributes` = JSON_REMOVE(`attributes` , '$.mount_type')
3WHERE
4    `category_id` = 3;
JSON_REMOVE函数将根据路径表达式删除指定的密钥后返回更新的 JSON。
或者,您可以使用 JSON 列删除整个行。
使用DELETE和JSON_EXTRACT和LIKE可以删除所有具有Jellybean版本的Android操作系统的手机:
1DELETE FROM `e_store`.`products`
2WHERE `category_id` = 2
3AND JSON_EXTRACT(`attributes` , '$.os') LIKE '%Jellybean%';
此查询将删除手机的欲望和激情模型。
使用特定属性需要使用JSON_EXTRACT函数,首先提取手机的os属性,然后将LIKE运算符应用到包含字符串Jellybean的所有记录中。
现在,您可以从 JSON 字段中删除数据。
第六步:创造移民
现在,创建一个新的Laravel项目。
<$>[警告] **警告:**本网页应用程序仅供教程使用,不应在生产设置中使用。
打开终端窗口并执行以下命令:
1composer create-project laravel/laravel estore-example
导航到新创建的项目目录:
1cd estore-example
配置您的 Laravel 应用程序使用 MySQL 数据库。
您可能需要修改您的.env 文件,以设置DB_DATABASE,DB_USERNAME和DB_PASSWORD。
您将创建三个品牌,类别和产品的迁移。
执行create_brands迁移:
1php artisan make:migration create_brands
用以下代码行修改create_brands.php迁移:
 1[label database/migrations/(...)create_brands.php]
 2<?php
 3
 4use Illuminate\Database\Migrations\Migration;
 5use Illuminate\Database\Schema\Blueprint;
 6use Illuminate\Support\Facades\Schema;
 7
 8class CreateBrands extends Migration
 9{
10    /**
11     * Run the migrations.
12     *
13     * @return void
14     */
15    public function up()
16    {
17        Schema::create('brands', function(Blueprint $table){
18            $table->engine = 'InnoDB';
19            $table->increments('id');
20            $table->string('name');
21            $table->timestamps();
22        });
23    }
24
25    /**
26     * Reverse the migrations.
27     *
28     * @return void
29     */
30    public function down()
31    {
32        Schema::dropIfExists('brands');
33    }
34}
执行Create_categories迁移:
1php artisan make:migration create_categories
用以下代码行修改create_categories.php迁移:
 1[label database/migrations/(...)create_categories.php]
 2<?php
 3
 4use Illuminate\Database\Migrations\Migration;
 5use Illuminate\Database\Schema\Blueprint;
 6use Illuminate\Support\Facades\Schema;
 7
 8class CreateCategories extends Migration
 9{
10    /**
11     * Run the migrations.
12     *
13     * @return void
14     */
15    public function up()
16    {
17        Schema::create('categories', function(Blueprint $table){
18            $table->engine = 'InnoDB';
19            $table->increments('id');
20            $table->string('name');
21            $table->timestamps();
22        });
23    }
24
25    /**
26     * Reverse the migrations.
27     *
28     * @return void
29     */
30    public function down()
31    {
32        Schema::dropIfExists('categories');
33    }
34}
create_products迁移还将为索引和外部密钥提供指令:
1php artisan make:migration create_products
用以下代码行修改create_products.php迁移:
 1[label database/migrations/(...)create_products.php]
 2<?php
 3
 4use Illuminate\Database\Migrations\Migration;
 5use Illuminate\Database\Schema\Blueprint;
 6use Illuminate\Support\Facades\Schema;
 7
 8class CreateProducts extends Migration
 9{
10    /**
11     * Run the migrations.
12     *
13     * @return void
14     */
15    public function up()
16    {
17        Schema::create('products', function(Blueprint $table){
18            $table->engine = 'InnoDB';
19            $table->increments('id');
20            $table->string('name');
21            $table->unsignedInteger('brand_id');
22            $table->unsignedInteger('category_id');
23            $table->json('attributes');
24            $table->timestamps();
25            // foreign key constraints
26            $table->foreign('brand_id')->references('id')->on('brands')->onDelete('restrict')->onUpdate('cascade');
27            $table->foreign('category_id')->references('id')->on('categories')->onDelete('restrict')->onUpdate('cascade');
28            // indexes
29            $table->index('brand_id');
30            $table->index('category_id');
31        });
32    }
33
34    /**
35     * Reverse the migrations.
36     *
37     * @return void
38     */
39    public function down()
40    {
41        Schema::dropIfExists('products');
42    }
43}
在迁移中,请注意$table->json('attributes')声明。
<$>[注] 注: 此功能仅适用于支持 JSON 数据类型的数据库引擎。
引擎,如MySQL的旧版本将无法执行这些迁移 <$>
与使用相应的数据类型命名方法创建其他类型的表字段类似,您使用名为属性的json方法创建了一个JSON列。
第7步:创建模型
您将分别为品牌,类别和产品创建三个模型。
创建品牌模式:
1php artisan make:model Brand
用以下行代码修改Brand.php文件:
 1[label app/Models/Brand.php]
 2<?php
 3
 4namespace App\Models;
 5
 6use Illuminate\Database\Eloquent\Factories\HasFactory;
 7use Illuminate\Database\Eloquent\Model;
 8
 9class Brand extends Model
10{
11    use HasFactory;
12
13    // A brand has many products
14    public function products(){
15        return $this->hasMany('Product')
16    }
17}
创建一个类别模型:
1php artisan make:model Category
用以下行代码修改Category.php文件:
 1[label app/Models/Category.php]
 2<?php
 3
 4namespace App\Models;
 5
 6use Illuminate\Database\Eloquent\Factories\HasFactory;
 7use Illuminate\Database\Eloquent\Model;
 8
 9class Category extends Model
10{
11    // A category has many products
12    public function products(){
13        return $this->hasMany('Product')
14    }
15}
创建一个产品模式:
1php artisan make:model Product
用以下行代码修改Product.php文件:
 1[label app/Models/Product.php]
 2<?php
 3
 4namespace App\Models;
 5
 6use Illuminate\Database\Eloquent\Factories\HasFactory;
 7use Illuminate\Database\Eloquent\Model;
 8
 9class Product extends Model
10{
11    use HasFactory;
12
13    public $timestamps = false;
14
15    // Cast attributes JSON to array
16    protected $casts = [
17        'attributes' => 'array'
18    ];
19
20    // Each product has a brand
21    public function brand(){
22        return $this->belongsTo('Brand');
23    }
24
25    // Each product has a category
26    public function category(){
27        return $this->belongsTo('Category');
28    }
29}
$casts数组具有属性密钥设置为数组确保每次从数据库中提取产品时,其属性JSON被转换为相关数组。
第8步:创建产品
本教程的其余部分将集中在相机产品类别上。
您将使用具有相机特定的字段的表格构建视图,简而言之,电视和手机产品类别不会被覆盖,但在设计上非常相似。
创建相机产品类别的控制器:
1php artisan make:controller CameraController
修改「CameraController.php」用以下代码行:
 1[label app/Http/Controller/CameraController.php]
 2<?php
 3
 4namespace App\Http\Controllers;
 5
 6use Illuminate\Http\Request;
 7
 8class CameraController extends Controller
 9{
10    // creates product in database
11    // using form fields
12    public function store(Request $request){
13        // create object and set properties
14        $camera = new \App\Models\Product();
15        $camera->name = $request->name;
16        $camera->brand_id = $request->brand_id;
17        $camera->category_id = $request->category_id;
18        $camera->attributes = [
19            'processor' => $request->processor,
20            'sensor_type' => $request->sensor_type,
21            'monitor_type' => $request->monitor_type,
22            'scanning_system' => $request->scanning_system,
23        ];
24        // save to database
25        $camera->save();
26        // show the created camera
27        return view('product.camera.show', ['camera' => $camera]);
28    }
29}
这完成了摄像头的商店功能。
创建一个视图,在资源/视图/产品/摄像头目录树中创建一个new.blade.php文件:
 1[label resources/views/product/camera/new.blade.php]
 2<form method="POST" action="/product/camera/store">
 3    @csrf
 4    <table>
 5        <tr>
 6            <td><label for="name">Name</label></td>
 7            <td><input id="name" name="name" type="text"></td>
 8        </tr>
 9        <tr>
10            <td><label for="brand-id">Brand ID</label></td>
11            <td>
12                <select id="brand-id" name="brand_id">
13                    <option value="1">Samsung</option>
14                    <option value="2">Nokia</option>
15                    <option value="3">Canon</option>
16                </select>
17            </td>
18        </tr>
19        <tr>
20            <td><label for="attributes-processor">Processor</label></td>
21            <td><input id="attributes-processor" name="processor" type="text"></td>
22        </tr>
23        <tr>
24            <td><label for="attributes-sensor-type">Sensor Type</label></td>
25            <td><input id="attributes-sensor-type" name="sensor_type" type="text"></td>
26        </tr>
27        <tr>
28            <td><label for="attributes-monitor-type">Monitor Type</label></td>
29            <td><input id="attributes-monitor-type" name="monitor_type" type="text"></td>
30        </tr>
31        <tr>
32            <td><label for="attributes-scanning-system">Scanning System</label></td>
33            <td><input id="attributes-scanning-system" name="scanning_system" type="text"></td>
34        </tr>
35    </table>
36    <input name="category_id" value="3" type="hidden">
37    <button type="submit">Submit</button>
38</form>
brand_id作为一个硬代码的选择元素呈现,前面创建的三个品牌是选项。
修改routes/web.php中的路线以显示相机:
 1[label routes/web.php]
 2// ...
 3
 4use App\Http\Controllers\CameraController;
 5
 6Route::get('/product/camera/new', function() {
 7    return view('product/camera/new');
 8});
 9
10Route::post(
11    '/product/camera/store',
12    [CameraController::class, 'store']
13);
用以下命令服务应用程序:
1php artisan serve
然后,请访问localhost:8000/product/camera/new) 您的 Web 浏览器. 它将显示添加新相机的表格。
步骤9 - 收集产品
在产品模型中之前声明的$casts数组将帮助您通过将属性作为关联数组来读取和编辑产品。
用以下代码行修改CamerasController:
 1[label app/Http/Controller/CameraController.php]
 2<?php
 3
 4// ...
 5
 6class CameraController extends Controller
 7{
 8    // ... store ...
 9
10    // fetches a single product
11    // from database
12    public function show($id){
13        $camera = \App\Models\Product::find($id);
14        return view('product.camera.show', ['camera' => $camera]);
15    }
16}
这完成了摄像头的显示功能。
创建一个视图,在资源/视图/产品/摄像头目录树中创建一个show.blade.php文件:
 1[label resources/views/product/camera/show.blade.php]
 2<table>
 3    <tr>
 4        <td>Name</td>
 5        <td>{{ $camera->name }}</td>
 6    </tr>
 7    <tr>
 8        <td>Brand ID</td>
 9        <td>{{ $camera->brand_id }}</td>
10    </tr>
11    <tr>
12        <td>Category ID</td>
13        <td>{{ $camera->category_id }}</td>
14    </tr>
15    <tr>
16        <td>Processor</td>
17        <td>{{ $camera->attributes['processor'] }}</td>
18    </tr>
19    <tr>
20        <td>Sensor Type</td>
21        <td>{{ $camera->attributes['sensor_type'] }}</td>
22    </tr>
23    <tr>
24        <td>Monitor Type</td>
25        <td>{{ $camera->attributes['monitor_type'] }}</td>
26    </tr>
27    <tr>
28        <td>Scanning System</td>
29        <td>{{ $camera->attributes['scanning_system'] }}</td>
30    </tr>
31</table>
修改routes/web.php中的路线以显示相机:
1[label routes/web.php]
2// ...
3
4Route::get(
5    '/product/camera/show/{id}',
6    [CameraController::class, 'show']
7);
用以下命令服务应用程序:
1php artisan serve
然后,请使用您的 Web 浏览器访问相机产品的有效 ID(例如,localhost:8000/product/camera/show/11)。
第10步:编辑产品
通过使用商店和显示技术的组合,您可以创建一个编辑现有产品的视图。
您可以创建一个类似于new.blade.php中的表格,然后将其预定义为类似于show.blade.php中的产品变量:
1<tr>
2    <td><label for="attributes-processor">Processor</label></td>
3    <td><input id="attributes-processor" name="processor" type="text" value="{{ $camera->attributes['processor'] }}"></td>
4</tr>
现在,表单显示现有值,使用户更容易看到需要更新的值。
首先,使用id来检索模型,然后应用请求中的值,最后将新值保存到数据库中。
步骤 11 – 基于 JSON 属性进行搜索
您也可以使用 Eloquent ORM 查询 JSON 列。
考虑一个搜索页面,允许用户根据他们感兴趣的属性搜索相机。
1public function search(Request $request){
2    $cameras = \App\Models\Product::where([
3        ['attributes->processor', 'like', $request->processor],
4        ['attributes->sensor_type', 'like', $request->sensor_type],
5        ['attributes->monitor_type', 'like', $request->monitor_type],
6        ['attributes->scanning_system', 'like', $request->scanning_system]
7    ])->get();
8    return view('product.camera.search', ['cameras' => $cameras]);
9}
获取的记录现在将可在product.camera.search视图中作为一个$cameras集合,这将允许您浏览结果并显示满足用户搜索请求的条件的摄像头。
步骤 12 – 删除产品
使用非 JSON 列属性,您可以通过指定在哪里条款,然后调用删除方法来删除产品。
例如,在一个ID的情况下。
1\App\Models\Product::where('id', $id)->delete();
对于 JSON 列,使用单个或多个属性指定一个在哪里条款,然后调用删除方法。
1\App\Models\Product::where('attributes->sensor_type', 'CMOS')->delete();
2}
在本示例中,此代码将删除所有具有sensor_type属性设置为CMOS的产品。
结论
在本文中,您设计了使用 JSON 数据类型的 MySQL 数据库,并使用 Laravel Web 应用程序连接到它。
当您需要将数据保存为单独表中的密钥/值对或使用实体的灵活属性时,应考虑使用 JSON 数据类型字段,因为它可以大大有助于压缩数据库设计。
如果您对深入潜水感兴趣,MySQL文档(LINK0)是进一步探索JSON概念的绝佳资源。
有关Laravel的更多信息,您可以参阅我们的技术谈话在 Getting Started with Laravel。