介绍
大多数时候,你会写 Vue.js 组件,这些组件通过 DOM 与网页互动,但 Vue 的反应系统比这更有用!
在本文中,我们将创建一组组件,以在HTML5画布中使用Vue渲染基本条形图。
前提条件
要完成本教程,您将需要:
- Node.js 是本地安装的,您可以按照 如何安装 Node.js 和创建本地开发环境进行操作。
本教程已通过 Node v16.5.0、npm v7.20.0 和 vue v2.6.11 进行验证。
步骤1 - 设置项目
您可以从 @vue/cli开始这个项目。
1npx @vue/cli create vue-canvas-example --default
然后,导航到新项目目录:
1cd vue-canvas-example
然后,用以下代码更换App.vue组件的内容:
 1[label src/App.vue]
 2<template>
 3  <div id="app">
 4    <h2>Bar Chart Example</h2>
 5    <my-canvas style="width: 100%; height: 600px;">
 6      <my-box
 7        v-for="(obj, index) of chartValues"
 8        :key=index
 9        :x1="(index / chartValues.length) * 100"
10        :x2="(index / chartValues.length) * 100 + 100 / chartValues.length"
11        :y1="100"
12        :y2="100 - obj.val"
13        :color="obj.color"
14        :value="obj.val"
15      >
16      </my-box>
17    </my-canvas>
18  </div>
19</template>
20
21<script>
22import MyCanvas from './components/MyCanvas.vue';
23import MyBox from './components/MyBox.vue';
24
25export default {
26  name: 'app',
27  components: {
28    MyCanvas,
29    MyBox,
30  },
31
32  data() {
33    return {
34      chartValues: [
35        { val: 24, color: 'red' },
36        { val: 32, color: '#0f0' },
37        { val: 66, color: 'rebeccapurple' },
38        { val: 1, color: 'green' },
39        { val: 28, color: 'blue' },
40        { val: 60, color: 'rgba(150, 100, 0, 0.2)' },
41      ],
42    };
43  },
44
45  mounted() {
46    let dir = 1;
47    let selectedVal = Math.floor(Math.random() * this.chartValues.length);
48
49    setInterval(() => {
50      if (Math.random() > 0.995) dir *= -1;
51      if (Math.random() > 0.99)
52        selectedVal = Math.floor(Math.random() * this.chartValues.length);
53
54      this.chartValues[selectedVal].val = Math.min(
55        Math.max(this.chartValues[selectedVal].val + dir * 0.5, 0),
56        100
57      );
58    }, 16);
59  },
60};
61</script>
62
63<style>
64html,
65body {
66  margin: 0;
67  padding: 0;
68}
69
70#app {
71  position: relative;
72  height: 100vh;
73  width: 100vw;
74  padding: 20px;
75  box-sizing: border-box;
76}
77</style>
这是应用程序模板,它使用setInterval和Math.random()每 16 毫秒更新图表值。
MyCanvas和MyBox是两个自定义组件。my-box的值是面板宽度的百分比。
步骤 2 – 构建 Canvas 组件
面膜组件创建一个面膜元素,并通过反应性提供器将面膜渲染背景注入到其所有子组件中。
 1[label src/components/MyCanvas.vue]
 2<template>
 3  <div class="my-canvas-wrapper">
 4    <canvas ref="my-canvas"></canvas>
 5    <slot></slot>
 6  </div>
 7</template>
 8
 9<script>
10export default {
11  data() {
12    return {
13      provider: {
14        context: null,
15      },
16    };
17  },
18
19  provide() {
20    return {
21      provider: this.provider,
22    };
23  },
24
25  mounted() {
26    this.provider.context = this.$refs['my-canvas'].getContext('2d');
27
28    this.$refs['my-canvas'].width = this.$refs[
29      'my-canvas'
30    ].parentElement.clientWidth;
31    this.$refs['my-canvas'].height = this.$refs[
32      'my-canvas'
33    ].parentElement.clientHeight;
34  },
35};
36</script>
通过在数据属性中创建提供者,它会变得反应性,所以当背景发生变化时,儿童组件将更新。
provide()允许任何儿童组件注入: [‘供应商’]并访问它。
我们无法访问渲染背景,直到面具安装到DOM,一旦我们有它,我们将其提供给所有儿童组件。
然后,调整面料的尺寸,以适应其父母的宽度. 通常你会使用一个更灵活的调整尺寸系统。
步骤3 - 构建盒子组件
MyBox.vue是魔法发生的地方,它是一个抽象组件(https://andsky.com/tech/tutorials/vuejs-vue-abstract-components),不是一个真实的组件,所以它实际上没有向DOM渲染。
<$>[注] 注: 此组件中包含模板或风格。
相反,在渲染函数中,我们使用正常的画布调用来绘制注入的画布. 因此,每个组件在其属性改变时仍在重新渲染,而无需任何额外工作。
 1[label components/MyBox.vue]
 2<script>
 3const percentWidthToPix = (percent, ctx) =>
 4  Math.floor((ctx.canvas.width / 100) * percent);
 5const percentHeightToPix = (percent, ctx) =>
 6  Math.floor((ctx.canvas.height / 100) * percent);
 7
 8export default {
 9  inject: ['provider'],
10
11  props: {
12    x1: {
13      type: Number,
14      default: 0,
15    },
16    y1: {
17      type: Number,
18      default: 0,
19    },
20    x2: {
21      type: Number,
22      default: 0,
23    },
24    y2: {
25      type: Number,
26      default: 0,
27    },
28    value: {
29      type: Number,
30      defualt: 0,
31    },
32    color: {
33      type: String,
34      default: '#F00',
35    },
36  },
37
38  data() {
39    return {
40      oldBox: {
41        x: null,
42        y: null,
43        w: null,
44        h: null,
45      },
46    };
47  },
48
49  computed: {
50    calculatedBox() {
51      const ctx = this.provider.context;
52
53      const calculated = {
54        x: percentWidthToPix(this.x1, ctx),
55        y: percentHeightToPix(this.y1, ctx),
56        w: percentWidthToPix(this.x2 - this.x1, ctx),
57        h: percentHeightToPix(this.y2 - this.y1, ctx),
58      };
59
60      // eslint-disable-next-line vue/no-side-effects-in-computed-properties
61      this.oldBox = calculated;
62
63      return calculated;
64    },
65  },
66
67  // eslint-disable-next-line vue/require-render-return
68  render() {
69    if (!this.provider.context) return;
70
71    const ctx = this.provider.context;
72    const oldBox = this.oldBox;
73    const newBox = this.calculatedBox;
74
75    ctx.beginPath();
76    ctx.clearRect(oldBox.x, oldBox.y, oldBox.w, oldBox.h);
77    ctx.clearRect(newBox.x, newBox.y - 42, newBox.w, 100);
78
79    ctx.rect(newBox.x, newBox.y, newBox.w, newBox.h);
80    ctx.fillStyle = this.color;
81    ctx.fill();
82
83    ctx.fillStyle = '#000';
84    ctx.font = '28px sans-serif';
85    ctx.textAlign = 'center';
86    ctx.fillText(
87      Math.floor(this.value),
88      newBox.x + newBox.w / 2,
89      newBox.y - 14
90    );
91  },
92};
93</script>
percentWidthToPix 和 percentHeightToPix 是将面板面积的百分比转换为像素的辅助函数。
注射: [提供者]从母组件<my-canvas>中给我们带来了提供者属性。
由于主面板必须先安装,所以在render()函数首次运行时,可能不会注入文本文本,检查是否定义了this.provider.context。
oldBox用于缓存上次渲染的尺寸,以便在下次渲染上重新计算calculatedBox之前,我们可以清除该区域。
<$>[注]
注: 这确实引入了副作用,但适用于教程的需求。为了避免 ESLint 错误,我们使用eslint-disable-next-line
<$>
保存更改并运行您的应用程序:
1npm run serve
在浏览器中打开应用程序:
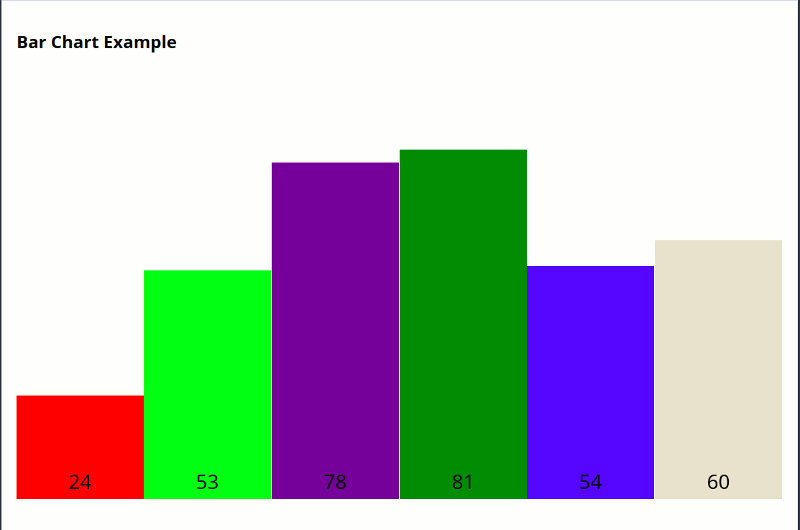
这是一个在HTML5面板上绘制的条形图,具有Vue反应性。
结论
在本文中,您创建了一组组件,用Vue在HTML5面板中渲染一个基本的条形图。
这种方法可以用于任何类型的画布渲染,甚至可以使用WebGL或WebVR的3D内容!使用您的想象力!
通过一个挑战来继续学习:尝试通过将每个盒子的尺寸传递给注入的提供商来添加个别事件处理,并让主面板决定在哪里发送事件。