欢迎来到Tomcat DataSource JNDI 示例教程. 我们在最后一本教程中查看了 [JDBC DataSource](/community/tutorials/java-datasource-jdbc-datasource-example JDBC DataSource 示例 – Oracle, MySQL 和 Apache DBCP 教程)并学习如何在独立的 Java 应用程序中使用它。
Tomcat 数据源 JNDI
 Actual benefit of DataSource comes when we use it with a JNDI Context. For example, connection pool in a web application deployed in a servlet container. Most of the popular servlet containers provide built-in support for DataSource through Resource configuration and JNDI context. This helps us in creating and using DataSource connection pool with just few lines of configuration. This tutorial is aimed to provide Tomcat DataSource JNDI configuration example. Apache Tomcat provide three ways to configure DataSource in JNDI context.
- 联合国 ** 应用上下文.xml** - 这是最容易配置数据源的方法,我们需要的只是META-INF目录中的上下文.xml文件. 我们必须在上下文文件中定义资源元素,容器将注意加载和配置. 做法很简单,但有一些缺点;(_) ) - 由于上下文文件与WAR文件相捆绑,我们需要为每一个小的配置变化来构建和部署新的WAR. 如果您的应用程序在分布环境中工作,或者您的应用程序需要部署在不同的测试环境中,如QA,IT,PROD等,则会出现同样的问题
- 数据源由容器创建,仅供应用程序使用,因此不能在全球使用. 我们不能通过多个应用程序共享数据源。 (_) ) - 如果有一个全局数据源(server.xml)被定义同名,应用程序数据源会被忽略.
- Server上下文.xml - 如果服务器中有多个应用程序,而您想要在它们之间共享数据源,我们可以在服务器上下文.xml文件中定义. 此文件位于
apache- tomcat/ conf目录中 。 服务器上下文.xml文件的范围是应用程序,所以如果定义了由100个连接组成的数据源连接池,并且有20个应用程序,那么每个应用程序将创建数据源. 这将导致2000年的连接,显然会消耗所有数据库服务器资源并损害应用程序的性能. () (英语). ** server.xml和上下文.xml** - 我们可以通过在服务器.xmlGlobalNamingResources'元素中定义数据源来定义全球一级的数据源. 如果我们使用这种方法,那么我们需要从服务器或应用程序的上下文.xml文件中定义ResourceLink'。 这是您想要在服务器上运行的多个应用程序中共享一个共同资源池的首选方式 。 关于资源链接,是否在服务器级别上下文 xml 文件或应用程序级别下定义取决于您的要求。 () (英语)
对于测试数据设置,请参阅我的最新文章关于 [JDBC DataSource 示例](/community/tutorials/java-datasource-jdbc-datasource-example JDBC DataSource 示例 – Oracle, MySQL 和 Apache DBCP 教程).
Tomcat 数据源 JNDI 配置示例 - server.xml
下面在 tomcat server.xml 文件中添加代码. 该代码应该在GlobalNamingResources元素中添加。 此外,请确保数据库驱动程序存在于 tomcat lib 目录中,所以在这种情况下,mysql jdbc jar 必须在 tomcat lib 中存在。
 1<Resource name="jdbc/MyDB"
 2      global="jdbc/MyDB"
 3      auth="Container"
 4      type="javax.sql.DataSource"
 5      driverClassName="com.mysql.jdbc.Driver"
 6      url="jdbc:mysql://localhost:3306/UserDB"
 7      username="pankaj"
 8      password="pankaj123"
 9
10      maxActive="100"
11      maxIdle="20"
12      minIdle="5"
13      maxWait="10000"/>
在这里,我们正在创建一个名为jdbc/MyDB的JNDI环境,这是一个类型的DataSource。我们正在通过数据库配置为URL、用户名、密码和driverClassName属性。
Tomcat 数据源 JNDI 资源链接配置 - context.xml
在服务器 context.xml 文件中添加下面的代码。
1<ResourceLink name="jdbc/MyLocalDB"
2                global="jdbc/MyDB"
3                auth="Container"
4                type="javax.sql.DataSource" />
请注意,资源链接名称与全球链接不同,我们必须在我们的java程序中使用这个名称来获取DataSource。
Tomcat 数据源 JNDI 示例
创建一个名为 JDBCDataSourceTomcat的动态 Web 应用程序,然后使用以下代码创建一个 Servlet。
 1package com.journaldev.jdbc.datasource;
 2
 3import java.io.IOException;
 4import java.io.PrintWriter;
 5import java.sql.Connection;
 6import java.sql.ResultSet;
 7import java.sql.SQLException;
 8import java.sql.Statement;
 9
10import javax.naming.Context;
11import javax.naming.InitialContext;
12import javax.naming.NamingException;
13import javax.servlet.ServletException;
14import javax.servlet.annotation.WebServlet;
15import javax.servlet.http.HttpServlet;
16import javax.servlet.http.HttpServletRequest;
17import javax.servlet.http.HttpServletResponse;
18import javax.sql.DataSource;
19
20@WebServlet("/JDBCDataSourceExample")
21public class JDBCDataSourceExample extends HttpServlet {
22    private static final long serialVersionUID = 1L;
23
24    protected void doGet(HttpServletRequest request, HttpServletResponse response) throws ServletException, IOException {
25    	Context ctx = null;
26    	Connection con = null;
27    	Statement stmt = null;
28    	ResultSet rs = null;
29    	try{
30    		ctx = new InitialContext();
31    		DataSource ds = (DataSource) ctx.lookup("java:/comp/env/jdbc/MyLocalDB");
32
33    		con = ds.getConnection();
34    		stmt = con.createStatement();
35
36    		rs = stmt.executeQuery("select empid, name from Employee");
37
38    		PrintWriter out = response.getWriter();
39            response.setContentType("text/html");
40            out.print("<html><body><h2>Employee Details</h2>");
41            out.print("<table border=\"1\" cellspacing=10 cellpadding=5>");
42            out.print("<th>Employee ID</th>");
43            out.print("<th>Employee Name</th>");
44
45            while(rs.next())
46            {
47                out.print("<tr>");
48                out.print("<td>" + rs.getInt("empid") + "</td>");
49                out.print("<td>" + rs.getString("name") + "</td>");
50                out.print("</tr>");
51            }
52            out.print("</table></body><br/>");
53
54            //lets print some DB information
55            out.print("<h3>Database Details</h3>");
56            out.print("Database Product: "+con.getMetaData().getDatabaseProductName()+"<br/>");
57            out.print("Database Driver: "+con.getMetaData().getDriverName());
58            out.print("</html>");
59
60    	}catch(NamingException e){
61    		e.printStackTrace();
62    	} catch (SQLException e) {
63    		e.printStackTrace();
64    	}finally{
65    		try {
66    			rs.close();
67    			stmt.close();
68    			con.close();
69    			ctx.close();
70    		} catch (SQLException e) {
71    			System.out.println("Exception in closing DB resources");
72    		} catch (NamingException e) {
73    			System.out.println("Exception in closing Context");
74    		}
75
76    	}
77    }
78
79}
请注意,我正在使用 Servlet 3 注释基于配置 它将工作在Tomcat 7或更高版本. 如果你正在使用更低版本的Tomcat,那么你需要做一些修改的servlet代码,删除WebServlet注释和配置在web.xml文件。
1ctx = new InitialContext();
2DataSource ds = (DataSource) ctx.lookup("java:/comp/env/jdbc/MyLocalDB");
这就是如何让应用程序使用定义的JNDI资源,我们也可以这样写。
1ctx = new InitialContext();
2Context initCtx  = (Context) ctx.lookup("java:/comp/env");
3DataSource ds = (DataSource) initCtx.lookup("jdbc/MyLocalDB");
I am also printing some database information to check which database we are connected. Now when you will run the application, you will see following output.  Let's see how easy it is to switch the database server because we are using Tomcat DataSource. All you need is to change the Database properties. So if we have to switch to Oracle database, my Resource configuration will look like below.
 1<Resource name="jdbc/MyDB"
 2      global="jdbc/MyDB"
 3      auth="Container"
 4      type="javax.sql.DataSource"
 5      driverClassName="oracle.jdbc.driver.OracleDriver"
 6      url="jdbc:oracle:thin:@localhost:1521:orcl"
 7      username="hr"
 8      password="oracle"
 9
10      maxActive="100"
11      maxIdle="20"
12      minIdle="5"
13      maxWait="10000"/>
And when we restart the server and run the application, it will connect to Oracle database and produce below result. 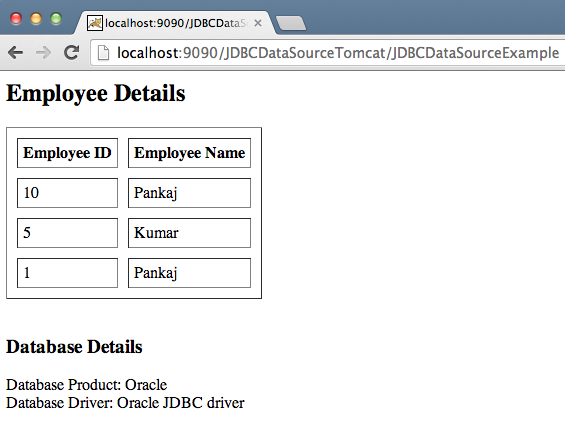 That's all for Tomcat DataSource JNDI configuration example tutorial, you can define the resource in similar way in context.xml files too.