然而,在阅读本文之前,请浏览我之前的关于`[春季 4 安全 MVC 登录示例]( / 社区 / 教程 / 春季 4 安全 - mvc - 登录 - 登录示例)"的文章,以获得一些关于春季 4 安全的基本知识。
春天的安全角色
在本文中,我们将讨论如何在春季 Web 应用程序中定义、使用和管理用户、管理等春季安全角色。 与我之前的帖子一样,本文的例子也使用春季 4 MVC 安全与内存商店和春季 Java 配置功能来开发应用程序。 这意味着我们不会使用 web.xml 文件,也不会写单行春季 XML 配置。 我们将使用内存商店选项来存储和管理用户凭据。 我们将使用春季 4.0.2.RELEASE、春季 STS 3.7 套件 IDE、春季 TC Server 3.1 与 Java 1.8 和 Maven 构建工具来开发这个例子。
春季安全基于角色的访问授权示例
1.在Spring STS Suite中创建一个简单的春季WebMaven项目,包含以下细节
项目名称 : SpringMVCSecruityMavenRolesApp2 使用我以前的帖子中的相同 pom.xml 文件,并进行以下更改
1<artifactId>SpringMVCSecruityMavenRolesApp</artifactId>
2
3<build>
4  <finalName>SpringMVCSecruityMavenRolesApp</finalName>
5</build>
6</project>
我们将讨论仅更新或新添加的内容在这里
5.更新 LoginSecurityConfig.java文件来配置用户角色,如用户和管理员。
** 登录安全配置.java**
 1package com.journaldev.spring.secuity.config;
 2
 3import org.springframework.beans.factory.annotation.Autowired;
 4import org.springframework.context.annotation.Configuration;
 5import org.springframework.security.config.annotation.authentication.builders.AuthenticationManagerBuilder;
 6import org.springframework.security.config.annotation.web.builders.HttpSecurity;
 7import org.springframework.security.config.annotation.web.configuration.EnableWebSecurity;
 8import org.springframework.security.config.annotation.web.configuration.WebSecurityConfigurerAdapter;
 9
10@Configuration
11@EnableWebSecurity
12public class LoginSecurityConfig extends WebSecurityConfigurerAdapter {
13
14    @Autowired
15    public void configureGlobal(AuthenticationManagerBuilder authenticationMgr) throws Exception {
16    	authenticationMgr.inMemoryAuthentication()
17    		.withUser("jduser").password("jdu@123").authorities("ROLE_USER")
18    		.and()
19    		.withUser("jdadmin").password("jda@123").authorities("ROLE_USER","ROLE_ADMIN");
20    }
21
22    @Override
23    protected void configure(HttpSecurity http) throws Exception {
24
25
26    	http.authorizeRequests()
27    		.antMatchers("/homePage").access("hasRole('ROLE_USER') or hasRole('ROLE_ADMIN')")
28    		.antMatchers("/userPage").access("hasRole('ROLE_USER')")
29    		.antMatchers("/adminPage").access("hasRole('ROLE_ADMIN')")
30    		.and()
31    			.formLogin().loginPage("/loginPage")
32    			.defaultSuccessUrl("/homePage")
33    			.failureUrl("/loginPage?error")
34    			.usernameParameter("username").passwordParameter("password")
35    		.and()
36    			.logout().logoutSuccessUrl("/loginPage?logout");
37
38    }
39}
- 代码说明 *
在 configureGlobal() 方法中,我们添加了两个用户:一个具有ROLE_USER角色的用户,另一个具有ROLE_USER和ROLE_ADMIN角色的用户,这意味着第二个用户将作为管理员用户。像这样,我们可以配置任何用户和角色
2。我们可以使用权限(ROLE)或角色(ROLE)方法在我们的应用程序中配置角色
3。
- authorities()需要完整的角色名称,如
ROLE_USER*角色名称需要角色名称,如USER。它会自动将ROLE_值添加到这个USER角色名称
在 configure() 方法中,我们已经定义了需要访问角色的不同 URL
1antMatchers("/homePage")
2   .access("hasRole('ROLE_USER') or hasRole('ROLE_ADMIN')")
此代码片段配置/homePage可用于用户和管理员角色。
1.antMatchers("/userPage").access("hasRole('ROLE_USER')")
2 .antMatchers("/adminPage").access("hasRole('ROLE_ADMIN')")
此代码片段配置为/userPage仅可访问USER角色,而/adminPage仅可访问ADMIN角色。
- 更新 LoginController.java 控制器文件以定义下面的新的 URL 访问路径
主持人:Java
 1package com.journaldev.spring.web.controller;
 2
 3import org.springframework.stereotype.Controller;
 4import org.springframework.web.bind.annotation.RequestMapping;
 5import org.springframework.web.bind.annotation.RequestMethod;
 6import org.springframework.web.bind.annotation.RequestParam;
 7import org.springframework.web.servlet.ModelAndView;
 8
 9@Controller
10public class LoginController {
11
12    @RequestMapping(value = { "/"}, method = RequestMethod.GET)
13    public ModelAndView welcomePage() {
14    	ModelAndView model = new ModelAndView();
15    	model.setViewName("welcomePage");
16    	return model;
17    }
18
19    @RequestMapping(value = { "/homePage"}, method = RequestMethod.GET)
20    public ModelAndView homePage() {
21    	ModelAndView model = new ModelAndView();
22    	model.setViewName("homePage");
23    	return model;
24    }
25
26    @RequestMapping(value = {"/userPage"}, method = RequestMethod.GET)
27    public ModelAndView userPage() {
28    	ModelAndView model = new ModelAndView();
29    	model.setViewName("userPage");
30    	return model;
31    }
32
33    @RequestMapping(value = {"/adminPage"}, method = RequestMethod.GET)
34    public ModelAndView adminPage() {
35    	ModelAndView model = new ModelAndView();
36    	model.setViewName("adminPage");
37    	return model;
38    }
39
40    @RequestMapping(value = "/loginPage", method = RequestMethod.GET)
41    public ModelAndView loginPage(@RequestParam(value = "error",required = false) String error,
42    @RequestParam(value = "logout",	required = false) String logout) {
43
44    	ModelAndView model = new ModelAndView();
45    	if (error != null) {
46    		model.addObject("error", "Invalid Credentials provided.");
47    	}
48
49    	if (logout != null) {
50    		model.addObject("message", "Logged out from JournalDEV successfully.");
51    	}
52
53    	model.setViewName("loginPage");
54    	return model;
55    }
56
57}
代码解释 除了上篇文章示例外,我们还添加了两个新的URL。
/userPage被用户角色用于访问和执行正常用户活动./adminPage被 Admin 角色用于访问和执行 Admin 用户活动。
主页 > JSP
 1<%@taglib prefix="c" uri="https://java.sun.com/jsp/jstl/core"%>
 2<a href="${pageContext.request.contextPath}/userPage">JD User</a> | <a href="${pageContext.request.contextPath}/adminPage">JD Admin</a> | <a href="javascript:document.getElementById('logout').submit()">Logout</a>
 3
 4<h3>Welcome to JournalDEV Tutorials</h3>
 5<ul>
 6   <li>Java 8 tutorial</li>
 7   <li>Spring tutorial</li>
 8   <li>Gradle tutorial</li>
 9   <li>BigData tutorial</li>
10</ul>
11
12<c:url value="/logout" var="logoutUrl" />
13<form id="logout" action="${logoutUrl}" method="post" >
14  <input type="hidden" name="${_csrf.parameterName}" value="${_csrf.token}" />
15</form>
在这里,我们已经添加了三种 Menu like 选项在顶部框架上。 Logout已经在我的上一篇文章中讨论了。
- JD 用户:可访问
用户和管理员角色 - JD 管理员:只能访问
管理员角色
** 注意:-** 在实时应用程序中,我们只会显示JD用户链接到用户角色并隐藏JD Admin链接。 为了测试它是否可以通过用户角色访问,并查看确切的错误消息,我们没有隐藏这个链接。
 1<%@taglib prefix="c" uri="https://java.sun.com/jsp/jstl/core"%>
 2<h3>Welcome to JournalDEV Tutorials</h3>
 3<h3>Admin Page</h3>
 4
 5<c:url value="/logout" var="logoutUrl" />
 6<form id="logout" action="${logoutUrl}" method="post" >
 7  <input type="hidden" name="${_csrf.parameterName}" value="${_csrf.token}" />
 8</form>
 9<c:if test="${pageContext.request.userPrincipal.name != null}">
10    <a href="javascript:document.getElementById('logout').submit()">Logout</a>
11</c:if>
23、添加新的 userPage.jsp 文件以作为用户角色的首页
用戶頁.jsp
 1<%@taglib prefix="c" uri="https://java.sun.com/jsp/jstl/core"%>
 2<h3>Welcome to JournalDEV Tutorials</h3>
 3<h3>User Page</h3>
 4
 5<c:url value="/logout" var="logoutUrl" />
 6<form id="logout" action="${logoutUrl}" method="post" >
 7  <input type="hidden" name="${_csrf.parameterName}" value="${_csrf.token}" />
 8</form>
 9<c:if test="${pageContext.request.userPrincipal.name != null}">
10    <a href="javascript:document.getElementById('logout').submit()">Logout</a>
11</c:if>
We have completed our application development now. It's time to see our project final structure and test the application.26. Final Project Structure looks like this:

春季安全角色示例应用测试
- 右键按一下 Spring STS IDE 中的 Project,然后选择
Run AS >> Run on Server选项
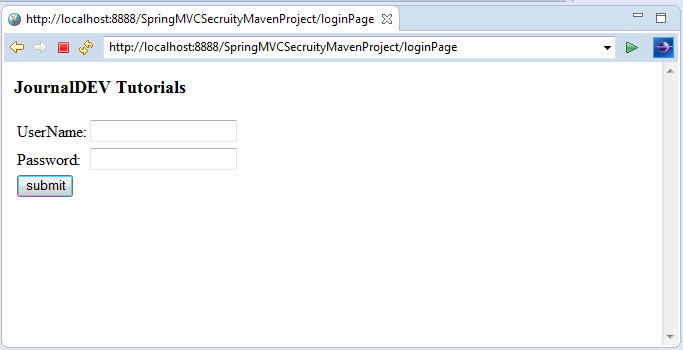
It will access default Application welcome page as shown below:  3. Click on "Login to JournalDEV" link.Now you are at Login Page.
 5. First login with "USER" Role Credentials:
Username: jduser Password: jdu@123
5. First login with "USER" Role Credentials:
Username: jduser Password: jdu@123  Now we will see Application HomePage with 3 Menu Options: "JD User", "JD Admin" and "Logout". Click on "JD User" link. As we have logged into application using "USER" Role Credentials, We can access this link as shown below.
  Just use backword arrow in Spring STS IDE and this time click on "JD Admin" Link.
  As we have logged in with "USER" Role Credentials, We cannot access this link. That's why we saw this error message: "403 Access is denied".9. Now Logged and again login with ADMIN Role Credentials
Username: jdadmin Password: jda@123 This time we can access "JD Admin" Link successfully as shown below.
As we have logged in with "USER" Role Credentials, We cannot access this link. That's why we saw this error message: "403 Access is denied".9. Now Logged and again login with ADMIN Role Credentials
Username: jdadmin Password: jda@123 This time we can access "JD Admin" Link successfully as shown below.  Test "Logout" link to Logged out of the Application.
这是关于 Spring 安全角色的例子,以提供授权访问 Web 应用程序页面。