Spring RestTemplate 提供了一个方便的方式来测试 [RESTful Web 服务]( / 社区 / 教程 / 春节休息 - 示例 - 教程 - 春节休息 - 网络服务)。
春天回归
- 春季 RestTemplate 类是
春季 Web的一部分,于春季 3 引入 *我们可以使用 RestTemplate 来测试基于 HTTP 的安静的 Web 服务,它不支持 HTTPS 协议 - RestTemplate 类为不同的 HTTP 方法提供 [过载]( / 社区 / 教程 / 方法 - 过载 - 在 Java) 方法,如 GET, POST, PUT, DELETE 等
春天 例子 例子
此分類下列圖表顯示了由此休息網站服務所支援的 URI。.tg {border-collapse:collapse:collapse:hidden;word-break:normal;border-spacing:#999;#999;}.tg td{ground-color:#F7FDFA;font-size:14px;padding:10px 5px;border-style:solid;border-width:1px;flow:hidden;word-break:normal;border-spacing:#999;color:#444;background-color:#F7FDFA;}.tg{font-size:14;padding:10px 5px;border-style:solid-size:14px;font-weight:14px;font-weight:normal;
| URI | HTTP Method | Description |
|---|---|---|
| /springData/person | GET | Get all persons from database |
| /springData/person/{id} | GET | Get person by id |
| /springData/person | POST | Add person to database |
| /springData/person | PUT | Update person |
| /springData/person/{id} | DELETE | Delete person by id |
Let's start creating our Rest client project to test these web services. Below image shows our final Spring RestTemplate example project. 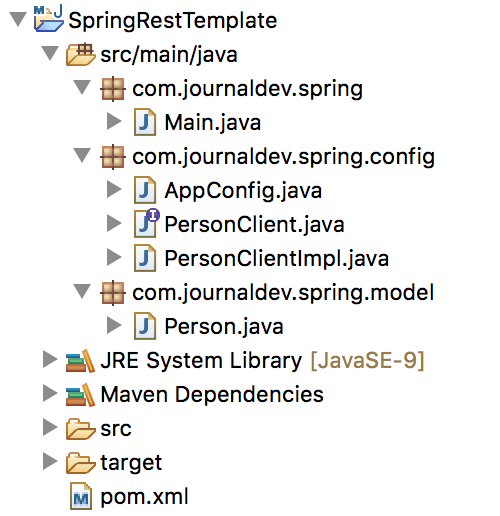
春天 依赖性 依赖性
然后我们需要包含RestTemplate类的spring-web文物,我们还需要jackson-mapper-asl为 Spring JSON通过 JacksonAPI的支持。
 1<?xml version="1.0" encoding="UTF-8"?>
 2<project xmlns="https://maven.apache.org/POM/4.0.0" xmlns:xsi="https://www.w3.org/2001/XMLSchema-instance"
 3    xsi:schemaLocation="https://maven.apache.org/POM/4.0.0 https://maven.apache.org/xsd/maven-4.0.0.xsd">
 4    <modelVersion>4.0.0</modelVersion>
 5
 6    <groupId>com.journaldev.spring</groupId>
 7    <artifactId>SpringRestTemplate</artifactId>
 8    <version>1.0-SNAPSHOT</version>
 9    <properties>
10    	<spring.framework>4.3.0.RELEASE</spring.framework>
11    	<spring.web>3.0.2.RELEASE</spring.web>
12    	<serializer.version>2.8.1</serializer.version>
13    </properties>
14    <dependencies>
15    	<dependency>
16    		<groupId>org.springframework</groupId>
17    		<artifactId>spring-core</artifactId>
18    		<version>${spring.framework}</version>
19    	</dependency>
20    	<dependency>
21    		<groupId>org.springframework</groupId>
22    		<artifactId>spring-context</artifactId>
23    		<version>${spring.framework}</version>
24    	</dependency>
25    	<dependency>
26    		<groupId>org.codehaus.jackson</groupId>
27    		<artifactId>jackson-mapper-asl</artifactId>
28    		<version>1.9.4</version>
29    	</dependency>
30    	<dependency>
31    		<groupId>org.springframework</groupId>
32    		<artifactId>spring-web</artifactId>
33    		<version>${spring.web}</version>
34    	</dependency>
35    </dependencies>
36</project>
春季配置班级
我们必须为 RestTemplate 类定义一个 [春豆]( / 社区 / 教程 / 春豆 - 生命周期),这是在 'AppConfig' 类中完成的。
 1package com.journaldev.spring.config;
 2
 3import org.codehaus.jackson.map.ObjectMapper;
 4import org.springframework.context.annotation.Bean;
 5import org.springframework.context.annotation.ComponentScan;
 6import org.springframework.context.annotation.Configuration;
 7import org.springframework.http.converter.json.MappingJacksonHttpMessageConverter;
 8import org.springframework.web.client.RestTemplate;
 9
10@Configuration
11@ComponentScan("com.journaldev.spring")
12public class AppConfig {
13
14    @Bean
15    RestTemplate restTemplate() {
16    	RestTemplate restTemplate = new RestTemplate();
17    	MappingJacksonHttpMessageConverter converter = new MappingJacksonHttpMessageConverter();
18    	converter.setObjectMapper(new ObjectMapper());
19    	restTemplate.getMessageConverters().add(converter);
20    	return restTemplate;
21    }
22}
请注意,RestTamplate 使用 MessageConverter,我们需要在 RestTemplate 标本中设置此属性,在我们的示例中,我们正在使用MappingJacksonHttpMessageConverter来从 JSON 格式获取数据。
类型模型
由于我们正在尝试使用 jackson mapper 将由我们的 Web 服务返回的 JSON 转换为 Java 对象,我们必须为此创建模型类。
 1package com.journaldev.spring.model;
 2
 3public class Person {
 4
 5    private Long id;
 6
 7    private Integer age;
 8
 9    private String firstName;
10
11    private String lastName;
12
13    public Person() {
14    }
15
16    public Long getId() {
17    	return id;
18    }
19
20    public void setId(Long id) {
21    	this.id = id;
22    }
23
24    public Integer getAge() {
25    	return age;
26    }
27
28    public void setAge(Integer age) {
29    	this.age = age;
30    }
31
32    public String getFirstName() {
33    	return firstName;
34    }
35
36    public void setFirstName(String firstName) {
37    	this.firstName = firstName;
38    }
39
40    public String getLastName() {
41    	return lastName;
42    }
43
44    public void setLastName(String lastName) {
45    	this.lastName = lastName;
46    }
47
48    @Override
49    public String toString() {
50    	return "Person{" + "id=" + id + ", age=" + age + ", firstName='" + firstName + '\'' + ", lastName='" + lastName
51    			+ '\'' + '}';
52    }
53}
春季客服客服班级
最后一步是创建将使用上面定义的 RestTemplate 豆类的客户端类。
 1package com.journaldev.spring.config;
 2
 3import java.util.List;
 4
 5import org.springframework.http.HttpStatus;
 6
 7import com.journaldev.spring.model.Person;
 8
 9public interface PersonClient {
10    List<Person> getAllPerson();
11
12    Person getById(Long id);
13
14    HttpStatus addPerson(Person person);
15
16    void updatePerson(Person person);
17
18    void deletePerson(Long id);
19}
 1package com.journaldev.spring.config;
 2
 3import java.util.Arrays;
 4import java.util.List;
 5
 6import org.springframework.beans.factory.annotation.Autowired;
 7import org.springframework.http.HttpStatus;
 8import org.springframework.http.ResponseEntity;
 9import org.springframework.stereotype.Service;
10import org.springframework.web.client.RestTemplate;
11
12import com.journaldev.spring.model.Person;
13
14@Service
15public class PersonClientImpl implements PersonClient {
16
17    @Autowired
18    RestTemplate restTemplate;
19
20    final String ROOT_URI = "https://localhost:8080/springData/person";
21
22    public List<Person> getAllPerson() {
23    	ResponseEntity<Person[]> response = restTemplate.getForEntity(ROOT_URI, Person[].class);
24    	return Arrays.asList(response.getBody());
25
26    }
27
28    public Person getById(Long id) {
29    	ResponseEntity<Person> response = restTemplate.getForEntity(ROOT_URI + "/"+id, Person.class);
30    	return response.getBody();
31    }
32
33    public HttpStatus addPerson(Person person) {
34    	ResponseEntity<HttpStatus> response = restTemplate.postForEntity(ROOT_URI, person, HttpStatus.class);
35    	return response.getBody();
36    }
37
38    public void updatePerson(Person person) {
39    	restTemplate.put(ROOT_URI, person);
40    }
41
42    public void deletePerson(Long id) {
43    	restTemplate.delete(ROOT_URI + id);
44
45    }
46}
代码是自明的,我们正在调用基于URI和HTTP方法的RestTemplate方法,并在必要时通过适当的请求对象。
春季考验课 考验课
是时候测试我们的 Spring RestTemplate 示例项目了,下面的课堂显示了如何以 Spring 方式使用 RestTemplate 方法。
 1package com.journaldev.spring;
 2
 3import org.springframework.context.annotation.AnnotationConfigApplicationContext;
 4import org.springframework.http.HttpStatus;
 5
 6import com.journaldev.spring.config.AppConfig;
 7import com.journaldev.spring.config.PersonClient;
 8import com.journaldev.spring.model.Person;
 9
10public class Main {
11
12    public static void main(String[] args) {
13    	AnnotationConfigApplicationContext applicationContext = new AnnotationConfigApplicationContext(AppConfig.class);
14
15    	PersonClient client = applicationContext.getBean(PersonClient.class);
16
17    	System.out.println("Getting list of all people:");
18
19    	for (Person p : client.getAllPerson()) {
20    		System.out.println(p);
21    	}
22
23    	System.out.println("\nGetting person with ID 2");
24
25    	Person personById = client.getById(2L);
26
27    	System.out.println(personById);
28
29    	System.out.println("Adding a Person");
30    	Person p = new Person();
31    	p.setAge(50);
32    	p.setFirstName("David");
33    	p.setLastName("Blain");
34    	HttpStatus status = client.addPerson(p);
35    	System.out.println("Add Person Response = " + status);
36
37    	applicationContext.close();
38    }
39}
当我对本地设置运行程序时,我会跟踪输出。
1Getting list of all people:
2Person{id=2, age=30, firstName='Oksi', lastName=' Bahatskaya'}
3Person{id=1, age=30, firstName='Vlad', lastName='Mateo'}
4
5Getting person with ID 2
6Person{id=2, age=30, firstName='Oksi', lastName=' Bahatskaya'}
7Adding a Person
8Add Person Response = 201
Below image shows the web service database table data before and after executing above program. 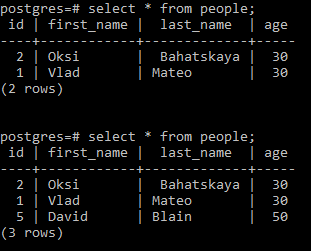 As you can see that the program output matches with the sample table data. That's all for Spring RestTemplate example, you can download the project from below link.
[下载《春季复兴示例项目》(LINK0)]
引用: API Doc