Spring is one of the most widely used Java EE frameworks. We have earlier seen how to use Spring MVC to create Java-based web applications. Today we will learn to create Spring Restful Web Services using Spring MVC and then test it out with the Rest client. In the end, we will also look into how to invoke Spring Restful web service using Spring RestTemplate API. 
春天留下
We will use Spring latest version 4.0.0.RELEASE and utilize Spring Jackson JSON integration to send JSON response in the rest call response. The tutorial is developed in Spring STS IDE for creating Spring MVC skeleton code easily and then extended to implement Restful architecture. Create a new Spring MVC Project in the STS, our final project will look like the below image. We will look into each of the components one by one. 
春季 REST 配置 XML 文件
我们的 pom.xml 文件看起来像下面。
  1<?xml version="1.0" encoding="UTF-8"?>
  2<project xmlns="https://maven.apache.org/POM/4.0.0" xmlns:xsi="https://www.w3.org/2001/XMLSchema-instance"
  3    xsi:schemaLocation="https://maven.apache.org/POM/4.0.0 https://maven.apache.org/maven-v4_0_0.xsd">
  4    <modelVersion>4.0.0</modelVersion>
  5    <groupId>com.journaldev</groupId>
  6    <artifactId>SpringRestExample</artifactId>
  7    <name>SpringRestExample</name>
  8    <packaging>war</packaging>
  9    <version>1.0.0-BUILD-SNAPSHOT</version>
 10    <properties>
 11    	<java-version>1.6</java-version>
 12    	<org.springframework-version>4.0.0.RELEASE</org.springframework-version>
 13    	<org.aspectj-version>1.7.4</org.aspectj-version>
 14    	<org.slf4j-version>1.7.5</org.slf4j-version>
 15    	<jackson.databind-version>2.2.3</jackson.databind-version>
 16    </properties>
 17    <dependencies>
 18    	<!-- Jackson -->
 19    	<dependency>
 20    		<groupId>com.fasterxml.jackson.core</groupId>
 21    		<artifactId>jackson-databind</artifactId>
 22    		<version>${jackson.databind-version}</version>
 23    	</dependency>
 24    	<!-- Spring -->
 25    	<dependency>
 26    		<groupId>org.springframework</groupId>
 27    		<artifactId>spring-context</artifactId>
 28    		<version>${org.springframework-version}</version>
 29    		<exclusions>
 30    			<!-- Exclude Commons Logging in favor of SLF4j -->
 31    			<exclusion>
 32    				<groupId>commons-logging</groupId>
 33    				<artifactId>commons-logging</artifactId>
 34    			</exclusion>
 35    		</exclusions>
 36    	</dependency>
 37    	<dependency>
 38    		<groupId>org.springframework</groupId>
 39    		<artifactId>spring-webmvc</artifactId>
 40    		<version>${org.springframework-version}</version>
 41    	</dependency>
 42
 43    	<!-- AspectJ -->
 44    	<dependency>
 45    		<groupId>org.aspectj</groupId>
 46    		<artifactId>aspectjrt</artifactId>
 47    		<version>${org.aspectj-version}</version>
 48    	</dependency>
 49
 50    	<!-- Logging -->
 51    	<dependency>
 52    		<groupId>org.slf4j</groupId>
 53    		<artifactId>slf4j-api</artifactId>
 54    		<version>${org.slf4j-version}</version>
 55    	</dependency>
 56    	<dependency>
 57    		<groupId>org.slf4j</groupId>
 58    		<artifactId>jcl-over-slf4j</artifactId>
 59    		<version>${org.slf4j-version}</version>
 60    		<scope>runtime</scope>
 61    	</dependency>
 62    	<dependency>
 63    		<groupId>org.slf4j</groupId>
 64    		<artifactId>slf4j-log4j12</artifactId>
 65    		<version>${org.slf4j-version}</version>
 66    		<scope>runtime</scope>
 67    	</dependency>
 68    	<dependency>
 69    		<groupId>log4j</groupId>
 70    		<artifactId>log4j</artifactId>
 71    		<version>1.2.15</version>
 72    		<exclusions>
 73    			<exclusion>
 74    				<groupId>javax.mail</groupId>
 75    				<artifactId>mail</artifactId>
 76    			</exclusion>
 77    			<exclusion>
 78    				<groupId>javax.jms</groupId>
 79    				<artifactId>jms</artifactId>
 80    			</exclusion>
 81    			<exclusion>
 82    				<groupId>com.sun.jdmk</groupId>
 83    				<artifactId>jmxtools</artifactId>
 84    			</exclusion>
 85    			<exclusion>
 86    				<groupId>com.sun.jmx</groupId>
 87    				<artifactId>jmxri</artifactId>
 88    			</exclusion>
 89    		</exclusions>
 90    		<scope>runtime</scope>
 91    	</dependency>
 92
 93    	<!-- @Inject -->
 94    	<dependency>
 95    		<groupId>javax.inject</groupId>
 96    		<artifactId>javax.inject</artifactId>
 97    		<version>1</version>
 98    	</dependency>
 99
100    	<!-- Servlet -->
101    	<dependency>
102    		<groupId>javax.servlet</groupId>
103    		<artifactId>servlet-api</artifactId>
104    		<version>2.5</version>
105    		<scope>provided</scope>
106    	</dependency>
107    	<dependency>
108    		<groupId>javax.servlet.jsp</groupId>
109    		<artifactId>jsp-api</artifactId>
110    		<version>2.1</version>
111    		<scope>provided</scope>
112    	</dependency>
113    	<dependency>
114    		<groupId>javax.servlet</groupId>
115    		<artifactId>jstl</artifactId>
116    		<version>1.2</version>
117    	</dependency>
118
119    	<!-- Test -->
120    	<dependency>
121    		<groupId>junit</groupId>
122    		<artifactId>junit</artifactId>
123    		<version>4.7</version>
124    		<scope>test</scope>
125    	</dependency>
126    </dependencies>
127    <build>
128    	<plugins>
129    		<plugin>
130    			<artifactId>maven-eclipse-plugin</artifactId>
131    			<version>2.9</version>
132    			<configuration>
133    				<additionalProjectnatures>
134    					<projectnature>org.springframework.ide.eclipse.core.springnature</projectnature>
135    				</additionalProjectnatures>
136    				<additionalBuildcommands>
137    					<buildcommand>org.springframework.ide.eclipse.core.springbuilder</buildcommand>
138    				</additionalBuildcommands>
139    				<downloadSources>true</downloadSources>
140    				<downloadJavadocs>true</downloadJavadocs>
141    			</configuration>
142    		</plugin>
143    		<plugin>
144    			<groupId>org.apache.maven.plugins</groupId>
145    			<artifactId>maven-compiler-plugin</artifactId>
146    			<version>2.5.1</version>
147    			<configuration>
148    				<source>1.6</source>
149    				<target>1.6</target>
150    				<compilerArgument>-Xlint:all</compilerArgument>
151    				<showWarnings>true</showWarnings>
152    				<showDeprecation>true</showDeprecation>
153    			</configuration>
154    		</plugin>
155    		<plugin>
156    			<groupId>org.codehaus.mojo</groupId>
157    			<artifactId>exec-maven-plugin</artifactId>
158    			<version>1.2.1</version>
159    			<configuration>
160    				<mainClass>org.test.int1.Main</mainClass>
161    			</configuration>
162    		</plugin>
163    	</plugins>
164
165    </build>
166</project>
STS 工具为我们生成 pom.xml 文件. 然而,我已经更新了 Spring Framework, AspectJ, SLF4J 和 Jackson 版本到今天的最新版本。 大部分是常见的和自动生成的,重要的是要注意的是,我已经在依赖中添加了 Jackson JSON 库,因为我们将使用它来将对象转换为 JSON 和相反。
 1<?xml version="1.0" encoding="UTF-8"?>
 2<web-app version="2.5" xmlns="https://java.sun.com/xml/ns/javaee"
 3    xmlns:xsi="https://www.w3.org/2001/XMLSchema-instance"
 4    xsi:schemaLocation="https://java.sun.com/xml/ns/javaee https://java.sun.com/xml/ns/javaee/web-app_2_5.xsd">
 5
 6    <!-- The definition of the Root Spring Container shared by all Servlets and Filters -->
 7    <context-param>
 8    	<param-name>contextConfigLocation</param-name>
 9    	<param-value>/WEB-INF/spring/root-context.xml</param-value>
10    </context-param>
11
12    <!-- Creates the Spring Container shared by all Servlets and Filters -->
13    <listener>
14    	<listener-class>org.springframework.web.context.ContextLoaderListener</listener-class>
15    </listener>
16
17    <!-- Processes application requests -->
18    <servlet>
19    	<servlet-name>appServlet</servlet-name>
20    	<servlet-class>org.springframework.web.servlet.DispatcherServlet</servlet-class>
21    	<init-param>
22    		<param-name>contextConfigLocation</param-name>
23    		<param-value>/WEB-INF/spring/appServlet/servlet-context.xml</param-value>
24    	</init-param>
25    	<load-on-startup>1</load-on-startup>
26    </servlet>
27
28    <servlet-mapping>
29    	<servlet-name>appServlet</servlet-name>
30    	<url-pattern>/</url-pattern>
31    </servlet-mapping>
32
33</web-app>
这个文件是自动生成的,我没有改变任何东西,但是,如果你想更改背景配置文件及其位置,你可以在web.xml文件中。
1<?xml version="1.0" encoding="UTF-8"?>
2<beans xmlns="https://www.springframework.org/schema/beans"
3    xmlns:xsi="https://www.w3.org/2001/XMLSchema-instance"
4    xsi:schemaLocation="https://www.springframework.org/schema/beans https://www.springframework.org/schema/beans/spring-beans.xsd">
5
6    <!-- Root Context: defines shared resources visible to all other web components -->
7
8</beans>
此文件包含共享的资源,将可见于所有 Web 组件,我们将开发一个简单的休息服务,这就是为什么我在这里没有改变任何东西。
 1<?xml version="1.0" encoding="UTF-8"?>
 2<beans:beans xmlns="https://www.springframework.org/schema/mvc"
 3    xmlns:xsi="https://www.w3.org/2001/XMLSchema-instance"
 4    xmlns:beans="https://www.springframework.org/schema/beans"
 5    xmlns:context="https://www.springframework.org/schema/context"
 6    xsi:schemaLocation="https://www.springframework.org/schema/mvc https://www.springframework.org/schema/mvc/spring-mvc.xsd
 7    	https://www.springframework.org/schema/beans https://www.springframework.org/schema/beans/spring-beans.xsd
 8    	https://www.springframework.org/schema/context https://www.springframework.org/schema/context/spring-context.xsd">
 9
10    <!-- DispatcherServlet Context: defines this servlet's request-processing infrastructure -->
11
12    <!-- Enables the Spring MVC @Controller programming model -->
13    <annotation-driven />
14
15    <!-- Handles HTTP GET requests for /resources/** by efficiently serving up static resources in the ${webappRoot}/resources directory -->
16    <resources mapping="/resources/**" location="/resources/" />
17
18    <!-- Resolves views selected for rendering by @Controllers to .jsp resources in the /WEB-INF/views directory -->
19    <beans:bean class="org.springframework.web.servlet.view.InternalResourceViewResolver">
20    	<beans:property name="prefix" value="/WEB-INF/views/" />
21    	<beans:property name="suffix" value=".jsp" />
22    </beans:bean>
23
24    <!-- Configure to plugin JSON as request and response in method handler -->
25    <beans:bean class="org.springframework.web.servlet.mvc.method.annotation.RequestMappingHandlerAdapter">
26    	<beans:property name="messageConverters">
27    		<beans:list>
28    			<beans:ref bean="jsonMessageConverter"/>
29    		</beans:list>
30    	</beans:property>
31    </beans:bean>
32
33    <!-- Configure bean to convert JSON to POJO and vice versa -->
34    <beans:bean id="jsonMessageConverter" class="org.springframework.http.converter.json.MappingJackson2HttpMessageConverter">
35    </beans:bean>
36
37    <context:component-scan base-package="com.journaldev.spring.controller" />
38
39</beans:beans>
大多数部分是自动生成的,包含锅炉板配置,但是要注意的重要点是 annotation-driven元素,以支持注释为基础的配置和插入在MappingJackson2HttpMessageConverter到RequestMappingHandlerAdapter的messageConverters,以便杰克逊的API启动并将JSON转换为Java Beans,反之亦然。
春天留下模型类
让我们写一个简单的POJO类,它将作为我们的安静的Web服务方法的输入和输出。
 1package com.journaldev.spring.model;
 2
 3import java.io.Serializable;
 4import java.util.Date;
 5
 6import com.fasterxml.jackson.databind.annotation.JsonSerialize;
 7import com.fasterxml.jackson.databind.ser.std.DateSerializer;
 8
 9public class Employee implements Serializable{
10
11    private static final long serialVersionUID = -7788619177798333712L;
12
13    private int id;
14    private String name;
15    private Date createdDate;
16
17    public int getId() {
18    	return id;
19    }
20    public void setId(int id) {
21    	this.id = id;
22    }
23    public String getName() {
24    	return name;
25    }
26    public void setName(String name) {
27    	this.name = name;
28    }
29
30    @JsonSerialize(using=DateSerializer.class)
31    public Date getCreatedDate() {
32    	return createdDate;
33    }
34    public void setCreatedDate(Date createdDate) {
35    	this.createdDate = createdDate;
36    }
37
38
39}
唯一重要的一点是使用@JsonSerialize注释来使用DateSerializer类来从Java类型转换到JSON格式,反之亦然。
春季安静的网页服务终点
我们将有以下休息网站服务终端。
百度 百度 百度 百度 百度 百度 百度 百度 百度 百度 百度 百度 百度 百度 百度 百度 百度 百度 百度 百度 百度 百度 百度 百度 百度 百度 百度 百度 百度 百度 百度 百度
我们有一个类,将所有这些 URI 定义为 String 常数。
 1package com.journaldev.spring.controller;
 2
 3public class EmpRestURIConstants {
 4
 5    public static final String DUMMY_EMP = "/rest/emp/dummy";
 6    public static final String GET_EMP = "/rest/emp/{id}";
 7    public static final String GET_ALL_EMP = "/rest/emps";
 8    public static final String CREATE_EMP = "/rest/emp/create";
 9    public static final String DELETE_EMP = "/rest/emp/delete/{id}";
10}
春季安静的Web服务控制器类
我们的 EmployeeController 类将发布上述所有 Web 服务端点,让我们看看该类的代码,然后我们将详细了解每个方法。
 1package com.journaldev.spring.controller;
 2
 3import java.util.ArrayList;
 4import java.util.Date;
 5import java.util.HashMap;
 6import java.util.List;
 7import java.util.Map;
 8import java.util.Set;
 9
10import org.slf4j.Logger;
11import org.slf4j.LoggerFactory;
12import org.springframework.stereotype.Controller;
13import org.springframework.web.bind.annotation.PathVariable;
14import org.springframework.web.bind.annotation.RequestBody;
15import org.springframework.web.bind.annotation.RequestMapping;
16import org.springframework.web.bind.annotation.RequestMethod;
17import org.springframework.web.bind.annotation.ResponseBody;
18
19import com.journaldev.spring.model.Employee;
20
21/**
22 * Handles requests for the Employee service.
23 */
24@Controller
25public class EmployeeController {
26
27    private static final Logger logger = LoggerFactory.getLogger(EmployeeController.class);
28
29    //Map to store employees, ideally we should use database
30    Map<Integer, Employee> empData = new HashMap<Integer, Employee>();
31
32    @RequestMapping(value = EmpRestURIConstants.DUMMY_EMP, method = RequestMethod.GET)
33    public @ResponseBody Employee getDummyEmployee() {
34    	logger.info("Start getDummyEmployee");
35    	Employee emp = new Employee();
36    	emp.setId(9999);
37    	emp.setName("Dummy");
38    	emp.setCreatedDate(new Date());
39    	empData.put(9999, emp);
40    	return emp;
41    }
42
43    @RequestMapping(value = EmpRestURIConstants.GET_EMP, method = RequestMethod.GET)
44    public @ResponseBody Employee getEmployee(@PathVariable("id") int empId) {
45    	logger.info("Start getEmployee. ID="+empId);
46
47    	return empData.get(empId);
48    }
49
50    @RequestMapping(value = EmpRestURIConstants.GET_ALL_EMP, method = RequestMethod.GET)
51    public @ResponseBody List<Employee> getAllEmployees() {
52    	logger.info("Start getAllEmployees.");
53    	List<Employee> emps = new ArrayList<Employee>();
54    	Set<Integer> empIdKeys = empData.keySet();
55    	for(Integer i : empIdKeys){
56    		emps.add(empData.get(i));
57    	}
58    	return emps;
59    }
60
61    @RequestMapping(value = EmpRestURIConstants.CREATE_EMP, method = RequestMethod.POST)
62    public @ResponseBody Employee createEmployee(@RequestBody Employee emp) {
63    	logger.info("Start createEmployee.");
64    	emp.setCreatedDate(new Date());
65    	empData.put(emp.getId(), emp);
66    	return emp;
67    }
68
69    @RequestMapping(value = EmpRestURIConstants.DELETE_EMP, method = RequestMethod.PUT)
70    public @ResponseBody Employee deleteEmployee(@PathVariable("id") int empId) {
71    	logger.info("Start deleteEmployee.");
72    	Employee emp = empData.get(empId);
73    	empData.remove(empId);
74    	return emp;
75    }
76
77}
For simplicity, I am storing all the employee's data in the HashMap empData. @RequestMapping annotation is used to map the request URI to the handler method. We can also specify the HTTP method that should be used by client application to invoke the rest method. @ResponseBody annotation is used to map the response object in the response body. Once the response object is returned by the handler method, MappingJackson2HttpMessageConverter kicks in and convert it to JSON response. @PathVariable annotation is the easy way to extract the data from the rest URI and map it to the method argument. @RequestBody annotation is used to map the request body JSON data into the Employee object, again this is done by the MappingJackson2HttpMessageConverter mapping. Rest of the code is simple and self-understood, our application is ready for deployment and testing. Just export as WAR file and copy it in the servlet container web app directory. If you have the server configured in the STS, you can simply run it on the server to get it deployed. I am using WizTools RestClient to invoke the rest calls but you can also use Chrome extension Postman. Below screenshots shows the different invocations of the rest APIs exposed by our application and it's output. Health Check - Get Dummy Employee Rest Call 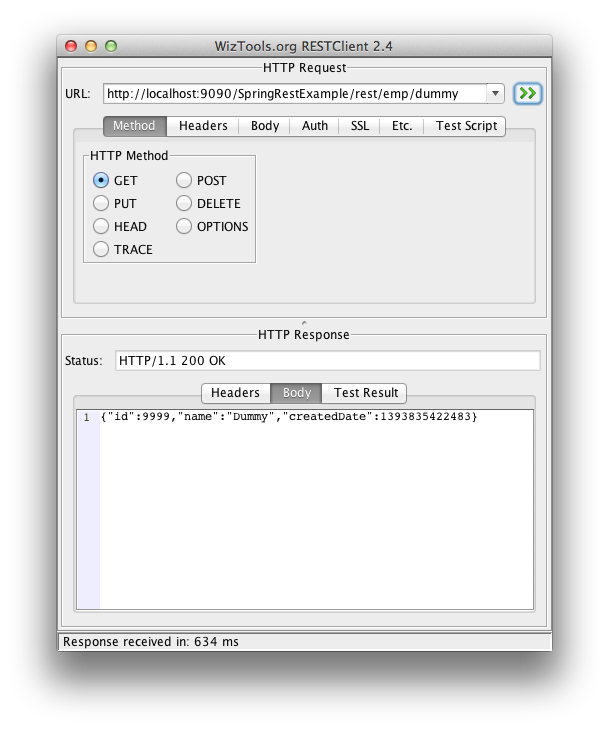 Create Employee POST Rest Call: Make sure request Content-Type is set to "application/json" otherwise you will get HTTP Error Code 415.
 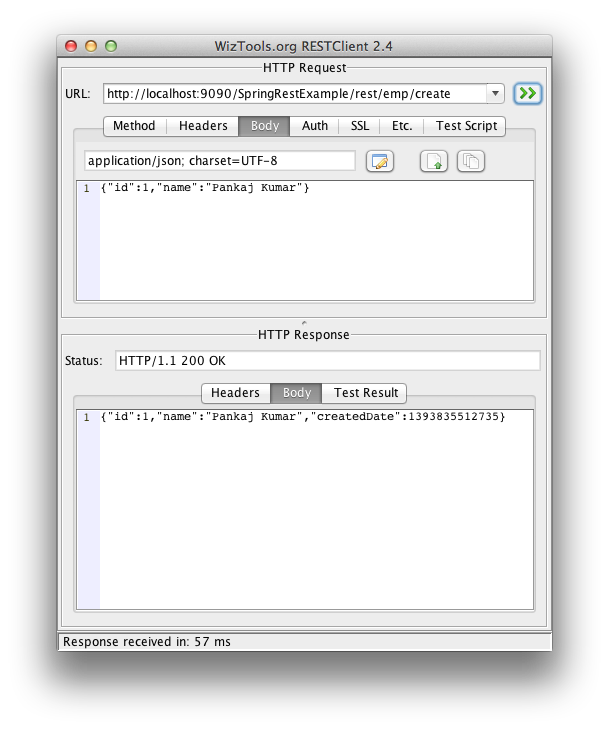 Get Employee Rest Call
  Delete Employee Rest Call
 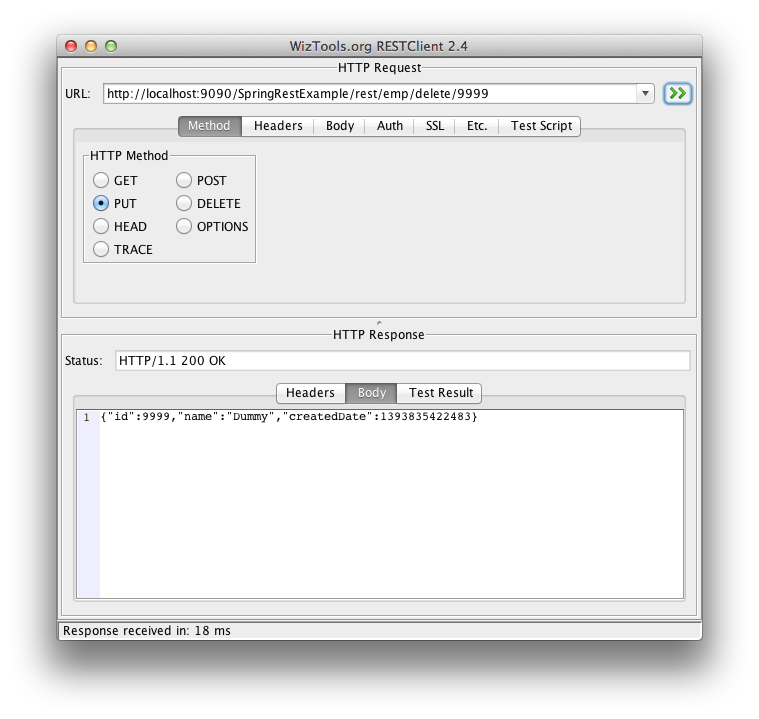 Get All Employees Rest Call
春季休息客户端计划
休息客户很擅长测试我们的休息网页服务,但大多数时候,我们需要通过我们的程序召唤休息服务。我们可以使用Spring‘RestTemplate’来轻松召唤这些方法。
 1package com.journaldev.spring;
 2
 3import java.util.LinkedHashMap;
 4import java.util.List;
 5
 6import org.springframework.web.client.RestTemplate;
 7
 8import com.journaldev.spring.controller.EmpRestURIConstants;
 9import com.journaldev.spring.model.Employee;
10
11public class TestSpringRestExample {
12
13    public static final String SERVER_URI = "https://localhost:9090/SpringRestExample";
14
15    public static void main(String args[]){
16
17    	testGetDummyEmployee();
18    	System.out.println("*****");
19    	testCreateEmployee();
20    	System.out.println("*****");
21    	testGetEmployee();
22    	System.out.println("*****");
23    	testGetAllEmployee();
24    }
25
26    private static void testGetAllEmployee() {
27    	RestTemplate restTemplate = new RestTemplate();
28    	//we can't get List<Employee> because JSON convertor doesn't know the type of
29    	//object in the list and hence convert it to default JSON object type LinkedHashMap
30    	List<LinkedHashMap> emps = restTemplate.getForObject(SERVER_URI+EmpRestURIConstants.GET_ALL_EMP, List.class);
31    	System.out.println(emps.size());
32    	for(LinkedHashMap map : emps){
33    		System.out.println("ID="+map.get("id")+",Name="+map.get("name")+",CreatedDate="+map.get("createdDate"));;
34    	}
35    }
36
37    private static void testCreateEmployee() {
38    	RestTemplate restTemplate = new RestTemplate();
39    	Employee emp = new Employee();
40    	emp.setId(1);emp.setName("Pankaj Kumar");
41    	Employee response = restTemplate.postForObject(SERVER_URI+EmpRestURIConstants.CREATE_EMP, emp, Employee.class);
42    	printEmpData(response);
43    }
44
45    private static void testGetEmployee() {
46    	RestTemplate restTemplate = new RestTemplate();
47    	Employee emp = restTemplate.getForObject(SERVER_URI+"/rest/emp/1", Employee.class);
48    	printEmpData(emp);
49    }
50
51    private static void testGetDummyEmployee() {
52    	RestTemplate restTemplate = new RestTemplate();
53    	Employee emp = restTemplate.getForObject(SERVER_URI+EmpRestURIConstants.DUMMY_EMP, Employee.class);
54    	printEmpData(emp);
55    }
56
57    public static void printEmpData(Employee emp){
58    	System.out.println("ID="+emp.getId()+",Name="+emp.getName()+",CreatedDate="+emp.getCreatedDate());
59    }
60}
大多数程序都很容易理解,但是当我们调用休息方法返回集合时,我们需要使用LinkedHashMap,因为JSON对对象转换不知道员工对象,并将其转换为LinkedHashMap集合。
1ID=9999,Name=Dummy,CreatedDate=Tue Mar 04 21:02:41 PST 2014
2*****
3ID=1,Name=Pankaj Kumar,CreatedDate=Tue Mar 04 21:02:41 PST 2014
4*****
5ID=1,Name=Pankaj Kumar,CreatedDate=Tue Mar 04 21:02:41 PST 2014
6*****
72
8ID=1,Name=Pankaj Kumar,CreatedDate=1393995761654
9ID=9999,Name=Dummy,CreatedDate=1393995761381
另一个问题是,‘RestTemplate’放置方法没有设置响应对象的选项,因为PUT方法应该用于存储在服务器上的东西,而一个简单的HTTP 200状态代码就足够了。
[下载《春季复兴的网站服务项目》(LINK0)]
下载上面的链接的样本项目,并与它一起玩,以了解更多。 UPDATE:由于有很多请求提供类似的示例与XML以及支持XML和JSON,我已经扩展了这个应用程序在(/社区/教程/春休-xml-and-json-例)支持XML和JSON请求和响应。
您可以从我们的 GitHub 存储库下载完整的项目。