在本春季MVC教程中,我们将学习如何使用Spring Tool Suite开发春季MVCWeb应用程序。 **春季MVC框架广泛用于JavaWeb应用程序(/社区/教程/java-web-application-tutorial-for-beginnersJavaWeb Application Tutorial for Beginners)。
MVC 春天
 Just like Struts Framework, Spring MVC is also based on Java EE Servlet and JSP technologies and implement Model-View-Controller design pattern.
春季MVC教程
我们之前已经看到了 [春季依赖注射]( / 社区 / 教程 / 春季依赖注射春季依赖注射示例与注释和XML配置)的工作,在本教程中我们将学习如何使用春季MVC框架创建一个简单的Web应用程序。我们可以使用Eclipse或IntelliJ IDE用于春季项目开发,但SpringSource提供 **春季工具套件(STS)**这是基于Eclipse的IDE,并配备了内置的 VMware vFabric tc Server是建立在Apache Tomcat容器上,并优化为春季应用程序。
在这个春季MVC教程中,我们将很快看到创建一个春季MVC项目是多么容易 *提供创建春季配置文件、解析配置文件和类等有用的功能,以提供有关它们的有用的信息 *春季应用程序的自动验证 *重构支持轻松地进行项目更改,更改也反映在配置文件中 *不仅对类,而且对配置文件的代码支持,我喜欢这个功能很多,因为我们大多数时候需要知道我们可以使用什么和它的细节
Looking at all the features STS provide, I was sold for this and decided to use it for Spring application and till now I am very happy with it. Just Download the STS from STS Official Download Page and install it. I am using STS 3.4.0.RELEASE that is based on Eclipse 4.3.1 release.  If you don't want to use STS and want to get its facilities in existing Eclipse, then you need to install its plugin from Eclipse Marketplace. Use below image as a reference and make sure to chose the correct STS version for installation. Below plugin is good for Eclipse Kepler.
  If you don't want to use SpringSource server, you can deploy the application in any other Java EE container such as Tomcat, JBoss etc. For this tutorial, I will use the server that ships with STS but I have tested the application by exporting it as WAR file into separate tomcat server and it's working fine. Now that our server environment and IDE is ready, let's proceed to create our first Spring MVC project. Below steps are valid for STS as well as Eclipse with STS plugins.
在 STS 或 Eclipse 中创建 Spring MVC 应用程序
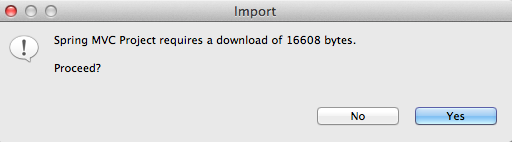
Step 1: Create New Spring Project from the menu.  Step 2: In the new project window, give the name as "SpringMVCExample" and chose template as "Spring MVC Project". If you are using this template for the first time, STS will download it from SpringSource website. If you want, you can add the project to any working set.
 Step 3: When the template is downloaded, in the next screen you need to provide the top-level package name. This package will be used as the base-package for Spring components.
  Step 4: Once the project is created by Spring MVC template, it will look like below image.
  Don't worry if you don't see User.java class, login.jsp and user.jsp files, they have been added by me later on. If your project is not compiled and you see some errors, run Maven/Update Project. Make sure to check the "Force update of Snapshots/Releases" options, refer below image.
  Overall project looks just like any other maven based web application with some Spring configuration files. Now it's time to analyze the different part of the projects and extend it a little.
春季MVC依赖
我們生成的 pom.xml 檔案看起來如下。
  1<?xml version="1.0" encoding="UTF-8"?>
  2<project xmlns="https://maven.apache.org/POM/4.0.0" xmlns:xsi="https://www.w3.org/2001/XMLSchema-instance"
  3    xsi:schemaLocation="https://maven.apache.org/POM/4.0.0 https://maven.apache.org/maven-v4_0_0.xsd">
  4    <modelVersion>4.0.0</modelVersion>
  5    <groupId>com.journaldev</groupId>
  6    <artifactId>SpringMVCExample</artifactId>
  7    <name>SpringMVCExample</name>
  8    <packaging>war</packaging>
  9    <version>1.0.0-BUILD-SNAPSHOT</version>
 10    <properties>
 11    	<java-version>1.6</java-version>
 12    	<org.springframework-version>4.0.0.RELEASE</org.springframework-version>
 13    	<org.aspectj-version>1.7.4</org.aspectj-version>
 14    	<org.slf4j-version>1.7.5</org.slf4j-version>
 15    </properties>
 16    <dependencies>
 17    	<!-- Spring -->
 18    	<dependency>
 19    		<groupId>org.springframework</groupId>
 20    		<artifactId>spring-context</artifactId>
 21    		<version>${org.springframework-version}</version>
 22    		<exclusions>
 23    			<!-- Exclude Commons Logging in favor of SLF4j -->
 24    			<exclusion>
 25    				<groupId>commons-logging</groupId>
 26    				<artifactId>commons-logging</artifactId>
 27    			 </exclusion>
 28    		</exclusions>
 29    	</dependency>
 30    	<dependency>
 31    		<groupId>org.springframework</groupId>
 32    		<artifactId>spring-webmvc</artifactId>
 33    		<version>${org.springframework-version}</version>
 34    	</dependency>
 35
 36    	<!-- AspectJ -->
 37    	<dependency>
 38    		<groupId>org.aspectj</groupId>
 39    		<artifactId>aspectjrt</artifactId>
 40    		<version>${org.aspectj-version}</version>
 41    	</dependency>
 42
 43    	<!-- Logging -->
 44    	<dependency>
 45    		<groupId>org.slf4j</groupId>
 46    		<artifactId>slf4j-api</artifactId>
 47    		<version>${org.slf4j-version}</version>
 48    	</dependency>
 49    	<dependency>
 50    		<groupId>org.slf4j</groupId>
 51    		<artifactId>jcl-over-slf4j</artifactId>
 52    		<version>${org.slf4j-version}</version>
 53    		<scope>runtime</scope>
 54    	</dependency>
 55    	<dependency>
 56    		<groupId>org.slf4j</groupId>
 57    		<artifactId>slf4j-log4j12</artifactId>
 58    		<version>${org.slf4j-version}</version>
 59    		<scope>runtime</scope>
 60    	</dependency>
 61    	<dependency>
 62    		<groupId>log4j</groupId>
 63    		<artifactId>log4j</artifactId>
 64    		<version>1.2.15</version>
 65    		<exclusions>
 66    			<exclusion>
 67    				<groupId>javax.mail</groupId>
 68    				<artifactId>mail</artifactId>
 69    			</exclusion>
 70    			<exclusion>
 71    				<groupId>javax.jms</groupId>
 72    				<artifactId>jms</artifactId>
 73    			</exclusion>
 74    			<exclusion>
 75    				<groupId>com.sun.jdmk</groupId>
 76    				<artifactId>jmxtools</artifactId>
 77    			</exclusion>
 78    			<exclusion>
 79    				<groupId>com.sun.jmx</groupId>
 80    				<artifactId>jmxri</artifactId>
 81    			</exclusion>
 82    		</exclusions>
 83    		<scope>runtime</scope>
 84    	</dependency>
 85
 86    	<!-- @Inject -->
 87    	<dependency>
 88    		<groupId>javax.inject</groupId>
 89    		<artifactId>javax.inject</artifactId>
 90    		<version>1</version>
 91    	</dependency>
 92
 93    	<!-- Servlet -->
 94    	<dependency>
 95    		<groupId>javax.servlet</groupId>
 96    		<artifactId>servlet-api</artifactId>
 97    		<version>2.5</version>
 98    		<scope>provided</scope>
 99    	</dependency>
100    	<dependency>
101    		<groupId>javax.servlet.jsp</groupId>
102    		<artifactId>jsp-api</artifactId>
103    		<version>2.1</version>
104    		<scope>provided</scope>
105    	</dependency>
106    	<dependency>
107    		<groupId>javax.servlet</groupId>
108    		<artifactId>jstl</artifactId>
109    		<version>1.2</version>
110    	</dependency>
111
112    	<!-- Test -->
113    	<dependency>
114    		<groupId>junit</groupId>
115    		<artifactId>junit</artifactId>
116    		<version>4.7</version>
117    		<scope>test</scope>
118    	</dependency>
119    </dependencies>
120    <build>
121        <plugins>
122            <plugin>
123                <artifactId>maven-eclipse-plugin</artifactId>
124                <version>2.9</version>
125                <configuration>
126                    <additionalProjectnatures>
127                        <projectnature>org.springframework.ide.eclipse.core.springnature</projectnature>
128                    </additionalProjectnatures>
129                    <additionalBuildcommands>
130                        <buildcommand>org.springframework.ide.eclipse.core.springbuilder</buildcommand>
131                    </additionalBuildcommands>
132                    <downloadSources>true</downloadSources>
133                    <downloadJavadocs>true</downloadJavadocs>
134                </configuration>
135            </plugin>
136            <plugin>
137                <groupId>org.apache.maven.plugins</groupId>
138                <artifactId>maven-compiler-plugin</artifactId>
139                <version>2.5.1</version>
140                <configuration>
141                    <source>1.6</source>
142                    <target>1.6</target>
143                    <compilerArgument>-Xlint:all</compilerArgument>
144                    <showWarnings>true</showWarnings>
145                    <showDeprecation>true</showDeprecation>
146                </configuration>
147            </plugin>
148            <plugin>
149                <groupId>org.codehaus.mojo</groupId>
150                <artifactId>exec-maven-plugin</artifactId>
151                <version>1.2.1</version>
152                <configuration>
153                    <mainClass>org.test.int1.Main</mainClass>
154                </configuration>
155            </plugin>
156        </plugins>
157    </build>
158</project>
artifactId 将是 Web 应用程序的 servlet 背景,所以你可以改变它,如果你想要其他东西. 对于 Spring Framework, AspectJ 和 SLF4j 版本,有很少的定义属性,我发现它们不反映最新的版本,所以我从今天开始将它们更改为最新的稳定版本。
- 春季背景:春季核心依赖. 请注意排除通用日志用于SLF4J *春季webmvc:春季文物用于MVC支持
- aspectjrt: AspectJ API参考 *SLF4J和Log4j:用于日志目的,春季非常容易为log4j或Java Logging API(/community/tutorials/logger-in-java-logging-example "Java Logging API Tutorial - 日志级别,处理器,格式和过滤器的示例")因SLF4J集成( *) javax.inject - JSR330 API for dependency injection(MBRK1)
有一些其他依赖性添加了,例如Servlet、JSP、JSTL 和 JUnit API,但对于初始应用程序,我们可以忽略它们。
春季MVC教程 - Log4j配置
生成的 log4j.xml 文件看起来像下面。
 1<?xml version="1.0" encoding="UTF-8"?>
 2<!DOCTYPE log4j:configuration PUBLIC "-//APACHE//DTD LOG4J 1.2//EN" "log4j.dtd">
 3<log4j:configuration xmlns:log4j="https://jakarta.apache.org/log4j/">
 4
 5    <!-- Appenders -->
 6    <appender name="console" class="org.apache.log4j.ConsoleAppender">
 7    	<param name="Target" value="System.out" />
 8    	<layout class="org.apache.log4j.PatternLayout">
 9    		<param name="ConversionPattern" value="%-5p: %c - %m%n" />
10    	</layout>
11    </appender>
12
13    <!-- Application Loggers -->
14    <logger name="com.journaldev.spring">
15    	<level value="info" />
16    </logger>
17
18    <!-- 3rdparty Loggers -->
19    <logger name="org.springframework.core">
20    	<level value="info" />
21    </logger>
22
23    <logger name="org.springframework.beans">
24    	<level value="info" />
25    </logger>
26
27    <logger name="org.springframework.context">
28    	<level value="info" />
29    </logger>
30
31    <logger name="org.springframework.web">
32    	<level value="info" />
33    </logger>
34
35    <!-- Root Logger -->
36    <root>
37    	<priority value="warn" />
38    	<appender-ref ref="console" />
39    </root>
40
41</log4j:configuration>
请注意,它打印了一切到控制台,我们可以很容易地添加附件来重定向日志到文件。
春季MVC教程 - 部署描述器配置
让我们看看我们的 web.xml 并分析它。
 1<?xml version="1.0" encoding="UTF-8"?>
 2<web-app version="2.5" xmlns="https://java.sun.com/xml/ns/javaee"
 3    xmlns:xsi="https://www.w3.org/2001/XMLSchema-instance"
 4    xsi:schemaLocation="https://java.sun.com/xml/ns/javaee https://java.sun.com/xml/ns/javaee/web-app_2_5.xsd">
 5
 6    <!-- The definition of the Root Spring Container shared by all Servlets and Filters -->
 7    <context-param>
 8    	<param-name>contextConfigLocation</param-name>
 9    	<param-value>/WEB-INF/spring/root-context.xml</param-value>
10    </context-param>
11
12    <!-- Creates the Spring Container shared by all Servlets and Filters -->
13    <listener>
14    	<listener-class>org.springframework.web.context.ContextLoaderListener</listener-class>
15    </listener>
16
17    <!-- Processes application requests -->
18    <servlet>
19    	<servlet-name>appServlet</servlet-name>
20    	<servlet-class>org.springframework.web.servlet.DispatcherServlet</servlet-class>
21    	<init-param>
22    		<param-name>contextConfigLocation</param-name>
23    		<param-value>/WEB-INF/spring/appServlet/servlet-context.xml</param-value>
24    	</init-param>
25    	<load-on-startup>1</load-on-startup>
26    </servlet>
27
28    <servlet-mapping>
29    	<servlet-name>appServlet</servlet-name>
30    	<url-pattern>/</url-pattern>
31    </servlet-mapping>
32
33</web-app>
ContextLoaderListener将ApplicationContext生命周期连接到ServletContext生命周期,并自动创建ApplicationContext。ApplicationContext是 Spring 豆的位置,我们可以通过 contextConfigLocation 背景参数提供它的配置。 root-context.xml 文件提供了 WebApplicationContext 的配置细节。
春季MVC教程 - 配置文件
root-context.xml 文件:
1<?xml version="1.0" encoding="UTF-8"?>
2<beans xmlns="https://www.springframework.org/schema/beans"
3    xmlns:xsi="https://www.w3.org/2001/XMLSchema-instance"
4    xsi:schemaLocation="https://www.springframework.org/schema/beans https://www.springframework.org/schema/beans/spring-beans.xsd">
5
6    <!-- Root Context: defines shared resources visible to all other web components -->
7
8</beans>
我们可以在这里定义共享豆,从现在开始,它没有任何东西。 servlet-context.xml代码:
 1<?xml version="1.0" encoding="UTF-8"?>
 2<beans:beans xmlns="https://www.springframework.org/schema/mvc"
 3    xmlns:xsi="https://www.w3.org/2001/XMLSchema-instance"
 4    xmlns:beans="https://www.springframework.org/schema/beans"
 5    xmlns:context="https://www.springframework.org/schema/context"
 6    xsi:schemaLocation="https://www.springframework.org/schema/mvc https://www.springframework.org/schema/mvc/spring-mvc.xsd
 7    	https://www.springframework.org/schema/beans https://www.springframework.org/schema/beans/spring-beans.xsd
 8    	https://www.springframework.org/schema/context https://www.springframework.org/schema/context/spring-context.xsd">
 9
10    <!-- DispatcherServlet Context: defines this servlet's request-processing infrastructure -->
11
12    <!-- Enables the Spring MVC @Controller programming model -->
13    <annotation-driven />
14
15    <!-- Handles HTTP GET requests for /resources/** by efficiently serving up static resources in the ${webappRoot}/resources directory -->
16    <resources mapping="/resources/**" location="/resources/" />
17
18    <!-- Resolves views selected for rendering by @Controllers to .jsp resources in the /WEB-INF/views directory -->
19    <beans:bean class="org.springframework.web.servlet.view.InternalResourceViewResolver">
20    	<beans:property name="prefix" value="/WEB-INF/views/" />
21    	<beans:property name="suffix" value=".jsp" />
22    </beans:bean>
23
24    <context:component-scan base-package="com.journaldev.spring" />
25
26</beans:beans>
这是标准的春季配置文件的样子,只是想象写下所有这些自己,你会开始喜欢STS工具。 annotation-driven 元素被用来让控制器服务器知道注释将用于豆类配置。 resources 元素定义了我们可以放置像图像,HTML页面等静态文件的位置,我们不希望通过春季框架。 InternalResourceViewResolver 是视图解决器,我们可以通过前缀和补充属性提供视图页面位置。
春季MVC控制器类
HomeController 是用 home() 方法自动创建的,虽然我通过添加 loginPage() 和 login() 方法来稍微扩展了它。
 1package com.journaldev.spring;
 2
 3import java.text.DateFormat;
 4import java.util.Date;
 5import java.util.Locale;
 6
 7import org.slf4j.Logger;
 8import org.slf4j.LoggerFactory;
 9import org.springframework.stereotype.Controller;
10import org.springframework.ui.Model;
11import org.springframework.validation.annotation.Validated;
12import org.springframework.web.bind.annotation.RequestMapping;
13import org.springframework.web.bind.annotation.RequestMethod;
14
15/**
16 * Handles requests for the application home page.
17 */
18@Controller
19public class HomeController {
20
21    private static final Logger logger = LoggerFactory.getLogger(HomeController.class);
22
23    /**
24     * Simply selects the home view to render by returning its name.
25     */
26    @RequestMapping(value = "/", method = RequestMethod.GET)
27    public String home(Locale locale, Model model) {
28    	logger.info("Welcome home! The client locale is {}.", locale);
29
30    	Date date = new Date();
31    	DateFormat dateFormat = DateFormat.getDateTimeInstance(DateFormat.LONG, DateFormat.LONG, locale);
32
33    	String formattedDate = dateFormat.format(date);
34
35    	model.addAttribute("serverTime", formattedDate );
36
37    	return "home";
38    }
39
40    @RequestMapping(value = "/login", method = RequestMethod.GET)
41    public String loginPage(Locale locale, Model model) {
42    	return "login";
43    }
44
45    @RequestMapping(value = "/home", method = RequestMethod.POST)
46    public String login(@Validated User user, Model model) {
47    	model.addAttribute("userName", user.getUserName());
48    	return "user";
49    }
50}
@Controller 注释被用来表示它是一个 Web 控制器类别。 @RequestMapping 被用来与类和方法一起将客户端请求重定向到特定处理方法。 请注意,处理方法返回 String,这应该是视图页面的名称作为响应。 正如您可以看到的,我们有三种方法返回不同的字符串,所以我们需要创建具有相同名称的 JSP 页面。 请注意,login() 方法将被称为 HTTP 方法作为 POST,所以我们在这里预计一些表单数据。 因此,我们有一个用户模型类别,它被标记用于验证使用 @Validated 注释。 每个方法都包含模型作为一个论点,我们可以设置属性用于后面的 JSP 响应页面。
春季MVC模型类
模型类被用来保留表单变量,我们的用户模型样本看起来如下。
 1package com.journaldev.spring;
 2
 3public class User {
 4
 5    private String userName;
 6
 7    public String getUserName() {
 8    	return userName;
 9    }
10
11    public void setUserName(String userName) {
12    	this.userName = userName;
13    }
14
15}
一个简单的Java豆与变量名及其getter和 setter方法。
春季MVC教程 - 查看页面
我们有三个 JSP 页面如下. home.jsp 代码:
 1<%@ taglib uri="https://java.sun.com/jsp/jstl/core" prefix="c" %>
 2<%@ page session="false" %>
 3<html>
 4<head>
 5    <title>Home</title>
 6</head>
 7<body>
 8<h1>
 9    Hello world!
10</h1>
11
12<P>  The time on the server is ${serverTime}. </P>
13</body>
14</html>
注意使用 JSP 表达语言来获取属性值。
 1<%@ page language="java" contentType="text/html; charset=UTF-8"
 2    pageEncoding="UTF-8"%>
 3<!DOCTYPE html PUBLIC "-//W3C//DTD HTML 4.01 Transitional//EN" "https://www.w3.org/TR/html4/loose.dtd">
 4<html>
 5<head>
 6<meta http-equiv="Content-Type" content="text/html; charset=UTF-8">
 7<title>Login Page</title>
 8</head>
 9<body>
10<form action="home" method="post">
11<input type="text" name="userName"><br>
12<input type="submit" value="Login">
13</form>
14</body>
15</html>
一个简单的JSP页面为用户提供用户名作为输入。 请注意,表单变量名与用户类变量名相同。 此外,表单操作是家和方法是邮件。 很明显,HomeController login() 方法将处理此请求。
 1<%@ page language="java" contentType="text/html; charset=UTF-8"
 2    pageEncoding="UTF-8"%>
 3<!DOCTYPE html PUBLIC "-//W3C//DTD HTML 4.01 Transitional//EN" "https://www.w3.org/TR/html4/loose.dtd">
 4<html>
 5<head>
 6<meta http-equiv="Content-Type" content="text/html; charset=UTF-8">
 7<title>User Home Page</title>
 8</head>
 9<body>
10<h3>Hi ${userName}</h3>
11</body>
12</html>
对于用户显示用户名的简单主页,请注意,我们在登录方法中设置此属性。
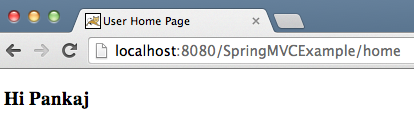
春季MVC示例应用测试
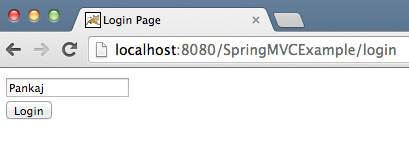
Our application is ready for execution, just run it on the VMware tc Server or your choice of any other servlet container, you will get below pages as the response. 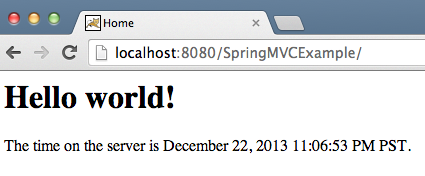
 That's it for Spring MVC Tutorial, you can see that how easy it is to create Spring MVC application using STS plugins. The code size is very less and most of the configuration is handled by Spring MVC so that we can focus on business logic. Download the example spring MVC project from below link and play around with it.