文件上传是一个非常常见的任务在任何Web应用程序. 我们之前已经看到如何 [上传文件在Servlet]( / 社区/教程/servlet-upload-file-download-example)和 [Struts2 文件上传]( / 社区/教程/struts-2-file-upload-example). 今天,我们将了解有关 Spring 文件上传,特别是 Spring MVC 文件上传的单个和多个文件。
春季 MVC 檔案上傳
Spring MVC framework provides support for uploading files by integrating Apache Commons FileUpload API. The process to upload files is very easy and requires simple configurations. We will create a simple Spring MVC project in STS that will look like below image. 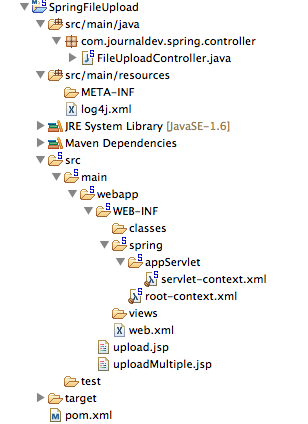 Most of the part is the boiler-plate code generated by STS tool, we will focus on the changes that are required to utilize Spring file upload integration.
Maven 依赖 Apache Commons 文件上传
首先,我们需要在我们的 pom.xml 文件中添加 Apache Commons FileUpload 依赖性,以便所需的 jar 文件是 Web 应用程序的一部分。
 1<!-- Apache Commons FileUpload -->
 2<dependency>
 3    <groupId>commons-fileupload</groupId>
 4    <artifactId>commons-fileupload</artifactId>
 5    <version>1.3.1</version>
 6</dependency>
 7
 8<!-- Apache Commons IO -->
 9<dependency>
10    <groupId>commons-io</groupId>
11    <artifactId>commons-io</artifactId>
12    <version>2.4</version>
13</dependency>
春天 文件上传 表格 观点
我们将创建两个JSP页面,允许单个和多个文件上传在春季Web应用程序中。
 1<%@ taglib uri="https://java.sun.com/jsp/jstl/core" prefix="c" %>
 2<%@ page session="false" %>
 3<html>
 4<head>
 5<title>Upload File Request Page</title>
 6</head>
 7<body>
 8    <form method="POST" action="uploadFile" enctype="multipart/form-data">
 9    	File to upload: <input type="file" name="file"><br />
10    	Name: <input type="text" name="name"><br /> <br />
11    	<input type="submit" value="Upload"> Press here to upload the file!
12    </form>
13</body>
14</html>
uploadMultiple.jsp 查看代码:
 1<%@ taglib uri="https://java.sun.com/jsp/jstl/core" prefix="c" %>
 2<%@ page session="false" %>
 3<html>
 4<head>
 5<title>Upload Multiple File Request Page</title>
 6</head>
 7<body>
 8    <form method="POST" action="uploadMultipleFile" enctype="multipart/form-data">
 9    	File1 to upload: <input type="file" name="file"><br />
10    	Name1: <input type="text" name="name"><br /> <br />
11    	File2 to upload: <input type="file" name="file"><br />
12    	Name2: <input type="text" name="name"><br /> <br />
13    	<input type="submit" value="Upload"> Press here to upload the file!
14    </form>
15</body>
16</html>
请注意,这些文件是简单的HTML文件,我不使用任何JSP或春节标签以避免复杂性。 重要的是要注意,表单 enctype应该是 multipart/form-data,所以春节的Web应用程序知道请求包含需要处理的文件数据。 另外,请注意,对于多个文件,表单字段文件和名称在输入字段中是相同的,所以数据将以数组的形式发送。
春季 MVC 多部件配置
要使用 Apache Commons FileUpload 来处理多部分请求,我们只需要配置multipartResolver标本以类为org.springframework.web.multipart.commons.CommonsMultipartResolver。
 1<?xml version="1.0" encoding="UTF-8"?>
 2<beans:beans xmlns="https://www.springframework.org/schema/mvc"
 3    xmlns:xsi="https://www.w3.org/2001/XMLSchema-instance" xmlns:beans="https://www.springframework.org/schema/beans"
 4    xmlns:context="https://www.springframework.org/schema/context"
 5    xsi:schemaLocation="https://www.springframework.org/schema/mvc https://www.springframework.org/schema/mvc/spring-mvc.xsd
 6    	https://www.springframework.org/schema/beans https://www.springframework.org/schema/beans/spring-beans.xsd
 7    	https://www.springframework.org/schema/context https://www.springframework.org/schema/context/spring-context.xsd">
 8
 9    <!-- DispatcherServlet Context: defines this servlet's request-processing
10    	infrastructure -->
11
12    <!-- Enables the Spring MVC @Controller programming model -->
13    <annotation-driven />
14
15    <!-- Handles HTTP GET requests for /resources/** by efficiently serving
16    	up static resources in the ${webappRoot}/resources directory -->
17    <resources mapping="/**" location="/" />
18
19    <!-- Resolves views selected for rendering by @Controllers to .jsp resources
20    	in the /WEB-INF/views directory -->
21    <beans:bean
22    	class="org.springframework.web.servlet.view.InternalResourceViewResolver">
23    	<beans:property name="prefix" value="/WEB-INF/views/" />
24    	<beans:property name="suffix" value=".jsp" />
25    </beans:bean>
26
27    <beans:bean id="multipartResolver"
28    	class="org.springframework.web.multipart.commons.CommonsMultipartResolver">
29
30    	 <!-- setting maximum upload size -->
31    	<beans:property name="maxUploadSize" value="100000" />
32
33    </beans:bean>
34
35    <context:component-scan base-package="com.journaldev.spring.controller" />
36
37</beans:beans>
请注意,我通过提供 maxUploadSize 属性值为 multipartResolver bean 设置最大上传大小限制,如果您将查看DispatcherServlet类的源代码,您将看到名为 multipartResolver 的 MultipartResolver 变量在下面的方法中定义和初始化。
 1private void initMultipartResolver(ApplicationContext context)
 2  {
 3    try
 4    {
 5      this.multipartResolver = ((MultipartResolver)context.getBean("multipartResolver", MultipartResolver.class));
 6      if (this.logger.isDebugEnabled()) {
 7        this.logger.debug("Using MultipartResolver [" + this.multipartResolver + "]");
 8      }
 9    }
10    catch (NoSuchBeanDefinitionException ex)
11    {
12      this.multipartResolver = null;
13      if (this.logger.isDebugEnabled())
14        this.logger.debug("Unable to locate MultipartResolver with name 'multipartResolver': no multipart request handling provided");
15    }
16  }
通过此配置,任何以多部分/表单数据编写的请求都将由 multipartResolver 处理,然后转移到控制器类。
春季文件上传控制器类
控制器类代码非常简单,我们需要为 uploadFile 和 uploadMultipleFile URI 定义处理方法。
  1package com.journaldev.spring.controller;
  2
  3import java.io.BufferedOutputStream;
  4import java.io.File;
  5import java.io.FileOutputStream;
  6
  7import org.slf4j.Logger;
  8import org.slf4j.LoggerFactory;
  9import org.springframework.stereotype.Controller;
 10import org.springframework.web.bind.annotation.RequestMapping;
 11import org.springframework.web.bind.annotation.RequestMethod;
 12import org.springframework.web.bind.annotation.RequestParam;
 13import org.springframework.web.bind.annotation.ResponseBody;
 14import org.springframework.web.multipart.MultipartFile;
 15
 16/**
 17 * Handles requests for the application file upload requests
 18 */
 19@Controller
 20public class FileUploadController {
 21
 22    private static final Logger logger = LoggerFactory
 23    		.getLogger(FileUploadController.class);
 24
 25    /**
 26     * Upload single file using Spring Controller
 27     */
 28    @RequestMapping(value = "/uploadFile", method = RequestMethod.POST)
 29    public @ResponseBody
 30    String uploadFileHandler(@RequestParam("name") String name,
 31    		@RequestParam("file") MultipartFile file) {
 32
 33    	if (!file.isEmpty()) {
 34    		try {
 35    			byte[] bytes = file.getBytes();
 36
 37    			// Creating the directory to store file
 38    			String rootPath = System.getProperty("catalina.home");
 39    			File dir = new File(rootPath + File.separator + "tmpFiles");
 40    			if (!dir.exists())
 41    				dir.mkdirs();
 42
 43    			// Create the file on server
 44    			File serverFile = new File(dir.getAbsolutePath()
 45    					+ File.separator + name);
 46    			BufferedOutputStream stream = new BufferedOutputStream(
 47    					new FileOutputStream(serverFile));
 48    			stream.write(bytes);
 49    			stream.close();
 50
 51    			logger.info("Server File Location="
 52    					+ serverFile.getAbsolutePath());
 53
 54    			return "You successfully uploaded file=" + name;
 55    		} catch (Exception e) {
 56    			return "You failed to upload " + name + " => " + e.getMessage();
 57    		}
 58    	} else {
 59    		return "You failed to upload " + name
 60    				+ " because the file was empty.";
 61    	}
 62    }
 63
 64    /**
 65     * Upload multiple file using Spring Controller
 66     */
 67    @RequestMapping(value = "/uploadMultipleFile", method = RequestMethod.POST)
 68    public @ResponseBody
 69    String uploadMultipleFileHandler(@RequestParam("name") String[] names,
 70    		@RequestParam("file") MultipartFile[] files) {
 71
 72    	if (files.length != names.length)
 73    		return "Mandatory information missing";
 74
 75    	String message = "";
 76    	for (int i = 0; i < files.length; i++) {
 77    		MultipartFile file = files[i];
 78    		String name = names[i];
 79    		try {
 80    			byte[] bytes = file.getBytes();
 81
 82    			// Creating the directory to store file
 83    			String rootPath = System.getProperty("catalina.home");
 84    			File dir = new File(rootPath + File.separator + "tmpFiles");
 85    			if (!dir.exists())
 86    				dir.mkdirs();
 87
 88    			// Create the file on server
 89    			File serverFile = new File(dir.getAbsolutePath()
 90    					+ File.separator + name);
 91    			BufferedOutputStream stream = new BufferedOutputStream(
 92    					new FileOutputStream(serverFile));
 93    			stream.write(bytes);
 94    			stream.close();
 95
 96    			logger.info("Server File Location="
 97    					+ serverFile.getAbsolutePath());
 98
 99    			message = message + "You successfully uploaded file=" + name
100    					+ "<br />";
101    		} catch (Exception e) {
102    			return "You failed to upload " + name + " => " + e.getMessage();
103    		}
104    	}
105    	return message;
106    }
107}
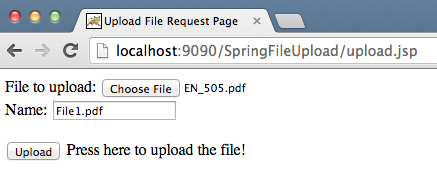
注意使用春季注释使我们的生活更容易,代码看起来更易读。‘uploadFileHandler’方法用于处理单个文件上传场景,而‘uploadMultipleFileHandler’方法用于处理多个文件上传场景。实际上,我们可以有一个单一的方法来处理两种场景。现在将应用程序导出为WAR文件并部署到Tomcat服务器容器中。当我们运行我们的应用程序时,下面的图像向我们展示了请求和响应。
春季 MVC 文件上传示例
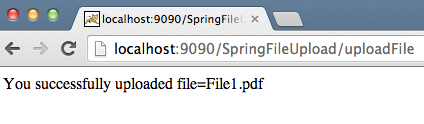

 You can check the server logs to know the location where the files have been stored. Download the project from the above link and play around with it to learn more.