欢迎来到春季MVC示例. 在春季MVC教程中(/社区/教程/春季MVC教程),我解释了如何使用春季工具套件创建春季MVC应用程序。
春季MVC例子
Spring MVC is based on Model-View-Controller architecture. Below image shows Spring MVC architecture at a high level. 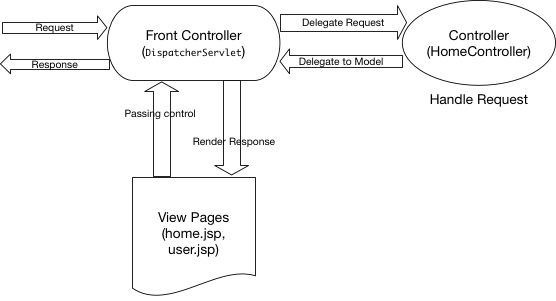
DispatcherServlet is the front controller class to take all requests and start processing them. We have to configure it in web.xml file. It's job is to pass request to appropriate controller class and send the response back when view pages have rendered the response page. HomeController.java will be the single controller class in our spring mvc example application. home.jsp, user.jsp are the view pages in our spring mvc hello world example application. User.java will be the only model class we will have in our spring mvc example web application.
春天 MVC 例子 Hello World Eclipse 项目
Below image shows our Spring MVC example project in Eclipse. 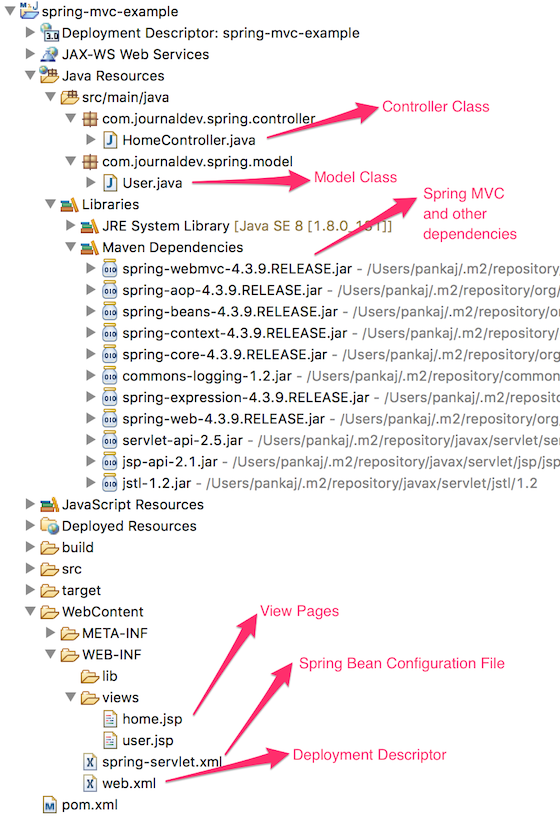 Let's get started and create our project right from the scratch.
春季 MVC 示例 Eclipse 项目设置
Since it's a web application and we want to use maven for dependencies management, first of all we have to create a dynamic web application and then convert it to a maven project. Below images show how to do this and get our project skeleton structure ready. Right click on the project explorer window and click on "New -> Dynamic Web Project" as shown in below image. 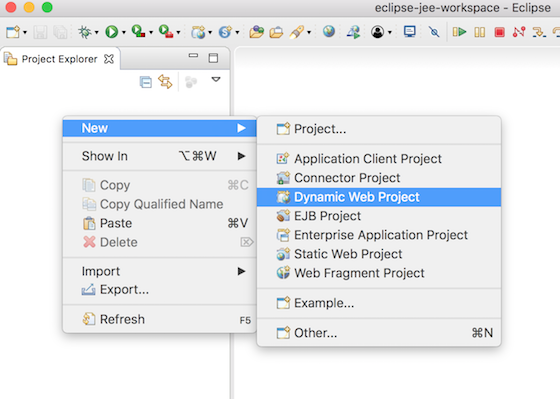 Provide name as "spring-mvc-example" in the next popup page, rest of the things should not required to be changed.
  On next page, provide the source folder as "src/main/java". You might have to remove "src" folder from the list before adding this.
 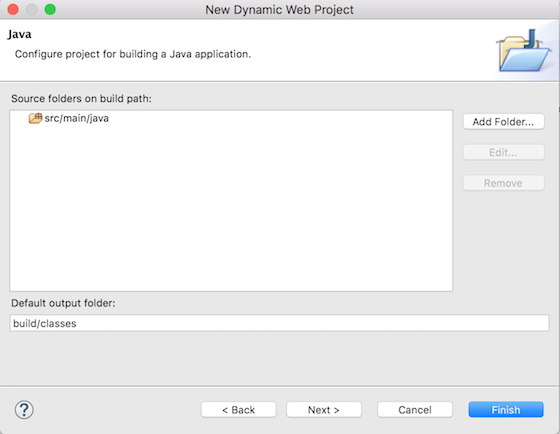 Next is the web module page, provide the context root of application as "spring-mvc-example" and make sure to check "Generate web.xml deployment descriptor" option.
 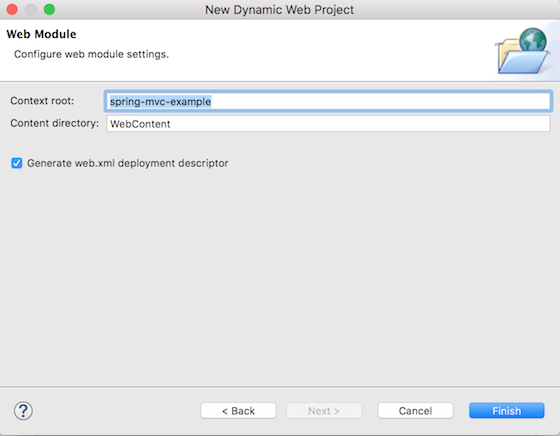 Click on Finish and you will have a new Dynamic Web Project in your eclipse project explorer.
将动态 Web 项目转换为 Maven 项目
We want to use maven for easily manage our spring mvc dependencies. So let's convert our web project to maven. Right click on the project and select "Configure -> Convert to Maven Project". 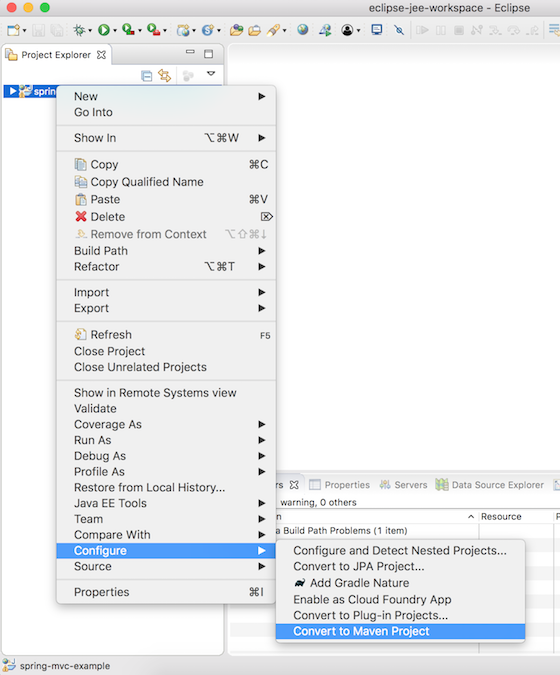 Next provide the pom.xml configurations as shown below.
 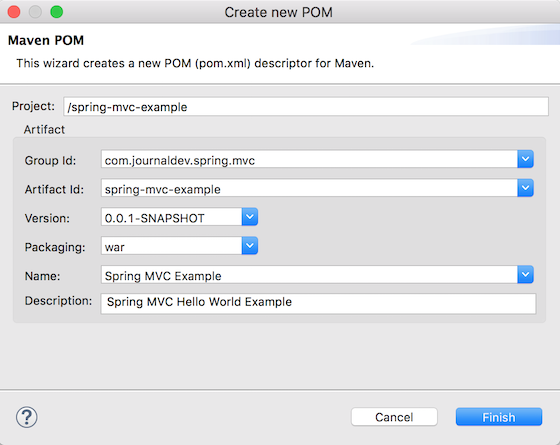 Our maven web application project skeleton code is ready. Now we can start making changes to it and create our spring mvc hello world example application.
春季 MVC 依赖到 pom.xml
我们需要在 pom.xml 中添加春网和春网webmvc 依赖,还需要添加 servlet-api、jsp-api 和 jstl 依赖。
 1<project xmlns="https://maven.apache.org/POM/4.0.0" xmlns:xsi="https://www.w3.org/2001/XMLSchema-instance"
 2    xsi:schemaLocation="https://maven.apache.org/POM/4.0.0 https://maven.apache.org/xsd/maven-4.0.0.xsd">
 3    <modelVersion>4.0.0</modelVersion>
 4    <groupId>com.journaldev.spring.mvc</groupId>
 5    <artifactId>spring-mvc-example</artifactId>
 6    <version>0.0.1-SNAPSHOT</version>
 7    <packaging>war</packaging>
 8    <name>Spring MVC Example</name>
 9    <description>Spring MVC Hello World Example</description>
10
11    <!-- Add Spring Web and MVC dependencies -->
12    <dependencies>
13    	<dependency>
14    		<groupId>org.springframework</groupId>
15    		<artifactId>spring-webmvc</artifactId>
16    		<version>4.3.9.RELEASE</version>
17    	</dependency>
18    	<dependency>
19    		<groupId>org.springframework</groupId>
20    		<artifactId>spring-web</artifactId>
21    		<version>4.3.9.RELEASE</version>
22    	</dependency>
23    	<!-- Servlet -->
24    	<dependency>
25    		<groupId>javax.servlet</groupId>
26    		<artifactId>servlet-api</artifactId>
27    		<version>2.5</version>
28    		<scope>provided</scope>
29    	</dependency>
30    	<dependency>
31    		<groupId>javax.servlet.jsp</groupId>
32    		<artifactId>jsp-api</artifactId>
33    		<version>2.1</version>
34    		<scope>provided</scope>
35    	</dependency>
36    	<dependency>
37    		<groupId>javax.servlet</groupId>
38    		<artifactId>jstl</artifactId>
39    		<version>1.2</version>
40    	</dependency>
41    </dependencies>
42
43    <build>
44    	<plugins>
45    		<plugin>
46    			<artifactId>maven-compiler-plugin</artifactId>
47    			<version>3.6.1</version>
48    			<configuration>
49    				<source>1.8</source>
50    				<target>1.8</target>
51    			</configuration>
52    		</plugin>
53    		<plugin>
54    			<artifactId>maven-war-plugin</artifactId>
55    			<version>3.0.0</version>
56    			<configuration>
57    				<warSourceDirectory>WebContent</warSourceDirectory>
58    			</configuration>
59    		</plugin>
60    	</plugins>
61    	<finalName>${project.artifactId}</finalName> <!-- added to remove Version from WAR file -->
62    </build>
63</project>
请注意finalName配置在构建中,以便我们的 WAR 文件名没有版本细节. 当项目由 Eclipse 构建时,您将注意到所有瓶子出现在 maven 依赖部分中。
Spring MVC Dispatcher 作为前置控制器的服务器
我们必须在我们的 Web 应用程序中添加 Spring MVC 框架,因此我们需要在 web.xml 中配置DispatcherServlet,如下所示。
 1<?xml version="1.0" encoding="UTF-8"?>
 2<web-app xmlns:xsi="https://www.w3.org/2001/XMLSchema-instance" xmlns="https://java.sun.com/xml/ns/javaee" xsi:schemaLocation="https://java.sun.com/xml/ns/javaee https://java.sun.com/xml/ns/javaee/web-app_3_0.xsd" id="WebApp_ID" version="3.0">
 3  <display-name>spring-mvc-example</display-name>
 4
 5    <!-- Add Spring MVC DispatcherServlet as front controller -->
 6    <servlet>
 7        <servlet-name>spring</servlet-name>
 8        <servlet-class>
 9                org.springframework.web.servlet.DispatcherServlet
10        </servlet-class>
11        <init-param>
12       		<param-name>contextConfigLocation</param-name>
13       		<param-value>/WEB-INF/spring-servlet.xml</param-value>
14    		</init-param>
15        <load-on-startup>1</load-on-startup>
16    </servlet>
17
18    <servlet-mapping>
19        <servlet-name>spring</servlet-name>
20        <url-pattern>/</url-pattern>
21    </servlet-mapping>
22
23 </web-app>
contextConfigLocation init-param 用于提供春豆配置文件的位置。
春季 MVC 示例 Bean 配置文件
下一步是创建 Spring Bean 配置文件 spring-servlet.xml 如下所示。
 1<?xml version="1.0" encoding="UTF-8"?>
 2<beans:beans xmlns="https://www.springframework.org/schema/mvc"
 3    xmlns:xsi="https://www.w3.org/2001/XMLSchema-instance" xmlns:beans="https://www.springframework.org/schema/beans"
 4    xmlns:context="https://www.springframework.org/schema/context"
 5    xsi:schemaLocation="https://www.springframework.org/schema/mvc https://www.springframework.org/schema/mvc/spring-mvc.xsd
 6    	https://www.springframework.org/schema/beans https://www.springframework.org/schema/beans/spring-beans.xsd
 7    	https://www.springframework.org/schema/context https://www.springframework.org/schema/context/spring-context.xsd">
 8
 9    <!-- DispatcherServlet Context: defines this servlet's request-processing
10    	infrastructure -->
11
12    <!-- Enables the Spring MVC @Controller programming model -->
13    <annotation-driven />
14    <context:component-scan base-package="com.journaldev.spring" />
15
16    <!-- Resolves views selected for rendering by @Controllers to .jsp resources
17    	in the /WEB-INF/views directory -->
18    <beans:bean
19    	class="org.springframework.web.servlet.view.InternalResourceViewResolver">
20    	<beans:property name="prefix" value="/WEB-INF/views/" />
21    	<beans:property name="suffix" value=".jsp" />
22    </beans:bean>
23
24</beans:beans>
有三个重要的配置。
- 「注释驱动」告诉 DispatcherServlet 使用 `@Controller' 注释搜索控制器类别。
context:component-scan告诉 DispatcherServlet 在哪里搜索控制器类别Internal ResourceViewResolver标本配置来指定使用的视图页面和附加字符的位置。
春季MVC控制器类
我们有一个单一的控制器类来响应两个URI - 首页的/和用户页的/user。
 1package com.journaldev.spring.controller;
 2
 3import java.text.DateFormat;
 4import java.util.Date;
 5import java.util.Locale;
 6
 7import org.springframework.stereotype.Controller;
 8import org.springframework.ui.Model;
 9import org.springframework.validation.annotation.Validated;
10import org.springframework.web.bind.annotation.RequestMapping;
11import org.springframework.web.bind.annotation.RequestMethod;
12
13import com.journaldev.spring.model.User;
14
15@Controller
16public class HomeController {
17
18    /**
19     * Simply selects the home view to render by returning its name.
20     */
21    @RequestMapping(value = "/", method = RequestMethod.GET)
22    public String home(Locale locale, Model model) {
23    	System.out.println("Home Page Requested, locale = " + locale);
24    	Date date = new Date();
25    	DateFormat dateFormat = DateFormat.getDateTimeInstance(DateFormat.LONG, DateFormat.LONG, locale);
26
27    	String formattedDate = dateFormat.format(date);
28
29    	model.addAttribute("serverTime", formattedDate);
30
31    	return "home";
32    }
33
34    @RequestMapping(value = "/user", method = RequestMethod.POST)
35    public String user(@Validated User user, Model model) {
36    	System.out.println("User Page Requested");
37    	model.addAttribute("userName", user.getUserName());
38    	return "user";
39    }
40}
请注意,为了简单,我没有使用任何日志框架,如 [log4j]( / 社区 / 教程 / log4j - 教程)。
春季MVC模型类
我们有一个简单的模型类,具有单个变量,它是getter-setter的方法,它是一个简单的POJO类。
 1package com.journaldev.spring.model;
 2
 3public class User {
 4    private String userName;
 5
 6    public String getUserName() {
 7    	return userName;
 8    }
 9
10    public void setUserName(String userName) {
11    	this.userName = userName;
12    }
13}
春季 MVC 查看页面
我们有两个视图页面,如下所定义。 home.jsp
 1<%@ page language="java" contentType="text/html; charset=UTF-8"
 2    pageEncoding="UTF-8"%>
 3<%@ taglib uri="https://java.sun.com/jsp/jstl/core" prefix="c"%>
 4<%@ page session="false"%>
 5<html>
 6<head>
 7<title>Home</title>
 8</head>
 9<body>
10    <h1>Hello world!</h1>
11
12    <P>The time on the server is ${serverTime}.</p>
13
14    <form action="user" method="post">
15    	<input type="text" name="userName"><br> <input
16    		type="submit" value="Login">
17    </form>
18</body>
19</html>
使用者.jsp
 1<%@ page language="java" contentType="text/html; charset=UTF-8"
 2    pageEncoding="UTF-8"%>
 3<!DOCTYPE html PUBLIC "-//W3C//DTD HTML 4.01 Transitional//EN" "https://www.w3.org/TR/html4/loose.dtd">
 4<html>
 5<head>
 6<meta http-equiv="Content-Type" content="text/html; charset=UTF-8">
 7<title>User Home Page</title>
 8</head>
 9<body>
10<h3>Hi ${userName}</h3>
11</body>
12</html>
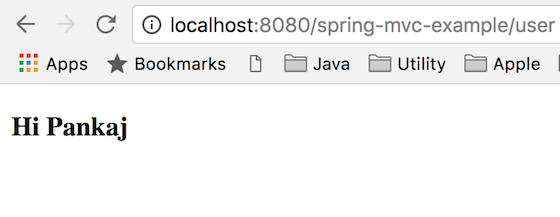
请注意,春季MVC负责将形式变量绘制为模型类变量,这就是为什么我们在两个地方都有相同的变量名称。
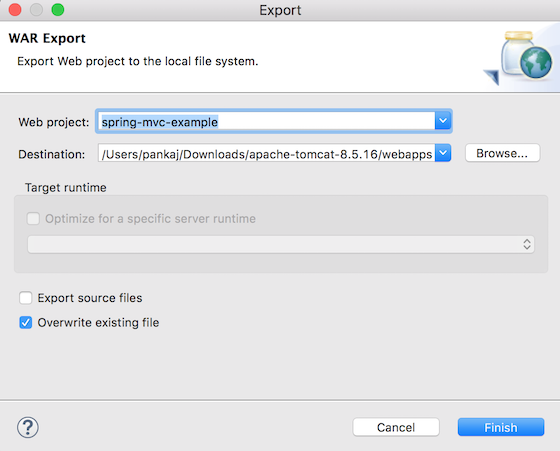
春季 MVC Eclipse 项目部署
We can use Eclipse export as WAR file option to deploy it directly to any running tomcat server webapps directory. However you can also use command line to build the project and then copy it into your favourite servlet container deployment directory. 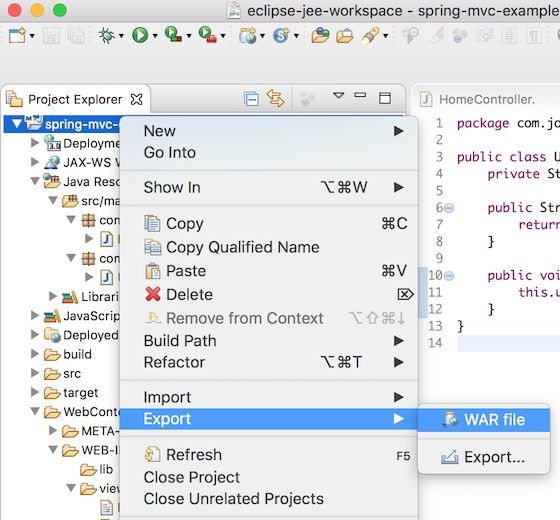
春季MVC示例测试
Once the spring mvc project is deployed, we can access the home page at https://localhost:8080/spring-mvc-example/. Change the tomcat port and context-root accordingly. 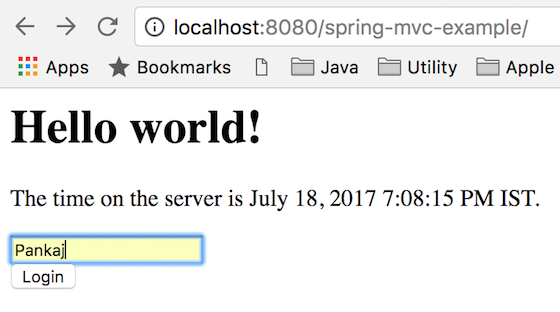
 That's all for Spring MVC example, I have tried to keep it as simple as possible. But still if you face any issues then please let me know through comments and I will try to help you out. You can download the final spring mvc example project from below link.
网址: 官方网址: https://docs.spring.io/spring/docs/current/spring-framework-reference/web.html#mvc