Spring Annotations 允许我们通过 java 程序配置依赖性并实施依赖性注入。
春季注释
- Spring 框架实施并促进了控制逆转(IOC)或依赖注入(DI)的原则,实际上是一个 IOC 容器 *传统上,Spring 允许开发人员通过使用基于 XML 的配置来管理豆类依赖 *有另一种方式来定义豆类及其依赖。
在本文中,我们将探索最常用的春季注释,并看看一些示例程序。
春季注释列表
一些春季核心框架 [注释]( / 社区 / 教程 / java 注释)是:
- [构 : 曾表示某类申报了一种或多种`Bean'方法。 这些类别由 " 春季 " 集装箱处理,以生成豆类的定义和服务请求。 (_) )2. 贝恩: 说明一种方法产生由"春"容器管理的豆. 这是最被使用和最重要的弹簧注释之一. @Bean 注释也可以使用名称, initMethod 和 destroy Method 等参数.
- name - 允许您给取取取取取取取取取取取取取取取取取取取取取取取取取取取取取取取取取取取取取取取取取取取取取取取取取取取取取取取取取取取取取取取取取取取取取取取的取取取取取取取取取取取取取取取取取取取取的取取取取取取取取取取取的取取取取取取取取取取的取取取取取取取取取取的取取取取取取取的取取取取取取取取的取取取取取取取取取的取取取取取取取取取取的取取取取取取取取取的取取取取取取的取取取取取取取取的取取取取的取取取取取取取取取的取取取的取取 ) - 销毁 Method - 允许您选择在上下文关闭时引用的方法( ) 例如:_____() ) @Configulation 公用类 AppConfig {
@Bean (name = "comp", init Method = "turn On", 销毁 Method = "turnOff" 计算机计算机 (){ 返回新计算机 (); 公用类 Approft (- ) 公用类计算机 { ( ) 和 (poset-MK1) 和 (st-MK1-PR-K1) 的替代方案 当豆类被我们定义时可以使用. 例如; _ 公共类计算机 {
@PostConstruct
公共空心转关 On (){
system.out.println ("Load 操作系统")
}
}(#
)}:配置组件扫描指令,与 @ Confubration 类使用 。 在这里我们可以指定用于扫描弹簧组件的基础软件包 。
5。 @% component : 表示注解类为"组件". 在使用基于注释的配置和类路径扫描时,这类类被认为是自动检测的候选类.
6. QQ Property Source':提供一个简单的声明机制,为斯普林环境添加一个属性源. 添加一系列属性源文件, 即 Property sources
7 的注释类似 。 @ Service : 表示注解类为"役". 此注释是 @ Concomponent 的一个专业,允许通过类路径扫描自动检测执行类.
8. * 仓库: 表示注释类为"仓库". 这个注释是 @ component 的专写, 最好与 [DAO] (/community/tourics/dao-design-pattern) 类一起使用。
9. XQAutowired : [春天@Autowired 注释] (/ community/tutoris/spring-autowired-anotation)用于自动注入豆类. 春季 QQ 附加注释与 Autowired 一起使用,以避免在我们为同类型配置了两个多豆时出现混乱。 (
(英语)
MVC 春季评论
一些重要的春季MVC注释是:
- @控制器
- @RequestMapping
- @PathVariable
- @RequestParam
- @ModelAttribute
- @RequestBody 和 @ResponseBody
- @RequestHeader 和 @ResponseHeader
您可以在 [春季MVC教程]( / 社区 / 教程 / 春季MVC教程)上了解更多。
春季交易管理笔记
「@Transactional」是春季宣言交易管理注释,阅读更多在 [春季MVC Hibernate]( / 社区 / 教程 / 春季-mvc-hibernate-mysql-integration-crud-example-tutorial)。
春季安全预告片
@EnableWebSecurity 与 @Configuration 类一起使用,以定义春季安全配置,请参阅 春季安全示例。
春天游艇评论
- @SpringBootApplication
- @EnableAutoConfiguration
阅读更多在 [春天启动示例]( / 社区 / 教程 / 春天启动-initilizr-web-interface)。
春天的例子
Let's look at a simple example where we will use Spring annotations in our application. Below image illustrates my Spring Annotations Example project. 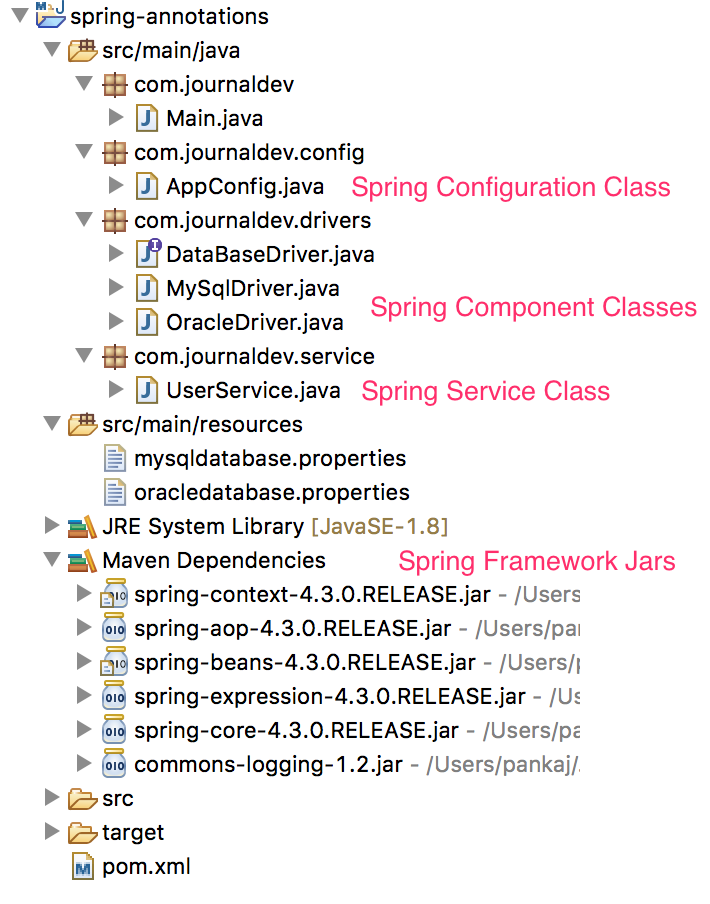
春季框架依赖
我创建了maven项目,并添加了Spring Core Framework依赖。
 1<project xmlns="https://maven.apache.org/POM/4.0.0" xmlns:xsi="https://www.w3.org/2001/XMLSchema-instance"
 2    xsi:schemaLocation="https://maven.apache.org/POM/4.0.0 https://maven.apache.org/xsd/maven-4.0.0.xsd">
 3    <modelVersion>4.0.0</modelVersion>
 4    <groupId>com.journaldev.spring</groupId>
 5    <artifactId>spring-annotations</artifactId>
 6    <version>0.0.1-SNAPSHOT</version>
 7    <name>Spring Annotations</name>
 8
 9    <properties>
10    	<spring.framework>4.3.0.RELEASE</spring.framework>
11    </properties>
12
13    <dependencies>
14    	<dependency>
15    		<groupId>org.springframework</groupId>
16    		<artifactId>spring-context</artifactId>
17    		<version>${spring.framework}</version>
18    	</dependency>
19    	<dependency>
20    		<groupId>org.springframework</groupId>
21    		<artifactId>spring-core</artifactId>
22    		<version>${spring.framework}</version>
23    	</dependency>
24
25    </dependencies>
26
27</project>
这将为我们的项目带来所有春季核心瓶子。
组件类
下一步是创建组件类,我在这里模仿多个数据库组件,一个用于MySQL,另一个用于Oracle。
1package com.journaldev.drivers;
2
3public interface DataBaseDriver {
4    public String getInfo();
5}
DataBaseDriver是我们将实施的基础界面( / 社区 / 教程 / interface-in-java)。
 1package com.journaldev.drivers;
 2
 3import org.springframework.beans.factory.annotation.Value;
 4import org.springframework.context.annotation.PropertySource;
 5import org.springframework.stereotype.Component;
 6
 7@Component
 8@PropertySource("classpath:mysqldatabase.properties")
 9public class MySqlDriver implements DataBaseDriver {
10
11    @Value("${databaseName}")
12    private String databaseName;
13    @Value("${disableStatementPooling}")
14    private String disableStatementPooling;
15
16    public String getInfo() {
17        return "[ Driver: mySql" +
18                ", databaseName: " + databaseName +
19                ", disableStatementPooling: " + disableStatementPooling +
20                " ]";
21    }
22}
请注意使用@Component注释来表示春季框架以将此类视为组件。我们还使用@PropertySource和@Value注释,春天会在运行时使用这些注入和设置这些变量值从指定的属性文件。
1databaseName=school
2disableStatementPooling=true
 1package com.journaldev.drivers;
 2
 3public class OracleDriver implements DataBaseDriver {
 4
 5    protected String url;
 6    protected String user;
 7    protected String password;
 8    protected String driver;
 9    protected Integer port;
10
11    public String getUrl() {
12        return url;
13    }
14
15    public String getUser() {
16        return user;
17    }
18
19    public void setUser(String user) {
20        this.user = user;
21    }
22
23    public String getPassword() {
24        return password;
25    }
26
27    public void setPassword(String password) {
28        this.password = password;
29    }
30
31    public String getDriver() {
32        return driver;
33    }
34
35    public void setDriver(String driver) {
36        this.driver = driver;
37    }
38
39    public Integer getPort() {
40        return port;
41    }
42
43    public void setPort(Integer port) {
44        this.port = port;
45    }
46
47    public void setUrl(String url) {
48        this.url = url;
49    }
50
51    public String getInfo() {
52        return "[ Driver: Oracle" +
53                ", url: " + url +
54                ", port; " + port +
55                ", user: " + user +
56                ", password: " + password  +
57                ", driver: " + driver +
58                " ] ";
59    }
60}
OracleDriver是一个简单的豆子,我们将使用服务类向这个豆子注入属性。
春季服务班级
 1package com.journaldev.service;
 2
 3import com.journaldev.drivers.DataBaseDriver;
 4import org.springframework.beans.factory.annotation.Autowired;
 5import org.springframework.beans.factory.annotation.Qualifier;
 6import org.springframework.stereotype.Service;
 7
 8@Service
 9public class UserService {
10
11    @Autowired
12    @Qualifier("oracleDriver")
13    private DataBaseDriver dataBaseDriver;
14
15    public String getDriverInfo(){
16        return dataBaseDriver.getInfo();
17    }
18}
在这里,我们使用@Service注释来表示 Spring 框架以将其视为 Service 类,然后我们使用@Autowired和@Qualifier(oracleDriver)注释来告诉 Spring 框架将名为oracleDriver的豆子注入到类属性dataBaseDriver`。
春豆
最后一步是创建我们的春豆和配置类,将一切粘合在一起。
 1package com.journaldev.config;
 2
 3import org.springframework.beans.factory.annotation.Autowired;
 4import org.springframework.context.annotation.Bean;
 5import org.springframework.context.annotation.ComponentScan;
 6import org.springframework.context.annotation.Configuration;
 7import org.springframework.context.annotation.PropertySource;
 8import org.springframework.core.env.Environment;
 9
10import com.journaldev.drivers.DataBaseDriver;
11import com.journaldev.drivers.MySqlDriver;
12import com.journaldev.drivers.OracleDriver;
13
14@Configuration
15@ComponentScan("com.journaldev")
16@PropertySource("classpath:oracledatabase.properties")
17public class AppConfig {
18
19    @Autowired
20        Environment environment;
21
22    @Bean
23    DataBaseDriver oracleDriver() {
24        OracleDriver oracleDriver = new OracleDriver();
25    oracleDriver.setDriver(environment.getProperty("db.driver"));
26        oracleDriver.setUrl(environment.getProperty("db.url"));
27        oracleDriver.setPort(Integer.parseInt(environment.getProperty("db.port")));
28        oracleDriver.setUser(environment.getProperty("db.user"));
29        oracleDriver.setPassword(environment.getProperty("db.password"));
30
31        return oracleDriver;
32
33    }
34
35    @Bean
36    DataBaseDriver mysqlDriver() {
37    	return new MySqlDriver();
38    }
39}
在此方法中,我们正在读取从oracledatabase.properties文件的属性,这是由 Spring framework 设置为环境变量,这里是oracledatabase.properties文件中定义的属性。
1db.url=localhost
2db.port=4444
3db.user=vasiliy
4db.password=yilisav
5db.driver=driver_name
我们的春季注释示例项目已经准备好进行测试,作为总结,我们执行了以下步骤:
创建了maven项目并添加了所需的春季依赖 2.创建了组件类,并将资源文件中的属性注入到其变量 3.如果我们有一个第三方组件,我们可以使用服务类将依赖注入其中。
春季标注示例测试
这里是我们测试我们的春季注释示例项目的主要类别。
 1package com.journaldev;
 2
 3import org.springframework.context.annotation.AnnotationConfigApplicationContext;
 4import org.springframework.context.support.AbstractApplicationContext;
 5
 6import com.journaldev.config.AppConfig;
 7import com.journaldev.drivers.DataBaseDriver;
 8import com.journaldev.service.UserService;
 9
10public class Main {
11    public static void main(String[] args) {
12    AbstractApplicationContext appContext = new AnnotationConfigApplicationContext(AppConfig.class);
13
14    DataBaseDriver oracle = appContext.getBean("oracleDriver", DataBaseDriver.class);
15    DataBaseDriver mysql = appContext.getBean("mysqlDriver", DataBaseDriver.class);
16
17        System.out.println("Oracle driver info:");
18        System.out.println(oracle.getInfo());
19
20        System.out.println("MySQL driver info:");
21        System.out.println(mysql.getInfo());
22
23        System.out.println("UserService Information");
24    UserService userService = appContext.getBean(UserService.class);
25    System.out.println(userService.getDriverInfo());
26
27    appContext.close();
28    }
29}
Below image shows the output produced. Notice that we haven't configured any logging framework, so all the spring framework logging is getting printed into console in red color. 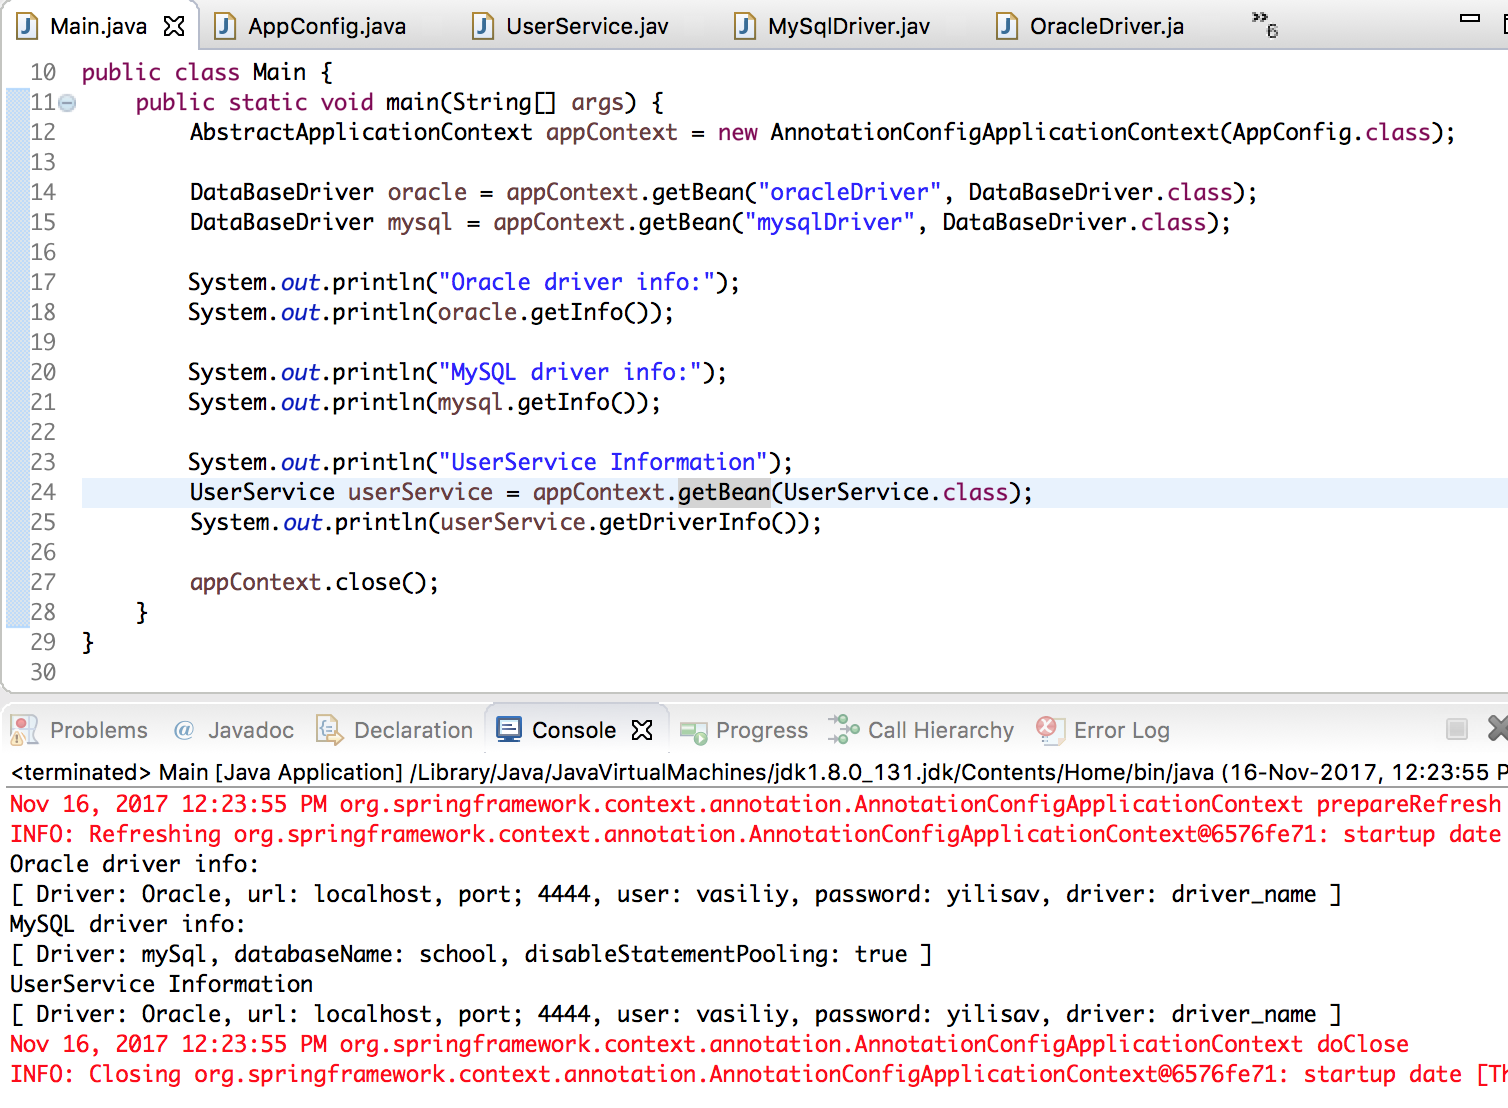 That's all for a brief introduction for spring annotations. I have listed here most of the important annotations, but there are a lot more of them for specific tasks. You can download my spring annotations example project from below link.
[下载下载《春天》标题项目(LINK0)]
引用: API Doc