在本教程中,我们将了解Sigmoid激活函数.Sigmoid函数总是返回0和1之间的输出。
在本教程之后,您将知道:
- 什么是激活函数?
- 如何在 python 中实现 sigmoid 函数?
- 如何在 python 中绘制 sigmoid 函数?
- 我们在哪里使用 sigmoid 函数?
- 什么是 sigmoid 激活函数引起的问题?
- 更好的替代方案。
什么是激活功能?
激活函数是控制神经网络的输出的数学函数,激活函数有助于确定神经元是否要发射。
** 一些流行的激活功能是:**
- 二进制步骤
- 线性步骤
- 线性步骤
- 线性步骤
- 线性步骤
- 线性步骤
- 线性步骤
- 线性步骤
- 线性步骤
- 线性步骤
激活负责在神经网络模型的输出中添加 非线性,没有激活函数,神经网络只是线性回归。
计算神经网络输出的数学方程式是:

在本教程中,我们将专注于 sigmoid 激活函数。 这个函数来自数学中的 sigmoid 函数。
让我们先讨论函数的公式。
标志式激活函数的公式
数学上,您可以将 sigmoid 激活函数表示为:

您可以看到,代号总是大于1,因此输出总是在0和1之间。
在Python中实施Sigmoid激活函数
在本节中,我们将学习如何在Python中实现Sigmoid激活函数。
我们可以在python中定义函数为:
1import numpy as np
2def sig(x):
3 return 1/(1 + np.exp(-x))
让我们尝试在一些输入上运行该函数。
 1import numpy as np
 2def sig(x):
 3 return 1/(1 + np.exp(-x))
 4
 5x = 1.0
 6print('Applying Sigmoid Activation on (%.1f) gives %.1f' % (x, sig(x)))
 7
 8x = -10.0
 9print('Applying Sigmoid Activation on (%.1f) gives %.1f' % (x, sig(x)))
10
11x = 0.0
12print('Applying Sigmoid Activation on (%.1f) gives %.1f' % (x, sig(x)))
13
14x = 15.0
15print('Applying Sigmoid Activation on (%.1f) gives %.1f' % (x, sig(x)))
16
17x = -2.0
18print('Applying Sigmoid Activation on (%.1f) gives %.1f' % (x, sig(x)))
输出:
1Applying Sigmoid Activation on (1.0) gives 0.7
2Applying Sigmoid Activation on (-10.0) gives 0.0
3Applying Sigmoid Activation on (0.0) gives 0.5
4Applying Sigmoid Activation on (15.0) gives 1.0
5Applying Sigmoid Activation on (-2.0) gives 0.1
使用Python进行Sigmoid激活
要计划 sigmoid 激活,我们将使用 [Numpy 库]( / 社区 / 教程 / python-numpy - 教程):
1import numpy as np
2import matplotlib.pyplot as plt
3x = np.linspace(-10, 10, 50)
4p = sig(x)
5plt.xlabel("x")
6plt.ylabel("Sigmoid(x)")
7plt.plot(x, p)
8plt.show()
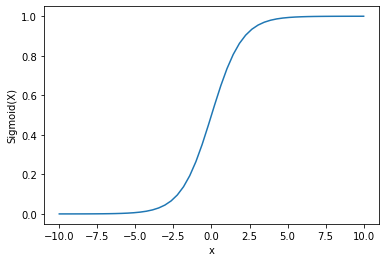
输出:

我们可以看到输出在0和1之间。
信号函数通常用于预测概率,因为概率总是在0和1之间。
信号函数的一个缺点是,向端区域 **,Y值对X值的变化反应较少。
这会导致一个被称为消失梯度问题的问题。
消失的梯度会减缓学习过程,因此是不可取的。
让我们讨论一些克服这个问题的替代方案。
ReLu 激活功能
解决这种消失梯度问题的更好的替代方案是 [ReLu 激活函数]( / 社区 / 教程 / relu-function-in-python)。
ReLu 激活函数返回 0 如果输入为负,否则返回输入。
数学上,它被表示为:

您可以在Python中执行以下操作:
1def relu(x):
2    return max(0.0, x)
让我们看看它如何在一些输入中工作。
 1def relu(x):
 2    return max(0.0, x)
 3
 4x = 1.0
 5print('Applying Relu on (%.1f) gives %.1f' % (x, relu(x)))
 6x = -10.0
 7print('Applying Relu on (%.1f) gives %.1f' % (x, relu(x)))
 8x = 0.0
 9print('Applying Relu on (%.1f) gives %.1f' % (x, relu(x)))
10x = 15.0
11print('Applying Relu on (%.1f) gives %.1f' % (x, relu(x)))
12x = -20.0
13print('Applying Relu on (%.1f) gives %.1f' % (x, relu(x)))
输出:
1Applying Relu on (1.0) gives 1.0
2Applying Relu on (-10.0) gives 0.0
3Applying Relu on (0.0) gives 0.0
4Applying Relu on (15.0) gives 15.0
5Applying Relu on (-20.0) gives 0.0
ReLu 的问题是,负输入的梯度是零。
这再次导致消失梯度(零梯度)对负输入的问题。
为了解决这个问题,我们有另一个被称为 ** Leaky ReLu 激活函数的替代方案。
泄漏 ReLu 激活功能
漏洞 ReLu 解决了负值的零梯度问题,通过给负输入一个非常小的线性组成部分 x。
从数学上讲,我们可以将其定义为:
1f(x)= 0.01x, x<0
2    = x, x>=0
您可以使用 Python 实现它:
 1def leaky_relu(x):
 2  if x>0 :
 3    return x
 4  else :
 5    return 0.01*x
 6
 7x = 1.0
 8print('Applying Leaky Relu on (%.1f) gives %.1f' % (x, leaky_relu(x)))
 9
10x = -10.0
11print('Applying Leaky Relu on (%.1f) gives %.1f' % (x, leaky_relu(x)))
12
13x = 0.0
14print('Applying Leaky Relu on (%.1f) gives %.1f' % (x, leaky_relu(x)))
15
16x = 15.0
17print('Applying Leaky Relu on (%.1f) gives %.1f' % (x, leaky_relu(x)))
18
19x = -20.0
20print('Applying Leaky Relu on (%.1f) gives %.1f' % (x, leaky_relu(x)))
输出:
1Applying Leaky Relu on (1.0) gives 1.0
2Applying Leaky Relu on (-10.0) gives -0.1
3Applying Leaky Relu on (0.0) gives 0.0
4Applying Leaky Relu on (15.0) gives 15.0
5Applying Leaky Relu on (-20.0) gives -0.2
结论
本教程是关于Sigmoid激活函数. 我们学会了如何在Python中实现和编程函数。