介绍
本文将涵盖 背景API(在版本 16.3 中引入)和 React hooks(在版本 16.8 中引入)。
Context API 引入解决了一个主要问题: prop drilling. 通过嵌入深层组件的层来将我们的数据从一个组件传递到另一个组件的过程。 React hooks 允许使用基于类而不是基于功能的组件。
在本文中,您将使用 Context API 和 React Hooks 一起构建一个功能齐全的 CRUD 应用程序,模拟员工列表. 它将读取员工数据,创建新员工,更新员工数据,并删除员工。
前提条件
要完成本教程,您将需要:
- Node.js 的本地开发环境 遵循 如何安装 Node.js 并创建本地开发环境。
- 了解如何导入、导出和渲染 React 组件。
本教程已通过 Node v15.3.0、npm v7.4.0、react v17.0.1、react-router-dom v5.2.0、tailwindcss-cli v0.1.2 和tailwindcss v2.0.2 进行验证。
步骤1 - 设置项目
首先,使用 Create React App开始设置 React 项目,使用以下命令:
1npx create-react-app react-crud-employees-example
导航到新创建的项目目录:
1cd react-crud-employees-example
接下来,通过运行以下命令将react-router-dom添加为依赖性:
1npm install [email protected]
<$>[注] 注: 有关 React Router 的更多信息,请参阅 我们的 React Router 教程。
然后,导航到src目录:
1cd src
使用以下命令将 Tailwind CSS 的默认构建添加到您的项目中:
1npx [email protected] build --output tailwind.css
<$>[注] 注: 有关 Tailwind CSS 的更多信息,请参阅 我们的 Tailwind CSS 教程。
接下来,在代码编辑器中打开index.js,并修改它以使用tailwind.css和BrowserRouter:
 1[label src/index.js]
 2import React from 'react';
 3import ReactDOM from 'react-dom';
 4import { BrowserRouter } from 'react-router-dom';
 5import './tailwind.css';
 6import './index.css';
 7import App from './App';
 8
 9ReactDOM.render(
10  <BrowserRouter>
11    <App />
12  <BrowserRouter>
13  document.getElementById('root')
14);
在这一点上,你将有一个新的React项目与Tailwind CSS和响应路由器-dom。
第2步:构建AppReducer和GlobalContext
首先,在src目录中,创建一个新的背景目录。
在这个新目录中,创建一个新的AppReducer.js文件. 这个缩减器将定义CRUD操作,如ADD_EMPLOYEE,EDIT_EMPLOYEE和REMOVE_EMPLOYEE。
 1[label src/context/AppReducer.js]
 2export default function appReducer(state, action) {
 3  switch (action.type) {
 4    case "ADD_EMPLOYEE":
 5      return {
 6        ...state,
 7        employees: [...state.employees, action.payload],
 8      };
 9
10    case "EDIT_EMPLOYEE":
11      const updatedEmployee = action.payload;
12
13      const updatedEmployees = state.employees.map((employee) => {
14        if (employee.id === updatedEmployee.id) {
15          return updatedEmployee;
16        }
17        return employee;
18      });
19
20      return {
21        ...state,
22        employees: updatedEmployees,
23      };
24
25    case "REMOVE_EMPLOYEE":
26      return {
27        ...state,
28        employees: state.employees.filter(
29          (employee) => employee.id !== action.payload
30        ),
31      };
32
33    default:
34      return state;
35  }
36};
ADD_EMPLOYEES将采取包含新员工的负载值,并返回更新的员工状态。
EDIT_EMPLOYEE将采取负载值,并将id与员工进行比较 - 如果找到匹配,它将使用新的负载值,并返回更新的员工状态。
「REMOVE_EMPLOYEE」會採取負載值並將「id」與員工進行比較 - 如果找到匹配,則會移除該員工並返回更新的員工狀態。
在背景目录中,创建一个新的GlobalState.js文件,它将包含一个初始的硬编码值,以模拟从请求中返回的员工数据。
 1[label src/context/GlobalState.js]
 2import React, { createContext, useReducer } from 'react';
 3
 4import appReducer from './AppReducer';
 5
 6const initialState = {
 7  employees: [
 8    {
 9      id: 1,
10      name: "Sammy",
11      location: "DigitalOcean",
12      designation: "Shark"
13    }
14  ]
15};
16
17export const GlobalContext = createContext(initialState);
18
19export const GlobalProvider = ({ children }) => {
20  const [state, dispatch] = useReducer(appReducer, initialState);
21
22  function addEmployee(employee) {
23    dispatch({
24      type: "ADD_EMPLOYEE",
25      payload: employee
26    });
27  }
28
29  function editEmployee(employee) {
30    dispatch({
31      type: "EDIT_EMPLOYEE",
32      payload: employee
33    });
34  }
35
36  function removeEmployee(id) {
37    dispatch({
38      type: "REMOVE_EMPLOYEE",
39      payload: id
40    });
41  }
42
43  return (
44    <GlobalContext.Provider
45      value={{
46        employees: state.employees,
47        addEmployee,
48        editEmployee,
49        removeEmployee
50      }}
51    >
52      {children}
53    </GlobalContext.Provider>
54  );
55};
这个代码添加了一些功能来发送一个操作,它进入了减少器文件,以切换与每个操作相符的案例。
在此时刻,您应该有一个 React 应用程序,具有AppReducer.js和GlobalState.js。
让我们创建一个EmployeeList组件来验证应用程序是否正常工作。 导航到src目录并创建一个新的components目录。 在该目录中,创建一个新的EmployeeList.js文件并添加以下代码:
 1[label src/components/EmployeeList.js]
 2import React, { useContext } from 'react';
 3
 4import { GlobalContext } from '../context/GlobalState';
 5
 6export const EmployeeList = () => {
 7  const { employees } = useContext(GlobalContext);
 8  return (
 9    <React.Fragment>
10      {employees.length > 0 ? (
11        <React.Fragment>
12          {employees.map((employee) => (
13            <div
14              className="flex items-center bg-gray-100 mb-10 shadow"
15              key={employee.id}
16            >
17              <div className="flex-auto text-left px-4 py-2 m-2">
18                <p className="text-gray-900 leading-none">
19                  {employee.name}
20                </p>
21                <p className="text-gray-600">
22                  {employee.designation}
23                </p>
24                <span className="inline-block text-sm font-semibold mt-1">
25                  {employee.location}
26                </span>
27              </div>
28            </div>
29          ))}
30        </React.Fragment>
31      ) : (
32        <p className="text-center bg-gray-100 text-gray-500 py-5">No data.</p>
33      )}
34    </React.Fragment>
35  );
36};
此代码将显示所有员工的employee.name,employee.designation和employee.location。
接下来,在代码编辑器中打开App.js,然后添加EmployeeList和GlobalProvider。
 1[label src/App.js]
 2import { EmployeeList } from './components/EmployeeList';
 3
 4import { GlobalProvider } from './context/GlobalState';
 5
 6function App() {
 7  return (
 8    <GlobalProvider>
 9      <div className="App">
10        <EmployeeList />
11      </div>
12    </GlobalProvider>
13  );
14}
15
16export default App;
运行您的应用程序并在网页浏览器中观察它:

EmployeeList组件将显示在GlobalState.js中建立的硬编码值。
步骤 3 – 构建添加员工和编辑员工组件
在此步骤中,您将构建支持创建新员工和更新现有员工的组件。
现在,返回组件目录,创建一个新的AddEmployee.js文件,这将作为AddEmployee组件,其中将包含一个onSubmit处理器,以将表单字段的值推入状态:
 1[label src/components/AddEmployee.js]
 2import React, { useState, useContext } from 'react';
 3import { Link, useHistory } from 'react-router-dom';
 4
 5import { GlobalContext } from '../context/GlobalState';
 6
 7export const AddEmployee = () => {
 8  let history = useHistory();
 9
10  const { addEmployee, employees } = useContext(GlobalContext);
11
12  const [name, setName] = useState("");
13  const [location, setLocation] = useState("");
14  const [designation, setDesignation] = useState("");
15
16  const onSubmit = (e) => {
17    e.preventDefault();
18    const newEmployee = {
19      id: employees.length + 1,
20      name,
21      location,
22      designation,
23    };
24    addEmployee(newEmployee);
25    history.push("/");
26  };
27
28  return (
29    <React.Fragment>
30      <div className="w-full max-w-sm container mt-20 mx-auto">
31        <form onSubmit={onSubmit}>
32          <div className="w-full mb-5">
33            <label
34              className="block uppercase tracking-wide text-gray-700 text-xs font-bold mb-2"
35              htmlFor="name"
36            >
37              Name of employee
38            </label>
39            <input
40              className="shadow appearance-none border rounded w-full py-2 px-3 text-gray-700 leading-tight focus:outline-none focus:text-gray-600"
41              value={name}
42              onChange={(e) => setName(e.target.value)}
43              type="text"
44              placeholder="Enter name"
45            />
46          </div>
47          <div className="w-full mb-5">
48            <label
49              className="block uppercase tracking-wide text-gray-700 text-xs font-bold mb-2"
50              htmlFor="location"
51            >
52              Location
53            </label>
54            <input
55              className="shadow appearance-none border rounded w-full py-2 px-3 text-gray-700 leading-tight focus:text-gray-600 focus:shadow-outline"
56              value={location}
57              onChange={(e) => setLocation(e.target.value)}
58              type="text"
59              placeholder="Enter location"
60            />
61          </div>
62          <div className="w-full mb-5">
63            <label
64              className="block uppercase tracking-wide text-gray-700 text-xs font-bold mb-2"
65              htmlFor="designation"
66            >
67              Designation
68            </label>
69            <input
70              className="shadow appearance-none border rounded w-full py-2 px-3 text-gray-700 leading-tight focus:outline-none focus:text-gray-600"
71              value={designation}
72              onChange={(e) => setDesignation(e.target.value)}
73              type="text"
74              placeholder="Enter designation"
75            />
76          </div>
77          <div className="flex items-center justify-between">
78            <button className="mt-5 bg-green-400 w-full hover:bg-green-500 text-white font-bold py-2 px-4 rounded focus:outline-none focus:shadow-outline">
79              Add Employee
80            </button>
81          </div>
82          <div className="text-center mt-4 text-gray-500">
83            <Link to="/">Cancel</Link>
84          </div>
85        </form>
86      </div>
87    </React.Fragment>
88  );
89};
在此代码中,setName、setLocation和setDesignation将采用用户输入表单字段的当前值,这些值将被包装在一个新的常数中,即newEmployee,具有独特的id (将一个添加到总长度)。
AddEmployee组件导入了GlobalState和useContext(https://andsky.com/tech/tutorials/react-usecontext),这是内置的React Hooks之一,使功能组件能够轻松进入我们的背景。
员工对象删除员工和编辑员工被从GlobalState.js文件中导入。
在组件目录中,创建一个新的EditEmployee.js文件,这将作为editEmployee组件,其中包括从状态中编辑现有对象的功能:
  1[label src/components/EditEmployee.js]
  2import React, { useState, useContext, useEffect } from 'react';
  3import { useHistory, Link } from 'react-router-dom';
  4
  5import { GlobalContext } from '../context/GlobalState';
  6
  7export const EditEmployee = (route) => {
  8  let history = useHistory();
  9
 10  const { employees, editEmployee } = useContext(GlobalContext);
 11
 12  const [selectedUser, setSelectedUser] = useState({
 13    id: null,
 14    name: "",
 15    designation: "",
 16    location: "",
 17  });
 18
 19  const currentUserId = route.match.params.id;
 20
 21  useEffect(() => {
 22    const employeeId = currentUserId;
 23    const selectedUser = employees.find(
 24      (currentEmployeeTraversal) => currentEmployeeTraversal.id === parseInt(employeeId)
 25    );
 26    setSelectedUser(selectedUser);
 27  }, [currentUserId, employees]);
 28
 29  const onSubmit = (e) => {
 30    e.preventDefault();
 31    editEmployee(selectedUser);
 32    history.push("/");
 33  };
 34
 35  const handleOnChange = (userKey, newValue) =>
 36    setSelectedUser({ ...selectedUser, [userKey]: newValue });
 37
 38  if (!selectedUser || !selectedUser.id) {
 39    return <div>Invalid Employee ID.</div>;
 40  }
 41
 42  return (
 43    <React.Fragment>
 44      <div className="w-full max-w-sm container mt-20 mx-auto">
 45        <form onSubmit={onSubmit}>
 46          <div className="w-full mb-5">
 47            <label
 48              className="block uppercase tracking-wide text-gray-700 text-xs font-bold mb-2"
 49              htmlFor="name"
 50            >
 51              Name of employee
 52            </label>
 53            <input
 54              className="shadow appearance-none border rounded w-full py-2 px-3 text-gray-700 leading-tight focus:text-gray-600 focus:shadow-outline"
 55              value={selectedUser.name}
 56              onChange={(e) => handleOnChange("name", e.target.value)}
 57              type="text"
 58              placeholder="Enter name"
 59            />
 60          </div>
 61          <div className="w-full mb-5">
 62            <label
 63              className="block uppercase tracking-wide text-gray-700 text-xs font-bold mb-2"
 64              htmlFor="location"
 65            >
 66              Location
 67            </label>
 68            <input
 69              className="shadow appearance-none border rounded w-full py-2 px-3 text-gray-700 leading-tight focus:text-gray-600 focus:shadow-outline"
 70              value={selectedUser.location}
 71              onChange={(e) => handleOnChange("location", e.target.value)}
 72              type="text"
 73              placeholder="Enter location"
 74            />
 75          </div>
 76          <div className="w-full mb-5">
 77            <label
 78              className="block uppercase tracking-wide text-gray-700 text-xs font-bold mb-2"
 79              htmlFor="designation"
 80            >
 81              Designation
 82            </label>
 83            <input
 84              className="shadow appearance-none border rounded w-full py-2 px-3 text-gray-700 leading-tight focus:text-gray-600 focus:shadow-outline"
 85              value={selectedUser.designation}
 86              onChange={(e) => handleOnChange("designation", e.target.value)}
 87              type="text"
 88              placeholder="Enter designation"
 89            />
 90          </div>
 91          <div className="flex items-center justify-between">
 92            <button className="block mt-5 bg-green-400 w-full hover:bg-green-500 text-white font-bold py-2 px-4 rounded focus:text-gray-600 focus:shadow-outline">
 93              Edit Employee
 94            </button>
 95          </div>
 96          <div className="text-center mt-4 text-gray-500">
 97            <Link to="/">Cancel</Link>
 98          </div>
 99        </form>
100      </div>
101    </React.Fragment>
102  );
103};
此代码使用的是 useEffect hook,它在组件安装时被召唤,在这个内,当前路径参数将与状态中的员工对象中的相同参数进行比较。
当用户对表单字段进行更改时,会触发onChange事件倾听器。userKey和newValue将被传输到setSelectedUser。
步骤4:设置路线
在此步骤中,您将更新员工列表,以链接到添加员工和编辑员工组件。
修订EmployeeList.js并修改它以使用链接和删除Employee:
 1[label src/components/EmployeeList.js]
 2import React, { useContext } from 'react';
 3import { Link } from 'react-router-dom';
 4
 5import { GlobalContext } from '../context/GlobalState';
 6
 7export const EmployeeList = () => {
 8  const { employees, removeEmployee } = useContext(GlobalContext);
 9  return (
10    <React.Fragment>
11      {employees.length > 0 ? (
12        <React.Fragment>
13          {employees.map((employee) => (
14            <div
15              className="flex items-center bg-gray-100 mb-10 shadow"
16              key={employee.id}
17            >
18              <div className="flex-auto text-left px-4 py-2 m-2">
19                <p className="text-gray-900 leading-none">
20                  {employee.name}
21                </p>
22                <p className="text-gray-600">
23                  {employee.designation}
24                </p>
25                <span className="inline-block text-sm font-semibold mt-1">
26                  {employee.location}
27                </span>
28              </div>
29              <div className="flex-auto text-right px-4 py-2 m-2">
30                <Link
31                  to={`/edit/${employee.id}`}
32                  title="Edit Employee"
33                >
34                  <div className="bg-gray-300 hover:bg-gray-400 text-gray-800 font-semibold mr-3 py-2 px-4 rounded-full inline-flex items-center">
35                    <svg xmlns="http://www.w3.org/2000/svg" width="24" height="24" viewBox="0 0 24 24" fill="none" stroke="currentColor" strokeWidth="2" strokeLinecap="round" strokeLinejoin="round" className="feather feather-edit"><path d="M11 4H4a2 2 0 0 0-2 2v14a2 2 0 0 0 2 2h14a2 2 0 0 0 2-2v-7"></path><path d="M18.5 2.5a2.121 2.121 0 0 1 3 3L12 15l-4 1 1-4 9.5-9.5z"></path></svg>
36                  </div>
37                </Link>
38                <button
39                  onClick={() => removeEmployee(employee.id)}
40                  className="block bg-gray-300 hover:bg-gray-400 text-gray-800 font-semibold py-2 px-4 rounded-full inline-flex items-center"
41                  title="Remove Employee"
42                >
43                  <svg xmlns="http://www.w3.org/2000/svg" width="24" height="24" viewBox="0 0 24 24" fill="none" stroke="currentColor" strokeWidth="2" strokeLinecap="round" strokeLinejoin="round" className="feather feather-trash-2"><polyline points="3 6 5 6 21 6"></polyline><path d="M19 6v14a2 2 0 0 1-2 2H7a2 2 0 0 1-2-2V6m3 0V4a2 2 0 0 1 2-2h4a2 2 0 0 1 2 2v2"></path><line x1="10" y1="11" x2="10" y2="17"></line><line x1="14" y1="11" x2="14" y2="17"></line></svg>
44                </button>
45              </div>
46            </div>
47          ))}
48        </React.Fragment>
49      ) : (
50        <p className="text-center bg-gray-100 text-gray-500 py-5">No data.</p>
51      )}
52    </React.Fragment>
53  );
54};
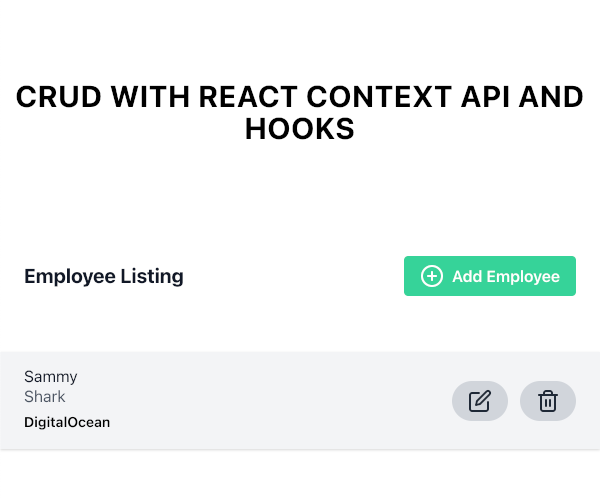
此代码将添加两个图标,旁边的员工信息. 铅笔和纸张图标代表编辑和链接到编辑员工组件. 垃圾桶图标代表删除,点击它将打开删除员工。
接下来,您将创建两个新的组件,即标题和主页,以显示员工列表组件,并为用户提供访问添加员工组件。
在组件目录中,创建一个新的Heading.js文件:
 1[label src/components/Heading.js]
 2import React from "react";
 3import { Link } from "react-router-dom";
 4
 5export const Heading = () => {
 6  return (
 7    <div>
 8      <div className="flex items-center mt-24 mb-10">
 9        <div className="flex-grow text-left px-4 py-2 m-2">
10          <h5 className="text-gray-900 font-bold text-xl">Employee Listing</h5>
11        </div>
12        <div className="flex-grow text-right px-4 py-2 m-2">
13          <Link to="/add">
14            <button className="bg-green-400 hover:bg-green-500 text-white font-semibold py-2 px-4 rounded inline-flex items-center">
15              <svg xmlns="http://www.w3.org/2000/svg" width="24" height="24" viewBox="0 0 24 24" fill="none" stroke="currentColor" strokeWidth="2" strokeLinecap="round" strokeLinejoin="round" className="feather feather-plus-circle"><circle cx="12" cy="12" r="10"></circle><line x1="12" y1="8" x2="12" y2="16"></line><line x1="8" y1="12" x2="16" y2="12"></line></svg>
16              <span className="pl-2">Add Employee</span>
17            </button>
18          </Link>
19        </div>
20      </div>
21    </div>
22  );
23};
在组件目录中,创建一个新的Home.js文件:
 1[label src/components/Home.js]
 2import React from "react";
 3import { Heading } from "./Heading";
 4import { EmployeeList } from "./EmployeeList";
 5
 6export const Home = () => {
 7  return (
 8    <React.Fragment>
 9      <div className="container mx-auto">
10        <h3 className="text-center text-3xl mt-20 text-base leading-8 text-black font-bold tracking-wide uppercase">
11          CRUD with React Context API and Hooks
12        </h3>
13        <Heading />
14        <EmployeeList />
15      </div>
16    </React.Fragment>
17  );
18};
重新定义App.js并从react-router-dom中导入Route和Switch。
 1[label src/App.js]
 2import { Route, Switch } from 'react-router-dom';
 3
 4import { GlobalProvider } from './context/GlobalState';
 5
 6import { Home } from './components/Home';
 7import { AddEmployee } from './components/AddEmployee';
 8import { EditEmployee } from './components/EditEmployee';
 9
10function App() {
11  return (
12    <GlobalProvider>
13      <div className="App">
14        <Switch>
15          <Route path="/" component={Home} exact />
16          <Route path="/add" component={AddEmployee} exact />
17          <Route path="/edit/:id" component={EditEmployee} exact />
18        </Switch>
19      </div>
20    </GlobalProvider>
21  );
22}
23
24export default App;
编译应用程序并在您的浏览器中观察它。
您将被路由到首页组件,其中包含标题和员工列表组件:
点击添加员工链接,您将被路由到添加员工组件:

提交新员工信息后,您将被路由回到首页组件,现在将列出新员工。
点击编辑员工链接,您将被导向编辑员工组件:
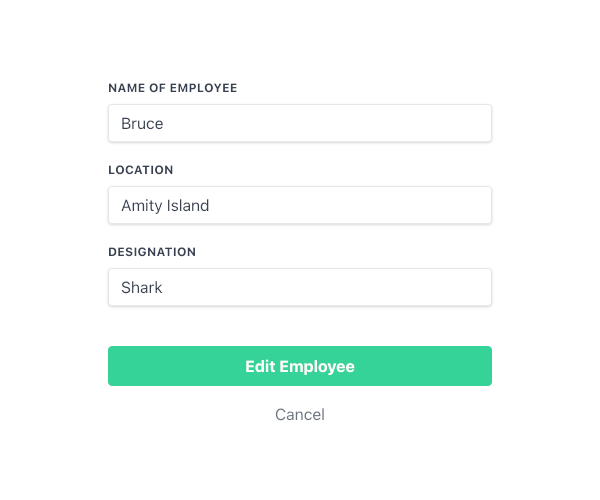
对员工的信息进行更改后,您将被路由回到首页组件,它现在将列出新员工的更新细节。
结论
在本文中,您使用了 Context API 和 React 绑架来构建一个功能齐全的 CRUD 应用程序。
如果您想了解更多关于 React 的信息,请查看我们的 如何在 React.js 中编码系列,或查看 我们的 React 主题页面以获取练习和编程项目。