在本教程中,我们将讨论并在我们的Android应用程序中实施NavigationView。
导航视图
我們已經在 這中實施了一個 Navigation Drawer 教程,編碼很累。 NavigationView 是更好的和更容易實施的替代方案,而 NavigationDrawer 要求我們使用 ListView/RecyclerView來實施項目,通過實施自定義適應器。 隨著導入 NavigationView,我們所需要的一切就是使用我們很快就會看到的菜單資源來膨脹項目。 NavigationView 通常會被放置在
导航启动
Android Studio provides us a ready made Navigation Drawer Activity that implements a standard Navigation Menu. You can choose it from the following dialog. 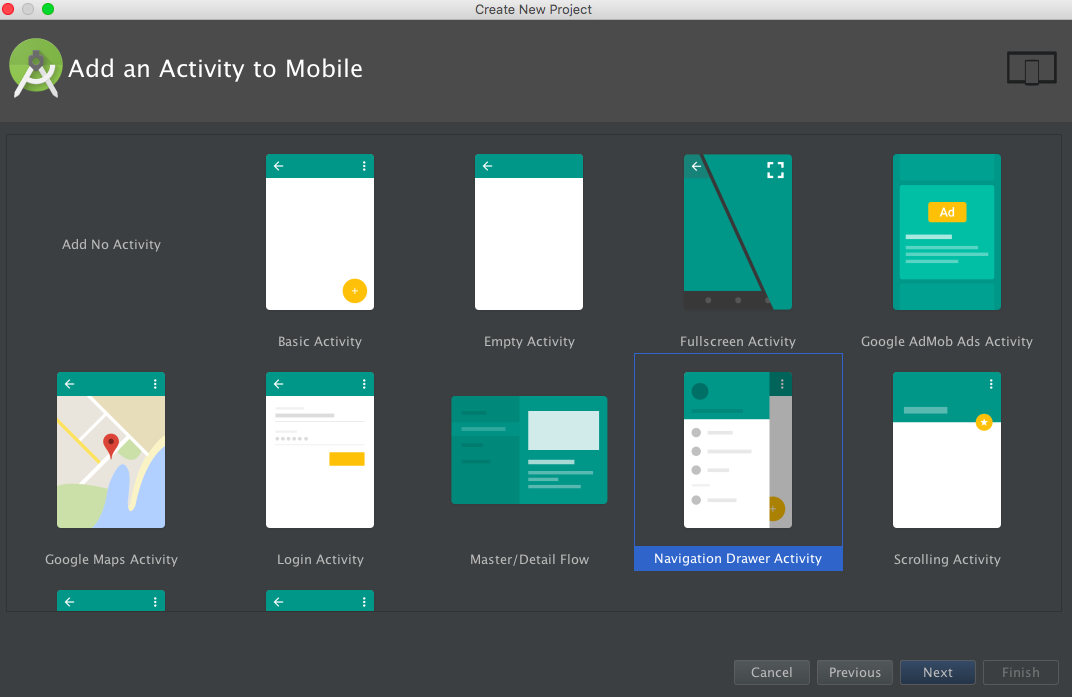
了解导航视图
NavigationView 类扩展 FrameLayout. 在标签下方的 xml 中定义为:
1<android.support.design.widget.NavigationView/>
NavigationView基本上由两个主要组成部分组成:
- HeaderView : 此视图通常显示在导航窗口的顶部。 它基本上包含个人资料图像、姓名电子邮件地址和背景封面图像。 此视图被定义为一个单独的布局文件,我们将仔细研究一下。 为了将布局添加到我们的 NavigationView,使用了 app:headerLayout参数
- Menu : 此视图显示在HeaderView下方,并且包含了所有导航项目的列表形式。 此布局文件被定义在菜单文件夹中。 为了将布局添加到NavigationView,使用了 :appusmen参数(MK1)
用于自定义 NavigationView 的其他重要 XML 属性包括:
- app:itemTextColor : 此变更文本颜色
- app:itemIconTint : 此变更图标颜色
- app:itemBackground : 此变更文本背景颜色
让我们看看内置的 NavigationView 模板的项目结构. activity_main.xml 是 MainActivity 的布局。
 1<?xml version="1.0" encoding="utf-8"?>
 2<android.support.v4.widget.DrawerLayout xmlns:android="https://schemas.android.com/apk/res/android"
 3    xmlns:app="https://schemas.android.com/apk/res-auto"
 4    xmlns:tools="https://schemas.android.com/tools"
 5    android:id="@+id/drawer_layout"
 6    android:layout_width="match_parent"
 7    android:layout_height="match_parent"
 8    android:fitsSystemWindows="true"
 9    tools:openDrawer="start">
10
11    <include
12        layout="@layout/app_bar_main"
13        android:layout_width="match_parent"
14        android:layout_height="match_parent" />
15
16    <android.support.design.widget.NavigationView
17        android:id="@+id/nav_view"
18        android:layout_width="wrap_content"
19        android:layout_height="match_parent"
20        android:layout_gravity="start"
21        android:fitsSystemWindows="true"
22        app:headerLayout="@layout/nav_header_main"
23        app:menu="@menu/activity_main_drawer" />
24
25</android.support.v4.widget.DrawerLayout>
** 注意**:上述 DrawerLayout 是包含导航盒内容和我们的应用程序内容的布局。 app_bar_main.xml 布局由一个 CoordinatorLayout 组成,该布局包含一个 ToolBar、一个 FloatingActionButton 和一个 content_main.xml 布局(显示一个基本的 Hello World 文本视图)。
 1<?xml version="1.0" encoding="utf-8"?>
 2<android.support.design.widget.CoordinatorLayout xmlns:android="https://schemas.android.com/apk/res/android"
 3    xmlns:app="https://schemas.android.com/apk/res-auto"
 4    xmlns:tools="https://schemas.android.com/tools"
 5    android:layout_width="match_parent"
 6    android:layout_height="match_parent"
 7    android:fitsSystemWindows="true"
 8    tools:context="com.journaldev.navigationviewstyling.MainActivity">
 9
10    <android.support.design.widget.AppBarLayout
11        android:layout_width="match_parent"
12        android:layout_height="wrap_content"
13        android:theme="@style/AppTheme.AppBarOverlay">
14
15        <android.support.v7.widget.Toolbar
16            android:id="@+id/toolbar"
17            android:layout_width="match_parent"
18            android:layout_height="?attr/actionBarSize"
19            android:background="?attr/colorPrimary"
20            app:popupTheme="@style/AppTheme.PopupOverlay" />
21
22    </android.support.design.widget.AppBarLayout>
23
24    <include layout="@layout/content_main" />
25
26    <android.support.design.widget.FloatingActionButton
27        android:id="@+id/fab"
28        android:layout_width="wrap_content"
29        android:layout_height="wrap_content"
30        android:layout_gravity="bottom|end"
31        android:layout_margin="@dimen/fab_margin"
32        android:src="@android:drawable/ic_dialog_email" />
33
34</android.support.design.widget.CoordinatorLayout>
content_main.xml布局如下所示:
 1<?xml version="1.0" encoding="utf-8"?>
 2<RelativeLayout xmlns:android="https://schemas.android.com/apk/res/android"
 3    xmlns:app="https://schemas.android.com/apk/res-auto"
 4    xmlns:tools="https://schemas.android.com/tools"
 5    android:layout_width="match_parent"
 6    android:layout_height="match_parent"
 7    android:paddingBottom="@dimen/activity_vertical_margin"
 8    android:paddingLeft="@dimen/activity_horizontal_margin"
 9    android:paddingRight="@dimen/activity_horizontal_margin"
10    android:paddingTop="@dimen/activity_vertical_margin"
11    app:layout_behavior="@string/appbar_scrolling_view_behavior"
12    tools:context="com.journaldev.navigationviewstyling.MainActivity"
13    tools:showIn="@layout/app_bar_main">
14
15    <TextView
16        android:layout_width="wrap_content"
17        android:layout_height="wrap_content"
18        android:text="Hello World!" />
19</RelativeLayout>
默认的HeaderLayout和NavigationView的菜单如下: nav_header_main.xml
 1<?xml version="1.0" encoding="utf-8"?>
 2<LinearLayout xmlns:android="https://schemas.android.com/apk/res/android"
 3    android:layout_width="match_parent"
 4    android:layout_height="@dimen/nav_header_height"
 5    android:background="@drawable/side_nav_bar"
 6    android:gravity="bottom"
 7    android:orientation="vertical"
 8    android:paddingBottom="@dimen/activity_vertical_margin"
 9    android:paddingLeft="@dimen/activity_horizontal_margin"
10    android:paddingRight="@dimen/activity_horizontal_margin"
11    android:paddingTop="@dimen/activity_vertical_margin"
12    android:theme="@style/ThemeOverlay.AppCompat.Dark">
13
14    <ImageView
15        android:id="@+id/imageView"
16        android:layout_width="wrap_content"
17        android:layout_height="wrap_content"
18        android:paddingTop="@dimen/nav_header_vertical_spacing"
19        android:src="@android:drawable/sym_def_app_icon" />
20
21    <TextView
22        android:layout_width="match_parent"
23        android:layout_height="wrap_content"
24        android:paddingTop="@dimen/nav_header_vertical_spacing"
25        android:text="Android Studio"
26        android:textAppearance="@style/TextAppearance.AppCompat.Body1" />
27
28    <TextView
29        android:id="@+id/textView"
30        android:layout_width="wrap_content"
31        android:layout_height="wrap_content"
32        android:text="[email protected]" />
33
34</LinearLayout>
「activity_main_drawer.xml」的內容
 1<menu xmlns:android="https://schemas.android.com/apk/res/android">
 2
 3    <group android:checkableBehavior="single">
 4        <item
 5            android:id="@+id/nav_camera"
 6            android:icon="@drawable/ic_menu_camera"
 7            android:title="Import" />
 8        <item
 9            android:id="@+id/nav_gallery"
10            android:icon="@drawable/ic_menu_gallery"
11            android:title="Gallery" />
12        <item
13            android:id="@+id/nav_slideshow"
14            android:icon="@drawable/ic_menu_slideshow"
15            android:title="Slideshow" />
16        <item
17            android:id="@+id/nav_manage"
18            android:icon="@drawable/ic_menu_manage"
19            android:title="Tools" />
20    </group>
21
22    <item android:title="Communicate">
23        <menu>
24            <item
25                android:id="@+id/nav_share"
26                android:icon="@drawable/ic_menu_share"
27                android:title="Share" />
28            <item
29                android:id="@+id/nav_send"
30                android:icon="@drawable/ic_menu_send"
31                android:title="Send" />
32        </menu>
33    </item>
34
35</menu>
该 android:checkable Behavior xml 属性为整个组定义,并采用下列三种值之一。
- 单个 : 可以检查组中的一个项目
- 全部 : 所有项目可以检查(检查框)
- 没有 : 没有项目可以检查
android:checkable ** 属性用于为单个项目设置可检查的行为. 它接受布尔值。 ** 注意:在 app:menus 布局中可以嵌入菜单项。
  1package com.journaldev.navigationviewstyling;
  2
  3import android.os.Bundle;
  4import android.support.design.widget.FloatingActionButton;
  5import android.support.design.widget.Snackbar;
  6import android.view.View;
  7import android.support.design.widget.NavigationView;
  8import android.support.v4.view.GravityCompat;
  9import android.support.v4.widget.DrawerLayout;
 10import android.support.v7.app.ActionBarDrawerToggle;
 11import android.support.v7.app.AppCompatActivity;
 12import android.support.v7.widget.Toolbar;
 13import android.view.Menu;
 14import android.view.MenuItem;
 15
 16public class MainActivity extends AppCompatActivity
 17        implements NavigationView.OnNavigationItemSelectedListener {
 18
 19    @Override
 20    protected void onCreate(Bundle savedInstanceState) {
 21        super.onCreate(savedInstanceState);
 22        setContentView(R.layout.activity_main);
 23        Toolbar toolbar = (Toolbar) findViewById(R.id.toolbar);
 24        setSupportActionBar(toolbar);
 25
 26        FloatingActionButton fab = (FloatingActionButton) findViewById(R.id.fab);
 27        fab.setOnClickListener(new View.OnClickListener() {
 28            @Override
 29            public void onClick(View view) {
 30                Snackbar.make(view, "Replace with your own action", Snackbar.LENGTH_LONG)
 31                        .setAction("Action", null).show();
 32            }
 33        });
 34
 35        DrawerLayout drawer = (DrawerLayout) findViewById(R.id.drawer_layout);
 36        ActionBarDrawerToggle toggle = new ActionBarDrawerToggle(
 37                this, drawer, toolbar, R.string.navigation_drawer_open, R.string.navigation_drawer_close);
 38        //drawer.setDrawerListener(toggle);
 39        drawer.addDrawerListener(toggle);
 40        toggle.syncState();
 41
 42        NavigationView navigationView = (NavigationView) findViewById(R.id.nav_view);
 43        navigationView.setNavigationItemSelectedListener(this);
 44    }
 45
 46    @Override
 47    public void onBackPressed() {
 48        DrawerLayout drawer = (DrawerLayout) findViewById(R.id.drawer_layout);
 49        if (drawer.isDrawerOpen(GravityCompat.START)) {
 50            drawer.closeDrawer(GravityCompat.START);
 51        } else {
 52            super.onBackPressed();
 53        }
 54    }
 55
 56    @Override
 57    public boolean onCreateOptionsMenu(Menu menu) {
 58        // Inflate the menu; this adds items to the action bar if it is present.
 59        getMenuInflater().inflate(R.menu.main, menu);
 60        return true;
 61    }
 62
 63    @Override
 64    public boolean onOptionsItemSelected(MenuItem item) {
 65        // Handle action bar item clicks here. The action bar will
 66        // automatically handle clicks on the Home/Up button, so long
 67        // as you specify a parent activity in AndroidManifest.xml.
 68        int id = item.getItemId();
 69
 70        //noinspection SimplifiableIfStatement
 71        if (id == R.id.action_settings) {
 72            return true;
 73        }
 74
 75        return super.onOptionsItemSelected(item);
 76    }
 77
 78    @SuppressWarnings("StatementWithEmptyBody")
 79    @Override
 80    public boolean onNavigationItemSelected(MenuItem item) {
 81        // Handle navigation view item clicks here.
 82        int id = item.getItemId();
 83
 84        if (id == R.id.nav_camera) {
 85            // Handle the camera action
 86        } else if (id == R.id.nav_gallery) {
 87
 88        } else if (id == R.id.nav_slideshow) {
 89
 90        } else if (id == R.id.nav_manage) {
 91
 92        } else if (id == R.id.nav_share) {
 93
 94        } else if (id == R.id.nav_send) {
 95
 96        }
 97
 98        DrawerLayout drawer = (DrawerLayout) findViewById(R.id.drawer_layout);
 99        drawer.closeDrawer(GravityCompat.START);
100        return true;
101    }
102}
以下是从上面的代码中得出的重要结论:
- 联合国 主要活动执行 ** Navigation View. OnNavigation Project Selected Listener** 并推翻** Navigation Project** 的方法。 我们处理菜单项 点击这里, 关闭绘图器向左。 让我们为下面的每个项目显示一个祝词信息 。 @ @ @ Override 在Navigation上公开布尔 项目已选定(梅努项目) { int id = 项目.get 项目Id(); _ 如果(id = R.id.nav_camera) { // 处理相机动作 Toast.makeText(Get ApplicationContext ()),"Camera被点击", Toast. LENGTH_SHORT.show ();
) 如果(id = r.id.nav_gallery) { Toast. makeText(Get ApplicationContext ()),"Gallery is clicked","Toast. LENGTH_SHORT.show ();
}如果(id = R.id.nav_ slipsshow) { Toast. makeText(Get ApplicationContext (,)) "滑道被点击","土司". LENGTH_SHORT. Show ();
) 如果(id = R.id.nav_manage) { Toast. makeText(Get ApplicationContext (,)) ,则其他的, "Tools被点击了", Toast. LENGTH_SHORT. Show ();
) 如果(id = R.id.nav_share) { Toast. MakeText(Get ApplicationContext (,)) "分享被点击", Toast. LENGTH_SHORT. show ();
} 如果(id = R.id.nav_send) ,则其他 { Toast. makeText(GetApplicationContext (,)), "发送被点击", Toast. LENGTH_SHORT.show ();
}
抽取器 布局抽屉 = (DrawerLayout) find ViewById(R.id.drawer_layout); 抽屉. closeDrawer(Gravity Compat.START); 返回真能; } *_ 2. ** Action Bar Drawer Toggle ** 已宣布为 :
- _ Action Bar Drawer 切换切换 = 新的 Action BarDrawerTogle ( ) 此选项, 抽屉, 工具栏, R. string.navigation_drawer_ open, R. string. navigation_drawer_ close); 使用 Action BarDrawerTogle 来实施 Navigh Drawers 建议的功能 。 其用法如下:- 它充当收听者,用于打开和关闭抽屉。
- 它提供了工具栏/动作栏中的汉堡图标. (_) ) - 它允许汉堡图标和箭头之间的动画存在. ** 注**:android. support.v4.app. Action Bar DrawerTogle已贬值. 总是使用android.support.v7.app. Action Bar DrawerTogle作为替换.
- 要在 DraverLayout 上添加一个收听器,使用以下方法.
drawer.add Drawer listener (toggle)' ;复制器。 该收听器用于随时通知抽屉事件. ** 注: setDrawer Listener(toggle)现在已贬值. - **toggle.syncState () **:将同步图标状态并显示汉堡图标或后箭头,视抽屉是关闭还是打开而定. 关闭抽屉时, 关闭这条代码线不会将后箭头改为汉堡图标 。
- **drawer. closeDrawer (Gravity Compat.START) ** : 用于关闭抽屉, 将重力设置为START( 默认左侧)
Here's how the default NavigationView looks like in an application: 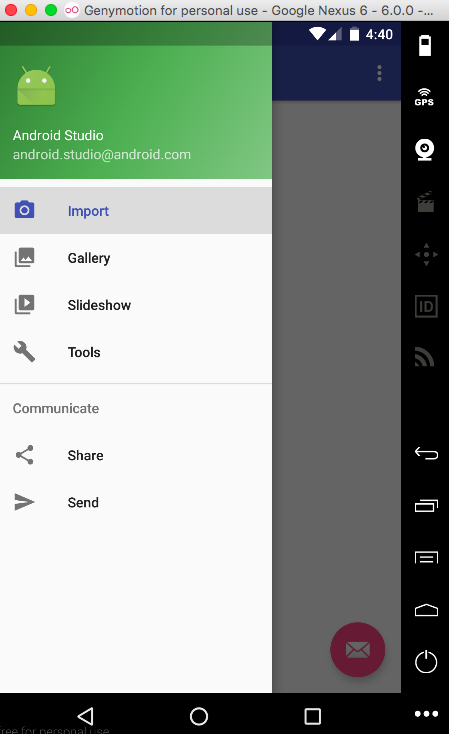 Note that the last clicked item always stays highlighted in the first group. To remove the highlight as soon as the drawer is closed change the android:checkableBehavior to "none". The current NavigationView is drawn over the status bar. To put it beneath the status bar set the android:fitsSystemWindows as "false" for the NavigationView.
 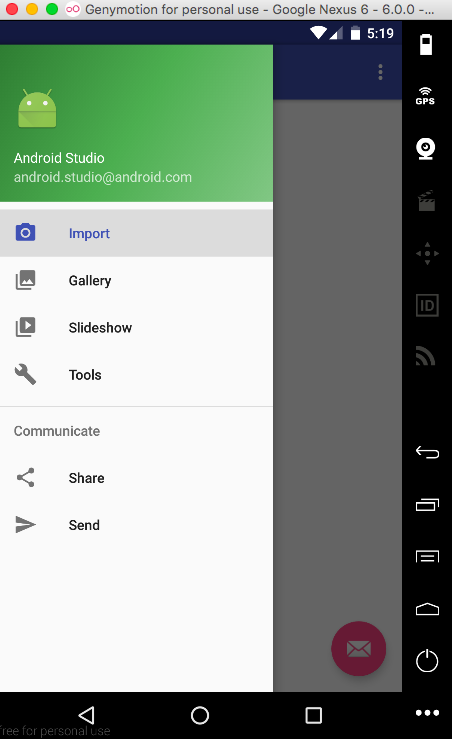 Now with the above attributes set we can further style the NavigationView by putting it under the ToolBar/ActionBar(Though this is not recommended in the Material Design Guidelines) by setting android:layout_marginTop="?attr/actionBarSize" in the NavigationView and also setting android:fitsSystemWindows="false" for CoordinatorLayout and DrawerLayout. With the above customisation done, this is how the output looks :
  You see the white status bar at the top? It's due to the android:fitSystemWindows set to false for CoordinatorLayout and the DrawerLayout. Styling the status bar in the styles.xml like
 @color/colorPrimaryDark won't change it. We need a better approach. The only alternative is to get rid of the CoordinatorLayout (we aren't using it's animation either) and to put the DrawerLayout and ToolBar inside a LinearLayout. Here are the update xml layouts: activity_main.xml
 1<?xml version="1.0" encoding="utf-8"?>
 2<LinearLayout xmlns:android="https://schemas.android.com/apk/res/android"
 3xmlns:app="https://schemas.android.com/apk/res-auto"
 4android:orientation="vertical"
 5android:layout_width="match_parent"
 6android:layout_height="match_parent">
 7
 8<!-- The toolbar -->
 9<android.support.v7.widget.Toolbar
10    android:id="@+id/toolbar"
11    android:layout_height="wrap_content"
12    android:layout_width="match_parent"
13    android:fitsSystemWindows="true"
14    android:minHeight="?attr/actionBarSize"
15    android:theme="@style/AppTheme.AppBarOverlay"
16    android:background="?attr/colorPrimary" />
17
18<android.support.v4.widget.DrawerLayout
19    xmlns:android="https://schemas.android.com/apk/res/android"
20    android:id="@+id/drawer_layout"
21    android:layout_width="match_parent"
22    android:fitsSystemWindows="true"
23    android:layout_height="match_parent">
24
25    <include
26        layout="@layout/app_bar_main"
27        android:layout_width="match_parent"
28        android:layout_height="match_parent" />
29
30    <android.support.design.widget.NavigationView
31        android:id="@+id/nav_view"
32        android:layout_width="wrap_content"
33        android:layout_height="match_parent"
34        android:layout_gravity="start"
35        android:fitsSystemWindows="true"
36        app:headerLayout="@layout/nav_header_main"
37        app:menu="@menu/activity_main_drawer" />
38
39</android.support.v4.widget.DrawerLayout>
40
41</LinearLayout>
android:fitSystemWindows="true" is necessary in the Toolbar. Omitting it, you'll end up with something like this! 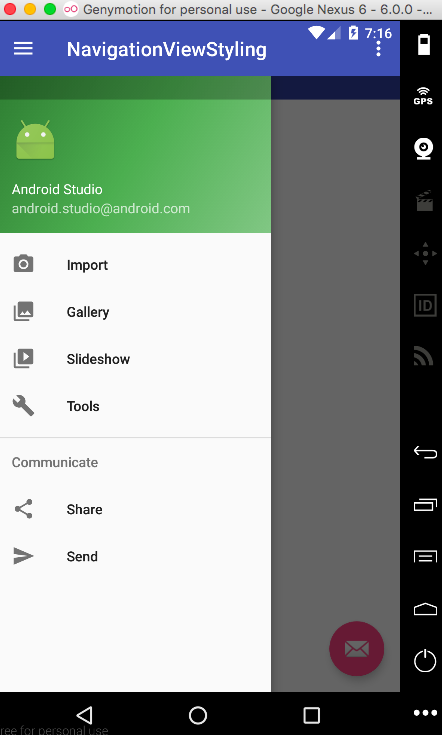 Note: Removing the xml attribute
 android:theme="@style/AppTheme.AppBarOverlay" would change the ToolBar items color to black. Give it a go! app_bar_main.xml
 1<?xml version="1.0" encoding="utf-8"?>
 2<RelativeLayout xmlns:android="https://schemas.android.com/apk/res/android"
 3    xmlns:tools="https://schemas.android.com/tools"
 4    android:layout_width="match_parent"
 5    android:layout_height="match_parent"
 6    tools:context="com.journaldev.navigationviewstyling.MainActivity">
 7
 8    <include layout="@layout/content_main" />
 9
10    <android.support.design.widget.FloatingActionButton
11        android:id="@+id/fab"
12        android:layout_width="wrap_content"
13        android:layout_height="wrap_content"
14        android:layout_gravity="bottom|end"
15        android:src="@android:drawable/ic_dialog_email"
16        android:layout_alignParentBottom="true"
17        android:layout_margin="@dimen/activity_horizontal_margin"
18        android:layout_alignParentRight="true"
19        android:layout_alignParentEnd="true" />
20
21</RelativeLayout>
This is how the application looks now.  Oh wait! The status bar color is identical with the ToolBar. It was supposed to be a shade darker. Solution: Just remove the following line from v-21/styles.xml
1<item name="android:statusBarColor">@android:color/transparent</item>
让我们定制NavigationView,以便它从右向左打开!
项目结构
We'll be adding our own hamburger icon png file into the drawable folder as shown below. 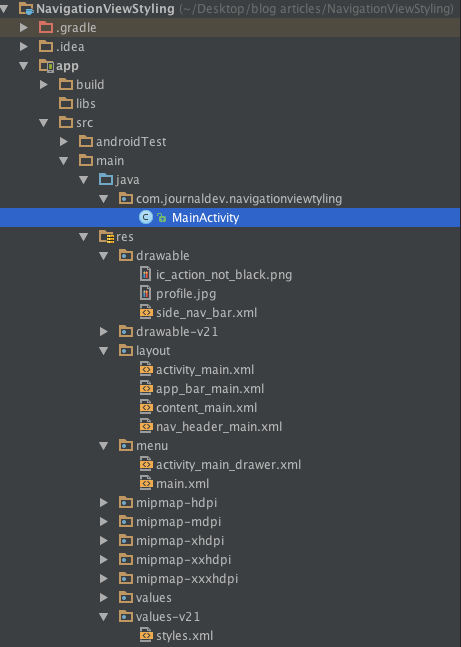
Android 导航 查看示例代码
activity_main.xml 布局现在定义为
 1<?xml version="1.0" encoding="utf-8"?>
 2<LinearLayout xmlns:android="https://schemas.android.com/apk/res/android"
 3    xmlns:app="https://schemas.android.com/apk/res-auto"
 4    xmlns:tools="https://schemas.android.com/tools"
 5    android:orientation="vertical"
 6    android:layout_width="match_parent"
 7    android:layout_height="match_parent">
 8
 9    <!-- The toolbar -->
10    <RelativeLayout
11        android:layout_width="match_parent"
12        android:fitsSystemWindows="true"
13        android:layout_height="wrap_content">
14
15        <android.support.v7.widget.Toolbar
16            android:id="@+id/toolbar"
17            android:layout_width="match_parent"
18            android:layout_height="wrap_content"
19            android:minHeight="?attr/actionBarSize"
20            android:background="?attr/colorPrimary"
21            android:fitsSystemWindows="true"
22            android:theme="@style/AppTheme.AppBarOverlay" />
23
24        <FrameLayout
25            android:id="@+id/drawer_button"
26            android:layout_width="50dp"
27            android:layout_height="?attr/actionBarSize"
28            android:fitsSystemWindows="true"
29            android:layout_alignParentRight="true"
30            android:clickable="true">
31
32            <ImageView
33                android:layout_width="wrap_content"
34                android:layout_height="wrap_content"
35                android:layout_gravity="center_horizontal|center_vertical"
36                android:src="@drawable/ic_action_not_black" />
37        </FrameLayout>
38
39    </RelativeLayout>
40
41    <android.support.v4.widget.DrawerLayout
42        xmlns:android="https://schemas.android.com/apk/res/android"
43        android:id="@+id/drawer_layout"
44        android:layout_width="match_parent"
45        android:fitsSystemWindows="true"
46        android:layout_height="match_parent"
47        tools:openDrawer="end">
48
49        <include
50            layout="@layout/app_bar_main"
51            android:layout_width="match_parent"
52            android:layout_height="match_parent" />
53
54        <android.support.design.widget.NavigationView
55            android:id="@+id/nav_view"
56            android:layout_width="wrap_content"
57            android:layout_height="match_parent"
58            android:layout_gravity="end"
59            android:fitsSystemWindows="true"
60            app:itemTextColor="#1d3f4c"
61            app:itemIconTint="#cd4312"
62            app:headerLayout="@layout/nav_header_main"
63            app:menu="@menu/activity_main_drawer" />
64
65    </android.support.v4.widget.DrawerLayout>
66
67</LinearLayout>
我们已经在 RelativeLayout 中放置了 FrameLayout 中的 ToolBar. android:fitSystemWindows 需要在所有三种中都设置为真实。 DrawerLayout 包含 tools:openDrawer="end' 和 android:layout_gravity="end',这会改变底盘的默认侧向右。理想情况下,一个圆形标题图像在 NavigationView 中看起来很漂亮。我们将编译依赖性 de.hdodenhof.circleimageview.CircleImageView' 并在我们的 nav_header_main.xml 文件中使用,如下所示。 nav_header_main.xml`
 1<?xml version="1.0" encoding="utf-8"?>
 2<LinearLayout xmlns:android="https://schemas.android.com/apk/res/android"
 3    android:layout_width="match_parent"
 4    android:layout_height="@dimen/nav_header_height"
 5    android:background="@drawable/side_nav_bar"
 6    android:gravity="bottom"
 7    android:orientation="vertical"
 8    android:paddingBottom="@dimen/activity_vertical_margin"
 9    android:paddingLeft="@dimen/activity_horizontal_margin"
10    android:paddingRight="@dimen/activity_horizontal_margin"
11    android:paddingTop="@dimen/activity_vertical_margin"
12    android:theme="@style/ThemeOverlay.AppCompat.Dark">
13
14    <de.hdodenhof.circleimageview.CircleImageView
15        android:id="@+id/imageView"
16        android:layout_width="75dp"
17        android:layout_height="75dp"
18        android:paddingTop="@dimen/nav_header_vertical_spacing"
19        android:src="@drawable/profile" />
20
21    <TextView
22        android:layout_width="match_parent"
23        android:layout_height="wrap_content"
24        android:paddingTop="@dimen/nav_header_vertical_spacing"
25        android:text="Anupam Chugh"
26        android:textAppearance="@style/TextAppearance.AppCompat.Body1" />
27
28    <TextView
29        android:id="@+id/textView"
30        android:layout_width="wrap_content"
31        android:layout_height="wrap_content"
32        android:text="www.JournalDev.com" />
33
34</LinearLayout>
其他 xml 布局与上面讨论的相同. 以下是 MainActivity.java
  1package com.journaldev.navigationviewtyling;
  2
  3import android.os.Bundle;
  4import android.support.design.widget.FloatingActionButton;
  5import android.support.design.widget.Snackbar;
  6import android.view.View;
  7import android.support.design.widget.NavigationView;
  8import android.support.v4.view.GravityCompat;
  9import android.support.v4.widget.DrawerLayout;
 10import android.support.v7.app.ActionBarDrawerToggle;
 11import android.support.v7.app.AppCompatActivity;
 12import android.support.v7.widget.Toolbar;
 13import android.view.MenuItem;
 14import android.widget.Toast;
 15
 16public class MainActivity extends AppCompatActivity
 17        implements NavigationView.OnNavigationItemSelectedListener {
 18
 19    DrawerLayout drawer;
 20
 21    @Override
 22    protected void onCreate(Bundle savedInstanceState) {
 23        super.onCreate(savedInstanceState);
 24        setContentView(R.layout.activity_main);
 25        Toolbar toolbar = (Toolbar) findViewById(R.id.toolbar);
 26        setSupportActionBar(toolbar);
 27
 28        drawer = (DrawerLayout) findViewById(R.id.drawer_layout);
 29
 30        findViewById(R.id.drawer_button).setOnClickListener(new View.OnClickListener() {
 31            @Override
 32            public void onClick(View v) {
 33                // open right drawer
 34
 35                if (drawer.isDrawerOpen(GravityCompat.END)) {
 36                    drawer.closeDrawer(GravityCompat.END);
 37                }
 38                else
 39                drawer.openDrawer(GravityCompat.END);
 40            }
 41        });
 42
 43        FloatingActionButton fab = (FloatingActionButton) findViewById(R.id.fab);
 44        fab.setOnClickListener(new View.OnClickListener() {
 45            @Override
 46            public void onClick(View view) {
 47                Snackbar.make(view, "Replace with your own action", Snackbar.LENGTH_LONG)
 48                        .setAction("Action", null).show();
 49            }
 50        });
 51
 52        ActionBarDrawerToggle toggle = new ActionBarDrawerToggle(
 53                this, drawer, toolbar, R.string.navigation_drawer_open, R.string.navigation_drawer_close);
 54        toggle.setDrawerIndicatorEnabled(false);
 55        drawer.addDrawerListener(toggle);
 56
 57        toggle.syncState();
 58
 59        NavigationView navigationView = (NavigationView) findViewById(R.id.nav_view);
 60        navigationView.setNavigationItemSelectedListener(this);
 61    }
 62
 63    @Override
 64    public void onBackPressed() {
 65
 66        if (drawer.isDrawerOpen(GravityCompat.END)) {
 67            drawer.closeDrawer(GravityCompat.END);
 68        } else {
 69            super.onBackPressed();
 70        }
 71    }
 72
 73    @SuppressWarnings("StatementWithEmptyBody")
 74    @Override
 75    public boolean onNavigationItemSelected(MenuItem item) {
 76        // Handle navigation view item clicks here.
 77        int id = item.getItemId();
 78
 79        if (id == R.id.nav_camera) {
 80            // Handle the camera action
 81            Toast.makeText(getApplicationContext(), "Camera is clicked", Toast.LENGTH_SHORT).show();
 82
 83        } else if (id == R.id.nav_gallery) {
 84            Toast.makeText(getApplicationContext(), "Gallery is clicked", Toast.LENGTH_SHORT).show();
 85
 86        } else if (id == R.id.nav_slideshow) {
 87            Toast.makeText(getApplicationContext(), "Slideshow is clicked", Toast.LENGTH_SHORT).show();
 88
 89        } else if (id == R.id.nav_manage) {
 90            Toast.makeText(getApplicationContext(), "Tools is clicked", Toast.LENGTH_SHORT).show();
 91
 92        } else if (id == R.id.nav_share) {
 93            Toast.makeText(getApplicationContext(), "Share is clicked", Toast.LENGTH_SHORT).show();
 94
 95        } else if (id == R.id.nav_send) {
 96            Toast.makeText(getApplicationContext(), "Send is clicked", Toast.LENGTH_SHORT).show();
 97
 98        }
 99
100        DrawerLayout drawer = (DrawerLayout) findViewById(R.id.drawer_layout);
101        drawer.closeDrawer(GravityCompat.END);
102        return true;
103    }
104}
从上面的代码中得出的重要结论是:
toggle.setDrawerIndicatorEnabled(false);: 此行用于隐藏在左侧显示的默认汉堡图标- 所有 GravityCompat 常数现在更改为 END而不是 START
The output of the application in action is given below.  This brings an end to android NavigationView tutorial. You can download the final Android NavigationViewStyling Project from the link below.