介绍
redux-form是一个很好的方法来管理由 Redux驱动的表单。它是一个高级组件(HOC),它使用 react-redux来确保React中的HTML表单使用Redux来存储其所有状态。
redux-form 包含以下组件,可帮助您构建应用程序:
formReducer():这是一个函数,告诉你如何根据应用程序的变化更新Redux商店;这些变化是由Redux操作所描述的。formReducer必须安装在Redux状态在form.reduxForm():reduxForm()函数是一个更高级别的组件,它采取了配置对象,它总是返回一个新的函数。 它被用来包装表单组件,并将用户互动绑定到Redux发送操作<Field/>组件: 一个组件生活在你的包装表单组件内部。 它作为连接形式中的输入元素到redux-form 逻辑的途径。 换句话说,这是我们从用户
您可以在其 文档中阅读有关redux-form API 的更多信息。
在本教程中,您将使用 redux-form来构建具有验证的表单,并将其连接到 Redux 商店。
前提条件
要完成本教程,您将需要:
- Node.js 的本地开发环境 遵循 如何安装 Node.js 并创建本地开发环境
步骤1 - 创建项目
我们将使用 create-react-app包构建一个 React 应用程序。 create-react-app 允许您在没有构建配置的情况下创建 React 应用程序。
1npx create-react-app contact-redux
重要的是要注意,「npx」只适用于「npm」版本的版本,这些版本是 5.2 或更高版本. 如果您有比此版本更低的版本,并且仍然希望在您的计算机上使用「create-react-app」。
1npm install -g create-react-app
2create-react-app contact-redux
导航到目录并启动开发服务器以确保一切正常工作. 运行以下命令以在开发模式下启动新创建的 React 应用程序:
1npm start
您将在您的浏览器中看到以下内容:

我们现在有一个 React 应用程序并运行。
运行以下命令来添加您对表单所需的依赖。
1npm install --save redux react-redux redux-form
- redux - 一个状态容器,它是 redux-form 工作的前提条件.
- react-redux - React Redux 是 Redux 的官方 React 绑定,也是 redux-form 工作的前提条件
- redux-form - 本教程使用的包
一旦安装完毕,您就可以在联系表单上工作。
步骤二:创建形式
我们将添加一个 Bulma CDN 链接到 index.html 文件,以便添加一些默认样式。
1[label public/index.html]
2    <link rel="stylesheet" href="https://cdnjs.cloudflare.com/ajax/libs/bulma/0.6.2/css/bulma.min.css">
我们现在将对src/App.js文件进行一些编辑,打开src/App.js文件并在文件顶部添加下面的代码行。
1[label src/App.js]
2import { reduxForm, Field } from 'redux-form';
接下来,进入render()函数,并使用以下代码修改它:
 1[label src/App.js]
 2render() {
 3    return (
 4      <div className="App">
 5        <header className="App-header">
 6          <img src={logo} className="App-logo" alt="logo" />
 7          <h1 className="App-title">Welcome to React x redux-form</h1>
 8        </header>
 9        <div className="container">
10          <p className="App-intro">
11            Contact Form
12          </p>
13          <SignInForm />
14        </div>
15      </div>
16    );
17  }
介绍文本已被更改,最重要的是我们添加了一个<SignInForm />组件,我们将在下面创建它将是一个简单的组件,返回我们需要的表格,它将被连接到redux-form组件。
 1[label src/App.js]
 2let SignInForm = props => {
 3  return <form className="form">
 4    <div className="field">
 5      <div className="control">
 6        <label className="label">First Name</label>
 7        <Field className="input" name="firstName" component="input" type="text" placeholder="First Name"/>
 8      </div>
 9    </div>
10
11    <div className="field">
12      <div className="control">
13        <label className="label">Last Name</label>
14        <Field className="input" name="lastName" component="input" type="text" placeholder="Last Name"/>
15      </div>
16    </div>
17
18    <div className="field">
19      <div className="control">
20        <label className="label">Email</label>
21        <Field className="input" name="email" component="input" type="email" placeholder="Email Address"/>
22      </div>
23    </div>
24
25    <div className="field">
26      <div className="control">
27        <label className="label">Proficiency</label>
28        <div className="select">
29          <Field className="input" name="proficiency" component="select">
30            <option />
31            <option value="beginner">Beginner Dev</option>
32            <option value="intermediate">Intermediate Dev</option>
33            <option value="expert">Expert Dev</option>
34          </Field>
35        </div>
36      </div>
37    </div>
38
39    <div className="field">
40      <div className="control">
41        <label className="label">Age</label>
42        <Field className="input" name="age" component="input" type="number" placeholder="Age"/>
43      </div>
44    </div>
45
46    <div className="field">
47      <div className="control">
48        <label className="checkbox">
49          <Field name="saveDetails" id="saveDetails" component="input" type="checkbox"/>
50          Save Details
51        </label>
52      </div>
53    </div>
54
55    <div className="field">
56      <div className="control">
57        <label className="label">Message</label>
58        <Field className="textarea" name="message" component="textarea" />
59      </div>
60    </div>
61
62    <div className="field">
63      <div className="control">
64        <button className="button is-link">Submit</button>
65      </div>
66    </div>
67
68  </form>;
69};
在此代码中,我们设置了一个最小的联系表格,要求用户提供姓名、姓名和年龄等信息。
Field组件来自redux-form包,这就是我们写的input字段的方式。 type prop 表示它应该是哪种类型的输入,即无线电输入、检查箱输入、文本输入或电子邮件输入。
因此,为了使用连接到 redux 形式的表格,我们需要有一种已经创建的 Redux 商店,这就是我们接下来要做的。
步骤 3 – 设置一个 Redux 商店
我们需要一个Redux商店,在那里我们可以连接我们创建的表单组件(‘SignInForm’)。让我们先导入‘redux’包。打开‘src/index.js’文件,并添加以下代码行,我们基本上正在导入‘redux’到React应用。
1[label src/index.js]
2import { createStore, combineReducers } from 'redux';
3import { Provider } from 'react-redux';
4import { reducer as formReducer } from 'redux-form';
代码的第一行导入 createStore 和 combineReducers. createStore有助于创建一个 Redux 商店,其中包含您的应用程序的完整状态树,而 combineReducers有助于管理您的所有减量函数到一个单一的辅助函数,然后可以转移到 createStore。
第二行代码从react-redux中导入供应商。供应商有助于将商店状态传递给应用程序中的所有容器组件,我们将稍后演示如何工作。
代码的第三行将reducer导入为formReducer,这就是我们将用来将我们的表格连接到Redux商店的用途。
接下来,我们将创建实际的Redux商店,并通过使用供应商组件确保它适用于所有容器组件。
 1[label src/index.js]
 2import React from 'react';
 3import ReactDOM from 'react-dom';
 4
 5import { createStore, combineReducers } from 'redux';
 6import { Provider } from 'react-redux';
 7import { reducer as formReducer } from 'redux-form';
 8
 9import './index.css';
10import App from './App';
11import registerServiceWorker from './registerServiceWorker';
12
13const rootReducer = combineReducers({
14  form: formReducer,
15});
16
17const store = createStore(rootReducer);
18
19ReactDOM.render(
20  <Provider store={store}>
21    <App />
22  </Provider>,
23  document.getElementById('root')
24);
25
26registerServiceWorker();
在上面的代码块中,我们使用combineReducers函数将formReducer从表单连接到Redux商店. 它基本上用来更新我们的任何状态以响应行动,在这种情况下,是对表单的更改。
此新创建的商店随后通过提供商的帮助向应用程序的所有部分提供,该商店围绕应用程序组件包装,并接受上面创建的商店的商店支持。
让我们回到表格,最后将其连接到商店。
## 步骤 4 – 将表格连接到 redux-form
我们有我们的表单组件,但它还没有连接到redux-form。让我们解决这个问题。在class App extends Component之前,然后在 SignInForm 演示组件的声明后立即输入下面的这个代码块。
1[label src/index.js]
2SignInForm = reduxForm({
3  form: 'signIn',
4})(SignInForm);
在上面的代码块中,‘SignInForm’是通过使用‘reduxForm’ Higher Order 组件将其变成一个 redux 连接的表单,这意味着我们的表单现在已连接到商店。 一个值得注意的就是配置键‘form’,它被用作标识符,并且用于为表单组件提供一个独特的名称。
接下来我们要做的就是配置我们点击提交按钮时会发生什么。在一个理想的应用程序中,你想将数据发送到远程API或某些数据库,但为了演示,我们会将表单数据登录到浏览器控制台。
在SignInForm组件中,添加返回语句上方的代码行。
1[label src/index.js]
2  const { handleSubmit } = props;
3  return <form **onSubmit={handleSubmit}** className="form">
在SignInForm表格中的props被摧毁为handleSubmit。在点击submit按钮时,在表格中使用handleSubmit函数作为onSubmit事件的处理器。
最后,在src/App.js文件中的App组件中,我们将创建一个函数,将表单数据登录到浏览器控制台,然后在render()函数之前将下面的代码块添加到文件中。
1[label src/App.js]
2  handleSignIn = values => {
3    	console.log(values);
4    };
然后添加handleSignIn函数作为SignInForm组件的事件处理器。redux-form将自动确保从表单中获取的数据,这基本上是SignInForm组件应该通过上面的handleSubmit函数登录到控制台。
1[label src/App.js]
2    <SignInForm onSubmit={this.handleSignIn} />
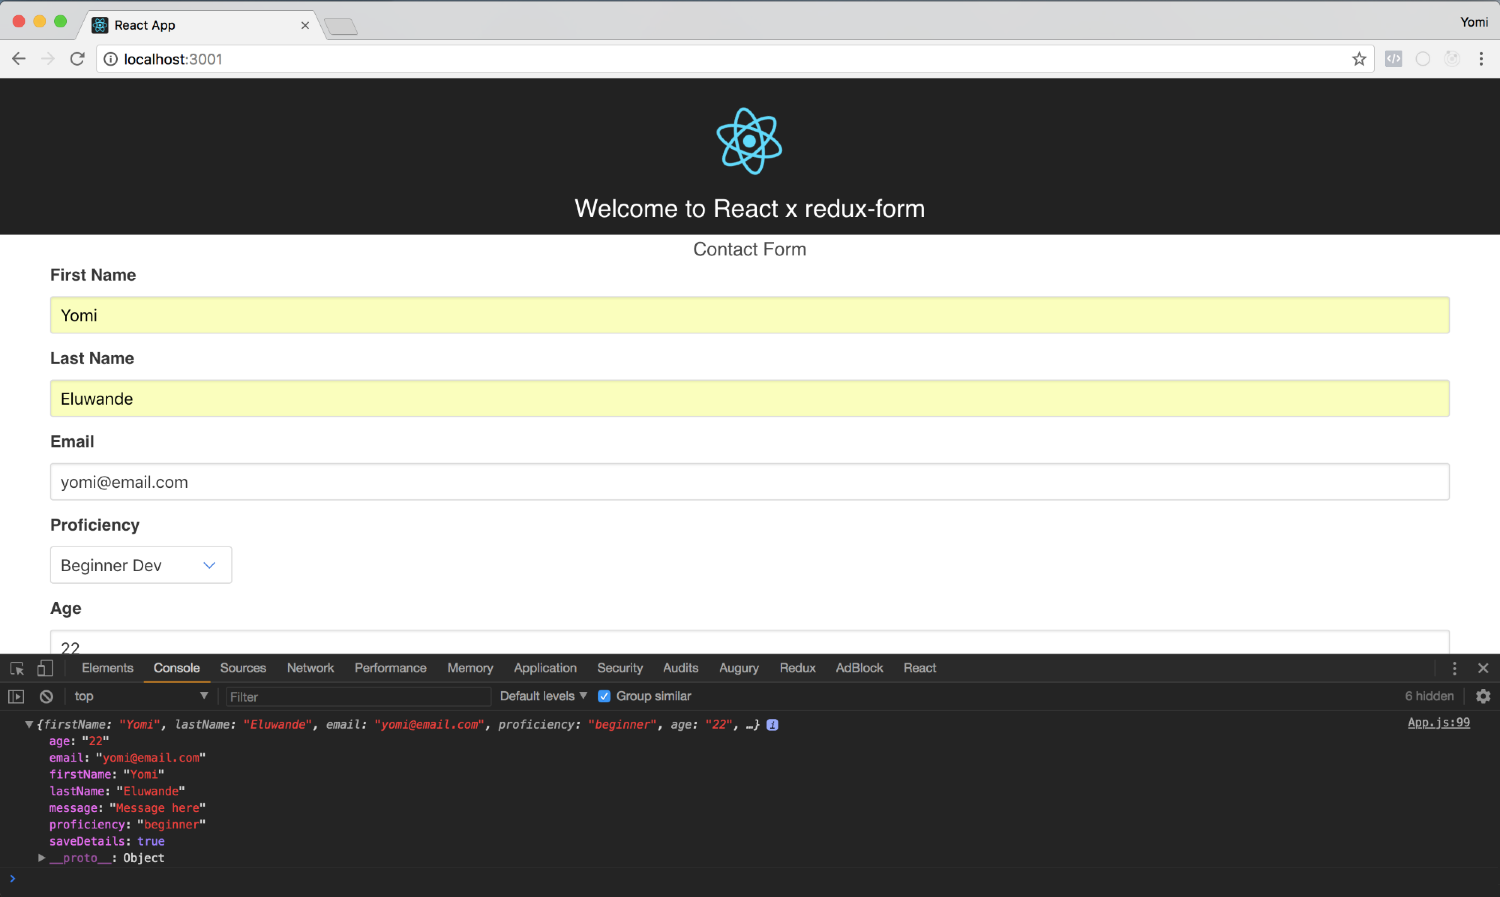
您现在可以通过运行npm start终端命令来启动应用程序. 填写表单,单击提交,您将看到登录到控制台的值。
步骤 5 – 添加验证
验证对于构建表单和具有某些验证功能的redux-form船舶至关重要,我们现在将实现这一点,在src/App.js文件中,键入下面代码块。
 1[label src/App.js]
 2const validate = val => {
 3  const errors = {};
 4  if (!val.firstName) {
 5    console.log('First Name is required');
 6    errors.firstName = 'Required';
 7  }
 8  if (!val.lastName) {
 9    console.log('Last Name is required');
10    errors.lastName = 'Required';
11  }
12  if (!val.email) {
13    console.log('email is required');
14    errors.email = 'Required';
15  } else if (!/^.+@.+$/i.test(val.email)) {
16    console.log('email is invalid');
17    errors.email = 'Invalid email address';
18  }
19  if (!val.age) {
20    errors.age = 'Required'
21  } else if (isNaN(Number(val.age))) {
22    errors.age = 'Must be a number'
23  } else if (Number(val.age) < 18) {
24    errors.age = 'Sorry, you must be at least 18 years old'
25  }
26  return errors;
27};
验证函数用于检查表单中的验证错误。val参数将用于检查不同字段的验证。我们首先检查错误对象是否空,一个空对象显然意味着没有错误。然后我们使用条件逻辑来检查一个字段是否空,如果是,你会抛出相应的错误。在上面的代码块中,我们只对firstName,lastName,email和age进行验证
在email验证条件中,我们检查它是否空,并检查它是否是使用reggex和age验证条件的有效电子邮件,我们检查它是否空,一个数字和如果用户小于18岁。
接下来,我们将我们的验证函数注册为redux-form,以便它可以开始使用它进行验证测试。
1[label src/index.js]
2
3SignInForm = reduxForm({
4  form: 'signIn',
5  validate,
6})(SignInForm);
现在,我们已经准备好了验证功能,并在redux-form HOC 中注册,建立一个可重复使用的组件,在任何时候显示错误,并在我们的表单中使用新创建的组件。
 1[label src/index.js]
 2
 3const renderField = ({ input, label, type, meta: { touched, error, warning } }) => (
 4  <div>
 5    <div className="control">
 6      <label className="field">{label}</label>
 7      <input className="input" {...input} placeholder={label} type={type}/>
 8      {touched && ((error && <span>{error}</span>) || (warning && <span>{warning}</span>))}
 9    </div>
10  </div>
11)
该renderField组件将输入对象、标签、输入类型和meta作为一个redux-form属性的附加组件。{touched && ((error && <span>{error}</span>)线条(警告 && {warning}))意味着在点击或聚焦表单字段时,错误消息应该显示是否存在任何错误。
现在,如果您检查表单并尝试输入任何无效的输入或跳过具有验证测试的字段,则应该在表单底部发出错误消息。

结论
在本教程中,您创建了一个用redux-form的表单,并将其连接到Redux商店. 您在不需要外部方案验证器的情况下在表单上添加了同步验证。
您可以阅读更多关于‘redux-form’(官方网站)(https://redux-form.com/7.0.1/)和你可以通过他们的 例子进一步探索。
您可以在 GitHub上找到本教程的完整代码。