欢迎来到JSF Primefaces教程。 JavaServer Faces是当今用于实现JavaWeb应用程序用户界面的领先框架之一。
JSF 首页 教程
The process of rendering the view in JSF does pass through what known as JSF lifecycle. This tutorial isn't intended for providing you a detailed discussion of how lifecycle works or how could we deal with. It's just a notification about what you should know about the JSF framework and how get JSF view ready for rendering. 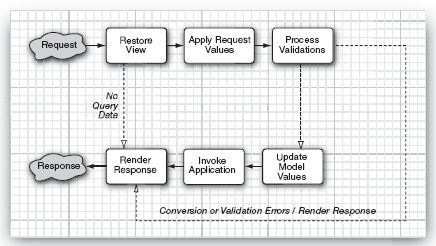 JSF has two major implementations till the time in which the article written, oracle implementation Mojarra and Apache MyFaces implementation. Several JSF libraries has been coming into existence, Richfaces, IceFaces, Primefaces, MyFaces, etc and one of the most lead library that used intensively and has an excellent reputation is Primefaces. Primefaces cellabrate before months ago by releasing the Primefaces 5 which will consider the subject of this tutorial and next coming tutorials. For being able of using the primefaces 5, you must install and configure it into your project. Either you are going to use a simple text editor or an enterprise development environment, by ending of this tutorial you will be ready for discovering the all Primefaces components.
JSF 2 有什么新鲜事
我们知道,JavaServer Faces是开发丰富的用户界面网页的框架. JSF在多起Java社区请求JSR中被引入了,最终于2009年于"Jul"发布[JSF 2 (https://jcp.org/en/jsr/detail?id=314),包含了一组增强和新的功能. 一套后果是继JSF 2之后产生的,最后一项是2013年5月发布的[JSF 2.2(https://www.jcp.org/en/jsr/detail?id=344). 与JSF 1.x不同的是,JSF 2.x 一直以许多特征出现,比如使用说明来宣布JSF管理的豆子,转换器,验证器,范围等. 不只是这样 JSF 2 提供了一个新的范围,比如 View 范围,自定义范围,流程范围以及对话范围等等。 而且,我们不能忘记JSF 2中添加的最惊人的特征,这是Ajax的概念. 在联森论坛2中,Ajax从本质上将联森论坛框架纳入其中。 因此,任何JSF组件都可以通过简单地添加Ajax的成分来被活化. 航行规则也发生了变化,也容易得多。 接下来的教程将涵盖更多关于 JSF 2 添加的功能, 而在这个教程中, 你会创建简单的 JSF 应用程序, 和一个bsic 样本,我们如何使用 Primefaces 标签 来实施某些商业方案.
用于完成教程的工具
要开始探索本教程,您必须使用以下开发工具。
- Tomcat 7
- 屏蔽 IDE
- Maven 3
- JSF 2 / 首页 5
It's obvious that we've used the Tomcat 7 for deploying the application and Eclipse IDE for developing the required components where the Maven used as building tool and for managing dependencies. So, be sure that you are aware of how could be all of these softwares installed and configured into your development machine. Our final project will look like below image. 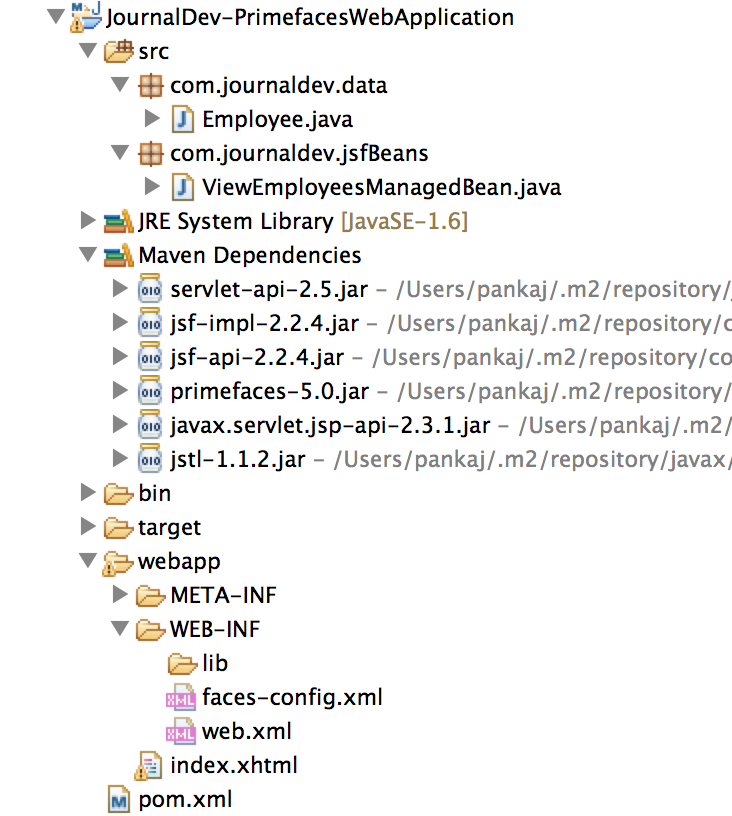
创建 Eclipse 项目
Eclipse IDE 支持在 Dynamic Project 伞下开发 Web 项目. 若要创建动态项目,只需遵循以下步骤:
- 打开 Eclipse IDE
- 右键单击项目探索器空间并选择 新 - 动态 Web 项目
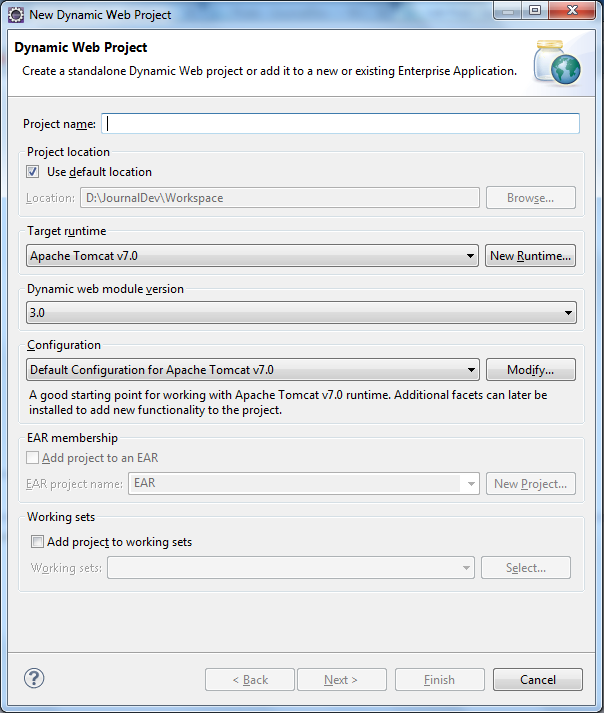
完成项目创建过程,设置项目名称、目标运行时间、源文件夹、背景根、内容目录和 web.xml
JSF 安装与配置
正如我们之前提到的,我们的目标是使用 JSF/Primefaces 开发使用 primefaces 用户界面组件的 Web 应用程序,但目前我们所拥有的只是一个简单的动态应用程序,需要更多的步骤来配置 jsf。
- 打开创建项目的属性窗口
- 从项目面孔窗口,只需检查JavaServer面孔,然后按照 进一步配置需要完成配置 3.一旦您点击了 进一步配置需要,必须显示JSF能力窗口
- 通过点击 下载库并从打开窗口中选择JSF 2.2(Mojarra 2.2.0) 添加 jsf实现库
After installing the JSF library, the JSF capabilities window looks like 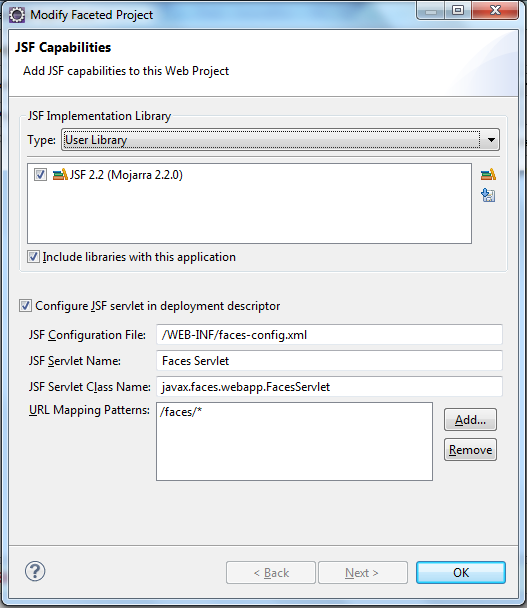 By end of this phase, you have a web application with jsf capabilities.
第5章 安装
目前,您的应用程序已经准备好使用JavaServer Faces用户界面,但没有使用Primefaces。
1.从 primefaces 官方网站或从 Maven central 下载所需的 primefaces 库 2. 将下载的 Primefaces JAR 包含在您的 lib 文件夹中 WEB-INF 文件夹下方
开发初级应用程序
现在,你的项目已经准备好开发一个JSF/Primefaces应用程序,正如你所看到的。我们将创建一个简单的应用程序,其中Primefaces DataTable已经消耗了来自支持豆的员工列表。
- 创建一个名为 ViewEmployeesManagedBean 的管理信号2. 创建一个名为 Employee的 Pojo,其中包含 EmployeeName和 EmployeeId
- 创建一个 Primefaces 视图,以便在定义的管理信号中消耗员工列表
 1package com.journaldev.data;
 2
 3public class Employee {
 4    private String employeeId;
 5    private String employeeName;
 6    public String getEmployeeId() {
 7    	return employeeId;
 8    }
 9    public void setEmployeeId(String employeeId) {
10    	this.employeeId = employeeId;
11    }
12    public String getEmployeeName() {
13    	return employeeName;
14    }
15    public void setEmployeeName(String employeeName) {
16    	this.employeeName = employeeName;
17    }
18}
 1package com.journaldev.jsfBeans;
 2
 3import java.util.ArrayList;
 4import java.util.List;
 5
 6import javax.annotation.PostConstruct;
 7import javax.faces.bean.ManagedBean;
 8import javax.faces.bean.SessionScoped;
 9
10import com.journaldev.data.Employee;
11
12@ManagedBean
13@SessionScoped
14public class ViewEmployeesManagedBean {
15    private List<Employee> employees = new ArrayList<Employee>();
16
17    public ViewEmployeesManagedBean(){
18
19    }
20
21    @PostConstruct
22    public void populateEmployeeList(){
23    	for(int i = 1 ; i <= 10 ; i++){
24    		Employee emp = new Employee();
25    		emp.setEmployeeId(String.valueOf(i));
26    		emp.setEmployeeName("Employee#"+i);
27    		this.employees.add(emp);
28    	}
29    }
30
31    public List<Employee> getEmployees() {
32    	return employees;
33    }
34
35    public void setEmployees(List<Employee> employees) {
36    	this.employees = employees;
37    }
38}
注意使用 JSF 注释和使用 PostConstruct 注释来填充员工列表。
 1<!DOCTYPE html PUBLIC "-//W3C//DTD XHTML 1.0 Transitional//EN" "https://www.w3.org/TR/xhtml1/DTD/xhtml1-transitional.dtd">
 2<html xmlns="https://www.w3.org/1999/xhtml"
 3    xmlns:ui="https://java.sun.com/jsf/facelets"
 4    xmlns:h="https://java.sun.com/jsf/html"
 5    xmlns:f="https://java.sun.com/jsf/core"
 6    xmlns:p="https://primefaces.org/ui">
 7<p:outputLabel value="JournalDev - JSF2/Primefaces Tutorial"></p:outputLabel>
 8<p:dataTable value="#{viewEmployeesManagedBean.employees}" var="employee">
 9    <p:column>
10    	<f:facet name="header">
11    		<h:outputText value="Employee ID"></h:outputText>
12    	</f:facet>
13    	<h:outputText value="#{employee.employeeId}"></h:outputText>
14    </p:column>
15    <p:column>
16    	<f:facet name="header">
17    		<h:outputText value="Employee Name"></h:outputText>
18    	</f:facet>
19    	<h:outputText value="#{employee.employeeName}"></h:outputText>
20    </p:column>
21</p:dataTable>
22</html>
注意使用dataTable元素来创建表从管理的豆属性。PrimeFaces和JSF负责将这些传输到视图页面进行渲染。如果您来自Servlet背景,您可以很容易地看到步骤的数量被削减 - 在servlet环境中,我们首先在servlet中处理请求,创建模型数据,将其设置为请求/会话中的属性,然后将其传送到JSP页面以提供响应。
 1<?xml version="1.0" encoding="UTF-8"?>
 2<web-app xmlns:xsi="https://www.w3.org/2001/XMLSchema-instance"
 3    xmlns="https://java.sun.com/xml/ns/javaee"
 4    xsi:schemaLocation="https://java.sun.com/xml/ns/javaee https://java.sun.com/xml/ns/javaee/web-app_3_0.xsd"
 5    id="WebApp_ID" version="3.0">
 6    <display-name>JournalDev-PrimefacesWebApplication</display-name>
 7    <servlet>
 8    	<servlet-name>Faces Servlet</servlet-name>
 9    	<servlet-class>javax.faces.webapp.FacesServlet</servlet-class>
10    	<load-on-startup>1</load-on-startup>
11    </servlet>
12    <servlet-mapping>
13    	<servlet-name>Faces Servlet</servlet-name>
14    	<url-pattern>/faces/*</url-pattern>
15    </servlet-mapping>
16    <context-param>
17    	<description>State saving method: 'client' or 'server' (=default). See JSF Specification 2.5.2</description>
18    	<param-name>javax.faces.STATE_SAVING_METHOD</param-name>
19    	<param-value>client</param-value>
20    </context-param>
21    <context-param>
22    	<param-name>javax.servlet.jsp.jstl.fmt.localizationContext</param-name>
23    	<param-value>resources.application</param-value>
24    </context-param>
25    <listener>
26    	<listener-class>com.sun.faces.config.ConfigureListener</listener-class>
27    </listener>
28</web-app>
请注意,javax.faces.webapp.FacesServlet是控制器类,这就是我们将JSF插入到我们的Web应用程序的地方。
1<?xml version="1.0" encoding="UTF-8"?>
2<faces-config
3    xmlns="https://xmlns.jcp.org/xml/ns/javaee"
4    xmlns:xsi="https://www.w3.org/2001/XMLSchema-instance"
5    xsi:schemaLocation="https://xmlns.jcp.org/xml/ns/javaee https://xmlns.jcp.org/xml/ns/javaee/web-facesconfig_2_2.xsd"
6    version="2.2">
7
8</faces-config>
This is where we provide JSF components configurations such as managed beans, i18n global messages, custom view handlers and custom factory classes. Since we are using annotations and it's a simple project, there is no configuration done here, but we will see it's usage in future posts. Now when you will run this, you will get output as shown in below image. 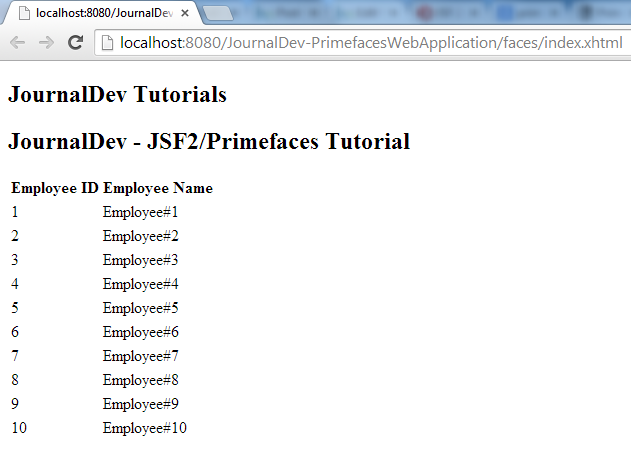
转换为 Maven
Maven 是管理 Java 项目构建和依赖的最受欢迎的方式,所以在这里我们将看到如何将其转换为 Maven. Eclipse IDE 提供将您的 Dynamic Web Project 转换为 Maven 的选项。 Maven 将帮助您控制和管理所需的依赖。只需右键单击创建的项目,并从配置菜单中选择 转换为 Maven Project。一旦您将您的项目转换为 Maven,您必须添加所需的依赖来使项目由 Maven 自己编译。
 1<project xmlns="https://maven.apache.org/POM/4.0.0" xmlns:xsi="https://www.w3.org/2001/XMLSchema-instance"
 2    xsi:schemaLocation="https://maven.apache.org/POM/4.0.0 https://maven.apache.org/xsd/maven-4.0.0.xsd">
 3    <modelVersion>4.0.0</modelVersion>
 4    <groupId>JournalDev-PrimefacesWebApplication</groupId>
 5    <artifactId>JournalDev-PrimefacesWebApplication</artifactId>
 6    <version>0.0.1-SNAPSHOT</version>
 7    <packaging>war</packaging>
 8    <build>
 9    	<sourceDirectory>src</sourceDirectory>
10    	<plugins>
11    		<plugin>
12    			<artifactId>maven-compiler-plugin</artifactId>
13    			<version>3.1</version>
14    			<configuration>
15    				<source>1.6</source>
16    				<target>1.6</target>
17    			</configuration>
18    		</plugin>
19    		<plugin>
20    			<artifactId>maven-war-plugin</artifactId>
21    			<version>2.3</version>
22    			<configuration>
23    				<warSourceDirectory>webapp</warSourceDirectory>
24    				<failOnMissingWebXml>false</failOnMissingWebXml>
25    			</configuration>
26    		</plugin>
27    	</plugins>
28    	<finalName>${project.artifactId}</finalName>
29    </build>
30    <repositories>
31    	<repository>
32    		<id>prime-repo</id>
33    		<name>PrimeFaces Maven Repository</name>
34    		<url>https://repository.primefaces.org</url>
35    		<layout>default</layout>
36    	</repository>
37    </repositories>
38    <dependencies>
39    	<!-- Servlet -->
40    	<dependency>
41    		<groupId>javax.servlet</groupId>
42    		<artifactId>servlet-api</artifactId>
43    		<version>2.5</version>
44    		<scope>provided</scope>
45    	</dependency>
46    	<!-- Faces Implementation -->
47    	<dependency>
48    		<groupId>com.sun.faces</groupId>
49    		<artifactId>jsf-impl</artifactId>
50    		<version>2.2.4</version>
51    	</dependency>
52    	<!-- Faces Library -->
53    	<dependency>
54    		<groupId>com.sun.faces</groupId>
55    		<artifactId>jsf-api</artifactId>
56    		<version>2.2.4</version>
57    	</dependency>
58    	<!-- Primefaces Version 5 -->
59    	<dependency>
60    		<groupId>org.primefaces</groupId>
61    		<artifactId>primefaces</artifactId>
62    		<version>5.0</version>
63    	</dependency>
64    	<!-- JSP Library -->
65    	<dependency>
66    		<groupId>javax.servlet.jsp</groupId>
67    		<artifactId>javax.servlet.jsp-api</artifactId>
68    		<version>2.3.1</version>
69    	</dependency>
70    	<!-- JSTL Library -->
71    	<dependency>
72    		<groupId>javax.servlet</groupId>
73    		<artifactId>jstl</artifactId>
74    		<version>1.1.2</version>
75    	</dependency>
76    </dependencies>
77</project>
并且通过对该项目执行 mvn clean package,您将获得一个WAR文件,准备对任何Java EE容器进行部署。
摘要
本教程介绍了如何使用 JSF 2 / Primefaces 来实现 Web 应用程序的用户界面。在其中,我们使用了 Eclipse IDE 来实现这一目标,通过创建动态项目,然后添加所有必要的库,无论是强制执行 JSF 2 还是使用 Primefaces 组件所需的库。
下载PrimeFaces Hello World Project
从上面的链接下载样本项目,并与之一起玩,以了解更多信息。 参考: Primefaces 官方网站