验证机制允许用户通过验证用户名和密码来安全访问应用程序. 我们将使用 JSF 视图用于登录,DAO 对象,HttpSession 用于会话管理,JSF 管理棒和 mysql 数据库. 现在让我们详细看看如何在 JSF 应用程序中创建一个 JSF 登录退出验证机制。
1CREATE TABLE Users(
2uid int(20) NOT NULL AUTO_INCREMENT,
3uname VARCHAR(60) NOT NULL,
4password VARCHAR(60) NOT NULL,
5PRIMARY KEY(uid));
在这里,我们创建了用户表,以 uid 作为主要密钥、用户名和密码字段而没有 null 限制。
1INSERT INTO Users VALUES(1,'adam','adam');
Before we move on to our project related code, below image shows the project structure in Eclipse. Just create a dynamic web project and convert it to maven to get the project stub and then keep on adding different components. 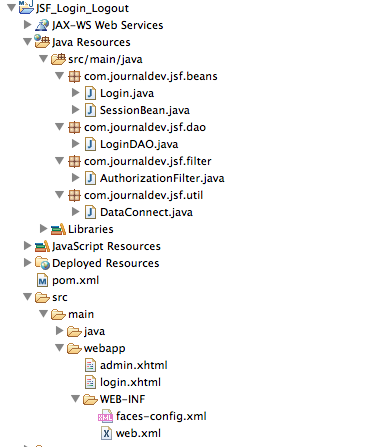 Step 3: Create the JSF login page
 login.xhtml as;
 1<?xml version='1.0' encoding='UTF-8' ?>
 2<!DOCTYPE html PUBLIC "-//W3C//DTD XHTML 1.0 Transitional//EN" "https://www.w3.org/TR/xhtml1/DTD/xhtml1-transitional.dtd">
 3<html xmlns="https://www.w3.org/1999/xhtml"
 4    xmlns:h="https://java.sun.com/jsf/html">
 5<h:head>
 6    <title>login</title>
 7</h:head>
 8<h:body>
 9    <h:form>
10    	<h3>JSF Login Logout</h3>
11    	<h:outputText value="Username" />
12    	<h:inputText id="username" value="#{login.user}"></h:inputText>
13    	<h:message for="username"></h:message>
14    	<br></br><br></br>
15
16    	<h:outputText value="Password" />
17    	<h:inputSecret id="password" value="#{login.pwd}"></h:inputSecret>
18    	<h:message for="password"></h:message>
19    	<br></br><br></br>
20
21    	<h:commandButton action="#{login.validateUsernamePassword}"
22    		value="Login"></h:commandButton>
23    </h:form>
24</h:body>
25</html>
在这里,我们正在创建一个 JSF 登录视图页面,用用户名和密码字段,并通过登录管理棒设置这些字段的值。我们在点击登录按钮时呼吁验证UsernamePassword方法来验证用户名和密码。
 1package com.journaldev.jsf.beans;
 2
 3import java.io.Serializable;
 4
 5import javax.faces.application.FacesMessage;
 6import javax.faces.bean.ManagedBean;
 7import javax.faces.bean.SessionScoped;
 8import javax.faces.context.FacesContext;
 9import javax.servlet.http.HttpSession;
10
11import com.journaldev.jsf.dao.LoginDAO;
12import com.journaldev.jsf.util.SessionUtils;
13
14@ManagedBean
15@SessionScoped
16public class Login implements Serializable {
17
18    private static final long serialVersionUID = 1094801825228386363L;
19
20    private String pwd;
21    private String msg;
22    private String user;
23
24    public String getPwd() {
25    	return pwd;
26    }
27
28    public void setPwd(String pwd) {
29    	this.pwd = pwd;
30    }
31
32    public String getMsg() {
33    	return msg;
34    }
35
36    public void setMsg(String msg) {
37    	this.msg = msg;
38    }
39
40    public String getUser() {
41    	return user;
42    }
43
44    public void setUser(String user) {
45    	this.user = user;
46    }
47
48    //validate login
49    public String validateUsernamePassword() {
50    	boolean valid = LoginDAO.validate(user, pwd);
51    	if (valid) {
52    		HttpSession session = SessionUtils.getSession();
53    		session.setAttribute("username", user);
54    		return "admin";
55    	} else {
56    		FacesContext.getCurrentInstance().addMessage(
57    				null,
58    				new FacesMessage(FacesMessage.SEVERITY_WARN,
59    						"Incorrect Username and Passowrd",
60    						"Please enter correct username and Password"));
61    		return "login";
62    	}
63    }
64
65    //logout event, invalidate session
66    public String logout() {
67    	HttpSession session = SessionUtils.getSession();
68    	session.invalidate();
69    	return "login";
70    }
71}
我们声明三个字符串变量用户, pwd 和 msg 用于用户名,密码和错误消息领域,以及 getter 和 setter 方法。 我们写一种方法 validateUsernamePassword() 来验证用户名和密码领域,通过召唤 LoginDAO 类来从数据库中提取用户名和密码,并将其与前端值进行比较。如果用户名和密码不匹配错误消息显示为 Incorrect username and password'. 还写了一种 logout()` 方法来执行登录,通过无效 HTTPSession 附加。 步骤 5:现在创建下面的 LoginDAO java 类。 注意数据库操作代码没有优化用于实际项目,我写了它尽快,因为这个想法是
 1package com.journaldev.jsf.dao;
 2
 3import java.sql.Connection;
 4import java.sql.PreparedStatement;
 5import java.sql.ResultSet;
 6import java.sql.SQLException;
 7
 8import com.journaldev.jsf.util.DataConnect;
 9
10public class LoginDAO {
11
12    public static boolean validate(String user, String password) {
13    	Connection con = null;
14    	PreparedStatement ps = null;
15
16    	try {
17    		con = DataConnect.getConnection();
18    		ps = con.prepareStatement("Select uname, password from Users where uname = ? and password = ?");
19    		ps.setString(1, user);
20    		ps.setString(2, password);
21
22    		ResultSet rs = ps.executeQuery();
23
24    		if (rs.next()) {
25    			//result found, means valid inputs
26    			return true;
27    		}
28    	} catch (SQLException ex) {
29    		System.out.println("Login error -->" + ex.getMessage());
30    		return false;
31    	} finally {
32    		DataConnect.close(con);
33    	}
34    	return false;
35    }
36}
在验证()方法中,我们首先通过召唤DataConnect类getConnection方法来建立连接到数据库,我们使用PreparedStatement来构建查询以从数据库中获取用户输入的值。
 1package com.journaldev.jsf.util;
 2
 3import java.sql.Connection;
 4import java.sql.DriverManager;
 5
 6public class DataConnect {
 7
 8    public static Connection getConnection() {
 9    	try {
10    		Class.forName("com.mysql.jdbc.Driver");
11    		Connection con = DriverManager.getConnection(
12    				"jdbc:mysql://localhost:3306/cardb", "pankaj", "pankaj123");
13    		return con;
14    	} catch (Exception ex) {
15    		System.out.println("Database.getConnection() Error -->"
16    				+ ex.getMessage());
17    		return null;
18    	}
19    }
20
21    public static void close(Connection con) {
22    	try {
23    		con.close();
24    	} catch (Exception ex) {
25    	}
26    }
27}
我們使用「Class.forName」方法下載 [JDBC 驅動程式](/community/tutorials/jdbc-example-mysql-oracle 「JDBC 示例教程 - 驅動程式、連線、聲明和結果集」),並使用「DriverManager.getConnection」方法傳遞 URL、使用者名稱和密碼來連接到資料庫。
 1package com.journaldev.jsf.beans;
 2
 3import javax.faces.context.FacesContext;
 4import javax.servlet.http.HttpServletRequest;
 5import javax.servlet.http.HttpSession;
 6
 7public class SessionUtils {
 8
 9    public static HttpSession getSession() {
10    	return (HttpSession) FacesContext.getCurrentInstance()
11    			.getExternalContext().getSession(false);
12    }
13
14    public static HttpServletRequest getRequest() {
15    	return (HttpServletRequest) FacesContext.getCurrentInstance()
16    			.getExternalContext().getRequest();
17    }
18
19    public static String getUserName() {
20    	HttpSession session = (HttpSession) FacesContext.getCurrentInstance()
21    			.getExternalContext().getSession(false);
22    	return session.getAttribute("username").toString();
23    }
24
25    public static String getUserId() {
26    	HttpSession session = getSession();
27    	if (session != null)
28    		return (String) session.getAttribute("userid");
29    	else
30    		return null;
31    }
32}
在这里,我们获得了通过 getUserId 方法登录的每个用户的会话,从而将会话 ID 与特定用户 ID 相关联。
 1package com.journaldev.jsf.filter;
 2
 3import java.io.IOException;
 4import javax.servlet.Filter;
 5import javax.servlet.FilterChain;
 6import javax.servlet.FilterConfig;
 7import javax.servlet.ServletException;
 8import javax.servlet.ServletRequest;
 9import javax.servlet.ServletResponse;
10import javax.servlet.annotation.WebFilter;
11import javax.servlet.http.HttpServletRequest;
12import javax.servlet.http.HttpServletResponse;
13import javax.servlet.http.HttpSession;
14
15@WebFilter(filterName = "AuthFilter", urlPatterns = { "*.xhtml" })
16public class AuthorizationFilter implements Filter {
17
18    public AuthorizationFilter() {
19    }
20
21    @Override
22    public void init(FilterConfig filterConfig) throws ServletException {
23
24    }
25
26    @Override
27    public void doFilter(ServletRequest request, ServletResponse response,
28    		FilterChain chain) throws IOException, ServletException {
29    	try {
30
31    		HttpServletRequest reqt = (HttpServletRequest) request;
32    		HttpServletResponse resp = (HttpServletResponse) response;
33    		HttpSession ses = reqt.getSession(false);
34
35    		String reqURI = reqt.getRequestURI();
36    		if (reqURI.indexOf("/login.xhtml") >= 0
37    				|| (ses != null && ses.getAttribute("username") != null)
38    				|| reqURI.indexOf("/public/") >= 0
39    				|| reqURI.contains("javax.faces.resource"))
40    			chain.doFilter(request, response);
41    		else
42    			resp.sendRedirect(reqt.getContextPath() + "/faces/login.xhtml");
43    	} catch (Exception e) {
44    		System.out.println(e.getMessage());
45    	}
46    }
47
48    @Override
49    public void destroy() {
50
51    }
52}
在 doFilter 方法中,我们将用户重定向到登录页面,如果他们试图访问其他页面而无需登录。
 1<?xml version='1.0' encoding='UTF-8' ?>
 2<!DOCTYPE html PUBLIC "-//W3C//DTD XHTML 1.0 Transitional//EN"
 3 "https://www.w3.org/TR/xhtml1/DTD/xhtml1-transitional.dtd">
 4<html xmlns="https://www.w3.org/1999/xhtml"
 5    xmlns:h="https://java.sun.com/jsf/html">
 6<h:head>
 7    <title>Facelet Title</title>
 8</h:head>
 9<h:body>
10    <h:form>
11    	<p>Welcome #{login.user}</p>
12    	<h:commandLink action="#{login.logout}" value="Logout"></h:commandLink>
13    </h:form>
14</h:body>
15</html>
此页面在用户成功登录时被渲染。登录功能通过调用Login.java类的登录方法来实现。 步骤 10:创建face-config.xml文件作为;
 1<?xml version='1.0' encoding='UTF-8'?>
 2<faces-config version="2.2" xmlns="https://xmlns.jcp.org/xml/ns/javaee"
 3    xmlns:xsi="https://www.w3.org/2001/XMLSchema-instance"
 4    xsi:schemaLocation="https://xmlns.jcp.org/xml/ns/javaee
 5    https://xmlns.jcp.org/xml/ns/javaee/web-facesconfig_2_2.xsd">
 6
 7    <navigation-rule>
 8    	<from-view-id>/login.xhtml</from-view-id>
 9    	<navigation-case>
10    		<from-outcome>admin</from-outcome>
11    		<to-view-id>/admin.xhtml</to-view-id>
12    	</navigation-case>
13    </navigation-rule>
14
15</faces-config>
Once done with all the steps specified above run the application and see the following output in the browser. Login Page  Authentication Error Page
  Login Success Page
 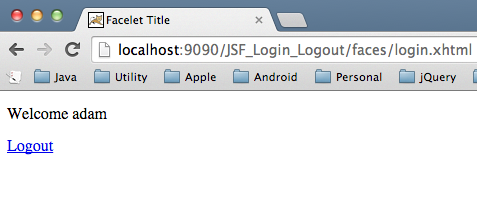 Accessing admin.xhtml while logged in
  Just click on the Logout link and the session will be invalidated, after that try to access admin.xhtml page and you will be redirected to the login page, go ahead and download the project from below link and try it out.