在这里,我们将学习关于Web服务,Web服务中的有用的概念,然后我们在Java中创建Web服务的不同类型的API。
什么是Web服务
简单地说,可以通过网络访问的服务被称为Web服务,所以它如何与Web应用程序不同,它们也是通过网络访问的服务。
- Web 应用程序的目的是用户,并在浏览器中访问具有人类可读格式的浏览器,而 Web 服务的目的是应用程序访问 XML, JSON 等格式的数据
- Web 应用程序总是使用 HTTP/HTTPS 协议,而传统的 Web 服务使用 SOAP 协议。最近 REST 越来越受欢迎,这是一个建筑风格,几乎总是运行在 HTTP/HTTPS 协议上
- Web 应用程序不是用于重复使用,而这是 Web 服务的优势之一。
我希望上述差异足以清除与Web应用程序和Web服务的任何混淆,这两者都是不同的概念,有不同的目的。
网站服务类型
有两种类型的Web服务。
SOAP: SOAP 代表简单对象访问协议 SOAP 是一个基于 XML 的行业标准协议,用于设计和开发 Web 服务. 由于它基于 XML,它是平台和语言独立的,所以我们的服务器可以基于 JAVA,客户端可以基于.NET,PHP 等,反之亦然 2. REST: REST 是开发 Web 服务的建筑风格。 最近它越来越受欢迎,因为它与 SOAP 相比,学习曲线很小。
Java Web 服务
Java 提供自己的 API 来创建 SOAP 和 REST 网页服务。
JAX-WS: JAX-WS 是 XML 基于的 Java API,用于构建 Web 服务器和客户端应用程序. 2. JAX-RS: Java API for RESTful Web Services (JAX-RS) 是创建 REST Web 服务的 Java API。
这两个 API 都是标准 JDK 安装的一部分,所以我们不需要添加任何瓶子来使用它们。
Hello World JAX-WS 应用程序
让我们创建一个非常简单的Hello World JAX-WS应用程序。
 1package com.journaldev.jaxws.service;
 2
 3import javax.jws.WebMethod;
 4import javax.jws.WebService;
 5import javax.jws.soap.SOAPBinding;
 6import javax.xml.ws.Endpoint;
 7
 8@WebService
 9@SOAPBinding(style = SOAPBinding.Style.DOCUMENT)
10public class TestService {
11
12    @WebMethod
13    public String sayHello(String msg){
14    	return "Hello "+msg;
15    }
16
17    public static void main(String[] args){
18    	Endpoint.publish("https://localhost:8888/testWS", new TestService());
19    }
20}
That's it. Just run this application and our Hello World JAX-WS SOAP web service is published. Below image shows the invocation of this JAX-WS web service through SOAP UI. 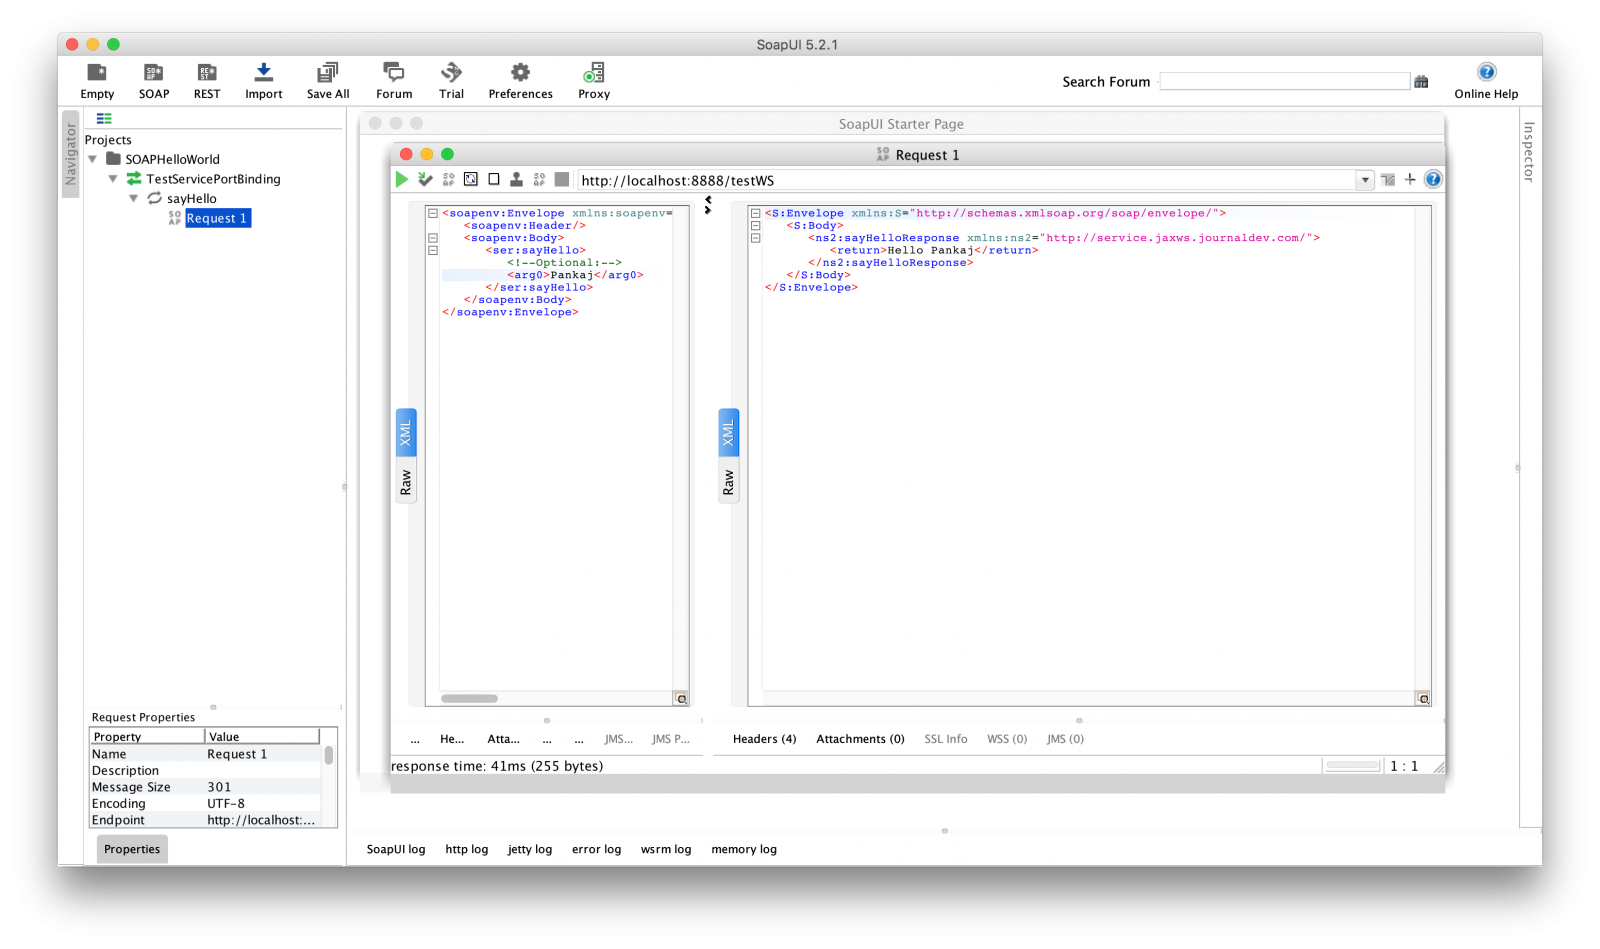 That's it for a very basic tutorial of JAX-WS web service. Below are some of the articles you should read for better understanding of SOAP web services and JAX-WS.
JAX-WS 教程 2. JAX-WS Web Service Deployment on Tomcat 3. SOAP Web Service Example using Eclipse and Apache Axis 4. Apache Axis 2 Web Services Tutorial
Hello World JAX-RS 应用程序
Jersey 是 JAX-RS API 的参考实现,它不是标准 JDK 的组成部分,我们必须包含所有所需的罐头。最好的方法是使用 Maven 构建,所以创建一个简单的动态 Web 项目,然后在 Eclipse 中将其转换为 Maven。
 1<project xmlns="https://maven.apache.org/POM/4.0.0" xmlns:xsi="https://www.w3.org/2001/XMLSchema-instance"
 2    xsi:schemaLocation="https://maven.apache.org/POM/4.0.0 https://maven.apache.org/xsd/maven-4.0.0.xsd">
 3    <modelVersion>4.0.0</modelVersion>
 4    <groupId>JAX-RS-HelloWorld</groupId>
 5    <artifactId>JAX-RS-HelloWorld</artifactId>
 6    <version>0.0.1-SNAPSHOT</version>
 7    <packaging>war</packaging>
 8
 9    <dependencies>
10    	<dependency>
11    		<groupId>com.sun.jersey</groupId>
12    		<artifactId>jersey-server</artifactId>
13    		<version>1.19</version>
14    	</dependency>
15    	<dependency>
16    		<groupId>com.sun.jersey</groupId>
17    		<artifactId>jersey-servlet</artifactId>
18    		<version>1.19</version>
19    	</dependency>
20    </dependencies>
21
22    <build>
23    	<sourceDirectory>src</sourceDirectory>
24    	<plugins>
25    		<plugin>
26    			<artifactId>maven-war-plugin</artifactId>
27    			<version>2.6</version>
28    			<configuration>
29    				<warSourceDirectory>WebContent</warSourceDirectory>
30    				<failOnMissingWebXml>false</failOnMissingWebXml>
31    			</configuration>
32    		</plugin>
33    		<plugin>
34    			<artifactId>maven-compiler-plugin</artifactId>
35    			<version>3.3</version>
36    			<configuration>
37    				<source>1.7</source>
38    				<target>1.7</target>
39    			</configuration>
40    		</plugin>
41    	</plugins>
42    </build>
43</project>
现在将 Jersey servlet 添加到我们的部署描述器 web.xml 作为前置控制器。
 1<?xml version="1.0" encoding="UTF-8"?>
 2<web-app xmlns:xsi="https://www.w3.org/2001/XMLSchema-instance"
 3    xmlns="https://xmlns.jcp.org/xml/ns/javaee"
 4    xsi:schemaLocation="https://xmlns.jcp.org/xml/ns/javaee https://xmlns.jcp.org/xml/ns/javaee/web-app_3_1.xsd"
 5    id="WebApp_ID" version="3.1">
 6    <display-name>JAX-RS-HelloWorld</display-name>
 7
 8    <servlet>
 9    	<servlet-name>Jersey REST Service</servlet-name>
10    	<servlet-class>com.sun.jersey.spi.container.servlet.ServletContainer</servlet-class>
11    	<init-param>
12    		<param-name>com.sun.jersey.config.property.packages</param-name>
13    		<param-value>com.journaldev.jaxrs.service</param-value>
14    	</init-param>
15    	<load-on-startup>1</load-on-startup>
16    </servlet>
17    <servlet-mapping>
18    	<servlet-name>Jersey REST Service</servlet-name>
19    	<url-pattern>/*</url-pattern>
20    </servlet-mapping>
21</web-app>
上面的两个步骤是初始设置所需的,下面是我们的Hello World JAX-RS服务类。
 1package com.journaldev.jaxrs.service;
 2
 3import javax.ws.rs.GET;
 4import javax.ws.rs.Path;
 5import javax.ws.rs.PathParam;
 6
 7@Path("/test")
 8public class TestService {
 9
10    @GET
11    @Path("/hello/{msg}")
12    public String sayHello(@PathParam(value="msg") String msg){
13    	return "Hello "+msg;
14    }
15}
Just export it as WAR file and then access it in the browser as shown in below image.  You can change the last part of URL and returned message will change accordingly. You can see how easy it was to create RESTful web service using JAX-RS API. However there is more to it, follow below articles to learn more.
这是为了快速介绍Java网络服务,最后,如果你正在为任何面试做准备,然后通过Web服务面试问题( / 社区 / 教程 / 网络服务 - 面试 - 问题 - 肥皂 - 休息)。