If you’ve ever tried to send large files then you would definitely know about 7Zip. From almost 2 decades now, 7Zip allowed us to get a higher compression ratio. Apart from getting high compression ratio, you can get support for extracting and compressing RAR files on Ubuntu with 7Zip. Apart from the GUI, you have used in Windows computers, 7Zip is also available to use with CLI with p7zip command. There are two other packages which you can install according to your requirement. You can use the p7zip-rar if you have to deal with the RAR files. In this tutorial, we will demonstrate to you how you can install and use 7Zip on Ubuntu 18.04. We will also provide a small tutorial of using 7z on Ubuntu directly from CLI. 
如何在Ubuntu上安装p7zip?
7Zip 可在 Ubuntu 存储库中作为一个名为 p7zip的软件包提供。 它也可以在其他基于 Linux 的系统上安装apt或任何其他软件包管理器。
1sudo apt update
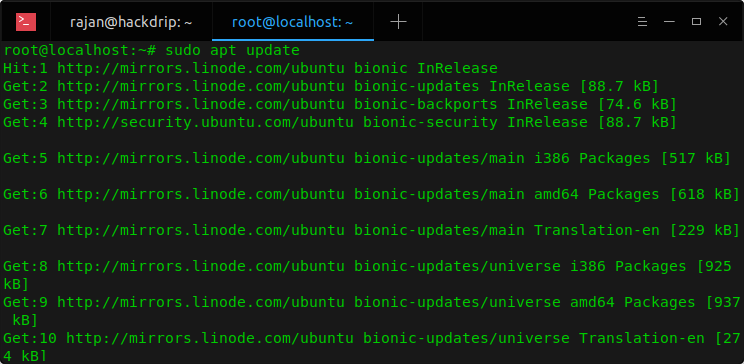 To install 7zip on your Ubuntu server or Desktop, open terminal (Ctrl + T) and enter the following command.
1sudo apt install p7zip-full p7zip-rar

在您的终端中执行此操作后,p7zip 将被安装为 CLI 实用程序 7z。
7Zip 语法与使用
17z <command> [<switch>...] <base_archive_name> [<arguments>...] [<@listfiles...>]
您可以使用7zip的命令和交换机在下面提供它们的含义。
7 Zip 指令
- a:将文件添加到档案
- b:基准
- d:从档案 中删除文件* e:从档案中提取文件(不使用目录名称)
- l:列出档案的内容
- t:测试档案的完整性
- u:将文件更新到档案
- x:用完整的路径提取文件
7Zip 交换机
- **-ai[r [-|0]] * * listfile * *! wildcard * * : 包含存档
- **-ax [r [-|0] *% listfile *%!wildcard *%: 不包括档案
- ** -- -- bd**: 禁用百分比指标
- @-i[r [-|0]] 列表文件! wildcard : 包含文件名( _) * **-m{平方厘米 *:设置压缩方法
- **-o{ Directory}: 设置输出目录
- **-p{ Password}: 设置密码
- -r[-|0]: 递归子目录
- **-scs{UTF-8}\ WIN\ DOS:为列表文件设置字符集
- **-sfx [{name}] **: 创建 SFX 归档
- -si[{名}:从stdin 读取数据* -slt:显示l(列表)命令的技术信息
- -so:将数据写入 stdout
- -sc[-]:设置敏感大小写模式
- **-t{Type}: 设置归档类型
- -u[-][p#][q][r][x#][y][z][!新ArchiveName]:更新选项
- **-v{Size} [b|k|m|g] **: 创建卷
- *-w [{path}] :指定工作目录. 空路径表示临时目录( _ ( ) @-x[r [-|0]]]] 列表文件 #! wildcard #}: 不包括文件名
- -y:假设:所有查询都有
- -an: (中文(简体) ). 禁用归档_ 名( _)
现在让我们来看看 Ubuntu 上如何使用 7Zip。
如何在 Ubuntu 上使用 7Zip?
现在你已经知道 Ubuntu 上的 7Zip 语法,你可以继续压缩和提取文件。
1、使用终端压缩文件
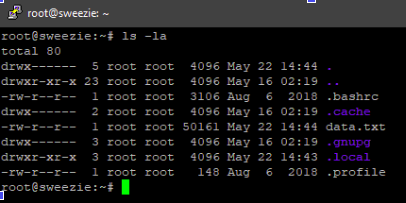
以下是您需要遵循的步骤,以便在 Ubuntu 机器上使用 7-zip 压缩文件: 首先,您需要选择文件或文件夹来创建压缩文件。 要做到这一点,只需使用 ls -la 命令来显示当前目录的所有文件和文件夹的列表。
1$ ls -la
 Now, to compress any file or folder. Like, in this case, data.txt, you need to enter the following command:
1$ 7z a data.7z data.txt

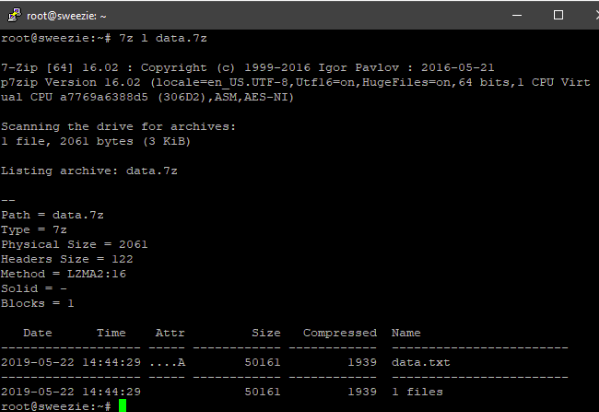
在这里,选项a是用于存档或压缩。 data.7z 是压缩文件的文件名称。 data.txt 是要压缩的文件。压缩后,压缩文件的大小已经达到约 3 kb. 这是节省系统空间的 90% 以上。 很棒! 不是吗? 您还可以使用l选项获取有关压缩的详细信息。
1$ 7z l data.7z
2. 使用 File Explorer 压缩文件
If you have Ubuntu Desktop, you can use 7Zip from File Explorer to compress and extract them. First of all, you need to go to the File Explorer or File Manager on your Linux system. Now, select the file or folder which you want to compress and right-click on the same. Here, select the Compress option from the context menu. 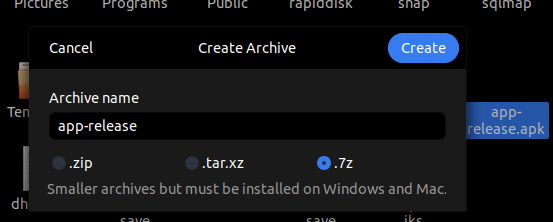 Select the extension for the compressed file and enter the filename. That’s it! You have successfully compressed a file on your Ubuntu Desktop system using File Explorer. Easy, No?
3. 使用 Terminal 提取 7Z 文件
以下是您需要遵循的步骤,以便使用 Ubuntu 机器上的 7-zip 提取 7z 文件:首先,您需要选择文件或文件夹来提取文件的内容。 要做到这一点,只需使用 ls -la 命令来显示当前目录的所有文件和文件夹的列表。
1$ ls -la
现在,要提取任何压缩的文件,如在这种情况下,data.7z,你需要输入以下命令:
1$ 7z e data.7z

只需用上面的命令代替 data.7z 你的文件名,你应该好好去。
使用 File Explorer 提取 7Z 文件
首先,你需要去你的Linux系统的文件浏览器或文件管理器. 现在,选择你想要提取或解压缩的压缩文件,并右键单击它. 在这里,从背景菜单中选择提取选项。 选择文件提取的位置,然后点击提取按钮。 这就是它! 你已经成功地提取了你的Ubuntu系统上的压缩文件的内容。
结论
7Zip是一个非常流行的软件来压缩文件并节省我们的系统空间,我们学会了如何使用命令行在Ubuntu系统上安装7Zip,我们还学会了如何从命令行和文件探索器中压缩和提取文件。