作者选择了 COVID-19 救援基金作为 Write for Donations计划的一部分接受捐款。
介绍
Flask是使用Python语言构建Web应用程序的框架,而 SQLite是您可以与Python一起使用的数据库引擎来存储应用程序数据。
虽然您可以独立遵循本教程,但它也是 How To Modify Items in a One-to-Many Database Relationships with Flask and SQLite]教程的延续,其中我们使用一个任务应用程序示例管理了一个多表数据库,使用一个任务关系。
数据库关系是两个表之间的关系,每个表中的一个记录可以引用另一个表中的几个记录。例如,在博客中,帖子的表可以与存储作者的表具有多对多关系。每个帖子可以引用许多作者,每个作者可以引用多个帖子。每个帖子可以有 many 作者,每个作者可以写 many 帖子。
到教程结束时,你的应用程序将有一个新的功能来分配给不同的用户的任务。我们将指那些被分配给分配字的用户。例如,你可以有一个清洁厨房的家庭任务,你可以分配给Sammy和Jo - 每个任务可以有 _many_分配(即Sammy和Jo)。
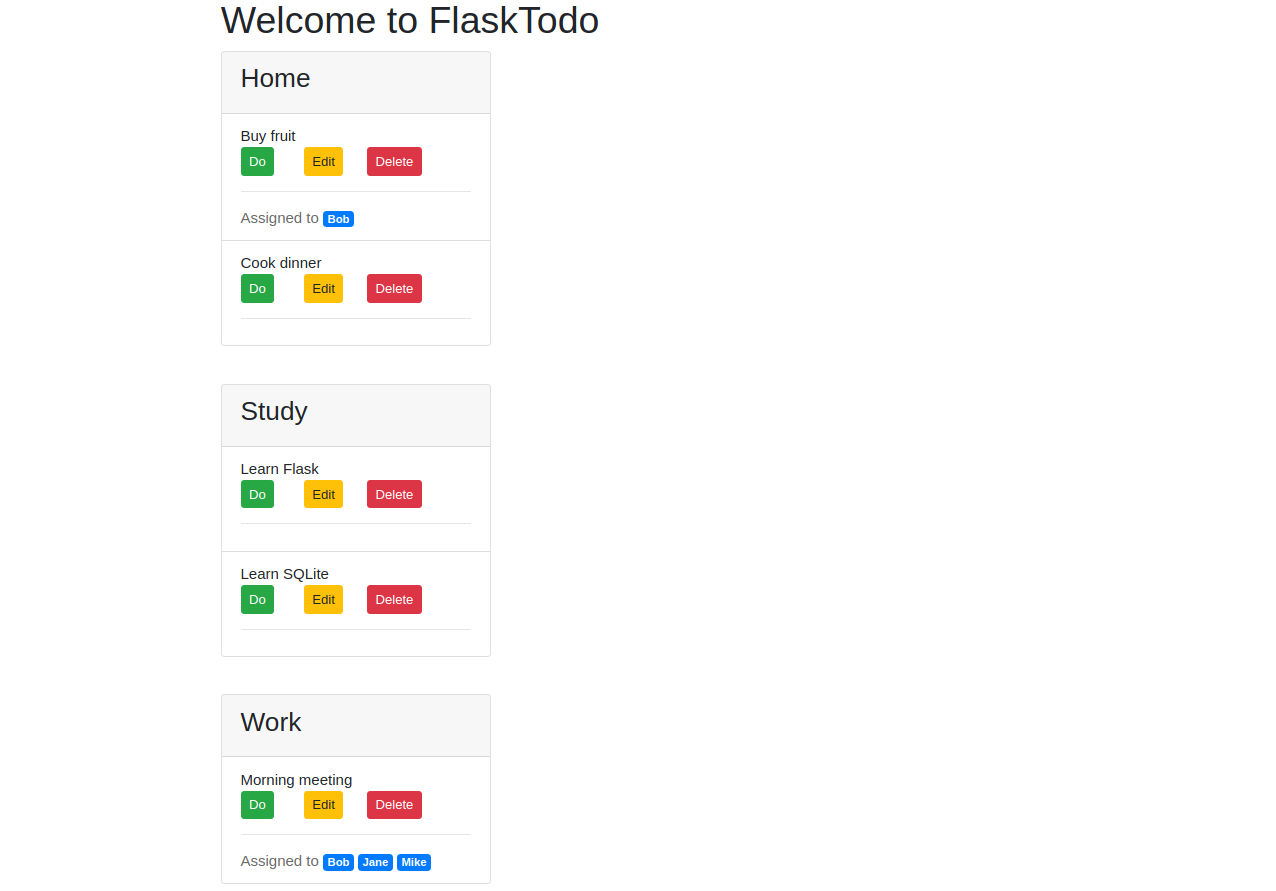
在本教程结束时,应用程序将包含一个 ** 分配到 ** 标签,其中列出的分配人的名字。
前提条件
在你开始遵循这个指南之前,你将需要:
在这个教程中,我们将调用我们的项目目录为flask_todo。
- (可选) 在 Step 1中,您将有选择克隆您将在本教程中工作的
如何安装和设置本地编程环境(https://www.digitalocean.com/community/tutorial_series/how-to-install-and-set-up-a-local-programming-environment-for-python-3)。 但是,您可以选择通过如何使用Flask和SQLite的多种数据库关系(https://andsky.com/tech/tutorials/how-to-use-one-to-many-database-relationships-with-flask-and-sqlite)和如何在Flask和SQLite的多种数据库关系中修改项目([INKL2])来工作。 您可以访问最终代码(从本页(https://github.com/do-community/flask-todo-2)。 *(可选)对创建必要的基本Flask路径的理解,如渲染HTML模板,并连接到不熟悉的SQL(How to use it in a Web ApLINK,
步骤 1 - 设置 Web 应用程序
在此步骤中,您将设置可修改的任务应用程序,您还将审查数据库方案以了解数据库的结构,如果您遵循前提部分的教程,并且仍然在本地机器上有代码和虚拟环境,您可以跳过此步骤。
要展示Flask Web 应用程序的多对多关系的添加,您将使用上一节教程的应用程序代码,该应用程序是使用 Flask, SQLite和 Bootstrap framework构建的任务管理 Web 应用程序,使用此应用程序用户可以创建新的任务,修改和删除现有的任务,并将任务列为完整。
克隆存储库,并用以下命令将其从flask-todo-2更名为flask_todo:
1git clone https://github.com/do-community/flask-todo-2 flask_todo
导航至flask_todo:
1cd flask_todo
创建一个新的虚拟环境:
1python -m venv env
激活环境:
1source env/bin/activate
安装瓶子:
1pip install Flask
然后,使用init_db.py程序初始化数据库:
1python init_db.py
然后,设置以下环境变量:
1export FLASK_APP=app
2export FLASK_ENV=development
「FLASK_APP」表示您目前正在开发的应用程序,在这种情况下是「app.py」。
然后运行开发服务器:
1flask run
如果你去你的浏览器,你将有应用程序运行在以下URL: http://127.0.0.1:5000/。
要停止开发服务器,请使用CTRL + C。
接下来,您将通过数据库方案来了解表之间的当前关系. 如果您熟悉的 schema.sql 文件的内容,您可以跳过到下一步。
打开schema.sql文件:
1nano schema.sql
文件内容如下:
 1[label flask_todo/schema.sql]
 2DROP TABLE IF EXISTS lists;
 3DROP TABLE IF EXISTS items;
 4
 5CREATE TABLE lists (
 6    id INTEGER PRIMARY KEY AUTOINCREMENT,
 7    created TIMESTAMP NOT NULL DEFAULT CURRENT_TIMESTAMP,
 8    title TEXT NOT NULL
 9);
10
11CREATE TABLE items (
12    id INTEGER PRIMARY KEY AUTOINCREMENT,
13    list_id INTEGER NOT NULL,
14    created TIMESTAMP NOT NULL DEFAULT CURRENT_TIMESTAMP,
15    content TEXT NOT NULL,
16    done INTEGER NOT NULL DEFAULT 0,
17    FOREIGN KEY (list_id) REFERENCES lists (id)
18);
在schema.sql文件中,你有两个表:用于存储列表的列表(如主页或研究)和项目用于存储要做的事情(如做菜或学习瓶子)。
列表表有以下列:
id: 列表的ID.created: 列表的创建日期.title: 列表的标题.
项目表有以下列:
id: 项目的ID.list_id: 项目所属的列表的ID.created: 项目的创建日期.content: 项目的内容.done: 项目的状态,值0表示项目尚未完成,而1表示项目完成。
在项目表中,您有一个 foreign key constraint,其中list_id列引用id列的列表母表。
1FOREIGN KEY (list_id) REFERENCES lists (id)
在下一步中,您将使用多对多关系创建两个表之间的链接。
步骤 2 – 添加分配表
在此步骤中,您将审查如何实现多对多关系并加入表,然后添加一个新的表来存储分配。
一个多对多关系链接两个表,其中一个表中的每个项目在另一个表中有许多相关项目。
假设您有一个简单的任务表如下:
1Items
2+----+-------------------+
3| id | content           |
4+----+-------------------+
5| 1  | Buy eggs          |
6| 2  | Fix lighting      |
7| 3  | Paint the bedroom |
8+----+-------------------+
和一个桌子为分配像这样的:
1assignees
2+----+------+
3| id | name |
4+----+------+
5| 1  | Sammy|
6| 2  | Jo   |
7+----+------+
假设您要将固定照明分配给Sammy和Jo,您可以通过在项目表中添加一个新的行来做到这一点:
1items
2+----+-------------------+-----------+
3| id | content           | assignees |
4+----+-------------------+-----------+
5| 1  | Buy eggs          |           |
6| 2  | Fix lighting      | 1, 2      |
7| 3  | Paint the bedroom |           |
8+----+-------------------+-----------+
这是错误的方法,因为每个列应该只有一个值;如果您有多个值,则数据的添加和更新等基本操作变得繁琐和缓慢。
以下是连接表的示例,该表将项目和分配之间的链接:
1item_assignees
2+----+---------+-------------+
3| id | item_id | assignee_id |
4+----+---------+-------------+
5| 1  | 2       | 1           |
6| 2  | 2       | 2           |
7+----+---------+-------------+
在第一行中,具有ID 2(即固定照明)的项目与ID 1(Sammy)的分配者有关。在第二行中,同一项目也与ID 2(Jo)的分配者有关。
现在,您将更改任务应用程序的数据库,以添加存储任务的表。
首先,打开schema.sql,添加一个名为分配的新表:
1nano schema.sql
添加一行以删除已存在的分配者表,以避免在重新启动数据库时出现的潜在问题,例如已经存在的具有不同列的分配者表,如果不遵循相同的方案,可能会意外破坏代码。
 1[label flask_todo/schema.sql]
 2DROP TABLE IF EXISTS assignees;
 3DROP TABLE IF EXISTS lists;
 4DROP TABLE IF EXISTS items;
 5
 6CREATE TABLE lists (
 7    id INTEGER PRIMARY KEY AUTOINCREMENT,
 8    created TIMESTAMP NOT NULL DEFAULT CURRENT_TIMESTAMP,
 9    title TEXT NOT NULL
10);
11
12CREATE TABLE items (
13    id INTEGER PRIMARY KEY AUTOINCREMENT,
14    list_id INTEGER NOT NULL,
15    created TIMESTAMP NOT NULL DEFAULT CURRENT_TIMESTAMP,
16    content TEXT NOT NULL,
17    done INTEGER NOT NULL DEFAULT 0,
18    FOREIGN KEY (list_id) REFERENCES lists (id)
19);
20
21CREATE TABLE assignees (
22    id INTEGER PRIMARY KEY AUTOINCREMENT,
23    name TEXT NOT NULL
24);
保存并关闭文件。
这个新的分配表有以下列:
id:授权人的身份。名称:授权人的姓名。
编辑init_db.py程序,将一些分配添加到数据库中,您可以使用此程序来初始化数据库:
1nano init_db.py
更改文件以显示如下:
 1[label flask_todo/init_db.py]
 2import sqlite3
 3
 4connection = sqlite3.connect('database.db')
 5
 6with open('schema.sql') as f:
 7    connection.executescript(f.read())
 8
 9cur = connection.cursor()
10
11cur.execute("INSERT INTO lists (title) VALUES (?)", ('Work',))
12cur.execute("INSERT INTO lists (title) VALUES (?)", ('Home',))
13cur.execute("INSERT INTO lists (title) VALUES (?)", ('Study',))
14
15cur.execute("INSERT INTO items (list_id, content) VALUES (?, ?)",
16            (1, 'Morning meeting')
17            )
18
19cur.execute("INSERT INTO items (list_id, content) VALUES (?, ?)",
20            (2, 'Buy fruit')
21            )
22
23cur.execute("INSERT INTO items (list_id, content) VALUES (?, ?)",
24            (2, 'Cook dinner')
25            )
26
27cur.execute("INSERT INTO items (list_id, content) VALUES (?, ?)",
28            (3, 'Learn Flask')
29            )
30
31cur.execute("INSERT INTO items (list_id, content) VALUES (?, ?)",
32            (3, 'Learn SQLite')
33            )
34
35cur.execute("INSERT INTO assignees (name) VALUES (?)", ('Sammy',))
36cur.execute("INSERT INTO assignees (name) VALUES (?)", ('Jo',))
37cur.execute("INSERT INTO assignees (name) VALUES (?)", ('Charlie',))
38cur.execute("INSERT INTO assignees (name) VALUES (?)", ('Ashley',))
39
40connection.commit()
41connection.close()
保存并关闭文件。
在突出列出的行中,您使用 Cursor object来执行一个INSERT SQL 语句,将四个名称插入到assignees表中。 在 execute()方法中,您使用了?的位置保持器,并通过包含该分配者的名称的 tuple 安全地将数据插入到数据库中。
这将为数据库添加四个分配,名称为Sammy,Jo,Charlie和Ashley。
运行init_db.py程序来重新启动数据库:
1python init_db.py
您现在有一个表,用于存储数据库中的分配项;接下来,您将添加一个连接表,以创建项目和分配项之间的多对多关系。
步骤 3 – 添加多到多合并表
在此步骤中,您将使用 join 表将 to-do 项目与分配项链接. 首先,您将编辑数据库架构文件以添加新的 join 表,编辑数据库初始化程序以添加几个分配项,然后使用演示程序来显示每个 to-do 的分配项。
打开schema.sql以添加新表格:
1nano schema.sql
由于表连接项目和分配,您将将其命名为item_assignees。如果已经存在,则添加一行以删除表,然后为表本身添加SQL代码:
 1[label flask_todo/schema.sql]
 2DROP TABLE IF EXISTS assignees;
 3DROP TABLE IF EXISTS lists;
 4DROP TABLE IF EXISTS items;
 5DROP TABLE IF EXISTS item_assignees;
 6
 7CREATE TABLE lists (
 8    id INTEGER PRIMARY KEY AUTOINCREMENT,
 9    created TIMESTAMP NOT NULL DEFAULT CURRENT_TIMESTAMP,
10    title TEXT NOT NULL
11);
12
13CREATE TABLE items (
14    id INTEGER PRIMARY KEY AUTOINCREMENT,
15    list_id INTEGER NOT NULL,
16    created TIMESTAMP NOT NULL DEFAULT CURRENT_TIMESTAMP,
17    content TEXT NOT NULL,
18    done INTEGER NOT NULL DEFAULT 0,
19    FOREIGN KEY (list_id) REFERENCES lists (id)
20);
21
22CREATE TABLE assignees (
23    id INTEGER PRIMARY KEY AUTOINCREMENT,
24    name TEXT NOT NULL
25);
26
27CREATE TABLE item_assignees (
28    id INTEGER PRIMARY KEY AUTOINCREMENT,
29    item_id INTEGER,
30    assignee_id INTEGER,
31    FOREIGN KEY(item_id) REFERENCES items(id),
32    FOREIGN KEY(assignee_id) REFERENCES assignees(id)
33);
保存并关闭文件。
此新表 item_assignees 包含以下列:
id:创建 to-dos 和 assignes 之间的关系的输入 ID;每个行代表一个关系。item_id:将与相应的assignee_id分配给分配方的 to-do 项目 ID.assignee_id:将与相应的item_id分配对象的分配方 ID.
item_assignees 表还具有两个外部密钥限制:一个链接item_id列与id列的item表,另一个链接assignee_id列与id列的assignees表。
打开init_db.py 以添加几个任务:
1nano init_db.py
更改文件以显示如下:
 1[label flask_todo/init_db.py]
 2import sqlite3
 3
 4connection = sqlite3.connect('database.db')
 5
 6with open('schema.sql') as f:
 7    connection.executescript(f.read())
 8
 9cur = connection.cursor()
10
11cur.execute("INSERT INTO lists (title) VALUES (?)", ('Work',))
12cur.execute("INSERT INTO lists (title) VALUES (?)", ('Home',))
13cur.execute("INSERT INTO lists (title) VALUES (?)", ('Study',))
14
15cur.execute("INSERT INTO items (list_id, content) VALUES (?, ?)",
16            (1, 'Morning meeting')
17            )
18
19cur.execute("INSERT INTO items (list_id, content) VALUES (?, ?)",
20            (2, 'Buy fruit')
21            )
22
23cur.execute("INSERT INTO items (list_id, content) VALUES (?, ?)",
24            (2, 'Cook dinner')
25            )
26
27cur.execute("INSERT INTO items (list_id, content) VALUES (?, ?)",
28            (3, 'Learn Flask')
29            )
30
31cur.execute("INSERT INTO items (list_id, content) VALUES (?, ?)",
32            (3, 'Learn SQLite')
33            )
34
35cur.execute("INSERT INTO assignees (name) VALUES (?)", ('Sammy',))
36cur.execute("INSERT INTO assignees (name) VALUES (?)", ('Jo',))
37cur.execute("INSERT INTO assignees (name) VALUES (?)", ('Charlie',))
38cur.execute("INSERT INTO assignees (name) VALUES (?)", ('Ashley',))
39
40# Assign "Morning meeting" to "Sammy"
41cur.execute("INSERT INTO item_assignees (item_id, assignee_id) VALUES (?, ?)",
42            (1, 1))
43
44# Assign "Morning meeting" to "Jo"
45cur.execute("INSERT INTO item_assignees (item_id, assignee_id) VALUES (?, ?)",
46            (1, 2))
47
48# Assign "Morning meeting" to "Ashley"
49cur.execute("INSERT INTO item_assignees (item_id, assignee_id) VALUES (?, ?)",
50            (1, 4))
51
52# Assign "Buy fruit" to "Sammy"
53cur.execute("INSERT INTO item_assignees (item_id, assignee_id) VALUES (?, ?)",
54            (2, 1))
55
56connection.commit()
57connection.close()
在突出的代码中,您将要执行的项目分配给分配者,通过插入到item_assignees附加表中。您将要向分配者分配的任务项目的item_id插入,其ID与assignee_id值相匹配。在第一个突出的行中,您将早晨会议的任务分配给Sammy,其ID为1。其他行都遵循相同的模式。
保存并关闭文件。
运行init_db.py程序来重新启动数据库:
1python init_db.py
运行list_example.py程序,显示您在数据库中所要做的项目:
1python list_example.py
以下是产量:
1[secondary_label Output]
2Home
3     Buy fruit | id: 2 | done: 0
4     Cook dinner | id: 3 | done: 0
5Study
6     Learn Flask | id: 4 | done: 0
7     Learn SQLite | id: 5 | done: 0
8Work
9     Morning meeting | id: 1 | done: 0
您有每个项目的内容,其ID,以及是否已完成(0 意味着项目尚未完成,而 1 意味着已经完成) 你现在需要显示每个任务的分配。
打开 'list_example.py' 来修改它以显示项目分配:
1nano list_example.py
更改文件以显示如下:
 1[label flask_todo/list_example.py]
 2from itertools import groupby
 3from app import get_db_connection
 4
 5conn = get_db_connection()
 6todos = conn.execute('SELECT i.id, i.done, i.content, l.title \
 7                      FROM items i JOIN lists l \
 8                      ON i.list_id = l.id ORDER BY l.title;').fetchall()
 9
10lists = {}
11
12for k, g in groupby(todos, key=lambda t: t['title']):
13    # Create an empty list for items
14    items = []
15    # Go through each to-do item row in the groupby() grouper object
16    for item in g:
17        # Get the assignees of the current to-do item
18        assignees = conn.execute('SELECT a.id, a.name FROM assignees a \
19                                  JOIN item_assignees i_a \
20                                  ON a.id = i_a.assignee_id \
21                                  WHERE i_a.item_id = ?',
22                                  (item['id'],)).fetchall()
23        # Convert the item row into a dictionary to add assignees
24        item = dict(item)
25        item['assignees'] = assignees
26
27        items.append(item)
28
29    # Build the list of dictionaries
30    # the list's name (ex: Home/Study/Work) as the key
31
32    # and a list of dictionaries of to-do items
33    # belonging to that list as the value
34    lists[k] = list(items)
35
36for list_, items in lists.items():
37    print(list_)
38    for item in items:
39        assignee_names = ', '.join(a['name'] for a in item['assignees'])
40
41        print('    ', item['content'], '| id:',
42              item['id'], '| done:', item['done'],
43              '| assignees:', assignee_names)
保存并关闭文件。
您可以使用 groupby() 函数来按它们所属的列表的标题组合要做项目(参见 How To Use One-to-Many Database Relationships with Flask and SQLite 的 Step 2 以获取更多信息) 在进行组合过程中,您会创建一个名为 `item' 的空列表,该列表将包含所有要做项目的数据,如项目的 ID、内容和分配。
该查询从分配者表中获取分配者ID(‘a.id’)和分配者名称(‘a.name’),该查询将ID和名称附加到item_assignees附加表中(附加到i.id = i_a.assignee_id),其中i_a.item_id值等于当前项目的ID(‘item[id])值。
使用字符串 item = dict(item),你将该项转换为字典,因为一个常规的 sqlite3.Row 对象不支持分配,你将需要将分配添加到该项中。接下来,使用字符串 item['assignees'] = assignees,你将新键 'assignees' 添加到 item' 字典中,以便从该项的字典中直接访问该项的分配。
要打印结果,你使用for list_, items in lists.items()循环通过每个任务列表标题和它所属的任务列表项目,打印列表的标题(list_),然后循环通过任务列表中的项目。你添加了一个名为assignee_names的变量,其值使用了join()方法(https://andsky.com/tech/tutorials/an-introduction-to-string-functions-in-python-3)将 generator expressiona[name]列表中的项目连接到一个assignee_names列表中的每个任务列表中的每个任务列表中的数据。
运行list_example.py程序:
1python list_example.py
以下是输出(与分配突出):
1[secondary_label Output]
2Home
3     Buy fruit | id: 2 | done: 0 | assignees: Sammy
4     Cook dinner | id: 3 | done: 0 | assignees:
5Study
6     Learn Flask | id: 4 | done: 0 | assignees:
7     Learn SQLite | id: 5 | done: 0 | assignees:
8Work
9     Morning meeting | id: 1 | done: 0 | assignees: Sammy, Jo, Ashley
您现在可以将每个任务项目的分配与其余数据一起显示。
接下来,您将使用此功能在 Web 应用程序索引页面中显示每个任务项下方的名称。
步骤 4 – 在索引页面中显示分配
在此步骤中,您将更改任务管理应用程序的索引页面以显示每个任务项目的分配,您将首先编辑包含Flask应用程序代码的 app.py 文件,然后编辑 index.html 模板文件以显示索引页面上的每个任务项目下方的分配。
首先,打开app.py,以编辑index()视图函数:
1nano app.py
更改函数以显示如下:
 1[label flask_todo/app.py]
 2@app.route('/')
 3def index():
 4    conn = get_db_connection()
 5    todos = conn.execute('SELECT i.id, i.done, i.content, l.title \
 6                          FROM items i JOIN lists l \
 7                          ON i.list_id = l.id ORDER BY l.title;').fetchall()
 8
 9    lists = {}
10
11    for k, g in groupby(todos, key=lambda t: t['title']):
12        # Create an empty list for items
13        items = []
14        # Go through each to-do item row in the groupby() grouper object
15        for item in g:
16            # Get the assignees of the current to-do item
17            assignees = conn.execute('SELECT a.id, a.name FROM assignees a \
18                                    JOIN item_assignees i_a \
19                                    ON a.id = i_a.assignee_id \
20                                    WHERE i_a.item_id = ?',
21                                    (item['id'],)).fetchall()
22            # Convert the item row into a dictionary to add assignees
23            item = dict(item)
24            item['assignees'] = assignees
25
26            items.append(item)
27
28        # Build the list of dictionaries
29        # the list's name (ex: Home/Study/Work) as the key
30
31        # and a list of dictionaries of to-do items
32        # belonging to that list as the value
33        lists[k] = list(items)
34
35    conn.close()
36    return render_template('index.html', lists=lists)
保存并关闭文件。
这是您在 Step 3中的list_example.py演示程序中使用的相同的代码,因此lists变量将包含您所需的所有数据,包括分配者数据,您将使用它来访问index.html模板文件中的分配者名称。
打开index.html文件,在每个项目后添加分配者名称:
1nano templates/index.html
更改文件以显示如下:
 1[label flask_todo/templates/index.html]
 2{% extends 'base.html' %}
 3
 4{% block content %}
 5    <h1>{% block title %} Welcome to FlaskTodo {% endblock %}</h1>
 6    {% for list, items in lists.items() %}
 7        <div class="card" style="width: 18rem; margin-bottom: 50px;">
 8            <div class="card-header">
 9                <h3>{{ list }}</h3>
10            </div>
11            <ul class="list-group list-group-flush">
12                {% for item in items %}
13                    <li class="list-group-item"
14                    {% if item['done'] %}
15                    style="text-decoration: line-through;"
16                    {% endif %}
17                    >{{ item['content'] }}
18                    {% if not item ['done'] %}
19                        {% set URL = 'do' %}
20                        {% set BUTTON = 'Do' %}
21                    {% else %}
22                        {% set URL = 'undo' %}
23                        {% set BUTTON = 'Undo' %}
24                    {% endif %}
25                    <div class="row">
26                        <div class="col-12 col-md-3">
27                            <form action="{{ url_for(URL, id=item['id']) }}"
28                                method="POST">
29                                <input type="submit" value="{{ BUTTON }}"
30                                    class="btn btn-success btn-sm">
31                            </form>
32                        </div>
33
34                        <div class="col-12 col-md-3">
35                            <a class="btn btn-warning btn-sm"
36                            href="{{ url_for('edit', id=item['id']) }}">Edit</a>
37                        </div>
38
39                        <div class="col-12 col-md-3">
40                            <form action="{{ url_for('delete', id=item['id']) }}"
41                                method="POST">
42                                <input type="submit" value="Delete"
43                                    class="btn btn-danger btn-sm">
44                            </form>
45                        </div>
46                    </div>
47
48                    <hr>
49                    {% if item['assignees'] %}
50                        <span style="color: #6a6a6a">Assigned to</span>
51                        {% for assignee in item['assignees'] %}
52                            <span class="badge badge-primary">
53                                {{ assignee['name'] }}
54                            </span>
55                        {% endfor %}
56                    {% endif %}
57
58                    </li>
59                {% endfor %}
60            </ul>
61        </div>
62    {% endfor %}
63{% endblock %}
保存并关闭文件。
如果该项目有任何分配(您通过声明如果项目(分配)而知道),则通过项目分配(即项目(分配)列表)显示灰色的分配给文本和循环,并显示分配名称(分配名称)在标签(LINK0)中。
最后,运行开发服务器:
1flask run
然后访问索引页面:http://127.0.0.1:5000/`。
每个任务项目现在可以有多个分配,您可以分配每个分配者多个任务. 索引页面显示每个项目的所有项目和分配者。
您可以访问最终代码(https://github.com/do-community/flask-todo-3)。
结论
在本教程中,您已经了解了 many-to-many 关系是什么,如何在 Flask 和 SQLite Web 应用程序中使用它,如何在表之间连接,以及如何在 Python 中组合关系数据。
您现在有一个完整的任务应用程序,用户可以创建新的任务项目,将项目标记为完整,编辑或删除现有项目,并创建新列表,并且每个项目可以分配给不同的分配。
要了解有关 Python 和 Flask 的 Web 开发的更多信息,请参阅这些 Flask 教程。