介绍
服务器自动化现在在系统管理中起着至关重要的作用,因为现代应用环境的可调用性质。 配置管理 工具如 Ansible 通常用于通过为新服务器建立标准程序来简化服务器设置的自动化过程,同时也减少了与手动设置相关的人为错误。
Ansible提供了一个简单的架构,不需要在节点上安装特殊软件,它还提供了一组强大的功能和内置模块,可方便编写自动化脚本。
本指南解释了如何使用Ansible来自动化我们在Ubuntu 18.04上安装WordPress的步骤(How To Install WordPress with LAMP)。WordPress是互联网上最受欢迎的CMS(内容管理系统),允许用户在MySQL后端上设置灵活的博客和网站。
前提条件
为了执行我们在本指南中讨论的播放簿提供的自动设置,您将需要:
- One Ansible 控制节点:安装并配置为使用 SSH 键连接您的 Ansible 主机的 Ubuntu 18.04 机器,请确保控制节点具有具有 sudo 权限的常规用户和启用防火墙,如我们在 初始服务器设置指南中所解释的那样。 为了设置 Ansible,请遵循我们在 如何在 Ubuntu 18.04 上安装和配置 Ansible上的指南。
<$>[注] 在继续之前,您需要先确保您的 Ansible 控制节点能够在您的 Ansible 主机(s)上连接和执行命令。
这个 Playbook 能做什么?
这个 Ansible 演示本提供了通过我们在 Ubuntu 18.04 上如何使用 LAMP 安装 WordPress 的指南中描述的手动运行的替代方案(https://andsky.com/tech/tutorials/how-to-install-wordpress-with-lamp-on-ubuntu-18-04)。
运行此播放簿将在您的 Ansible 主机上执行以下操作:
- 安装
aptitude,这是Ansible 作为对apt包管理器的替代选择 - 安装所需的 LAMP 包和 PHP 扩展
- 创建和启用新的 Apache
VirtualHost为 WordPress 网站 - 启用 Apache 重写(
mod_rewrite)模块 - 禁用默认的 Apache 网站
- 设置 MySQL 用户的密码 root
- 删除匿名 MySQL 帐户和测试数据库
- 创建一个新的 MySQL 数据库和用户为 WordPress 网站(_M
一旦播放簿完成运行,您将有一个WordPress安装在LAMP环境上运行,基于您在配置变量中定义的选项。
如何使用这个 Playbook
我们需要做的第一件事是从 do-community/ansible-playbooks 存储库中获取 WordPress on LAMP 播放书及其依赖。
如果您之前在遵循不同的指南时克隆了此存储库,请访问现有的ansible-playbooks副本并运行一个git pull命令,以确保您更新了内容:
1[environment local]
2cd ~/ansible-playbooks
3git pull
如果这是你第一次使用Do-community/ansible-playbooks存储库,你应该开始将存储库克隆到你的主文件夹:
1[environment local]
2cd ~
3git clone https://github.com/do-community/ansible-playbooks.git
4cd ansible-playbooks
我们感兴趣的文件位于wordpress-lamp_ubuntu1804文件夹中,其结构如下:
1wordpress-lamp_ubuntu1804
2├── files
3│   ├── apache.conf.j2
4│   └── wp-config.php.j2
5├── vars
6│   └── default.yml
7├── playbook.yml
8└── readme.md
以下是这些文件中的每一个是什么:
files/apache.conf.j2: 设置 Apache VirtualHost 的模板文件files/wp-config.php.j2: 设置 WordPress 的配置文件的模板文件vars/default.yml: 定制播放本设置的变量文件playbook.yml: 播放本文件,包含在远程服务器(s)上执行的任务。
我们将编辑播放簿的变量文件以定制其选项。 访问wordpress-lamp_ubuntu1804目录,并使用您所选择的命令行编辑器打开vars/default.yml文件:
1[environment local]
2cd wordpress-lamp_ubuntu1804
3nano vars/default.yml
此文件包含一些需要您的注意的变量:
 1[label vars/default.yml]
 2[environment local]
 3---
 4#System Settings
 5php_modules: [ 'php-curl', 'php-gd', 'php-mbstring', 'php-xml', 'php-xmlrpc', 'php-soap', 'php-intl', 'php-zip' ]
 6
 7#MySQL Settings
 8mysql_root_password: "mysql_root_password"
 9mysql_db: "wordpress"
10mysql_user: "sammy"
11mysql_password: "password"
12
13#HTTP Settings
14http_host: "your_domain"
15http_conf: "your_domain.conf"
16http_port: "80"
下列列表包含每个变量的简要解释,以及您可能想要如何更改它们:
您不需要更改此变量,但您可能想将新的扩展添加到列表中,如果您的特定的设置需要它
mysql_root_password: 对于 root MySQL 帐户所需的密码mysql_db: 应该为 WordPress 创建的 MySQL 数据库的名称mysql_user: 应该为 WordPress 创建的 MySQL 用户的名称mysql_password: 新 MySQL 用户的密码http_host: 您的域名http_conf
一旦您完成了vars/default.yml中的变量更新,请保存并关闭此文件. 如果您使用了nano,请按CTRL + X,Y,然后按ENTER。
您现在已经准备好在一个或多个服务器上运行此播放簿. 大多数播放簿已配置为在您的库存中的每个服务器上执行,默认情况下. 我们可以使用 -l 旗帜来确保只有一个服务器子集或单个服务器受到播放簿的影响。
要只在「server1」上執行播放簿,以「sammy」方式連接,您可以使用以下命令:
1[environment local]
2ansible-playbook playbook.yml -l server1 -u sammy
你会得到类似于此的输出:
 1[secondary_label Output]
 2PLAY [all] *****************************************************************************************************************************
 3
 4TASK [Gathering Facts] *****************************************************************************************************************
 5ok: [server1]
 6
 7TASK [Install prerequisites] ***********************************************************************************************************
 8ok: [server1]
 9
10…
11
12TASK [Download and unpack latest WordPress] ********************************************************************************************
13changed: [server1]
14
15TASK [Set ownership] *******************************************************************************************************************
16changed: [server1]
17
18TASK [Set permissions for directories] *************************************************************************************************
19changed: [server1]
20
21TASK [Set permissions for files] *******************************************************************************************************
22changed: [server1]
23
24TASK [Set up wp-config] ****************************************************************************************************************
25changed: [server1]
26
27RUNNING HANDLER [Reload Apache] ********************************************************************************************************
28changed: [server1]
29
30RUNNING HANDLER [Restart Apache] *******************************************************************************************************
31changed: [server1]
32
33PLAY RECAP *****************************************************************************************************************************
34server1          : ok=22 changed=18 unreachable=0 failed=0 skipped=0 rescued=0 ignored=0
<$>[注] 注:有关如何运行 Ansible 播放本的更多信息,请参阅我们的 Ansible Cheat Sheet Guide。
当播放簿完成运行时,您可以到您的Web浏览器完成WordPress的安装。
导航到您的服务器的域名或公共IP地址:
1http://server_host_or_IP
你会看到这样的页面:
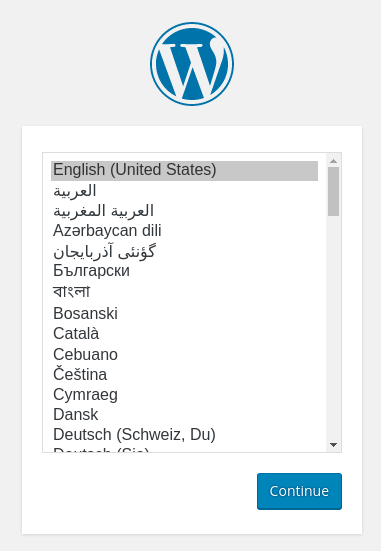
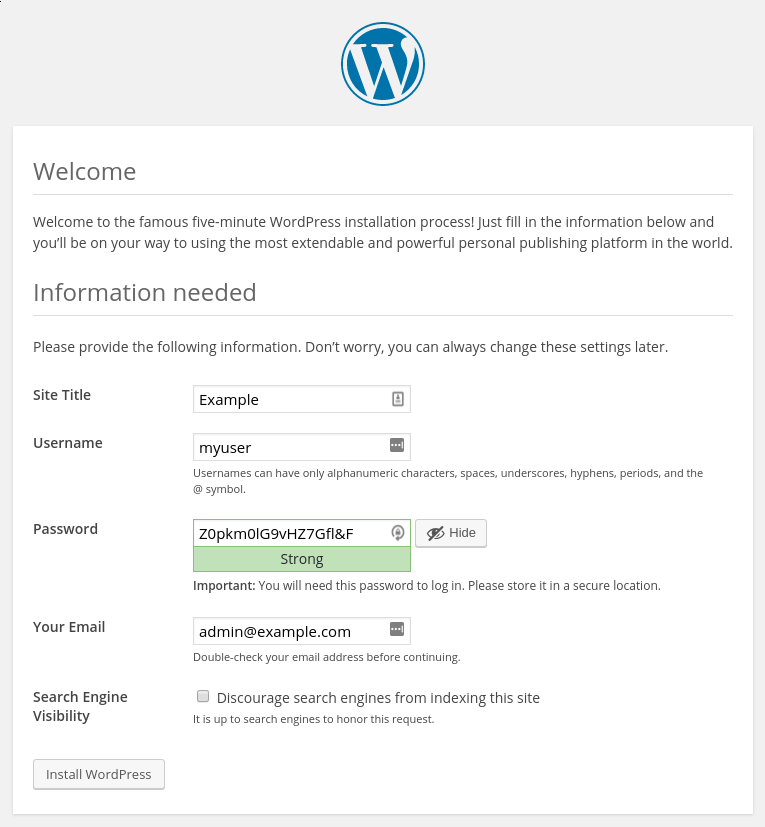
在选择您想使用的WordPress安装语言后,您将被介绍为设置您的WordPress用户和密码的最后一步,以便您可以登录您的控制面板:
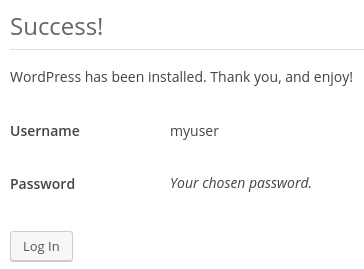
当您点击前进时,您将被带到一个提示您登录的页面:
一旦您登录,您将被带到WordPress管理仪表板:
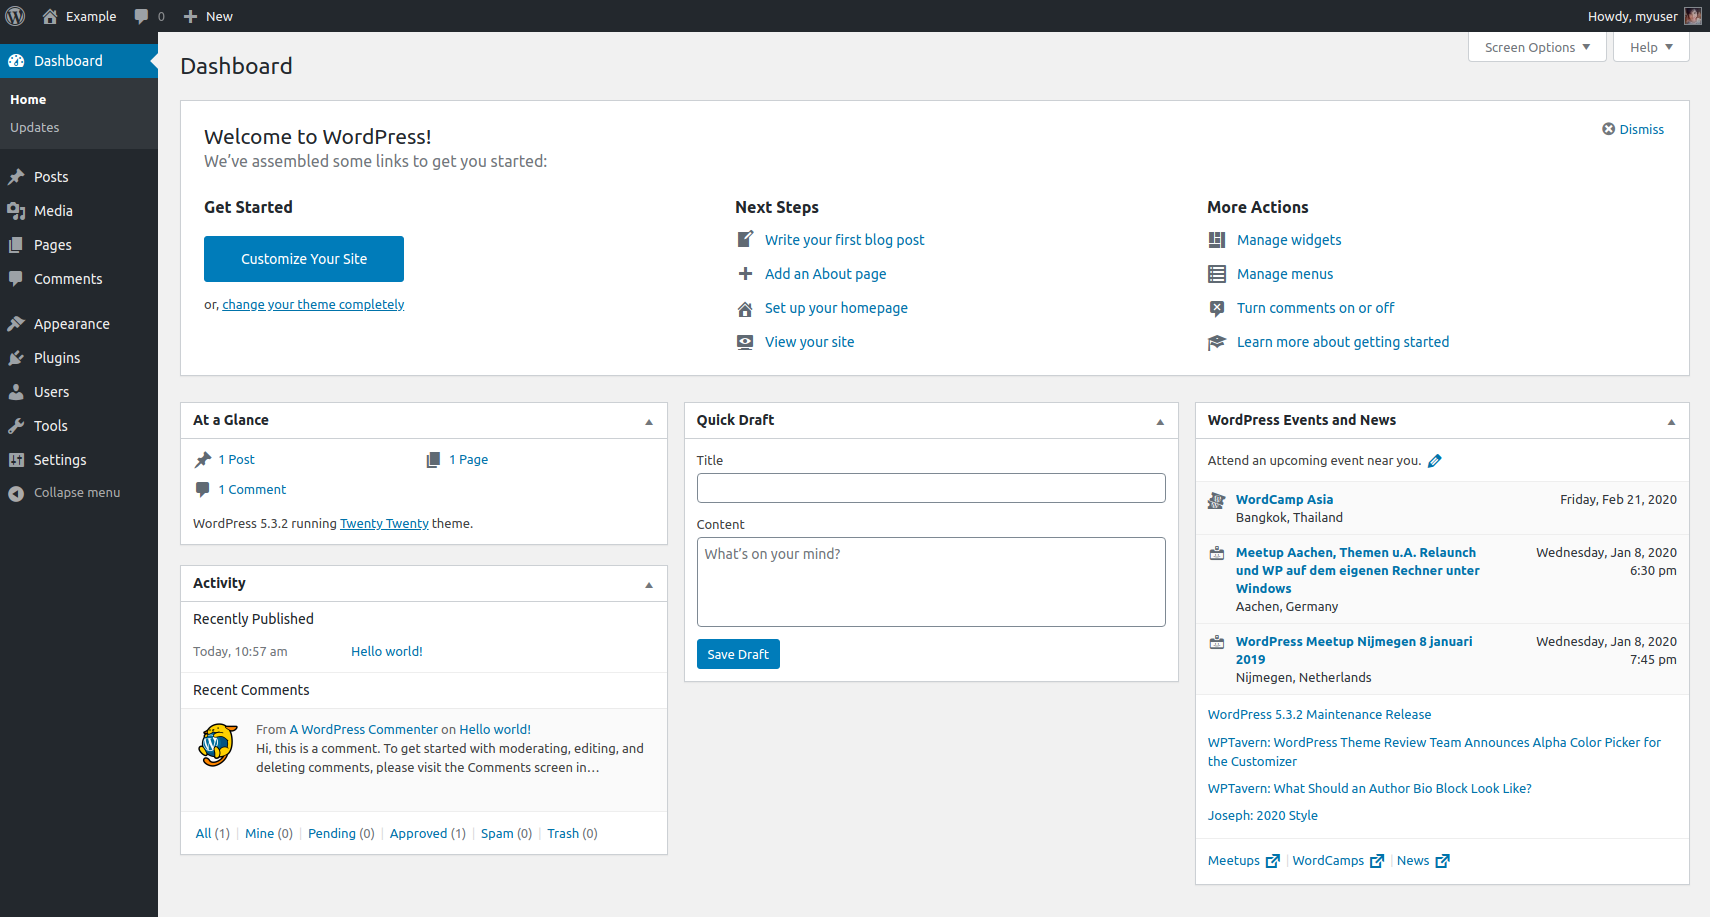
定制您的WordPress安装的一些常见的下一步步骤包括为您的帖子选择permalink设置(可以在设置 >永久性)和选择一个新的主题(在外观 >主题)。
剧本内容
您可以在 wordpress-lamp_ubuntu1804 文件夹中找到本教程中列出的 WordPress on LAMP 服务器设置,在 DigitalOcean Community Playbooks 存储库中。
播放书的完整内容以及相关文件也包括在这里,以便您方便。
首选 / 默认.yml
Default.yml变量文件包含在播放簿任务中使用的值,例如数据库设置和在Apache中配置的域名。
 1[label vars/default.yml]
 2[environment local]
 3#System Settings
 4php_modules: [ 'php-curl', 'php-gd', 'php-mbstring', 'php-xml', 'php-xmlrpc', 'php-soap', 'php-intl', 'php-zip' ]
 5
 6#MySQL Settings
 7mysql_root_password: "mysql_root_password"
 8mysql_db: "wordpress"
 9mysql_user: "sammy"
10mysql_password: "password"
11
12#HTTP Settings
13http_host: "your_domain"
14http_conf: "your_domain.conf"
15http_port: "80"
檔案/apache.conf.j2
apache.conf.j2 文件是一个 Jinja 2 模板文件,它配置了一个新的 Apache VirtualHost. 该模板内使用的变量在vars/default.yml 变量文件中定义。
 1[environment local]
 2[label files/apache.conf.j2]
 3<VirtualHost *:{{ http_port }}>
 4   ServerAdmin webmaster@localhost
 5   ServerName {{ http_host }}
 6   ServerAlias www.{{ http_host }}
 7   DocumentRoot /var/www/{{ http_host }}
 8   ErrorLog ${APACHE_LOG_DIR}/error.log
 9   CustomLog ${APACHE_LOG_DIR}/access.log combined
10
11   <Directory /var/www/{{ http_host }}>
12         Options -Indexes
13   </Directory>
14
15   <IfModule mod_dir.c>
16       DirectoryIndex index.php index.html index.cgi index.pl index.xhtml index.htm
17   </IfModule>
18
19</VirtualHost>
檔案/wp-config.php.j2
「wp-config.php.j2」文件是另一个Jinja模板,用于设置WordPress使用的主要配置文件. 该模板内使用的变量在「vars/default.yml」变量文件中定义。
 1[environment local]
 2[label files/info.php.j2]
 3<?php
 4/**
 5 * The base configuration for WordPress
 6 *
 7 * The wp-config.php creation script uses this file during the
 8 * installation. You don't have to use the web site, you can
 9 * copy this file to "wp-config.php" and fill in the values.
10 *
11 * This file contains the following configurations:
12 *
13 * * MySQL settings
14 * * Secret keys
15 * * Database table prefix
16 * * ABSPATH
17 *
18 * @link https://codex.wordpress.org/Editing_wp-config.php
19 *
20 * @package WordPress
21 */
22
23// ** MySQL settings - You can get this info from your web host ** //
24/** The name of the database for WordPress */
25define( 'DB_NAME', '{{ mysql_db }}' );
26
27/** MySQL database username */
28define( 'DB_USER', '{{ mysql_user }}' );
29
30/** MySQL database password */
31define( 'DB_PASSWORD', '{{ mysql_password }}' );
32
33/** MySQL hostname */
34define( 'DB_HOST', 'localhost' );
35
36/** Database Charset to use in creating database tables. */
37define( 'DB_CHARSET', 'utf8' );
38
39/** The Database Collate type. Don't change this if in doubt. */
40define( 'DB_COLLATE', '' );
41
42/** Filesystem access **/
43define('FS_METHOD', 'direct');
44
45/**#@+
46 * Authentication Unique Keys and Salts.
47 *
48 * Change these to different unique phrases!
49 * You can generate these using the {@link https://api.wordpress.org/secret-key/1.1/salt/ WordPress.org secret-key service}
50 * You can change these at any point in time to invalidate all existing cookies. This will force all users to have to log in again.
51 *
52 * @since 2.6.0
53 */
54define( 'AUTH_KEY',         '{{ lookup('password', '/dev/null chars=ascii_letters length=64') }}' );
55define( 'SECURE_AUTH_KEY',  '{{ lookup('password', '/dev/null chars=ascii_letters length=64') }}' );
56define( 'LOGGED_IN_KEY',    '{{ lookup('password', '/dev/null chars=ascii_letters length=64') }}' );
57define( 'NONCE_KEY',        '{{ lookup('password', '/dev/null chars=ascii_letters length=64') }}' );
58define( 'AUTH_SALT',        '{{ lookup('password', '/dev/null chars=ascii_letters length=64') }}' );
59define( 'SECURE_AUTH_SALT', '{{ lookup('password', '/dev/null chars=ascii_letters length=64') }}' );
60define( 'LOGGED_IN_SALT',   '{{ lookup('password', '/dev/null chars=ascii_letters length=64') }}' );
61define( 'NONCE_SALT',       '{{ lookup('password', '/dev/null chars=ascii_letters length=64') }}' );
62
63/**#@-*/
64
65/**
66 * WordPress Database Table prefix.
67 *
68 * You can have multiple installations in one database if you give each
69 * a unique prefix. Only numbers, letters, and underscores please!
70 */
71$table_prefix = 'wp_';
72
73/**
74 * For developers: WordPress debugging mode.
75 *
76 * Change this to true to enable the display of notices during development.
77 * It is strongly recommended that plugin and theme developers use WP_DEBUG
78 * in their development environments.
79 *
80 * For information on other constants that can be used for debugging,
81 * visit the Codex.
82 *
83 * @link https://codex.wordpress.org/Debugging_in_WordPress
84 */
85define( 'WP_DEBUG', false );
86
87/* That's all, stop editing! Happy publishing. */
88
89/** Absolute path to the WordPress directory. */
90if ( ! defined( 'ABSPATH' ) ) {
91    define( 'ABSPATH', dirname( __FILE__ ) . '/' );
92}
93
94/** Sets up WordPress vars and included files. */
95require_once( ABSPATH . 'wp-settings.php' );
图书馆.yml
该playbook.yml文件定义了此设置中的所有任务,它从定义该设置的目标服务器组(所有)开始,然后它使用become: true来定义任务应该默认执行的特权升级(sudo)然后,它包括vars/default.yml变量文件来加载配置选项。
  1[label playbook.yml]
  2[environment local]
  3---
  4- hosts: all
  5  become: true
  6  vars_files:
  7    - vars/default.yml
  8
  9  tasks:
 10    - name: Install prerequisites
 11      apt: name=aptitude update_cache=yes state=latest force_apt_get=yes
 12      tags: [ system ]
 13
 14    - name: Install LAMP Packages
 15      apt: name={{ item }} update_cache=yes state=latest
 16      loop: [ 'apache2', 'mysql-server', 'python3-pymysql', 'php', 'php-mysql', 'libapache2-mod-php' ]
 17      tags: [ system ]
 18
 19    - name: Install PHP Extensions
 20      apt: name={{ item }} update_cache=yes state=latest
 21      loop: "{{ php_modules }}"
 22      tags: [ system ]
 23
 24  # Apache Configuration
 25    - name: Create document root
 26      file:
 27        path: "/var/www/{{ http_host }}"
 28        state: directory
 29        owner: "www-data"
 30        group: "www-data"
 31        mode: '0755'
 32      tags: [ apache ]
 33
 34    - name: Set up Apache VirtualHost
 35      template:
 36        src: "files/apache.conf.j2"
 37        dest: "/etc/apache2/sites-available/{{ http_conf }}"
 38      notify: Reload Apache
 39      tags: [ apache ]
 40
 41    - name: Enable rewrite module
 42      shell: /usr/sbin/a2enmod rewrite
 43      notify: Reload Apache
 44      tags: [ apache ]
 45
 46    - name: Enable new site
 47      shell: /usr/sbin/a2ensite {{ http_conf }}
 48      notify: Reload Apache
 49      tags: [ apache ]
 50
 51    - name: Disable default Apache site
 52      shell: /usr/sbin/a2dissite 000-default.conf
 53      notify: Restart Apache
 54      tags: [ apache ]
 55
 56  # MySQL Configuration
 57    - name: Set the root password
 58      mysql_user:
 59        name: root
 60        password: "{{ mysql_root_password }}"
 61        login_unix_socket: /var/run/mysqld/mysqld.sock
 62      tags: [ mysql, mysql-root ]
 63
 64    - name: Remove all anonymous user accounts
 65      mysql_user:
 66        name: ''
 67        host_all: yes
 68        state: absent
 69        login_user: root
 70        login_password: "{{ mysql_root_password }}"
 71      tags: [ mysql ]
 72
 73    - name: Remove the MySQL test database
 74      mysql_db:
 75        name: test
 76        state: absent
 77        login_user: root
 78        login_password: "{{ mysql_root_password }}"
 79      tags: [ mysql ]
 80
 81    - name: Creates database for WordPress
 82      mysql_db:
 83        name: "{{ mysql_db }}"
 84        state: present
 85        login_user: root
 86        login_password: "{{ mysql_root_password }}"
 87      tags: [ mysql ]
 88
 89    - name: Create MySQL user for WordPress
 90      mysql_user:
 91        name: "{{ mysql_user }}"
 92        password: "{{ mysql_password }}"
 93        priv: "{{ mysql_db }}.*:ALL"
 94        state: present
 95        login_user: root
 96        login_password: "{{ mysql_root_password }}"
 97      tags: [ mysql ]
 98
 99  # UFW Configuration
100    - name: "UFW - Allow HTTP on port {{ http_port }}"
101      ufw:
102        rule: allow
103        port: "{{ http_port }}"
104        proto: tcp
105      tags: [ system ]
106
107  # WordPress Configuration
108    - name: Download and unpack latest WordPress
109      unarchive:
110        src: https://wordpress.org/latest.tar.gz
111        dest: "/var/www/{{ http_host }}"
112        remote_src: yes
113        creates: "/var/www/{{ http_host }}/wordpress"
114      tags: [ wordpress ]
115
116    - name: Set ownership
117      file:
118        path: "/var/www/{{ http_host }}"
119        state: directory
120        recurse: yes
121        owner: www-data
122        group: www-data
123      tags: [ wordpress ]
124
125    - name: Set permissions for directories
126      shell: "/usr/bin/find /var/www/{{ http_host }}/wordpress/ -type d -exec chmod 750 {} \\;"
127      tags: [ wordpress ]
128
129    - name: Set permissions for files
130      shell: "/usr/bin/find /var/www/{{ http_host }}/wordpress/ -type f -exec chmod 640 {} \\;"
131      tags: [ wordpress ]
132
133    - name: Set up wp-config
134      template:
135        src: "files/wp-config.php.j2"
136        dest: "/var/www/{{ http_host }}/wordpress/wp-config.php"
137      tags: [ wordpress ]
138
139  handlers:
140    - name: Reload Apache
141      service:
142        name: apache2
143        state: reloaded
144
145    - name: Restart Apache
146      service:
147        name: apache2
148        state: restarted
您可以自由地修改这些文件,以便在您自己的工作流中最适合您的个人需求。
结论
在本指南中,我们使用Ansible来自动化在Ubuntu 18.04服务器上使用LAMP安装和设置WordPress网站的过程。
如果您想在本演示本中包含其他任务,以进一步定制服务器设置,请参阅我们介绍的 Ansible 指南 配置管理 101:编写 Ansible 演示本。