介绍
本教程将涵盖在DigitalOcean上设置一个Hadoop集群。 Hadoop软件库是一个Apache框架,允许您通过利用基本的编程模型以分布式的方式在服务器集群中处理大数据集。Hadoop提供的可扩展性允许您从单个服务器扩展到数千台机器。
有4个重要模块,我们将在本教程中工作:
- Hadoop Common是支持其他 Hadoop 模块所必需的常见实用程序和库的集合。 Hadoop 分布式文件系统(HDFS),如 Apache 组织所述,是一种高度耐错误的分布式文件系统,专门设计用于在商品硬件上运行,以处理大数据集。
在本教程中,我们将设置并在四个DigitalOcean Droplets上运行Hadoop集群。
前提条件
此教程将需要以下内容:
- 四个Ubuntu 16.04 Droplets与非 root sudo用户设置. 如果您没有这个设置,请遵循 初始服务器设置与Ubuntu 16.04的步骤 1-4)。本教程将假定您正在使用来自本地机器的SSH密钥. 根据Hadoop的语言,我们将用以下名称参考这些 Droplets:
hadoop-masterhadoop-worker-01hadoop-worker-02hadoop-worker-03
- 此外,您可能想要使用 DigitalOcean Snapshots在初始服务器设置和完成 [Steps 1]
有了这些前提条件,您将准备好开始设置 Hadoop 集群。
步骤 1 – 每个滴滴的安装设置
如果您不希望在每个Dropplet上重复每个步骤,您可以使用 DigitalOcean Snapshots在 步骤 2的末尾复制您的初始安装和配置。
首先,我们将更新 Ubuntu 以提供最新的软件修补程序:
1sudo apt-get update && sudo apt-get -y dist-upgrade
接下来,让我们在每个Droplet上安装Ubuntu的无头版本的Java。无头是指能够在没有图形用户界面的设备上运行的软件。
1sudo apt-get -y install openjdk-8-jdk-headless
要在每个Droplet上安装Hadoop,让我们创建Hadoop将被安装的目录,我们可以称之为my-hadoop-install,然后移动到该目录。
1mkdir my-hadoop-install && cd my-hadoop-install
一旦我们创建了目录,让我们从Hadoop发布列表中安装最新的二进制(http://hadoop.apache.org/releases.html)。
<$>[注] 注:请记住,这些下载是通过镜像网站分发的,建议先检查使用GPG或SHA-256进行篡改。
当您对所选择的下载感到满意时,您可以使用wget命令与所选择的二进制链接一起使用,例如:
1wget http://mirror.cc.columbia.edu/pub/software/apache/hadoop/common/hadoop-3.0.1/hadoop-3.0.1.tar.gz
一旦下载完成,请使用Ubuntu的文件存档工具tar解码文件的内容:
1tar xvzf hadoop-3.0.1.tar.gz
我们现在已经准备好开始我们的初始配置。
步骤 2 — 更新 Hadoop 环境配置
对于每个 Droplet 节点,我们需要设置 JAVA_HOME. 使用 nano 或您选择的其他文本编辑器打开以下文件,以便我们可以更新它:
1nano ~/my-hadoop-install/hadoop-3.0.1/etc/hadoop/hadoop-env.sh
更新下列部分,其中位于JAVA_HOME:
 1[label hadoop-env.sh]
 2...
 3###
 4# Generic settings for HADOOP
 5###
 6
 7# Technically, the only required environment variable is JAVA_HOME.
 8# All others are optional. However, the defaults are probably not
 9# preferred. Many sites configure these options outside of Hadoop,
10# such as in /etc/profile.d
11
12# The java implementation to use. By default, this environment
13# variable is REQUIRED on ALL platforms except OS X!
14# export JAVA_HOME=
15
16# Location of Hadoop. By default, Hadoop will attempt to determine
17# this location based upon its execution path.
18# export HADOOP_HOME=
19...
要像这样看:
 1[label hadoop-env.sh]
 2...
 3###
 4# Generic settings for HADOOP
 5###
 6
 7# Technically, the only required environment variable is JAVA_HOME.
 8# All others are optional. However, the defaults are probably not
 9# preferred. Many sites configure these options outside of Hadoop,
10# such as in /etc/profile.d
11
12# The java implementation to use. By default, this environment
13# variable is REQUIRED on ALL platforms except OS X!
14export JAVA_HOME=/usr/lib/jvm/java-8-openjdk-amd64
15
16# Location of Hadoop. By default, Hadoop will attempt to determine
17# this location based upon its execution path.
18# export HADOOP_HOME=
19...
我们还需要添加一些环境变量来运行Hadoop及其模块,它们应该被添加到文件的底部,以便它看起来如下,其中sammy将是您的sudo非根用户的用户名。
<$>[注意] 注意:如果您在群集中的Droplets中使用不同的用户名,则需要编辑此文件以反映每个特定Droplet的正确用户名。
 1[label hadoop-env.sh]
 2...
 3#
 4# To prevent accidents, shell commands be (superficially) locked
 5# to only allow certain users to execute certain subcommands.
 6# It uses the format of (command)_(subcommand)_USER.
 7#
 8# For example, to limit who can execute the namenode command,
 9export HDFS_NAMENODE_USER="sammy"
10export HDFS_DATANODE_USER="sammy"
11export HDFS_SECONDARYNAMENODE_USER="sammy"
12export YARN_RESOURCEMANAGER_USER="sammy"
13export YARN_NODEMANAGER_USER="sammy"
在此时,您可以保存和退出文件,然后运行以下命令来应用我们的导出:
1source ~/my-hadoop-install/hadoop-3.0.1/etc/hadoop/hadoop-env.sh
随着hadoop-env.sh脚本的更新和源,我们需要为Hadoop分布式文件系统(HDFS)创建一个数据目录,以存储所有相关的HDFS文件。
1sudo mkdir -p /usr/local/hadoop/hdfs/data
请记住,如果您在每个 Droplet 上有不同的用户名,请确保允许您的 sudo 用户拥有这些权限:
1sudo chown -R sammy:sammy /usr/local/hadoop/hdfs/data
如果您想使用 DigitalOcean 快照复制这些命令在您的 Droplet 节点上,您可以现在创建您的快照,并从此图像中创建新的 Droplets。
完成以上步骤后,在所有四个Ubuntu Droplets中,您可以继续完成此组件的组成。
步骤 3 – 完成每个节点的初始配置
在此时刻,我们需要更新您的 Droplet 节点中的所有 4 节点的 core_site.xml 文件。 在每个 Droplet 中,打开以下文件:
1nano ~/my-hadoop-install/hadoop-3.0.1/etc/hadoop/core-site.xml
你应该看到以下几行:
1[label core-site.xml]
2...
3<configuration>
4</configuration>
更改文件看起来像以下的XML,以便我们将每个Droplet的相应IP包含在属性值中,我们有server-ip写在里面。
1[label core-site.xml]
2...
3<configuration>
4    <property>
5        <name>fs.defaultFS</name>
6        <value>hdfs://server-ip:9000</value>
7    </property>
8</configuration>
在相应的 Droplet IP 中重复上面的写法,用于您的四个服务器。
现在每个服务器节点都应该更新所有一般的 Hadoop 设置,我们可以通过 SSH 键继续连接我们的节点。
步骤 4 – 为每个节点设置 SSH
为了使 Hadoop 正常工作,我们需要在主节点和工人节点之间设置无密码的 SSH(主和工人的语言是 Hadoop 的语言,指的是主要和次要服务器)。
对于本教程,主节点将是hadoop-master,工人节点将被集体称为hadoop-worker,但总共将有三个(称为-01,-02和-03)。
在hadoop-master Droplet 上,运行以下命令. 您将按enter来使用默认位置的关键位置,然后按enter两次来使用空的密码句子:
1[environment second]
2ssh-keygen
对于每个工人节点,我们需要拿出主节点的公共密钥,并将其复制到每个工人节点的授权_keys文件中。
从主节点获取公共密钥,在位于您的.ssh 文件夹中的 id_rsa.pub 文件上运行 `cat' 以打印到控制台:
1[environment second]
2cat ~/.ssh/id_rsa.pub
Now log into each worker node Droplet, and open the authorized_keys file:
1[environment fourth]
2nano ~/.ssh/authorized_keys
You’ll copy the master node’s public key — which is the output you generated from the cat ~/.ssh/id_rsa.pub command on the master node — into each Droplet’s respective ~/.ssh/authorized_keys file. Be sure to save each file before closing.
When you are finished updating the 3 worker nodes, also copy the master node’s public key into its own authorized_keys file by issuing the same command:
1[environment second]
2nano ~/.ssh/authorized_keys
On hadoop-master, you should set up the ssh configuration to include each of the hostnames of the related nodes. Open the configuration file for editing, using nano:
1[environment second]
2nano ~/.ssh/config
You should modify the file to look like the following, with relevant IPs and usernames added.
 1[environment second]
 2[label config]
 3Host hadoop-master-server-ip
 4    HostName hadoop-example-node-server-ip
 5    User sammy
 6    IdentityFile ~/.ssh/id_rsa
 7
 8Host hadoop-worker-01-server-ip
 9    HostName hadoop-worker-01-server-ip
10    User sammy
11    IdentityFile ~/.ssh/id_rsa
12
13Host hadoop-worker-02-server-ip
14    HostName hadoop-worker-02-server-ip
15    User sammy
16    IdentityFile ~/.ssh/id_rsa
17
18Host hadoop-worker-03-server-ip
19    HostName hadoop-worker-03-server-ip
20    User sammy
21    IdentityFile ~/.ssh/id_rsa
Save and close the file.
From the hadoop-master, SSH into each node:
1[environment second]
2ssh sammy@hadoop-worker-01-server-ip
Since it’s your first time logging into each node with the current system set up, it will ask you the following:
1[environment second]
2[secondary_label Output]
3are you sure you want to continue connecting (yes/no)?
Reply to the prompt with yes. This will be the only time it needs to be done, but it is required for each worker node for the initial SSH connection. Finally, log out of each worker node to return to hadoop-master:
1[environment fourth]
2logout
Be sure to repeat these steps for the remaining two worker nodes.
Now that we have successfully set up passwordless SSH for each worker node, we can now continue to configure the master node.
Step 5 — Configure the Master Node
For our Hadoop cluster, we need to configure the HDFS properties on the master node Droplet.
While on the master node, edit the following file:
1[environment second]
2nano ~/my-hadoop-install/hadoop-3.0.1/etc/hadoop/hdfs-site.xml
Edit the configuration section to look like the XML below:
 1[environment second]
 2[label hdfs-site.xml]
 3...
 4<configuration>
 5    <property>
 6        <name>dfs.replication</name>
 7        <value>3</value>
 8    </property>
 9    <property>
10        <name>dfs.namenode.name.dir</name>
11        <value>file:///usr/local/hadoop/hdfs/data</value>
12    </property>
13</configuration>
Save and close the file.
We’ll next configure the MapReduce properties on the master node. Open mapred.site.xml with nano or another text editor:
1[environment second]
2nano ~/my-hadoop-install/hadoop-3.0.1/etc/hadoop/mapred-site.xml
Then update the file so that it looks like this, with your current server’s IP address reflected below:
 1[environment second]
 2[label mapred-site.xml]
 3...
 4<configuration>
 5    <property>
 6        <name>mapreduce.jobtracker.address</name>
 7        <value>hadoop-master-server-ip:54311</value>
 8    </property>
 9    <property>
10        <name>mapreduce.framework.name</name>
11        <value>yarn</value>
12    </property>
13</configuration>
Save and close the file. If you are using a firewall, be sure to open port 54311.
Next, set up YARN on the master node. Again, we are updating the configuration section of another XML file, so let’s open the file:
1[environment second]
2nano ~/my-hadoop-install/hadoop-3.0.1/etc/hadoop/yarn-site.xml
Now update the file, being sure to input your current server’s IP address:
 1[environment second]
 2[label yarn-site.xml]
 3...
 4<configuration>
 5    <!-- Site specific YARN configuration properties -->
 6    <property>
 7        <name>yarn.nodemanager.aux-services</name>
 8        <value>mapreduce_shuffle</value>
 9    </property>
10    <property>
11        <name>yarn.nodemanager.aux-services.mapreduce.shuffle.class</name>
12        <value>org.apache.hadoop.mapred.ShuffleHandler</value>
13    </property>
14    <property>
15        <name>yarn.resourcemanager.hostname</name>
16        <value>hadoop-master-server-ip</value>
17    </property>
18</configuration>
Finally, let’s configure Hadoop’s point of reference for what the master and worker nodes should be. First, open the masters file:
1[environment second]
2nano ~/my-hadoop-install/hadoop-3.0.1/etc/hadoop/masters
Into this file, you’ll add your current server’s IP address:
1[environment second]
2[label masters]
3hadoop-master-server-ip
Now, open and edit the workers file:
1[environment second]
2nano ~/my-hadoop-install/hadoop-3.0.1/etc/hadoop/workers
Here, you’ll add the IP addresses of each of your worker nodes, underneath where it says localhost.
1[environment second]
2[label workers]
3localhost
4hadoop-worker-01-server-ip
5hadoop-worker-02-server-ip
6hadoop-worker-03-server-ip
After finishing the configuration of the MapReduce and YARN properties, we can now finish configuring the worker nodes.
Step 6 — Configure the Worker Nodes
We’ll now configure the worker nodes so that they each have the correct reference to the data directory for HDFS.
On each worker node, edit this XML file:
1[environment fourth]
2nano ~/my-hadoop-install/hadoop-3.0.1/etc/hadoop/hdfs-site.xml
Replace the configuration section with the following:
 1[label hdfs-site.xml]
 2[environment fourth]
 3<configuration>
 4    <property>
 5        <name>dfs.replication</name>
 6        <value>3</value>
 7    </property>
 8    <property>
 9        <name>dfs.datanode.data.dir</name>
10        <value>file:///usr/local/hadoop/hdfs/data</value>
11    </property>
12</configuration>
Save and close the file. Be sure to replicate this step on all three of your worker nodes.
At this point, our worker node Droplets are pointing to the data directory for HDFS, which will allow us to run our Hadoop cluster.
Step 7 — Run the Hadoop Cluster
We have reached a point where we can start our Hadoop cluster. Before we start it up, we need to format the HDFS on the master node. While on the master node Droplet, change directories to where Hadoop is installed:
1[environment second]
2cd ~/my-hadoop-install/hadoop-3.0.1/
Then run the following command to format HDFS:
1[environment second]
2sudo ./bin/hdfs namenode -format
A successful formatting of the namenode will result in a lot of output, consisting of mostly INFO statements. At the bottom you will see the following, confirming that you’ve successfully formatted the storage directory.
 1[environment second]
 2[secondary_label Output]
 3...
 42018-01-28 17:58:08,323 INFO common.Storage: Storage directory /usr/local/hadoop/hdfs/data has been successfully formatted.
 52018-01-28 17:58:08,346 INFO namenode.FSImageFormatProtobuf: Saving image file /usr/local/hadoop/hdfs/data/current/fsimage.ckpt_0000000000000000000 using no compression
 62018-01-28 17:58:08,490 INFO namenode.FSImageFormatProtobuf: Image file /usr/local/hadoop/hdfs/data/current/fsimage.ckpt_0000000000000000000 of size 389 bytes saved in 0 seconds.
 72018-01-28 17:58:08,505 INFO namenode.NNStorageRetentionManager: Going to retain 1 images with txid >= 0
 82018-01-28 17:58:08,519 INFO namenode.NameNode: SHUTDOWN_MSG:
 9/************************************************************
10SHUTDOWN_MSG: Shutting down NameNode at hadoop-example-node/127.0.1.1
11************************************************************/
Now, start the Hadoop cluster by running the following scripts (be sure to check scripts before running by using the less command):
1[environment second]
2sudo ./sbin/start-dfs.sh
You’ll then see output that contains the following:
1[environment second]
2[secondary_label Output]
3Starting namenodes on [hadoop-master-server-ip]
4Starting datanodes
5Starting secondary namenodes [hadoop-master]
Then run YARN, using the following script:
1[environment second]
2./sbin/start-yarn.sh
The following output will appear:
1[environment second]
2[secondary_label Output]
3Starting resourcemanager
4Starting nodemanagers
Once you run those commands, you should have daemons running on the master node and one on each of the worker nodes.
We can check the daemons by running the jps command to check for Java processes:
1[environment second]
2jps
After running the jps command, you will see that the NodeManager, SecondaryNameNode, Jps, NameNode, ResourceManager, and DataNode are running. Something similar to the following output will appear:
1[environment second]
2[secondary_label Output]
39810 NodeManager
49252 SecondaryNameNode
510164 Jps
68920 NameNode
79674 ResourceManager
89051 DataNode
This verifies that we’ve successfully created a cluster and verifies that the Hadoop daemons are running.
In a web browser of your choice, you can get an overview of the health of your cluster by navigating to:
1http://hadoop-master-server-ip:9870
If you have a firewall, be sure to open port 9870. You’ll see something that looks similar to the following:
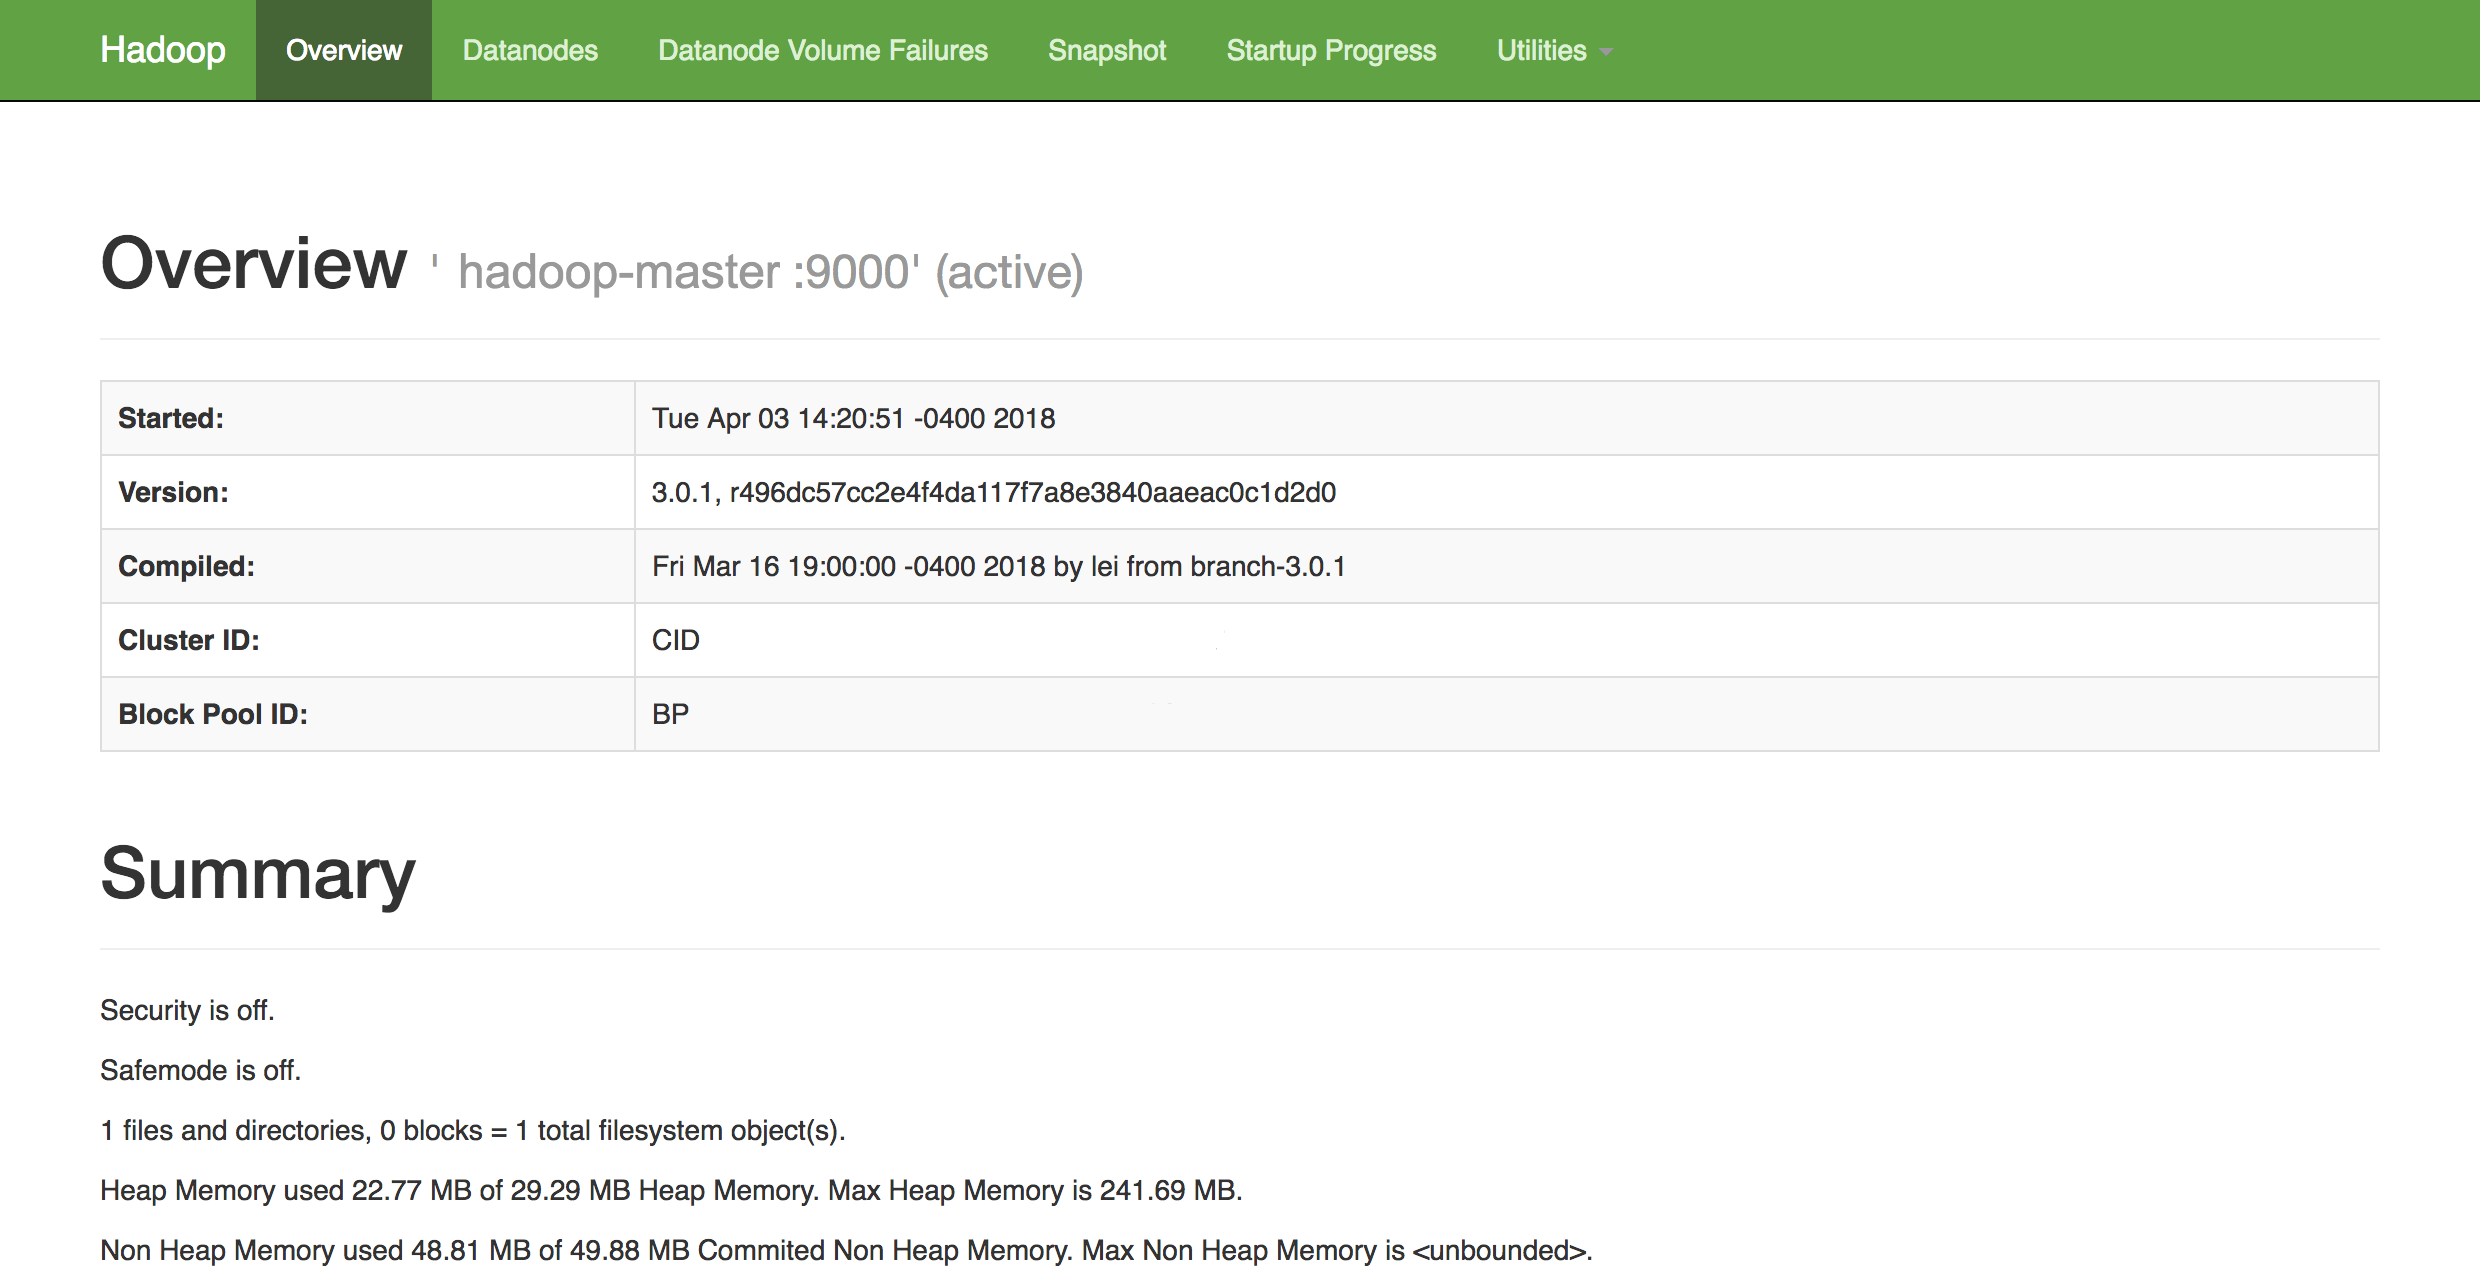
From here, you can navigate to the Datanodes item in the menu bar to see the node activity.
Conclusion
In this tutorial, we went over how to set up and configure a Hadoop multi-node cluster using DigitalOcean Ubuntu 16.04 Droplets. You can also now monitor and check the health of your cluster using Hadoop’s DFS Health web interface.
To get an idea of possible projects you can work on to utilize your newly configured cluster, check out Apache’s long list of projects powered by Hadoop.