介绍
Let's Encrypt是一个证书授权机构(CA),它为 Transport Layer Security (TLS) 加密提供免费证书,从而在 Web 服务器上允许加密 HTTPS。
在本教程中,您将使用 Certbot 在运行 Apache 作为 Web 服务器的 CentOS 7 服务器上设置从 Let’s Encrypt 的 TLS/SSL 证书。
前提条件
为了完成本指南,您将需要:
- 1 CentOS 7 服务器的设置遵循 [CentOS 7 初始服务器设置指南] (https://andsky.com/tech/tutorials/initial-server-setup-with-centos-7),与拥有"sudo"权限的非根基用户. (_) ( )* 通过遵循 [新 CentOS 7 服务器的附加推荐步骤] (https://andsky.com/tech/tutorials/additional-recommended-steps-for-new-centos-7-servers#configuring-a-basic-firewall) 指南配置的基本防火墙.
- Apache 安装在 CentOS 7 服务器上,配置了一个虚拟主机. 您可以遵循我们的教程[如何在 CentOS 7 上安装 Apache 网络服务器( https://andsky.com/tech/tutorials/how-to-install-the-apache-web-server-on-centos-7 ) 来学习如何设置此功能 。 确定您的域名有 [虚拟主机文件] (https://andsky.com/tech/tutorials/how-to-install-the-apache-web-server-on-centos-7#step-4-%E2%80%94-setting-up-virtual-hosts-(recommended ) 。 此教程将使用`/etc/httpd/sites-captive/example.com.conf'作为示例。
- 您应该拥有或控制您想要使用证书的已注册域名 。 如果您还没有注册域名, 您可以在 [Namecheap (https://namecheap.com 上购买域名), 在 [Freenom (http://www.freenom.com/en/index.html 上免费获得域名, 或者使用您选择的域名登记员 。 (
) * 一个 DNS **A Record ** 将您的域指向您的服务器的公共IP地址. 您可以跟随DigitalOcean DNS的介绍,详细了解如何与DigitalOcean平台相添加. DNS 数据 需要一个记录,因为让我们加密如何验证您拥有它所颁发的证书的域 。 例如,如果想要获得
example.com'的证书,该域必须解决到您的服务器上,以便验证进程发挥作用。 我们的设置将使用example.com'和`www.example.com'作为域名,这两个域名都需要有效的DNS记录。 (_) (英语)
当您完成所有这些前提条件后,继续安装 Let’s Encrypt 客户端软件。
步骤 1 – 安装 Certbot Let’s Encrypt 客户端
要使用 Let's Encrypt 获取 SSL 证书,您需要先安装 Certbot 和 mod_ssl,一个支持 SSL v3 加密的 Apache 模块。
默认情况下,certbot包无法通过包管理器使用,您需要启用 EPEL存储库来安装Certbot。
若要添加 CentOS 7 EPEL 存储库,请执行以下命令:
1sudo yum install epel-release
现在你可以访问存储库,安装所有所需的包:
1sudo yum install certbot python2-certbot-apache mod_ssl
在安装过程中,您将被要求导入 GPG 密钥. 此密钥将验证您正在安装的软件包的真实性. 若要允许安装完成,请通过键入y并按ENTER来接受 GPG 密钥。
有了这些服务,您现在已经准备好运行Certbot并获取证书。
步骤二:获得证书
现在,Certbot已安装,您可以使用它来请求您的域的SSL证书。
使用certbotLet’s Encrypt客户端来生成Apache的SSL证书,将自动化进程中的许多步骤,客户端将自动获得并安装一个新的SSL证书,该证书适用于您提供的域作为参数。
要执行交互式安装并获得仅覆盖单个域的证书,请运行certbot命令:
1sudo certbot --apache -d example.com
这将运行certbot与--apache插件,并指定该域以-d旗配置证书。
如果您想安装一个适用于多个域或子域的单一证书,您可以将其作为附加参数传递给命令,将每个新域或子域标记为 -d 旗帜。参数列表中的第一个域名将是 Let’s Encrypt 用来创建证书的 base 域名。
1sudo certbot --apache -d example.com -d www.example.com
此示例中的基本域名为example.com。
该certbot实用程序还可以在证书请求程序中向您请求域信息。 若要使用此功能,请拨打certbot而无域名:
1sudo certbot --apache
该程序将为您提供一步一步的指南,以自定义您的证书选项。它将要求您为丢失的密钥恢复和通知提供电子邮件地址,然后提示您同意服务条款。如果您没有在命令行中指定您的域名,您将被提示这样做。如果您的虚拟主机文件没有使用ServerName指令明确指定他们服务的域名,您将被要求选择虚拟主机文件。
您还可以选择允许http和https访问或强迫所有请求重定向到https。 为了更好的安全性,建议您选择2:重定向,如果您没有任何特殊需要允许未加密连接。
1[secondary_label Output]
2Please choose whether or not to redirect HTTP traffic to HTTPS, removing HTTP access.
3- - - - - - - - - - - - - - - - - - - - - - - - - - - - - - - - - - - - - - - -
41: No redirect - Make no further changes to the webserver configuration.
52: Redirect - Make all requests redirect to secure HTTPS access. Choose this for
6new sites, or if you're confident your site works on HTTPS. You can undo this
7change by editing your web server's configuration.
8- - - - - - - - - - - - - - - - - - - - - - - - - - - - - - - - - - - - - - - -
9Select the appropriate number [1-2] then [enter] (press 'c' to cancel):2
当安装成功完成后,您将看到类似于此的消息:
 1[secondary_label Output]
 2IMPORTANT NOTES:
 3 - Congratulations! Your certificate and chain have been saved at:
 4   /etc/letsencrypt/live/example.com/fullchain.pem
 5   Your key file has been saved at:
 6   /etc/letsencrypt/live/example.com/privkey.pem
 7   Your cert will expire on 2019-08-14. To obtain a new or tweaked
 8   version of this certificate in the future, simply run certbot again
 9   with the "certonly" option. To non-interactively renew *all* of
10   your certificates, run "certbot renew"
11 - If you like Certbot, please consider supporting our work by:
12
13   Donating to ISRG / Let's Encrypt:   https://letsencrypt.org/donate
14   Donating to EFF:                    https://eff.org/donate-le
生成的证书文件将在您的基域名为/etc/letsencrypt/live目录的子目录中可用。
现在您的证书已下载、安装和加载,您可以检查您的SSL证书状态,以确保一切正常工作。
步骤 3 – 检查您的证书状态
在此时,您可以通过使用云安全公司Qualys的SSL服务器测试(https://www.ssllabs.com/ssltest/)来确保Certbot正确地创建您的SSL证书。
在您喜爱的网页浏览器中打开以下链接,以您的 base 域名替换 example.com:
1https://www.ssllabs.com/ssltest/analyze.html?d=example.com
您将登陆一个立即开始测试与您的服务器的SSL连接的页面:
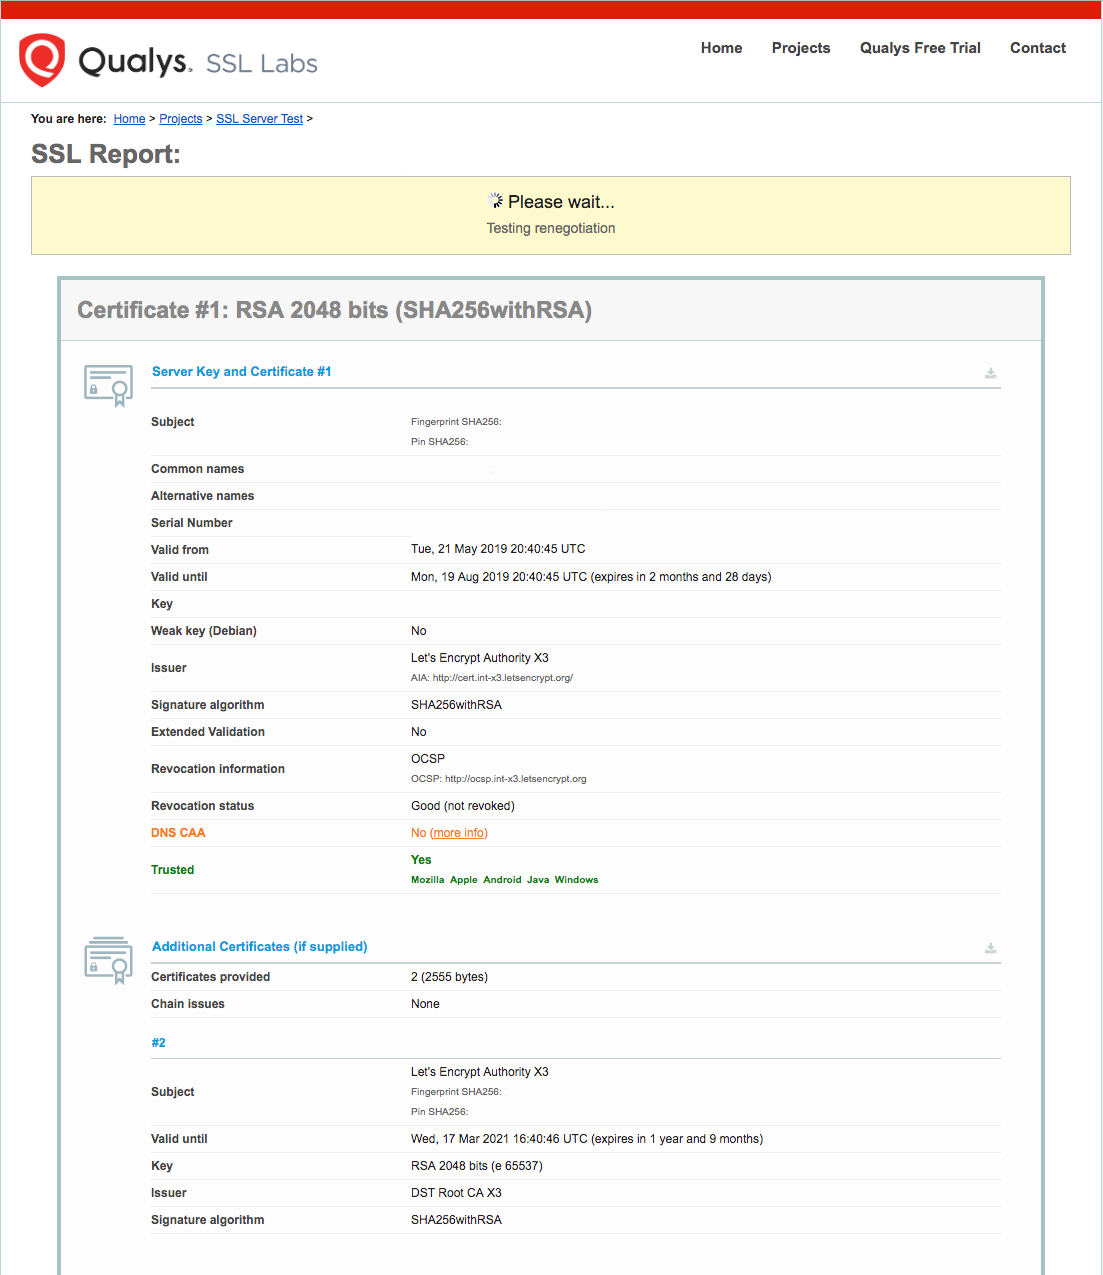
一旦测试开始运行,可能需要几分钟才能完成,测试状态将在您的浏览器中更新。
当测试结束时,页面将显示一个字母级别,评估您的服务器配置的安全性和质量。
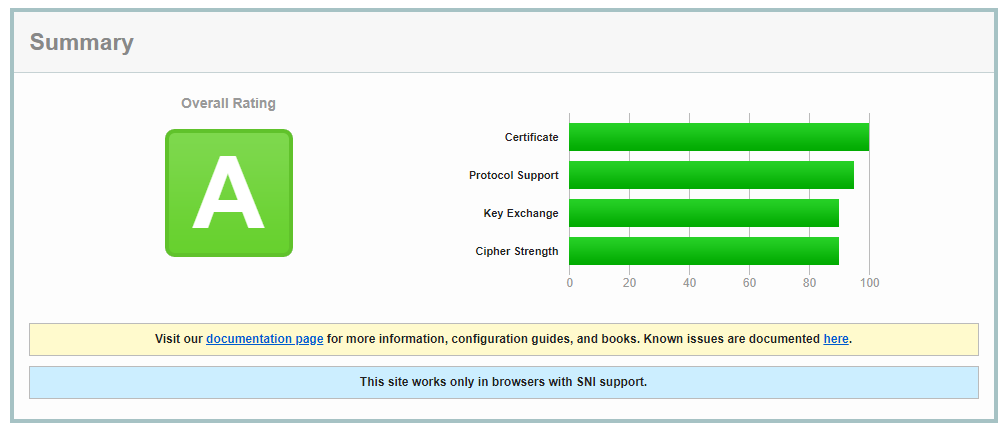
有关 SSL Labs 如何确定这些评级的更多信息,请参阅 SSL Labs 评级帖子,详细介绍了 2018 年 1 月对评级计划的更新。
尝试使用https://重新加载您的网站,并注意您的浏览器的安全指标,现在它将表明该网站是正确保护的,通常用绿色锁定图标。
当您的 SSL 证书被验证后,下一步是为您的证书设置自动更新,以保持证书的有效性。
步骤 4 – 设置自动更新
Let’s Encrypt 证书有效期为 90 天,但建议您每隔 60 天更新证书,以便出现错误。
首先,让我们看看您将使用的命令来更新证书。certbot``Let’s Encrypt客户端有一个renew命令,该命令会自动检查当前安装的证书,并尝试更新它们,如果它们在到期日期不到30天。
1sudo certbot renew --dry-run
结果应该是这样的:
 1[secondary_label Output]
 2Saving debug log to /var/log/letsencrypt/letsencrypt.log
 3
 4- - - - - - - - - - - - - - - - - - - - - - - - - - - - - - - - - - - - - - - -
 5Processing /etc/letsencrypt/renewal/example.com.conf
 6- - - - - - - - - - - - - - - - - - - - - - - - - - - - - - - - - - - - - - - -
 7Cert not due for renewal, but simulating renewal for dry run
 8Plugins selected: Authenticator apache, Installer apache
 9Starting new HTTPS connection (1): acme-staging-v02.api.letsencrypt.org
10Renewing an existing certificate
11Performing the following challenges:
12http-01 challenge for example.com
13http-01 challenge for www.example.com
14Waiting for verification...
15Cleaning up challenges
16Resetting dropped connection: acme-staging-v02.api.letsencrypt.org
17
18- - - - - - - - - - - - - - - - - - - - - - - - - - - - - - - - - - - - - - - -
19new certificate deployed with reload of apache server; fullchain is
20/etc/letsencrypt/live/example.com/fullchain.pem
21- - - - - - - - - - - - - - - - - - - - - - - - - - - - - - - - - - - - - - - -
22
23- - - - - - - - - - - - - - - - - - - - - - - - - - - - - - - - - - - - - - - -
24** DRY RUN: simulating 'certbot renew' close to cert expiry
25**          (The test certificates below have not been saved.)
26
27Congratulations, all renewals succeeded. The following certs have been renewed:
28  /etc/letsencrypt/live/example.com/fullchain.pem (success)
29...
请注意,如果您创建了包含多个域的组合证书,则输出中只会显示基本域名,但更新将适用于该证书中包含的所有域名。
确保您的证书不会过时的一种实用方法是创建一个 cron job,该任务会定期为您执行自动更新命令。
官方Certbot文件建议每天运行cron两次,这将确保如果Let's Encrypt启动证书撤销,在Certbot更新您的证书之前不会超过半天。
编辑crontab以创建一个新的工作,每天将运行更新两次。
1sudo crontab -e
您的文本编辑器将打开默认 crontab 这是一个空文本文件在这个时候. 本教程将使用 vi 文本编辑器. 要了解更多关于这个文本编辑器和其继任者 vim,请参阅我们的 安装和使用 Vim 文本编辑器在云服务器上教程。
输入插入模式,按i并在下列行中添加:
1[secondary_label crontab]
20 0,12 * * * python -c 'import random; import time; time.sleep(random.random() * 3600)' && certbot renew
当你完成时,按ESC来离开插入模式,然后按:wq和ENTER来保存和退出文件。这将创建一个新的 cron 任务,每天中午和午夜执行。将随机性元素添加到你的 cron 任务中,将确保每小时的工作都不会在同一分钟发生,导致服务器峰值;python -c导入随机;导入时间; time.sleep(random.random() * 3600)`将为你的更新任务选择一个随机分钟。
有关如何创建和安排 cron 工作的更多信息,请参阅我们的 如何在 VPS 中使用 Cron 来自动化任务指南。
结论
在本指南中,您安装了 Let's Encrypt Certbot 客户端,下载了您的域的 SSL 证书,并设置了自动证书更新。如果您对使用 Certbot 有任何问题,您可以检查官方的 Certbot 文档.我们还建议您定期查看官方的 Let's Encrypt 博客有关重要更新。