介绍
机器学习,或ML,是人工智能的一个子领域,专注于从数据中学习模型的算法。
在2015年,研究人员使用深度学习技术创建了一个算法,将一个图像的内容与另一个艺术风格混合在一起。
正如它的名字所暗示的那样,神经风格传输依赖神经网络来执行这个任务. 这个实施的确切细节超出了本教程的范围,但您可以了解更多(在这个关于艺术风格传输的博客文章中)(https://harishnarayanan.org/writing/artistic-style-transfer/)或从(https://arxiv.org/abs/1508.06576)的原始研究手稿中)。
在本教程中,您将使用Jupyter笔记本和Linux命令行应用神经风格传输,以便拍摄这样的图像:

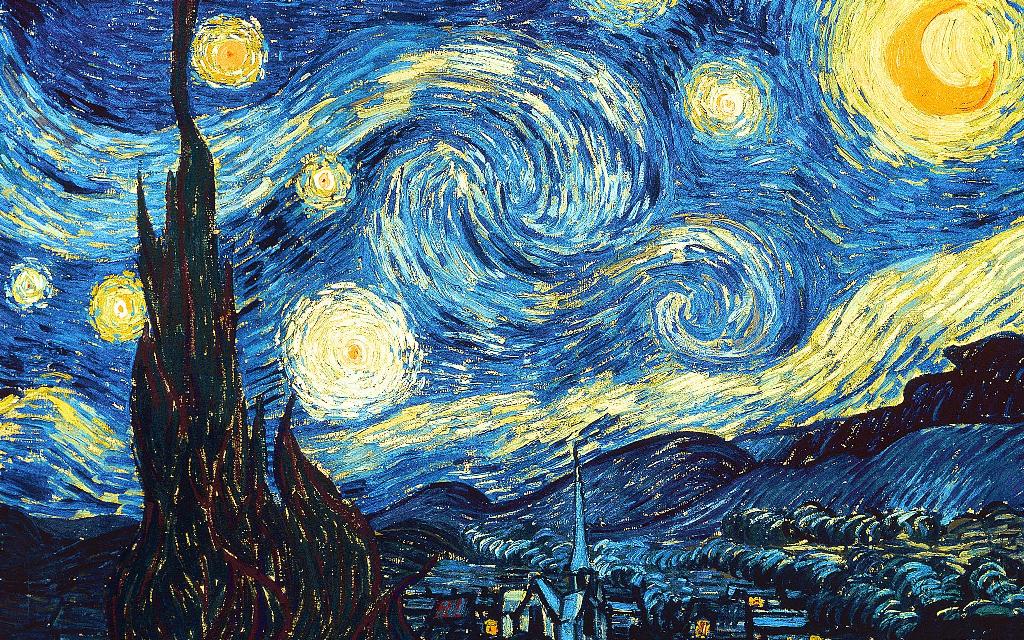
通过运用文森特·梵高的星际之夜的艺术风格来改造它,创建这个图像:
前提条件
要完成本教程,您将需要:
- 一个 Ubuntu 20.04 服务器通过以下设置( Ubuntu 20.04 初始服务器设置指南)(https://andsky.com/tech/tutorials/initial-server-setup-with-ubuntu-20-04),包括一个 sudo 非根用户和防火墙。
- Python 3 和一个通过以下设置的编程环境(https://andsky.com/tech/tutorials/how-to-install-python-3-and-set-up-a-programming-environment-on-an-ubuntu-20-04-server)。
- Jupyter 笔记本通过以下安装(How to Set Up Jupyter Notebook for Python 3](https://andsky.com/tech/tutorials/how-to-set-up-jupyter-notebook-for-python-3)
使用机器学习模型工作可能具有密集的内存,因此您的机器应该至少有8GB的内存,以执行本教程中的一些计算。
步骤 1 — 安装依赖并克隆 PyTorch 风格转移 GitHub 存储库
在本教程中,我们将使用由 Hang Zhang提供的神经风格传输的开源实现,称为 PyTorch-Style-Transfer。
激活您的编程环境,并使用以下命令安装torchvision和torchfile包:
1pip install torchvision torchfile
Pip 会自动恢复他们的依赖性:
1[secondary_label Output]
2Successfully installed numpy-1.22.0 pillow-9.0.0 torch-1.10.1 torchfile-0.1.0 torchvision-0.11.2 typing-extensions-4.0.1
若要避免将您的主目录混淆到文件中,请创建一个名为style_transfer的新目录,并将其用作工作目录:
1mkdir style_transfer
2cd style_transfer
接下来,用git clone命令将PyTorch-Style-Transfer存储库克隆到您的工作目录,您可以在 这个 Git 教程系列中了解更多关于 Git 的信息。
1git clone https://github.com/zhanghang1989/PyTorch-Style-Transfer.git
该存储库的作者将我们将使用的代码放置在PyTorch-Style-Transfer存储库的实验文件夹中,因此在所有文件被克隆后切换到此目录:
1cd PyTorch-Style-Transfer/experiments
看看实验目录的内容:
1ls
您将看到以下目录:
1[secondary_label Output]
2camera_demo.py dataset images main.py models net.py option.py utils.py
在本教程中,您将使用包含库存图像的 images/ 目录和 main.py 脚本,用于将神经风格转移应用于您的图像。
在移动到下一个部分之前,您还需要下载先训练的深度学习模型,以运行神经风格传输。这些模型可能很大,因此不适合存储在GitHub上,因此作者提供了一个小脚本来下载该文件。
首先,使脚本可执行:
1chmod +x ./models/download_model.sh
然后运行脚本来下载模型:
1./models/download_model.sh
现在一切都下载了,让我们使用这些工具来转换一些图像。
步骤2 - 运行您的第一个风格转移实验
为了说明神经风格传输是如何工作的,让我们开始使用PyTorch-Style-Transfer存储库的作者提供的示例,因为我们需要显示和查看图像,所以使用Jupyter笔记本更方便。
从您的终端启动 Jupyter:
1jupyter notebook
然后访问Jupyter,遵循所提供的指示。
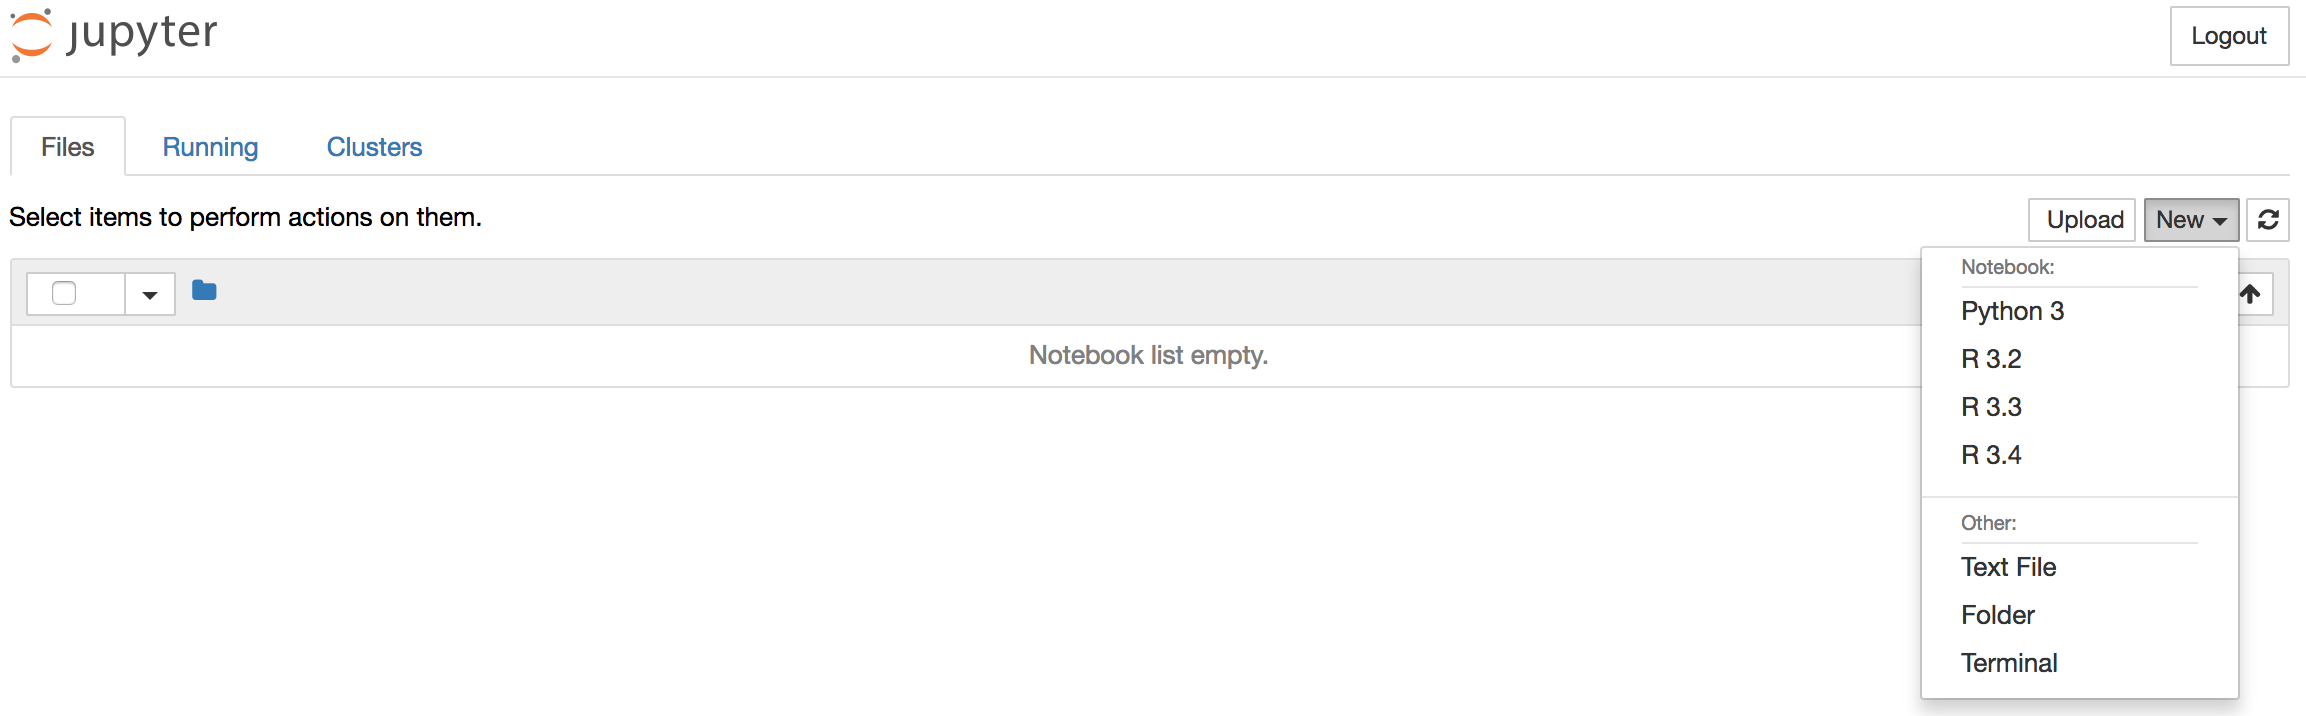
一旦 Jupyter 显示,请从右上角的推卸菜单中选择 新 > Python 3来创建新笔记本:
这会打开一个新笔记本,你可以输入你的代码。
在笔记本的顶部,添加以下代码来加载所需的库。
1[label Notebook]
2import torch
3import os
4import subprocess
5from IPython.display import Image
6from IPython.display import display
除了torch之外,我们还导入了标准库os和subprocess,我们将使用它们直接从Jupyter笔记本中运行Python脚本,我们还包括了IPython.display库,允许我们在Jupyter笔记本中显示图像。
<$>[注]
注:键入ALT+ENTER (或SHIFT+ENTER在macOS上)以运行代码并在笔记本内移动到一个新的代码块。
在PyTorch-Style-Transfer存储库的README文件中提供的示例使用位于images/目录和main.py脚本中的库存图像。
- 通往内容图像的路径(位于
/images/content)。 - 通往风格图像的路径(位于
/images/21styles)。 - 通往预先训练的GAN(Generative Adversarial Network)模型的路径用于执行风格转移(位于
/models)。 - 输出图像的路径和名称。
要运行神经风格传输代码,我们将指定所需的参数,并使用子过程库在壳中运行命令。
首先,让我们定义到我们的工作目录的路径,我们将存储一个名为workingdir的变量:
1[label Notebook]
2# define the path to the working directory
3experiment_dir = 'style_transfer/PyTorch-Style-Transfer/experiments'
4workingdir = '{}/{}'.format(os.environ['HOME'], experiment_dir)
我们将在整个代码中使用这个变量,当我们指向图像和其他文件时。
现在让我们定义main.py脚本的路径,以及我们将用作此测试运行输入的参数列表,我们将指定内容图像为venice-boat.jpg,风格图像为starry_night.jpg,我们将将我们神经风格转移的输出保存到名为test.jpg的文件:
 1[label Notebook]
 2# specify the path to the main.py script
 3path2script = '{}/main.py'.format(workingdir)
 4
 5# specify the list of arguments to be used as input to main.py
 6args = ['eval',
 7        '--content-image',
 8        '{}/images/content/venice-boat.jpg'.format(workingdir),
 9        '--style-image',
10        '{}/images/21styles/starry_night.jpg'.format(workingdir),
11        '--model',
12        '{}/models/21styles.model'.format(workingdir),
13        '--output-image',
14        '{}/test.jpg'.format(workingdir),
15        '--cuda=0']
在运行测试示例之前,您可以通过在笔记本中执行此代码快速查看您为此示例选择的内容和风格图像:
1[label Notebook]
2content_image = Image('{}/images/content/venice-boat.jpg'.format(workingdir))
3style_image = Image('{}/images/21styles/starry_night.jpg'.format(workingdir))
4display(content_image)
5display(style_image)
你会看到这些图像显示在输出中:

最后,将调用连接到main.py及其参数列表,并使用subprocess.check_output函数在壳中运行:
1[label Notebook]
2# build subprocess command
3cmd = ['python3', path2script] + args
4
5# run the command
6x = subprocess.check_output(cmd, universal_newlines=True)
取决于您的计算机上可用的内存量,这可能需要一分钟或两分钟才能运行。一旦完成,您应该在工作目录中看到一个 test.jpg 文件。从 Jupyter 笔记本中,您可以使用 Ipython 魔法命令在 Jupyter 笔记本中显示工作目录的内容:
1[label Notebook]
2!ls $workingdir
或者,您可以使用您的终端中的ls命令,无论是哪种方式,您都会看到以下输出:
1[secondary_label Output]
2__pycache__	dataset main.py myutils option.py
3camera_demo.py	images	 models net	   test.jpg
您将看到一个名为test.jpg的新文件,其中包含使用输入内容和风格图像的神经风格传输的结果。
使用图像函数显示test.jpg的内容:
1[label Notebook]
2Image('{}/test.jpg'.format(workingdir))
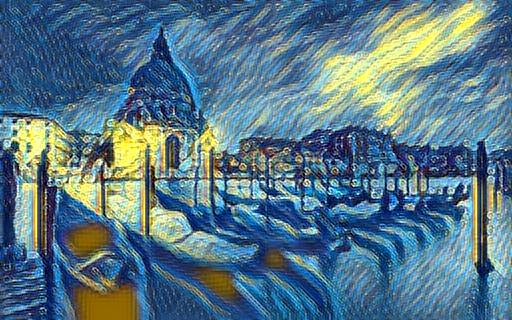
Vincent van Vogh的星夜画布的艺术风格已被绘制到我们的威尼斯船图像的内容上。你已经成功地应用了神经风格转移与教科书示例,所以让我们尝试用不同的图像重复这个练习。
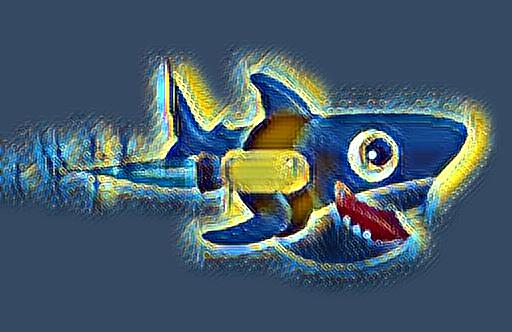
步骤三:改造自己的图像
到目前为止,您已经使用了我们正在使用的图书馆的作者提供的图像. 让我们使用自己的图像。 要做到这一点,您可以找到您感兴趣的图像,并在下面的命令中使用图像的URL,或者使用提供的URL使用Sammy the Shark。
我们将再次使用一些IPython魔法来下载图像到我们的工作目录,并将其放入名为sammy.png的文件中。
1[label Notebook]
2!wget -O - 'https://assets.digitalocean.com/blog/static/sammy-the-shark-gets-a-birthday-makeover-from-simon-oxley/sammy-jetpack.png' > $workingdir/sammy.png
当您在笔记本中运行此命令时,您将看到以下输出:
 1[secondary_label Output]
 2--2017-08-15 20:03:27--  https://assets.digitalocean.com/blog/static/sammy-the-shark-gets-a-birthday-makeover-from-simon-oxley/sammy-jetpack.png
 3Resolving assets.digitalocean.com (assets.digitalocean.com)... 151.101.20.233
 4Connecting to assets.digitalocean.com (assets.digitalocean.com)|151.101.20.233|:443... connected.
 5HTTP request sent, awaiting response... 200 OK
 6Length: 10483 (10K) [image/png]
 7Saving to: 'STDOUT'
 8
 9-                   100%[===================>]  10.24K  --.-KB/s in 0.001s
10
112017-08-15 20:03:27 (12.9 MB/s) - written to stdout [10483/10483]
使用图像命令在笔记本中显示新图像:
1[label Notebook]
2Image('{}/sammy.png'.format(workingdir))
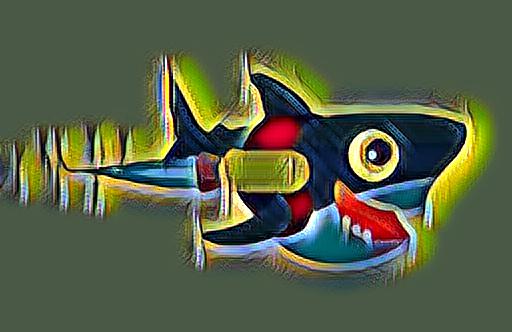
按照测试运行相同的工作流程,让我们运行我们的艺术风格转移模型,使用Rocket Sammy作为内容图像,以及与我们的风格图像相同的星夜图像。
我们将使用我们之前使用的相同代码,但这次我们将指定内容图像为sammy.png,风格图像为starry_night.jpg,我们将输出写入名为starry_sammy.jpg的文件。
 1[label Notebook]
 2# specify the path to the main.py script
 3path2script = '{}/main.py'.format(workingdir)
 4
 5# specify the list of arguments to be used as input to main.py
 6args = ['eval',
 7        '--content-image',
 8        '{}/sammy.png'.format(workingdir),
 9        '--style-image',
10        '{}/images/21styles/starry_night.jpg'.format(workingdir),
11        '--model',
12        '{}/models/21styles.model'.format(workingdir),
13        '--output-image',
14        '{}/starry_sammy.jpg'.format(workingdir),
15        '--cuda=0']
16
17# build subprocess command
18cmd = ['python3', path2script] + args
19
20# run the bash command
21x = subprocess.check_output(cmd, universal_newlines=True)
然后使用图片函数查看将Vincent van Vogh的星夜的艺术风格转移到您的Rocket Sammy图像的内容的结果。
1[label Notebook]
2Image('{}/starry_sammy.jpg'.format(workingdir))
你会看到新的风格化火箭Sammy:
我们将使用毕加索的The Muse这一次. 再次,我们将使用sammy.png作为我们的内容图像,但我们将改变风格图像为la_muse.jpg。
 1[label Notebook]
 2# specify the path to the main.py script
 3path2script = '{}/main.py'.format(workingdir)
 4
 5# specify the list of arguments to be used as input to main.py
 6args = ['eval',
 7        '--content-image',
 8        '{}/sammy.png'.format(workingdir),
 9        '--style-image',
10        '{}/images/21styles/la_muse.jpg'.format(workingdir),
11        '--model',
12        '{}/models/21styles.model'.format(workingdir),
13        '--output-image',
14        '{}/musing_sammy.jpg'.format(workingdir),
15        '--cuda=0']
16
17# build subprocess command
18cmd = ['python3', path2script] + args
19
20# run the bash command
21x = subprocess.check_output(cmd, universal_newlines=True)
一旦代码完成运行,使用您指定的输出文件名和图像函数显示工作的输出:
1[label Notebook]
2Image('{}/musing_sammy.jpg'.format(workingdir))
到目前为止,你应该有一个很好的想法如何使用这些转换. 尝试使用一些自己的图像,如果你还没有。
结论
在本教程中,您使用了Python和开源PyTorch的神经风格传输模型,将风格传输应用于图像中。机器学习和AI的领域是巨大的,这只是其应用之一。
- 将上述代码包装到可随时调用的 函数中。
- 学习使用 [在这里发布的教程]使用时间序列数据进行可视化和预测。