介绍
Parse 是一个移动后端作为服务平台,自 2013 年以来由 Facebook 拥有。
幸运的是,Parse 还发布了 一个开源 API 服务器,与托管服务的 API 兼容,称为 Parse Server。
本指南专注于将现有的 Parse 应用程序迁移到运行在 Ubuntu 14.04 上的独立 Parse Server 实例中,它使用 TLS/SSL 加密用于所有连接,使用由 Let's Encrypt 提供的证书,这是一个新的证书授权机构,它提供免费证书。
<$>[警告] 警告: 强烈建议在使用面向用户的生产应用程序之前先在应用程序的开发或测试版本中测试此程序。
前提条件
此指南是建立在 [如何在Ubuntu 14.04上运行Parse Server(LINK0))。
- 一个 Ubuntu 14.04 服务器,配置了非 root
sudo用户 - Node.js 5.6.x
- MongoDB 3.0.x
- 一个域名指向服务器
- 一个要迁移的 Parse 应用程序
- Nginx 安装和配置与 SSL 使用 Let's Encrypt 证书。
目标服务器应该有足够的存储空间来处理您的应用程序的所有数据. 由于 Parse 在其端压缩数据,他们正式建议您提供至少 10 倍的存储空间,与您的托管应用程序使用。
步骤 1 – 配置 MongoDB 迁移
Parse 为现有应用程序提供了一个迁移工具. 为了利用它,我们需要向外部连接打开MongoDB,并用Let's Encrypt的TLS/SSL证书的副本保护它。
1sudo cat /etc/letsencrypt/archive/domain_name/{fullchain1.pem,privkey1.pem} | sudo tee /etc/ssl/mongo.pem
<$>[注] 在更新 Let's Encrypt 证书后,您将不得不重复上述命令。
請確保「mongo.pem」屬於「mongodb」使用者,且只能由其所有者讀取:
1sudo chown mongodb:mongodb /etc/ssl/mongo.pem
2sudo chmod 600 /etc/ssl/mongo.pem
现在,在nano中打开/etc/mongod.conf(或您所选择的文本编辑器):
1sudo nano /etc/mongod.conf
在这里,我们将做一些重要的变化。
首先,在net:部分搜索bindIp行,并告诉MongoDB通过将127.0.0.1更改为0.0.0.0来倾听所有地址。
1[label /etc/mongod.conf]
2# network interfaces
3net:
4  port: 27017
5  bindIp: 0.0.0.0
6  ssl:
7    mode: requireSSL
8    PEMKeyFile: /etc/ssl/mongo.pem
接下来,在#安全下,启用客户端授权:
1[label /etc/mongod.conf]
2# security
3security:
4  authorization: enabled
最后,迁移工具要求我们将failIndexKeyTooLong参数设置为false:
1[label /etc/mongod.conf]
2
3setParameter:
4  failIndexKeyTooLong: false
<$>[注] 注: Whitespace 在基于 YAML的 MongoDB 配置文件中具有重要意义。
退出并保存文件。
在重新启动mongod服务之前,我们需要添加一个具有admin角色的用户。
1mongo --port 27017
创建一个管理员用户并退出. 请确保用您想要的用户名和密码代替 sammy 用一个强大的密码。
1use admin
2db.createUser({
3  user: "sammy",
4  pwd: "password",
5  roles: [ { role: "userAdminAnyDatabase", db: "admin" } ]
6})
7exit
重启Mongod服务:
1sudo service mongod restart
步骤 2 – 从 Parse 迁移应用程序数据
现在你有一个可远程访问的 MongoDB 实例,你可以使用 Parse 迁移工具将应用程序的数据传输到你的服务器。
配置 MongoDB 身份证件用于迁移工具
我们将从本地连接到我们的新管理员用户开始:
1mongo --port 27017 --ssl --sslAllowInvalidCertificates --authenticationDatabase admin --username sammy --password
你应该被要求输入你之前设置的密码。
一旦连接,请为数据库选择一个名称来存储应用程序的数据,例如,如果您正在迁移名为Todo的应用程序,您可能会使用todo。
从mongo壳,给这个用户访问database_name:
1use database_name
2db.createUser({ user: "parse", pwd: "password", roles: [ "readWrite", "dbAdmin" ] })
开始数据迁移过程
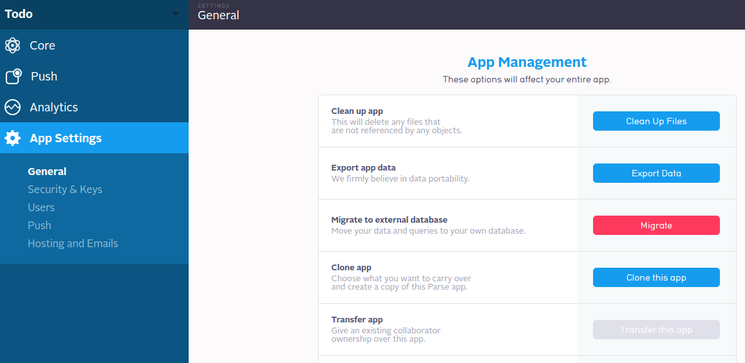
在浏览器窗口中,登录 Parse,并打开您的应用程序的设置. 在 一般下,找到 迁移按钮并点击它:
您将被提示使用 MongoDB 连接字符串,使用以下格式:
1mongodb://parse:password@your_domain_name:27017/database_name?ssl=true
例如,如果您使用example.com域名,使用用户parse,密码foo和名为todo的数据库,您的连接字符串将看起来如下:
1mongodb://parse:[email protected]:27017/todo?ssl=true
不要忘記「?ssl=true」在結尾,否則連接會失敗。
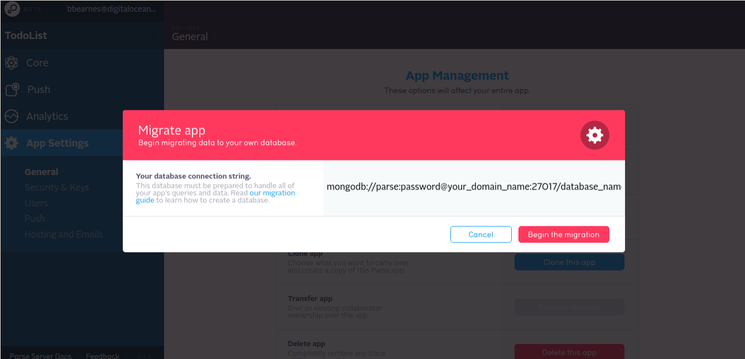
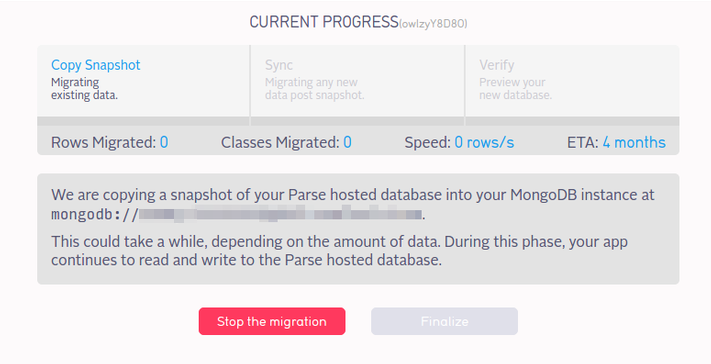
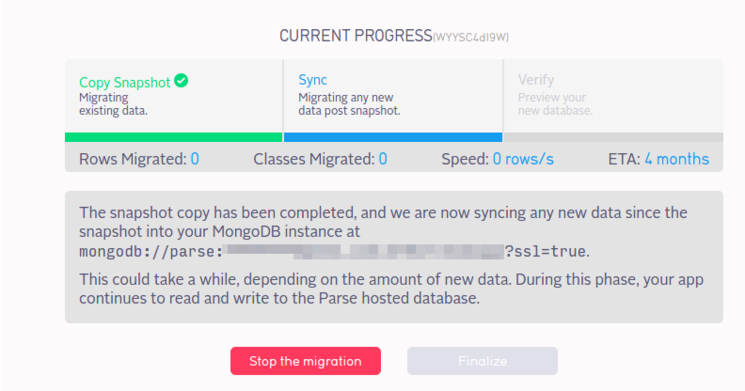
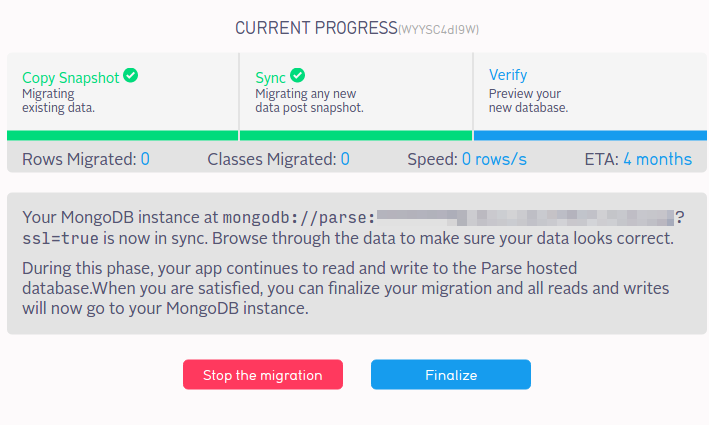
点击 开始迁移. 您应该看到向您的服务器复制 Parse 托管数据库的快照的进度对话框,然后从拍摄的快照开始同步新数据。
检查数据迁移
一旦完成,迁移过程将进入验证步骤. 尚未完成迁移. 您将首先想要确保数据实际上已传输,并测试本地的 Parse Server 实例。
回到你的mongo壳,检查你的本地数据库. 开始访问 database_name 并检查它所包含的集合:
1use database_name
1show collections
1[secondary_label Sample Output for Todo App]
2Todo
3_Index
4_SCHEMA
5_Session
6_User
7_dummy
8system.indexes
您可以使用 .find() 方法检查特定集合的内容:
1db.ApplicationName.find()
1[secondary_label Sample Output for Todo App]
2> db.Todo.find()
3{ "_id" : "hhbrhmBrs0", "order" : NumberLong(1), "_p_user" : "_User$dceklyR50A", "done" : false, "_acl" : { "dceklyR50A" : { "r" : true, "w" : true } }, "_rperm" : [ "dceklyR50A" ], "content" : "Migrate this app to my own server.", "_updated_at" : ISODate("2016-02-08T20:44:26.157Z"), "_wperm" : [ "dceklyR50A" ], "_created_at" : ISODate("2016-02-08T20:44:26.157Z") }
您的具体输出将不同,但您应该看到您的应用程序的数据. 一旦满足,请退出mongo并返回壳:
1exit
步骤 3 – 安装和配置 Parse 服务器和 PM2
有了 MongoDB 中的应用数据,我们可以继续安装 Parse Server 本身,并与其他系统集成,我们将给 Parse Server 一个专用用户,并使用一个名为 PM2的实用程序来配置它并确保它始终运行。
在全球范围内安装Parse Server和PM2
使用npm在全球范围内安装parse-server实用程序、pm2流程管理器及其依赖:
1sudo npm install -g parse-server pm2
创建专用 Parse 用户和 Home 目录
代替运行parse-server作为 root或您的sudo用户,我们将创建一个名为 parse的系统用户:
1sudo useradd --create-home --system parse
现在为 parse设置密码:
1sudo passwd parse
您将被要求输入密码两次。
现在,使用su命令成为 parse用户:
1sudo su parse
更改到 parse的家庭目录:
1cd ~
编写或迁移云代码文件
创建云代码目录:
1mkdir -p ~/cloud
编辑 /home/parse/cloud/main.js:
1nano ~/cloud/main.js
为了测试目的,您可以粘贴以下内容:
1[label /home/parse/cloud/main.js]
2Parse.Cloud.define('hello', function(req, res) {
3  res.success('Hi');
4});
或者,您可以将应用程序定义的任何云代码迁移到 Parse 仪表板上的应用程序设置中的 Cloud 代码部分。
走出去拯救。
查找密钥和写 /home/parse/ecosystem.json
PM2是一个功能丰富的流程管理器,在Node.js开发人员中很受欢迎,我们将使用pm2实用程序来配置我们的parse-server实例,并保持长期运行。
在 Parse 仪表板中,单击 App 设置,然后单击 安全和密钥:
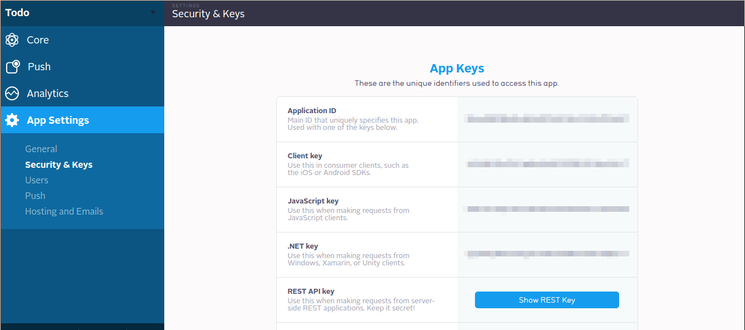
其中,只需要 Application ID和 Master Key。 其他(客户端、JavaScript、.NET 和 REST API 密钥) may 是支持较旧的客户端构建所必需的,但如果设置,则在所有请求中都需要。
使用这些键,您可以编辑一个名为 /home/parse/ecosystem.json的新文件:
1nano ecosystem.json
粘贴以下,改变配置值以反映您的 MongoDB 连接字符串、应用程序 ID 和主密钥:
 1{
 2  "apps" : [{
 3    "name"        : "parse-wrapper",
 4    "script"      : "/usr/bin/parse-server",
 5    "watch"       : true,
 6    "merge_logs"  : true,
 7    "cwd"         : "/home/parse",
 8    "env": {
 9      "PARSE_SERVER_CLOUD_CODE_MAIN": "/home/parse/cloud/main.js",
10      "PARSE_SERVER_DATABASE_URI": "mongodb://parse:password@your_domain_name:27017/database_name?ssl=true",
11      "PARSE_SERVER_APPLICATION_ID": "your_application_id",
12      "PARSE_SERVER_MASTER_KEY": "your_master_key",
13    }
14  }]
15}
env 对象用于设置环境变量. 如果您需要配置额外的键,则 parse-server 还会识别以下变量:
PARSE_SERVER_COLLECTION_PREFIXPARSE_SERVER_CLIENT_KEYPARSE_SERVER_REST_API_KEYPARSE_SERVER_DOTNET_KEYPARSE_SERVER_JAVASCRIPT_KEYPARSE_SERVER_DOTNET_KEYPARSE_SERVER_FILE_KEYPARSE_SERVER_EBOFACOK_IDS
退出并保存ecosystem.json。
现在,用pm2运行脚本:
1pm2 start ecosystem.json
 1[secondary_label Sample Output]
 2...
 3[PM2] Spawning PM2 daemon
 4[PM2] PM2 Successfully daemonized
 5[PM2] Process launched
 6┌───────────────┬────┬──────┬──────┬────────┬─────────┬────────┬─────────────┬──────────┐
 7│ App name      │ id │ mode │ pid  │ status │ restart │ uptime │ memory      │ watching │
 8├───────────────┼────┼──────┼──────┼────────┼─────────┼────────┼─────────────┼──────────┤
 9│ parse-wrapper │ 0  │ fork │ 3499 │ online │ 0       │ 0s     │ 13.680 MB   │  enabled │
10└───────────────┴────┴──────┴──────┴────────┴─────────┴────────┴─────────────┴──────────┘
11 Use `pm2 show <id|name>` to get more details about an app
现在说‘pm2’来保存此过程列表:
1pm2 save
1[secondary_label Sample Output]
2[PM2] Dumping processes
对于 parse的用户,正在运行的进程列表pm2现在应该存储在/home/parse/.pm2中。
现在我们需要确保我们在ecosystem.json中早些时候定义的parse-wrapper过程每次重新启动服务器都被恢复。
退出您的常规sudo用户:
1exit
告诉pm2为Ubuntu安装初始化脚本,作为 parse用户运行,使用/home/parse作为其主目录:
1sudo pm2 startup ubuntu -u parse --hp /home/parse/
1[label Output]
2[PM2] Spawning PM2 daemon
3[PM2] PM2 Successfully daemonized
4[PM2] Generating system init script in /etc/init.d/pm2-init.sh
5[PM2] Making script booting at startup...
6[PM2] -ubuntu- Using the command:
7      su -c "chmod +x /etc/init.d/pm2-init.sh && update-rc.d pm2-init.sh defaults"
8 System start/stop links for /etc/init.d/pm2-init.sh already exist.
9[PM2] Done.
步骤 4 – 安装和配置 Nginx
我們將使用 Nginx 網頁伺服器為「對方伺服器」提供反向代理,以便我們可以透過 TLS/SSL 安全地服務對方 API。
在前提条件下,您将设置默认服务器来响应您的域名,使用Let’s Encrypt证书提供的SSL。
在nano中打开/etc/nginx/sites-enabled/default (或您所选择的编辑器):
1sudo nano /etc/nginx/sites-enabled/default
在主服务器块中(它应该已经包含一个位置/块),添加另一个位置块来处理/parse/ URL 的代理:
 1[label /etc/nginx/sites-enabled/default]
 2. . .
 3        # Pass requests for /parse/ to Parse Server instance at localhost:1337
 4        location /parse/ {
 5                proxy_set_header X-Real-IP $remote_addr;
 6                proxy_set_header X-Forwarded-For $proxy_add_x_forwarded_for;
 7                proxy_set_header X-NginX-Proxy true;
 8                proxy_pass http://localhost:1337/;
 9                proxy_ssl_session_reuse off;
10                proxy_set_header Host $http_host;
11                proxy_redirect off;
12        }
退出编辑器并保存文件. 重新启动 Nginx 以使更改生效:
1sudo service nginx restart
1[secondary_label Output]
2 * Restarting nginx nginx
3   ...done.
步骤5:测试Parse Server
在这个阶段,你应该有如下:
- 通过 Let's Encrypt
- MongoDB提供的 TLS/SSL 证书,使用 Let's Encrypt 证书
*在端口 1337上的 parse用户下运行的
parse-server,配置为您的应用 pm2管理 parse用户下的parse-server流程,以及在 bootnginx 上重新启动pm2的启动脚本,使用 Let's Encrypt 证书进行安全,并配置为向https://your_domain_nameparse到separ-server` 实例 的代理连接
现在应该可以使用curl来测试读取、写入和云代码执行。
<$>[注]
**注:**本节中的弯曲命令在与测试或开发应用程序一起使用时应该是无害的。
用一个 POST 写数据
你需要给弯曲几个重要的选项:
| Option | Description |
|---|---|
-X POST | Sets the request type, which would otherwise default to GET |
-H "X-Parse-Application-Id: your_application_id" | Sends a header which identifies your application to parse-server |
-H "Content-Type: application/json" | Sends a header which lets parse-server know to expect JSON-formatted data |
-d '{json_data} | Sends the data itself |
把所有这些放在一起,我们得到:
1curl -X POST \
2  -H "X-Parse-Application-Id: your_application_id" \
3  -H "Content-Type: application/json" \
4  -d '{"score":1337,"playerName":"Sammy","cheatMode":false}' \
5  https://your_domain_name/parse/classes/GameScore
1[label Sample Output]
2{"objectId":"YpxFdzox3u","createdAt":"2016-02-18T18:03:43.188Z"}
通过GET读取数据
由于curl默认地发送 GET 请求,我们不提供任何数据,您只需要发送应用程序 ID 才能读取一些样本数据:
1curl -H "X-Parse-Application-Id: your_application_id" https://your_domain_name/parse/classes/GameScore
1[label Sample Output]
2{"results":[{"objectId":"BNGLzgF6KB","score":1337,"playerName":"Sammy","cheatMode":false,"updatedAt":"2016-02-17T20:53:59.947Z","createdAt":"2016-02-17T20:53:59.947Z"},{"objectId":"0l1yE3ivB6","score":1337,"playerName":"Sean Plott","cheatMode":false,"updatedAt":"2016-02-18T03:57:00.932Z","createdAt":"2016-02-18T03:57:00.932Z"},{"objectId":"aKgvFqDkXh","score":1337,"playerName":"Sean Plott","cheatMode":false,"updatedAt":"2016-02-18T04:44:01.275Z","createdAt":"2016-02-18T04:44:01.275Z"},{"objectId":"zCKTgKzCRH","score":1337,"playerName":"Sean Plott","cheatMode":false,"updatedAt":"2016-02-18T16:56:51.245Z","createdAt":"2016-02-18T16:56:51.245Z"},{"objectId":"YpxFdzox3u","score":1337,"playerName":"Sean Plott","cheatMode":false,"updatedAt":"2016-02-18T18:03:43.188Z","createdAt":"2016-02-18T18:03:43.188Z"}]}
执行云代码示例
一个简单的 POST 没有真正的数据到 https://your_domain_name/parse/functions/hello 将运行在 /home/parse/cloud/main.js 中定义的 hello()` 函数:
1curl -X POST \
2  -H "X-Parse-Application-Id: your_application_id" \
3  -H "Content-Type: application/json" \
4  -d '{}' \
5  https://your_domain_name/parse/functions/hello
1[label Sample Output]
2{"result":"Hi"}
如果您已经迁移了自己的自定义云代码,您可以使用已知的函数从main.js 进行测试。
步骤 6 – 配置您的应用程序为 Parse 服务器并完成迁移
您的下一步将是更改客户端应用程序本身以使用 Parse Server API 终端。 请参阅有关使用 Parse SDK 与 Parse Server 的官方文档(https://github.com/ParsePlatform/parse-server/wiki/Parse-Server-Guide#using-parse-sdks-with-parse-server)。
1https://your_domain_name/parse
回到您的浏览器中的 Parse 仪表板和 ** 迁移** 选项卡:
点击完成按钮:
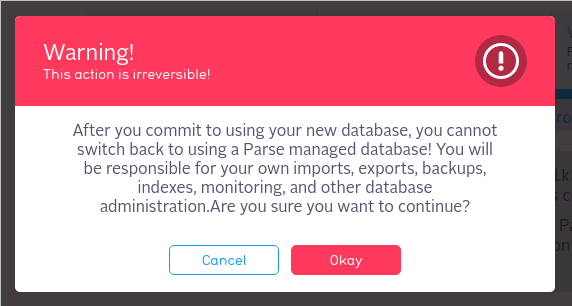
您的应用程序现在应该被迁移。
结论和下一步
本指南提供了将Parse托管的应用程序迁移到单个Ubuntu系统上安装的Parse Server的功能起点,例如DigitalOcean dropplet. 我们所描述的配置应该适用于具有适度用户群的低流量应用程序。为一个更大的应用程序托管可能需要多个系统来提供冗余的数据存储和API终端之间的负载平衡。
除了阅读官方的 Parse Server 文档以及在故障排除时跟踪 GitHub 项目问题之外,您还可能希望探索以下主题: