作者选择了 技术教育基金作为 写给捐款计划的一部分接受捐款。
介绍
Webmin是任何Linux机器的基于Web的控制面板,允许您通过现代的基于Web的界面来管理您的服务器。
在本教程中,您将安装和配置 Webmin 在您的服务器上,并通过使用 Let's Encrypt和 Apache 使用有效证书安全访问接口,然后使用 Webmin 添加新用户帐户,并从仪表板更新服务器上的所有包。
前提条件
要完成本教程,您将需要:
- 一个 Ubuntu 18.04 服务器由 Ubuntu 18.04 初始服务器安装指南设置,包括一个 sudo 非根用户和防火墙。
- Apache 通过以下 How To Install Linux, Apache, MySQL, PHP (LAMP) stack on Ubuntu 18.04安装。我们将使用 Apache 来执行 Let's Encrypt 的域验证,并作为 Webmin 的代理程序。 确保您在遵循本教程时通过防火墙配置 Apache 访问。
- A Fully-Qualified Domain Name (FQDN) 堆栈,具有 DNSA ** 记录,指向您的服务器的 IP 地址。 为了配置,请遵循本教程 [How To Set Up A Host
步骤 1 - 安装 Webmin
首先,我们需要添加Webmin存储库,以便我们可以使用我们的包管理器轻松安装和更新Webmin。
在您的编辑器中打开文件:
1sudo nano /etc/apt/sources.list
然后将此行添加到文件底部以添加新的存储库:
1[label /etc/apt/sources.list]
2. . .
3deb http://download.webmin.com/download/repository sarge contrib
保存文件并离开编辑器。
接下来,添加 Webmin PGP 密钥,以便您的系统信任新的存储库:
1wget http://www.webmin.com/jcameron-key.asc
2sudo apt-key add jcameron-key.asc
接下来,更新包列表以包括 Webmin 存储库:
1sudo apt update
然后安装 Webmin:
1sudo apt install webmin
一旦安装完成,您将收到以下输出:
1[secondary_label Output]
2Webmin install complete. You can now login to
3https://your_server_ip:10000 as root with your
4root password, or as any user who can use `sudo`.
现在,让我们通过将其放置在ApacheWeb服务器后面并添加有效的TLS/SSL证书来确保访问Webmin。
步骤 2 – 使用 Apache 和 Let’s Encrypt 保护 Webmin
要访问 Webmin,您必须指定端口10000并确保端口在您的防火墙上打开,这很不方便,特别是如果你使用FQDN访问Webmin,例如webmin.your_domain 我们将使用Apache虚拟主机向Webmin的服务器发送代理请求,该服务器运行在端口10000。
首先,在 Apache 配置目录中创建一个新的 Apache 虚拟主机文件:
1sudo nano /etc/apache2/sites-available/your_domain.conf
将以下内容添加到文件中,将电子邮件地址和域名替换为自己的:
1[label /etc/apache2/sites-available/your_domain.conf]
2
3<VirtualHost *:80>
4        ServerAdmin your_email
5        ServerName your_domain
6        ProxyPass / http://localhost:10000/
7        ProxyPassReverse / http://localhost:10000/
8</VirtualHost>
此配置告知Apache将请求传送到http://localhost:10000,即Webmin服务器,并确保从Webmin生成的内部链接也通过Apache。
保存文件并离开编辑器。
接下来,我们需要告诉Webmin停止使用TLS/SSL,因为Apache将为我们提供这一功能。
在您的编辑器中打开文件 /etc/webmin/miniserv.conf:
1sudo nano /etc/webmin/miniserv.conf
找下面的线条:
1[label /etc/webmin/miniserv.conf]
2...
3ssl=1
4...
将1更改为0,这将告诉Webmin停止使用SSL。
接下来,我们将我们的域名添加到允许域名列表中,以便 Webmin 了解当我们从我们的域名访问面板时,它不是恶意的东西,例如 跨站点脚本(XSS)攻击。
在您的编辑器中打开文件 /etc/webmin/config:
1sudo nano /etc/webmin/config
将下列行添加到文件底部,以完全合格的域名取代your_domain。
1[label /etc/webmin/config]
2 . . .
3referers=your_domain
保存文件并离开编辑器。
接下来,重新启动 Webmin 以应用配置更改:
1sudo systemctl restart webmin
然后启用Apache的proxy_http模块:
1sudo a2enmod proxy_http
您将看到以下输出:
1[secondary_label Output]
2Considering dependency proxy for proxy_http:
3Enabling module proxy.
4Enabling module proxy_http.
5To activate the new configuration, you need to run:
6  systemctl restart apache2
输出建议您重新启动Apache,但首先要激活您创建的新Apache虚拟主机:
1sudo a2ensite your_domain
您将看到以下输出,表示您的网站已启用:
1[secondary_label Output]
2Enabling site your_domain.
3To activate the new configuration, you need to run:
4  systemctl reload apache2
现在完全重新启动Apache,激活proxy_http模块和新的虚拟主机:
1sudo systemctl restart apache2
<$>[注]
注 : 确保您允许在端口 80 和端口 443 上的 Web 服务器的入口流量,如前提教程中所示 如何在 Ubuntu 18.04 上安装 Linux, Apache, MySQL, PHP (LAMP) 堆栈)。
在你的浏览器中导航到http://your_domain,你会看到Webmin登录页面出现。
<$>[警告] 警告: 不要登录Webmin,因为我们尚未启用SSL。 如果您现在登录,您的身份证将以清晰的文本发送到服务器。
现在让我们配置一个证书,以便您的连接在使用Webmin时被加密。
告诉 Certbot 为您的域创建 TLS/SSL 证书,并配置 Apache 将流量重定向到安全网站:
1sudo certbot --apache --email your_email -d your_domain --agree-tos --redirect --noninteractive
您将看到以下输出:
 1[secondary_label Output]
 2Saving debug log to /var/log/letsencrypt/letsencrypt.log
 3Plugins selected: Authenticator apache, Installer apache
 4Obtaining a new certificate
 5Performing the following challenges:
 6http-01 challenge for your_domain
 7Enabled Apache rewrite module
 8Waiting for verification...
 9Cleaning up challenges
10Created an SSL vhost at /etc/apache2/sites-available/your_domain-le-ssl.conf
11Enabled Apache socache_shmcb module
12Enabled Apache ssl module
13Deploying Certificate to VirtualHost /etc/apache2/sites-available/your_domain-le-ssl.conf
14Enabling available site: /etc/apache2/sites-available/your_domain-le-ssl.conf
15Enabled Apache rewrite module
16Redirecting vhost in /etc/apache2/sites-enabled/your_domain.conf to ssl vhost in /etc/apache2/sites-available/your_domain-le-ssl.conf
17
18-------------------------------------------------------------------------------
19Congratulations! You have successfully enabled https://your_domain
20
21You should test your configuration at:
22https://www.ssllabs.com/ssltest/analyze.html?d=your_domain
23-------------------------------------------------------------------------------
输出表示已安装证书,并且Apache已配置为将请求从http://your_domain重定向到https://your_domain。
您现在已经设置了 Webmin 的安全、工作实例,让我们看看如何使用它。
步骤 3 – 使用 Webmin
Webmin 有模块可以控制从 BIND DNS 服务器到添加用户到系统等简单的东西,让我们看看如何创建一个新用户,然后探索如何使用 Webmin 更新软件包。
要登录Webmin,请导航到http://your_domain,并与 root 用户或具有sudo特权的用户登录。
管理用户和组
让我们在服务器上管理用户和组。
首先,单击系统选项卡,然后单击用户和组按钮,从这里您可以添加用户,管理用户,或添加或管理组。
让我们创建一个名为 deploy 的新用户,可以用来托管Web应用程序。 要添加一个用户,请点击 Create a new user ,位于用户表的顶部。 这显示了 Create User 屏幕,您可以提供用户名、密码、组和其他选项。
- 填写 用户名 用
部署. - 选择 自动 为 ** 用户 ID**.
- 填写 真实名称 用描述名称如
部署用户. - 对于 Home Directory ,选择 自动 .
- 对于 Shell ,从下载列表中选择 /bin/bash .
- 对于 Password ,选择 Normal Password ,输入您选择的密码。
- 对于 Primary Group ,选择 **新组与用户相同的名称。
- 对于 Secondary Group ,从 All Group 列表中选择 sudo ,然后按
创建用户时,您可以设置密码到期期、用户壳或是否允许家庭目录的选项。
接下来,让我们看看如何在我们的系统上安装更新。
更新包裹
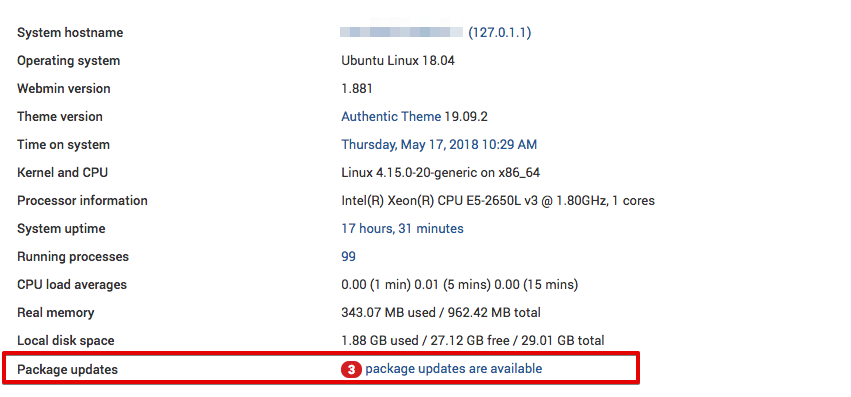
Webmin 允许您通过其用户界面更新所有软件包. 要更新所有软件包,请单击 Dashboard 链接,然后找到 Package updates 字段. 如果有可用的更新,您将看到一个链接,说明可用的更新数量,如下图所示:
点击此链接,然后按 更新选定的包 来启动更新,您可能会被要求重新启动服务器,您也可以通过 Webmin 接口进行。
结论
现在你有一个安全的,工作 Webmin 实例,你已经使用了界面创建一个用户和更新包. Webmin 给你访问许多你通常需要通过控制台访问的东西,它以直观的方式组织它们。
进一步探索界面,或查看官方Webminwiki(http://doxfer.webmin.com/Webmin/Main_Page),以了解有关使用Webmin管理您的系统的更多信息。