介绍
OpenLiteSpeed是一个优化的开源Web服务器,可用于管理和服务网站。OpenLiteSpeed具有一些有用的功能,使其成为许多安装的坚实选择,包括Apache(https://www.apache.org/)兼容的重写规则,内置的基于Web的管理界面,以及针对服务器优化的自定义PHP处理。
在本教程中,您将安装和配置OpenLiteSpeed在Ubuntu 20.04服务器上。
前提条件
要完成本教程,您将需要一个 Ubuntu 20.04 服务器,具有sudo启用,非根用户和ufw防火墙启用,您可以通过遵循Ubuntu 20.04 初始服务器设置(LINK0)来设置。
步骤 1 – 安装 OpenLiteSpeed
在使用OpenLiteSpeed之前,您需要安装它。OpenLiteSpeed提供了一个软件存储库,您可以使用Ubuntu的标准apt命令下载和安装服务器。
首先,更新包管理器的缓存:
1sudo apt update
然后安装任何正在进行的升级:
1sudo apt upgrade
如果被提示,输入您的密码,然后用Y确认安装。
要为您的 Ubuntu 系统启用此存储库,请下载并添加开发者的软件签名密钥:
1sudo wget -O - https://rpms.litespeedtech.com/debian/enable_lst_debian_repo.sh | sudo bash
wget 收集位于 OpenLitespeed 服务器上的 shell 脚本,该脚本将自动执行添加 Litespeed 存储库到 Ubuntu 的 apt 包管理器的必要步骤。
这个命令的输出将是:
 1[secondary_label Output]
 2--2022-10-01 13:12:00--  https://rpms.litespeedtech.com/debian/enable_lst_debian_repo.sh
 3Resolving rpms.litespeedtech.com (rpms.litespeedtech.com)... 52.55.120.73
 4Connecting to rpms.litespeedtech.com (rpms.litespeedtech.com)|52.55.120.73|:443... connected.
 5HTTP request sent, awaiting response... 200 OK
 6Length: 3457 (3.4K) [application/x-sh]
 7Saving to: ‘STDOUT’
 8
 9-                          0%[                                   ]       0  --.-KB/s detecting OS type :
10detected OS: ubuntu - 20.04
11 now enable the LiteSpeed Debian Repo
12-                        100%[==================================>]   3.38K  --.-KB/s in 0s
13
142022-10-01 13:12:01 (136 MB/s) - written to stdout [3457/3457]
15
16 register LiteSpeed GPG key
17--2022-10-01 13:12:01--  http://rpms.litespeedtech.com/debian/lst_debian_repo.gpg
18Resolving rpms.litespeedtech.com (rpms.litespeedtech.com)... 52.55.120.73
19Connecting to rpms.litespeedtech.com (rpms.litespeedtech.com)|52.55.120.73|:80... connected.
20HTTP request sent, awaiting response... 200 OK
21Length: 1198 (1.2K) [application/octet-stream]
22Saving to: ‘/etc/apt/trusted.gpg.d/lst_debian_repo.gpg’
23
24/etc/apt/trusted.gpg.d/l 100%[==================================>]   1.17K  --.-KB/s in 0s
25
262022-10-01 13:12:02 (101 MB/s) - ‘/etc/apt/trusted.gpg.d/lst_debian_repo.gpg’ saved [1198/1198]
27
28--2022-10-01 13:12:02--  http://rpms.litespeedtech.com/debian/lst_repo.gpg
29Resolving rpms.litespeedtech.com (rpms.litespeedtech.com)... 52.55.120.73
30Connecting to rpms.litespeedtech.com (rpms.litespeedtech.com)|52.55.120.73|:80... connected.
31HTTP request sent, awaiting response... 200 OK
32Length: 2336 (2.3K) [application/octet-stream]
33Saving to: ‘/etc/apt/trusted.gpg.d/lst_repo.gpg’
34
35/etc/apt/trusted.gpg.d/l 100%[==================================>]   2.28K  --.-KB/s in 0s
36
372022-10-01 13:12:02 (312 MB/s) - ‘/etc/apt/trusted.gpg.d/lst_repo.gpg’ saved [2336/2336]
38
39 update the repo
40Hit:1 http://mirrors.digitalocean.com/ubuntu focal InRelease
41Hit:2 http://mirrors.digitalocean.com/ubuntu focal-updates InRelease
42Hit:3 https://repos-droplet.digitalocean.com/apt/droplet-agent main InRelease
43Hit:4 http://mirrors.digitalocean.com/ubuntu focal-backports InRelease
44Hit:5 http://security.ubuntu.com/ubuntu focal-security InRelease
45Ign:6 http://rpms.litespeedtech.com/debian focal InRelease
46Hit:7 https://repos.insights.digitalocean.com/apt/do-agent main InRelease
47Get:8 http://rpms.litespeedtech.com/debian focal Release [1652 B]
48Get:9 http://rpms.litespeedtech.com/debian focal Release.gpg [836 B]
49Get:10 http://rpms.litespeedtech.com/debian focal/main amd64 Packages [19.0 kB]
50Fetched 21.5 kB in 1s (14.8 kB/s)
51Reading package lists... Done
52 All done, congratulations and enjoy !
要安装 OpenLitespeed 服务器和相应的 LS-PHP 解释器,请运行命令:
1sudo apt install openlitespeed lsphp81
如果被提示,输入您的密码,然后用Y确认安装。
此命令安装了 Openlitespeed 服务器包和 LSPHP 8.1。 LiteSpeed PHP (LSPHP)是一个与 LiteSpeed Server Application Programming Interface (LSAPI)集成的 PHP 解释器。
现在OpenLiteSpeed服务器已安装,您将通过更新默认管理员帐户来保护它。
步骤二:设置管理密码
在测试服务器之前,您将为 OpenLiteSpeed 设置一个新的管理密码. 您可以通过运行由 OpenLiteSpeed 提供的脚本来完成此操作:
1sudo /usr/local/lsws/admin/misc/admpass.sh
您将被要求为管理员用户提供一个用户名。 如果您按下ENTER而不选择新的用户名,则将使用admin的默认值。您可以使用您喜欢的任何管理员用户名。然后您将被要求创建并确认帐户的新密码。 输入您喜欢的管理员密码,然后再次按下ENTER。 脚本将确认成功更新:
1[secondary_label Output]
2Administrator's username/password is updated successfully!
您现在已经保护了管理员帐户,接下来,您将测试服务器,以确保它正常运行。
步骤 3 – 连接到服务器
在此步骤中,您将连接到您的服务器。
安装后,OpenLiteSpeed 应该自动启动,您可以验证它是否用systemctl status命令启动:
1sudo systemctl status lsws
此命令将打印以下输出:
 1[secondary_label Output]
 2● lshttpd.service - OpenLiteSpeed HTTP Server
 3     Loaded: loaded (/etc/systemd/system/lshttpd.service; enabled; vendor preset: enabled)
 4     Active: active (running) since Sat 2022-10-01 13:22:01 UTC; 5min ago
 5    Process: 5805 ExecStart=/usr/local/lsws/bin/lswsctrl start (code=exited, status=0/SUCCESS)
 6   Main PID: 5843 (litespeed)
 7     CGroup: /system.slice/lshttpd.service
 8             ├─5843 openlitespeed (lshttpd - main)
 9             ├─5852 openlitespeed (lscgid)
10             └─5881 openlitespeed (lshttpd - #01)
11
12Oct 01 13:21:58 ubuntu-s-1vcpu-1gb-blr1-01 systemd[1]: Starting OpenLiteSpeed HTTP Server...
13Oct 01 13:21:59 ubuntu-s-1vcpu-1gb-blr1-01 lswsctrl[5805]: [OK] litespeed: pid=5843.
14Oct 01 13:22:01 ubuntu-s-1vcpu-1gb-blr1-01 systemd[1]: Started OpenLiteSpeed HTTP Server.
活跃(运行)消息表示 OpenLiteSpeed 正在运行。
如果您的服务器不运行,您可以使用systemctl启动服务器:
1sudo systemctl start lsws
systemctl start命令将打印以下输出:
1[secondary_label Output]
2[OK] litespeed: pid=5137.
服务器现在应该运行. 按CTRL+C来退出服务输出。
在浏览器中访问之前,您需要在防火墙上打开一些端口,您可以通过ufw命令实现:
1sudo ufw allow 8088,7080,443,80/tcp
第一个端口,即8088,是 OpenLiteSpeed 示例网站的默认端口. 允许其使用ufw后,它现在应该向公众开放。 在您的 Web 浏览器中,导航到您的服务器的域名或 IP 地址,然后是:8088来指定端口:
1http://server_domain_or_IP:8088
您的浏览器将加载默认的 OpenLiteSpeed 网页,该网页将匹配下面的图像:
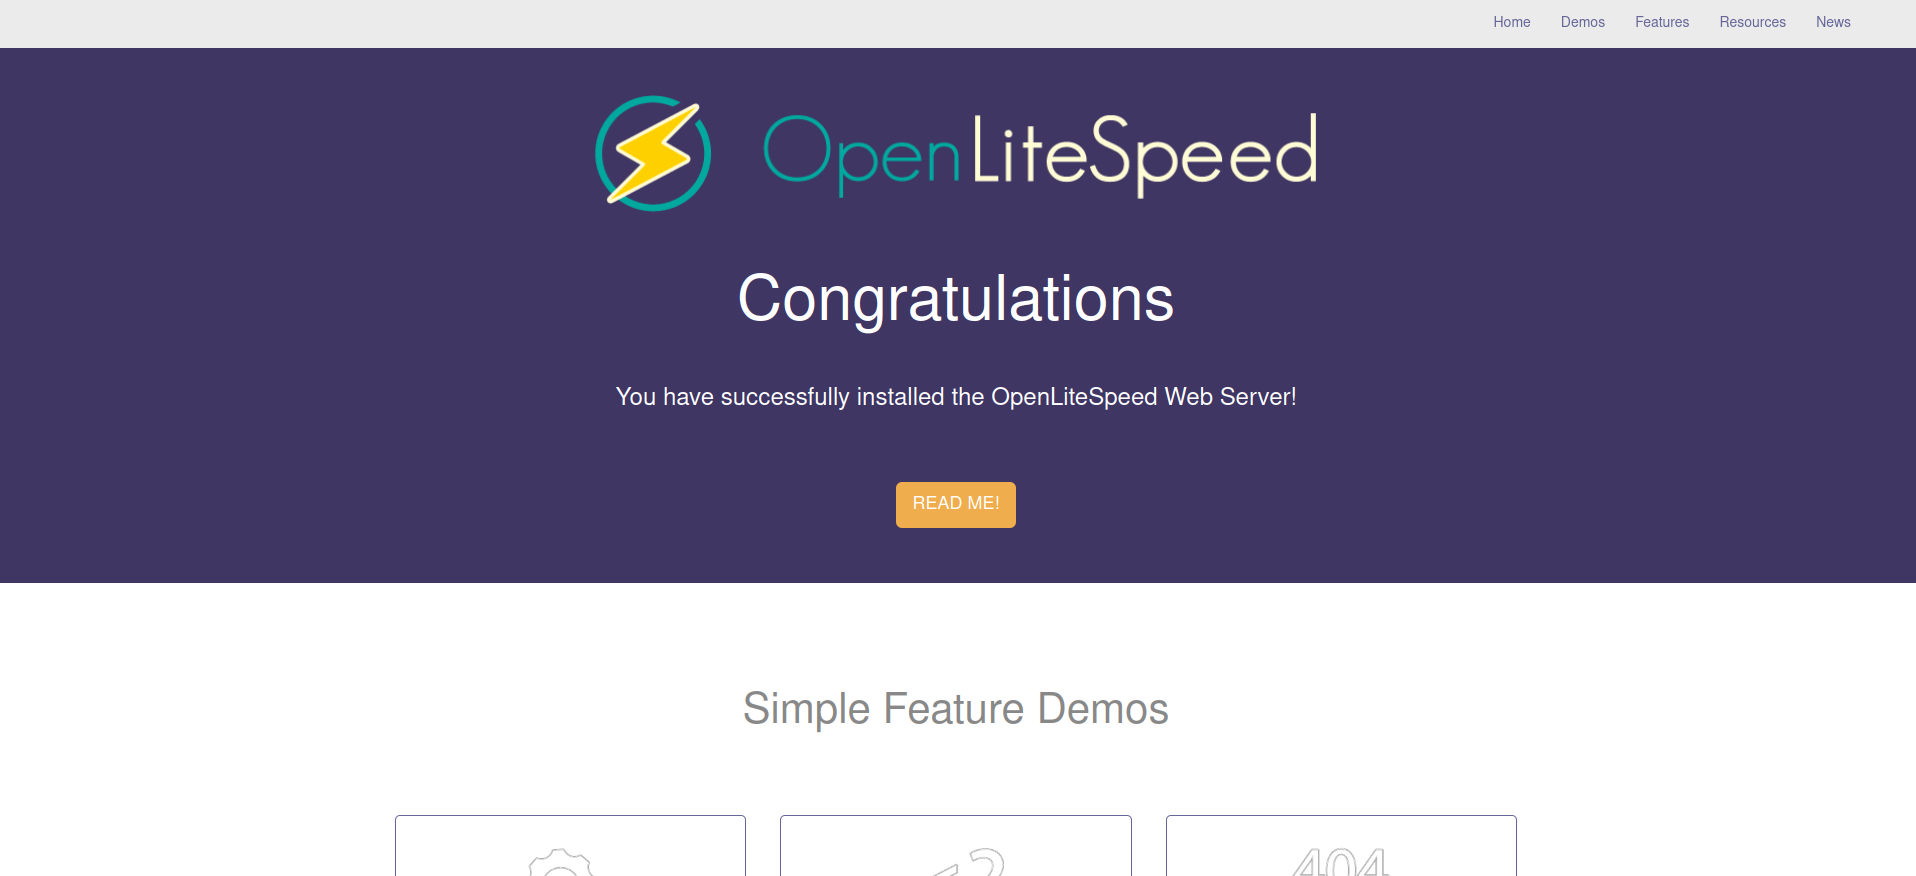
页面底部的链接展示了服务器的各种功能. 如果您点击它们,您可能会注意到这些功能已经安装和正确配置,包括可用的示例 CGI 脚本,正在运行的自定义 PHP 实例,以及已配置的自定义错误页面和身份验证端口。
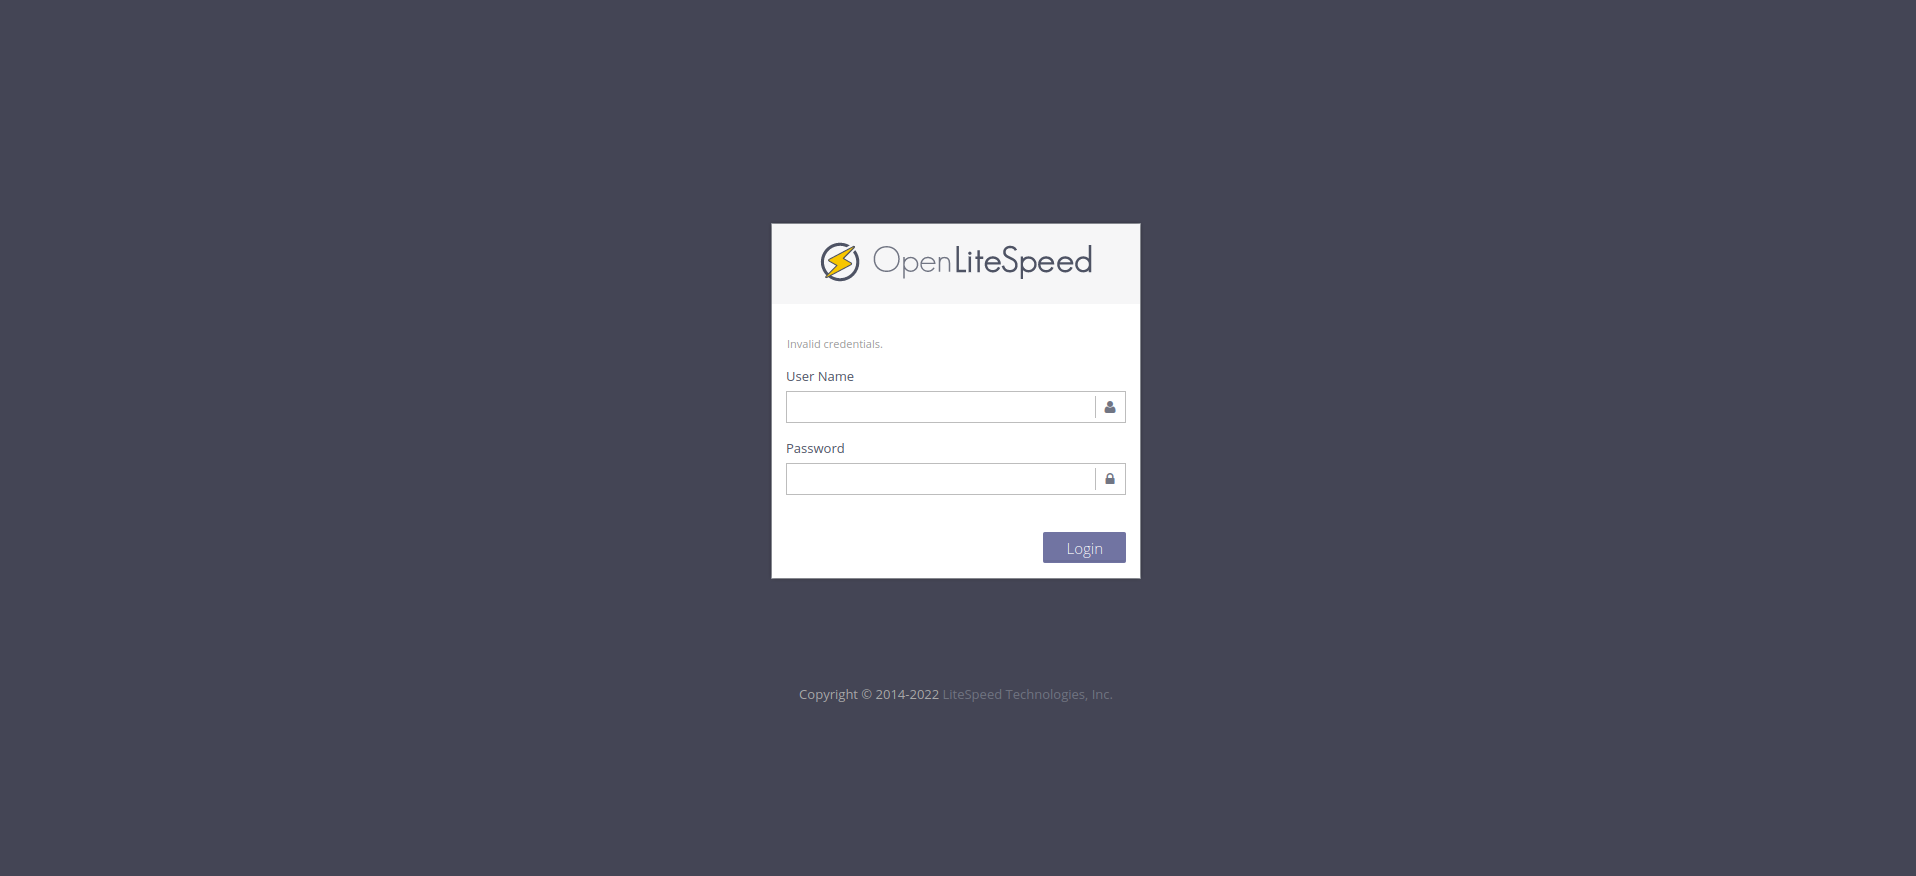
当您对默认网站满意时,您可以转到管理界面. 在您的 Web 浏览器中,使用 HTTPS 导航到您的服务器的域名或 IP 地址,然后按 :7080 来指定端口:
1https://server_domain_or_IP:7080
您可能会看到一页向您发出警告,即服务器上的SSL证书无法验证. 因为这是一个自签名的证书,因此预期会收到此消息。 点击可用的选项以继续访问网站。 在Chrome中,您必须点击 Advanced ,然后点击 继续到... 。
您将被要求输入您在上一步中使用admpass.sh脚本选择的管理用户名和密码:
一旦验证,您将被介绍为 OpenLiteSpeed 管理界面:
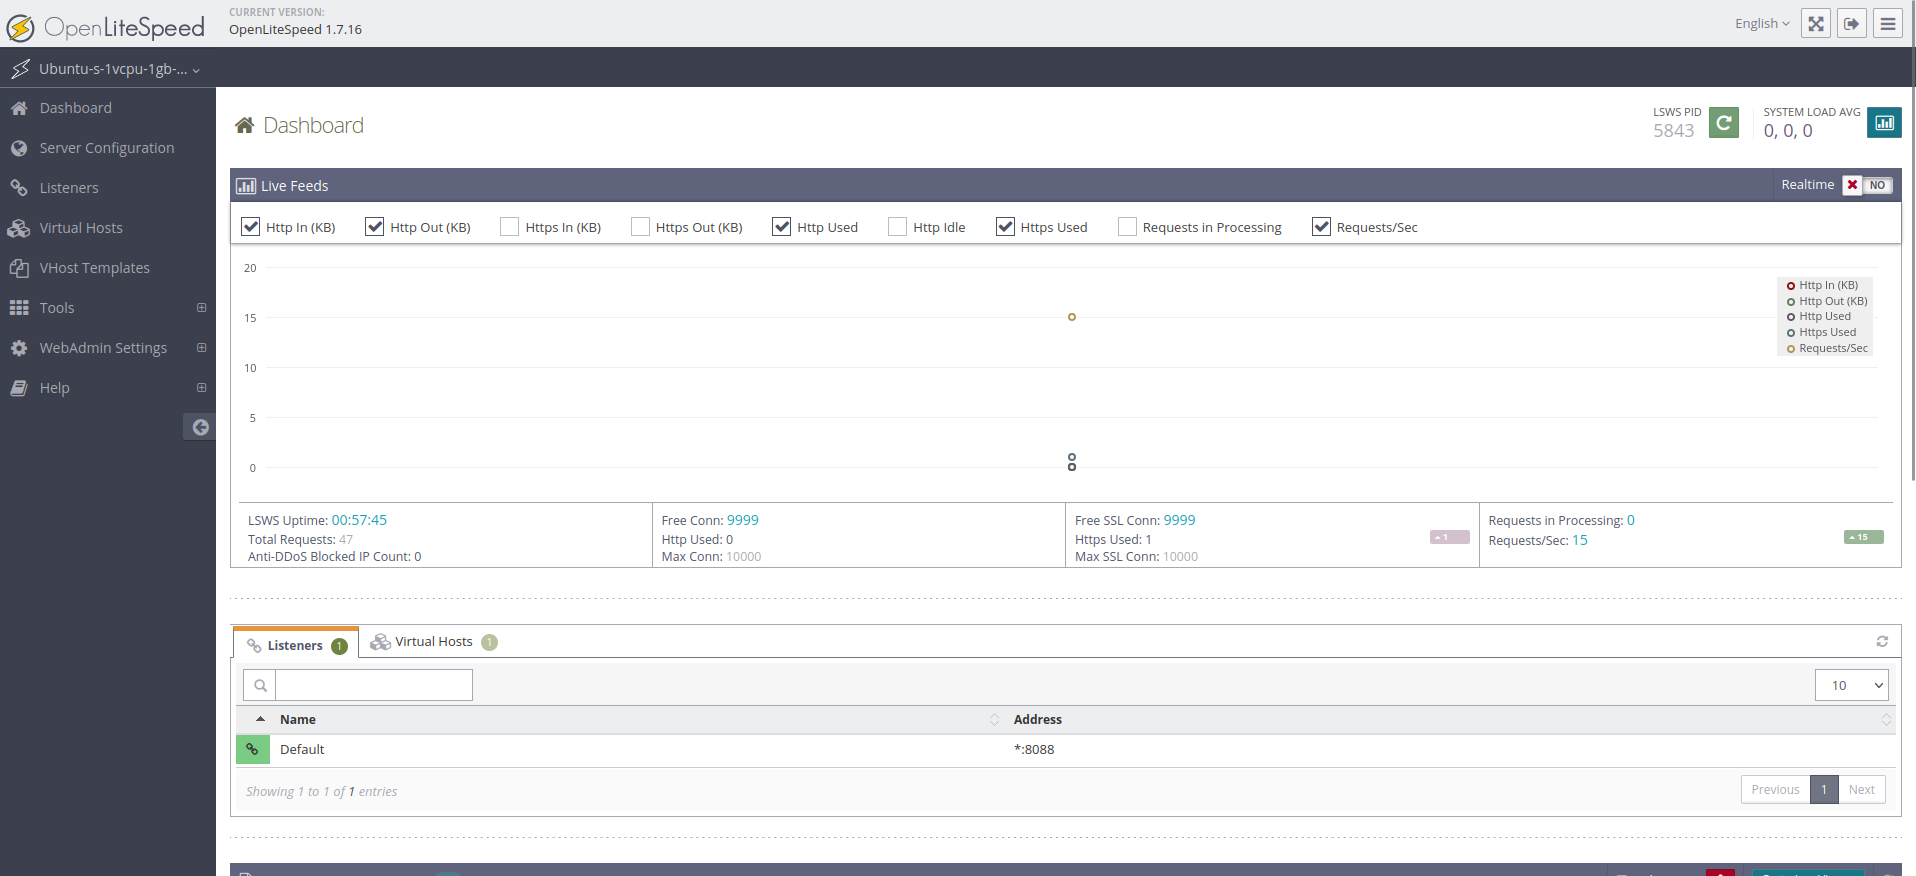
您对 Web 服务器的大部分配置将通过此仪表板进行。
在此步骤中,您通过新打开的端口连接到服务器,然后更新默认页面使用的端口。
步骤 4 – 更改默认页面的端口
要展示如何通过 Web 界面配置选项,您将将默认网站使用的端口从8088更改为常规的 HTTP 端口(80).
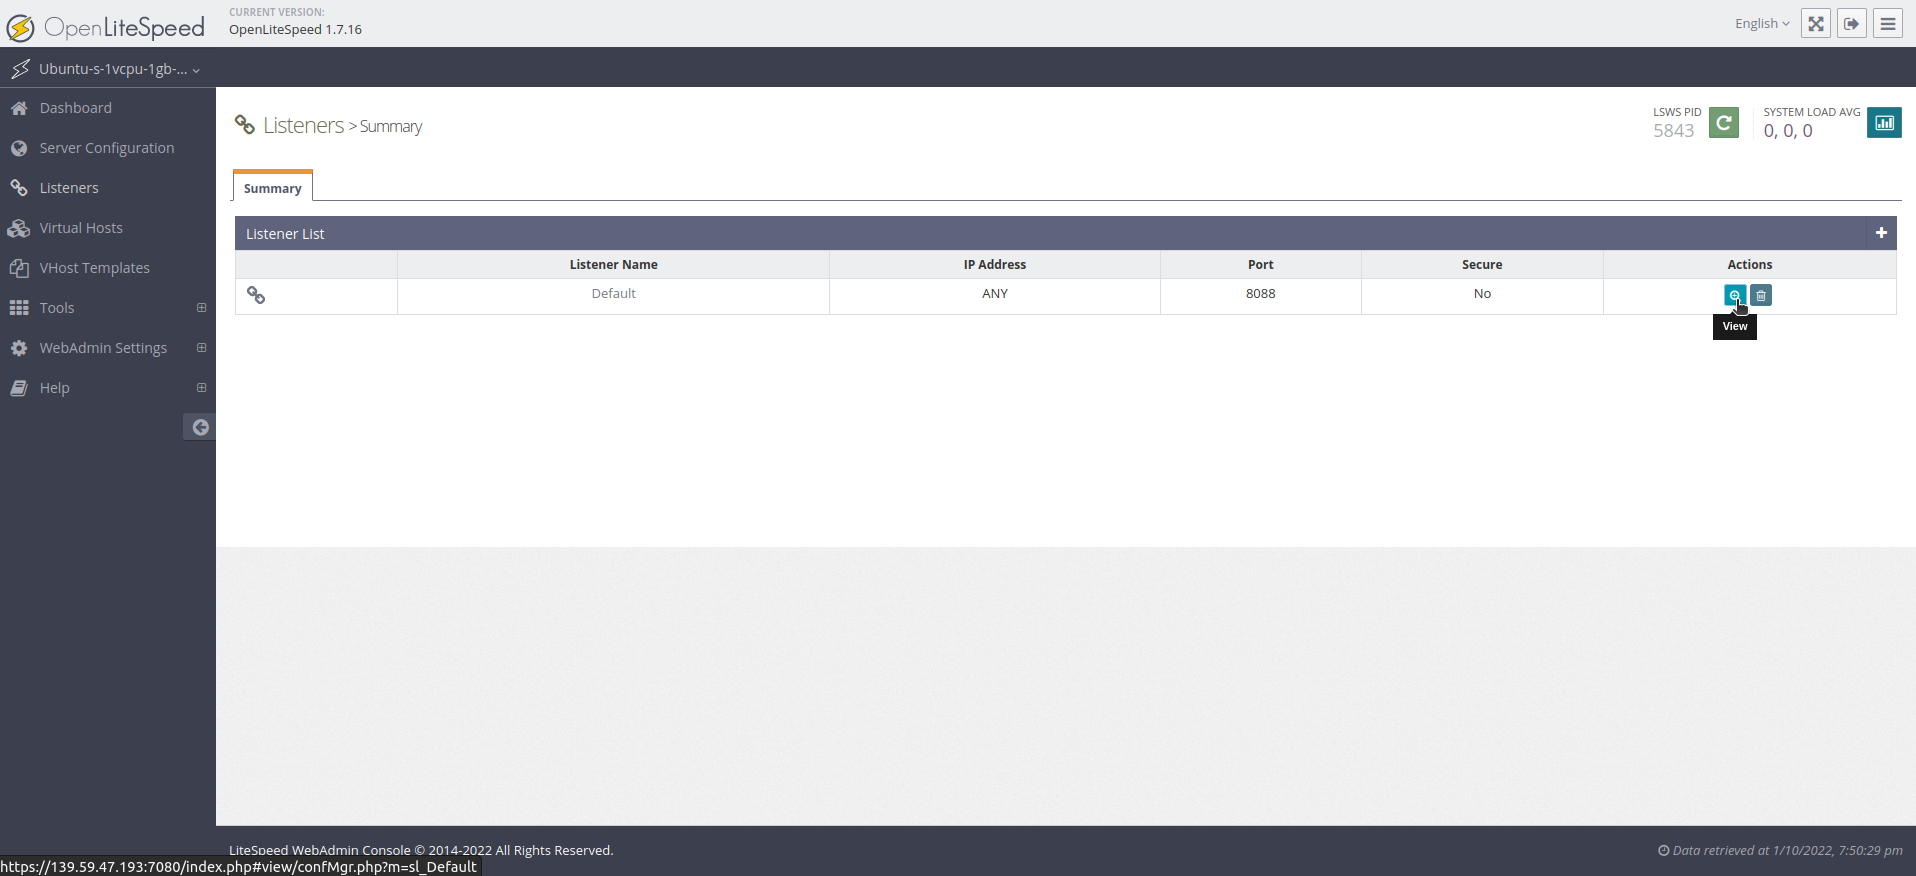
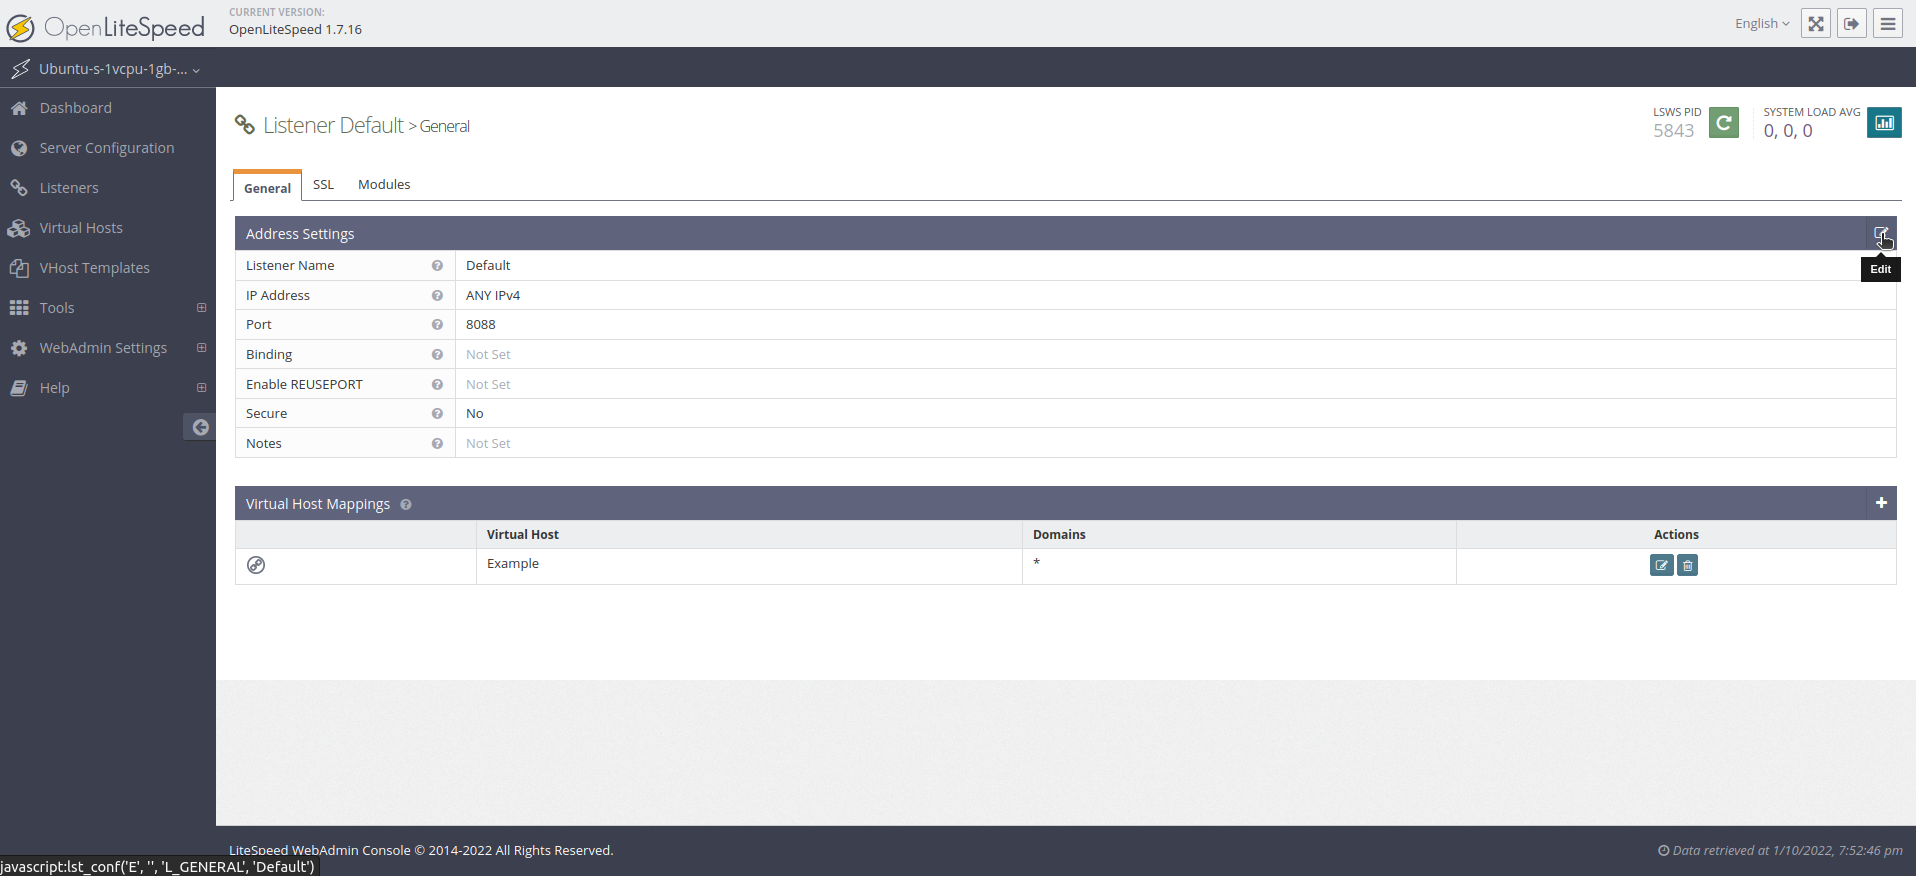
首先,在侧导航栏上的选项列表中点击 Listeners . 将加载所有可用的倾听者列表。
从此列表中,点击放大玻璃,这是 View 按钮,用于 Default 倾听器:
此操作将加载有关 Default 倾听器的更多细节的页面,点击编辑按钮(笔和纸符号)在 Address Settings 表的右上角,以更改其值:
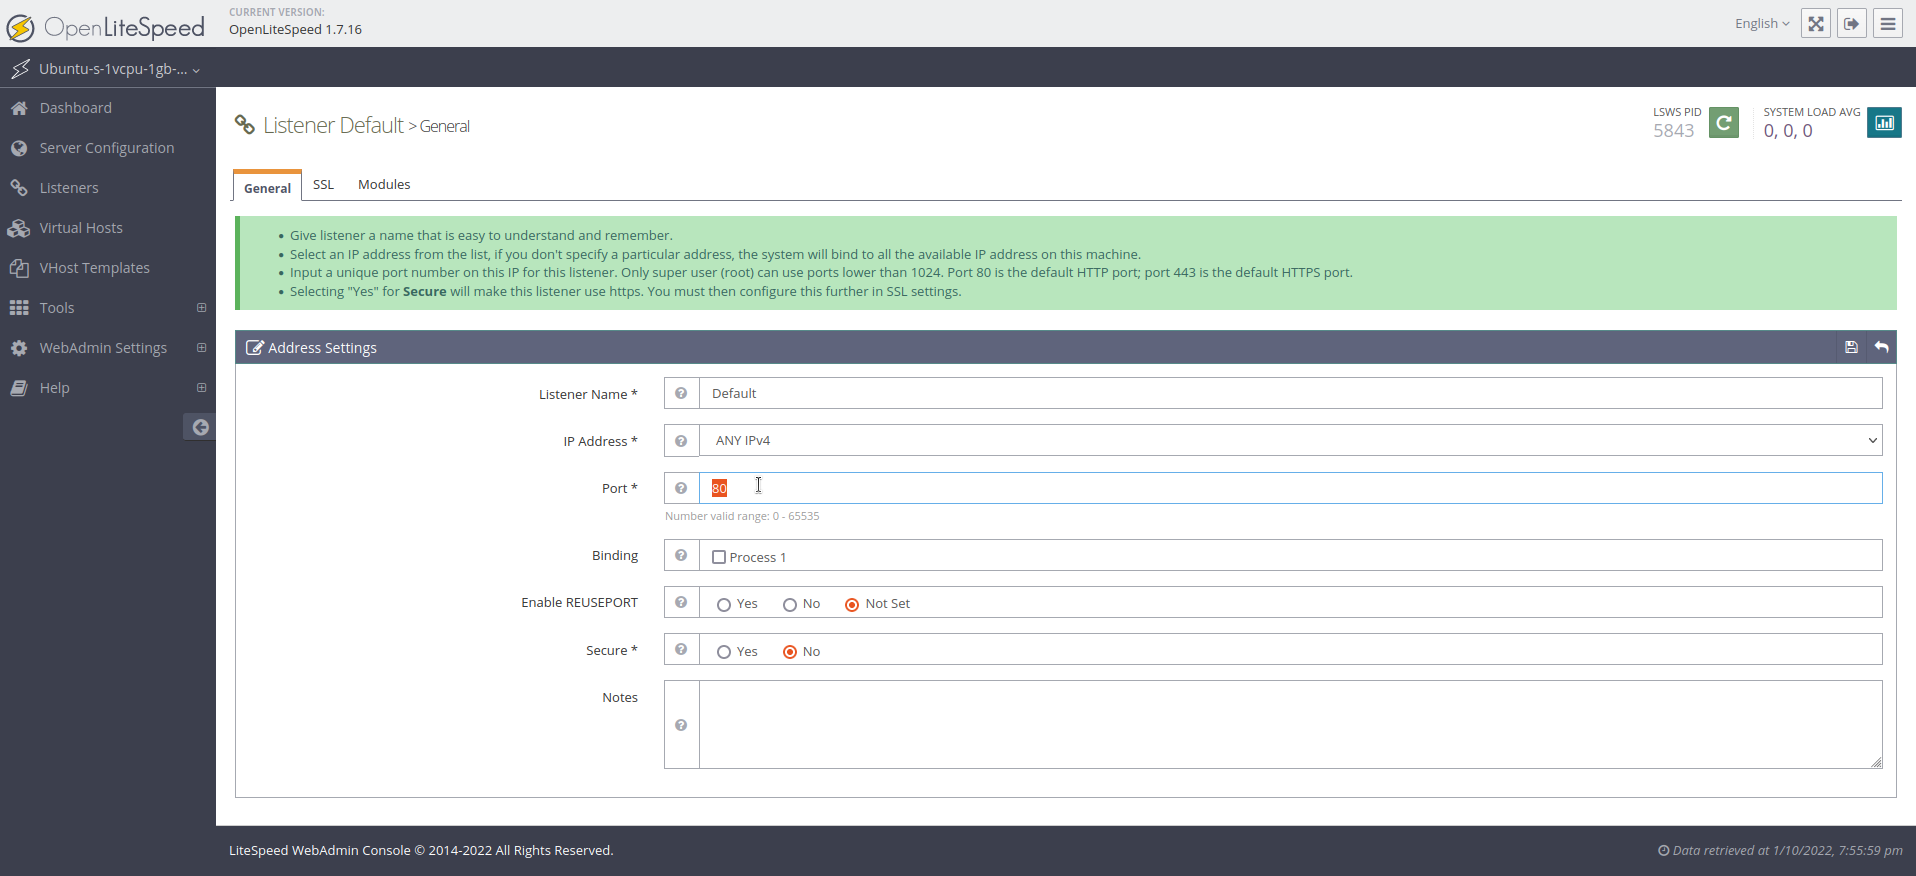
此按钮将打开一个新的屏幕. 更改端口 8088 到端口 80,然后点击 ** 保存** 按钮(磁盘符号):
保存修改后,您将需要重新启动服务器. 点击箭头图标,以获取将重启 OpenLiteSpeed 的 Graceful Restart 操作:
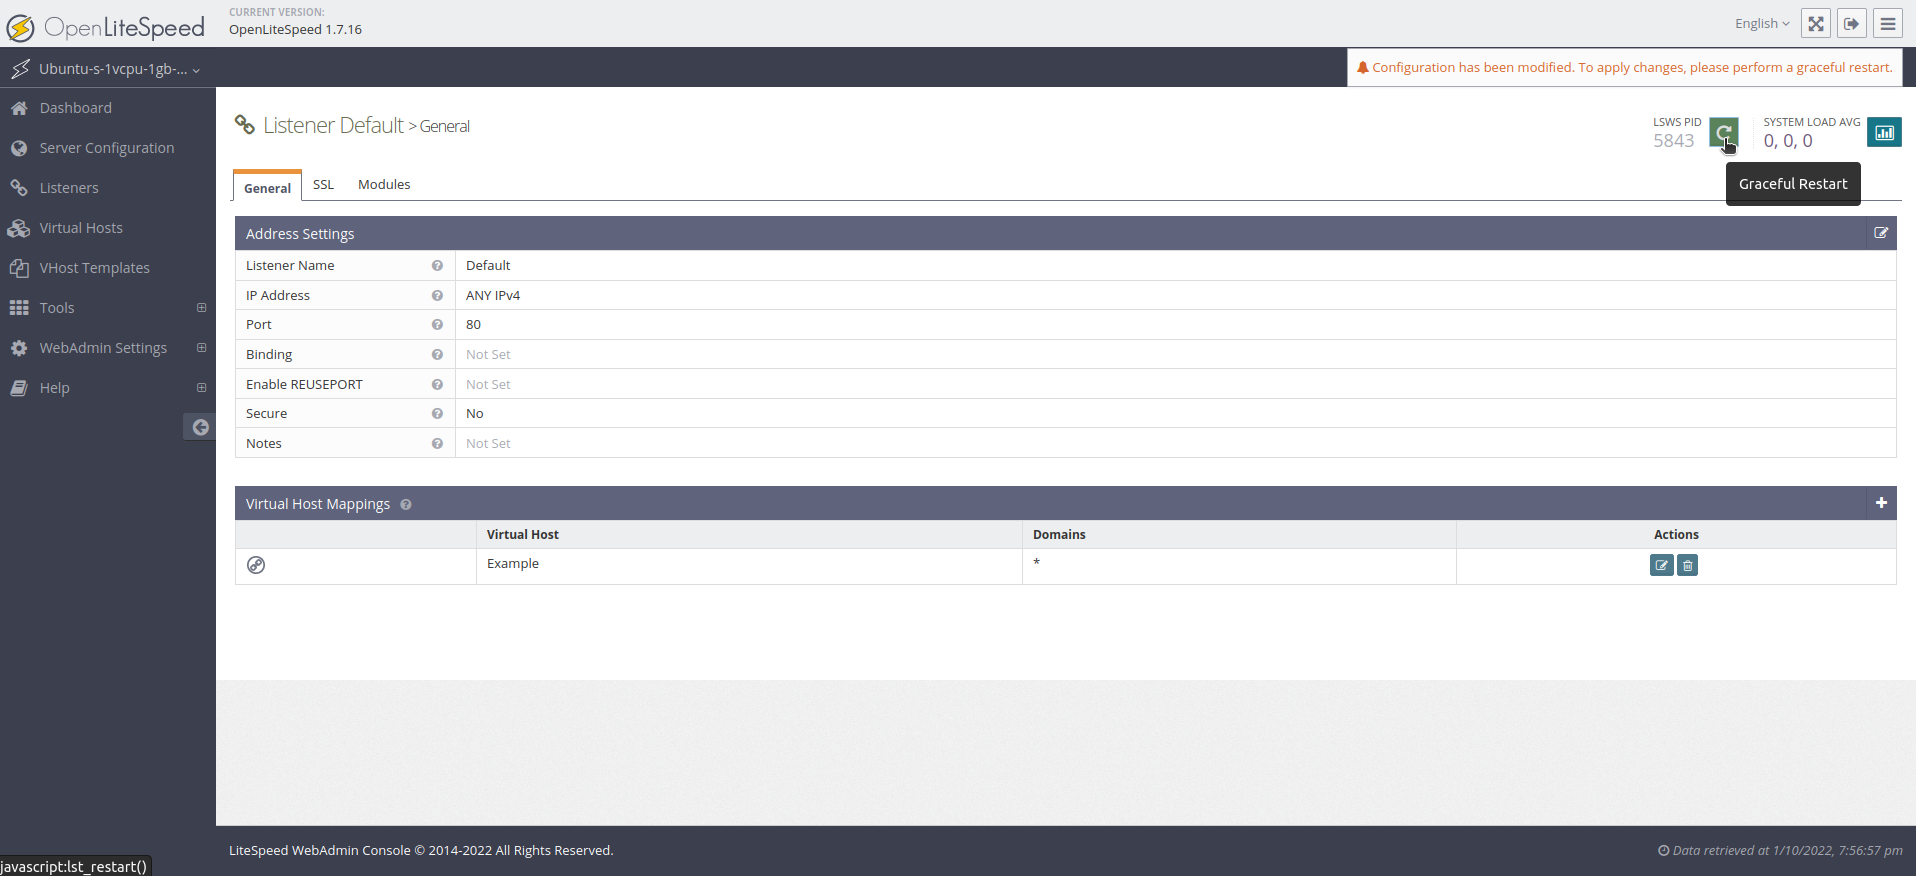
如果您被要求重新启动 LiteSpeed,请按 Go 按钮。
默认网页现在应该在您的浏览器中可访问的端口80而不是端口8088。访问您的服务器的域名或IP地址而不提供端口号将现在显示网站。
您现在可以添加任何HTML,CSS,JS或其他文件,您希望在您的网站上添加到位于/usr/local/lsws/Example/html的目录中。
结论
OpenLiteSpeed 是一个功能齐全的 Web 服务器,主要通过管理 Web 界面进行管理。
您可以继续配置您的界面,使用以下部分信息:
- 联合国 与OpenLiteSpeed相关的一切信息将在`usr/local/lsws'目录下找到。
- 默认虚拟主机的文档根( 您的文件将从何处服务) 位于 `/usr/local/lsws/example/html' 。 这个虚拟主机的配置和日志可见于"/usr/local/lsws/example"目录下.
- 您可以使用管理员界面为不同的站点创建新的虚拟主机. 然而,所有设置您的配置时引用的目录必须提前创建 。 OpenLiteSpeed 无法创建目录 。
- 您可以为相同一般格式的虚拟主机设置虚拟主机模板.
- 您可以考虑使用默认虚拟主机的目录结构和配置作为新配置的起点.
- 管理员界面有一个内置的工具提示帮助系统,几乎适用于所有字段. 导航菜单中还有一个 ** 帮助 ** 菜单选项链接到服务器文档. 如果您需要更多帮助, 请在配置过程中咨询这些信息来源 。
- 要用 HTTPS 保护您的 OpenLiteSpeed 安装, 请参看 [SSL setup] (https://openlitespeed.org/kb/ssl-setup/) 上的正式文件 。 (英语)
在这一点上,你有OpenLiteSpeed和PHP安装并运行在Ubuntu 20.04服务器上。OpenLiteSpeed提供出色的性能,基于Web的配置界面和预配置的脚本处理选项。