作者选择了 Code.org以作为 Write for Donations计划的一部分接受捐款。
介绍
Node.js是一个流行的JavaScript运行环境,可以帮助您使用前端JavaScript库,如 React, Angular和 Vue.您还可以使用 Express和 Nest框架构建全套应用程序。
在本教程中,您将为您的 Windows 计算机设置本地 Node.js 编程环境。
前提条件
您需要运行 Windows 10 的桌面或笔记本电脑,具有管理访问和互联网连接。
步骤 1 — 使用 Node 版本管理器安装 Node.js
Node Version Manager或NVM是您在计算机上安装 Node.js 的首选方法。NVM允许您同时维护多个版本的 Node.js,如果您需要在不同项目中使用特定 Node 版本,这很有帮助。
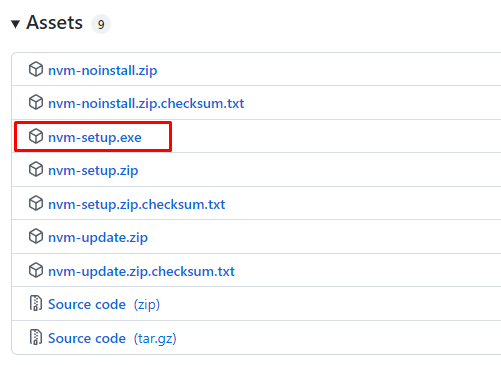
请访问 NVM-windows 发布页面以获取最新版本。
滚动到 资产 部分,然后单击nvm-setup.exe,将安装文件下载到您的计算机的下载文件夹:

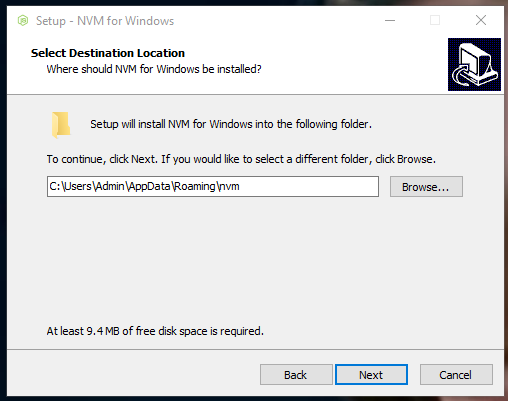
在下载完成后,前往您的下载位置并双击nvm-setup.exe文件来启动安装过程。
安装向导将加载并提供选择的选项,例如工具的目的地文件夹:

按照安装提示在您的计算机上安装 NVM。
接下来,在计算机上打开终端、命令栏或 PowerShell 作为管理员。
使用此命令来验证 NVM 安装:
1nvm -v
您将看到以下输出与 NVM 版本号:
1[secondary_label Output]
2Running version 1.1.9.
3...
您可以查看哪些 Node 版本可用此命令来安装:
1nvm list available
您将看到 Node 版本的列表:
 1[secondary_label Output]
 2|   CURRENT    |     LTS      |  OLD STABLE  | OLD UNSTABLE |
 3|--------------|--------------|--------------|--------------|
 4|    18.7.0    |   16.16.0    |   0.12.18    |   0.11.16    |
 5|    18.6.0    |   16.15.1    |   0.12.17    |   0.11.15    |
 6|    18.5.0    |   16.15.0    |   0.12.16    |   0.11.14    |
 7|    18.4.0    |   16.14.2    |   0.12.15    |   0.11.13    |
 8|    18.3.0    |   16.14.1    |   0.12.14    |   0.11.12    |
 9|    18.2.0    |   16.14.0    |   0.12.13    |   0.11.11    |
10|    18.1.0    |   16.13.2    |   0.12.12    |   0.11.10    |
11|    18.0.0    |   16.13.1    |   0.12.11    |    0.11.9    |
12|    17.9.1    |   16.13.0    |   0.12.10    |    0.11.8    |
13|    17.9.0    |   14.20.0    |    0.12.9    |    0.11.7    |
14|    17.8.0    |   14.19.3    |    0.12.8    |    0.11.6    |
15|    17.7.2    |   14.19.2    |    0.12.7    |    0.11.5    |
16|    17.7.1    |   14.19.1    |    0.12.6    |    0.11.4    |
17|    17.7.0    |   14.19.0    |    0.12.5    |    0.11.3    |
18|    17.6.0    |   14.18.3    |    0.12.4    |    0.11.2    |
19|    17.5.0    |   14.18.2    |    0.12.3    |    0.11.1    |
20|    17.4.0    |   14.18.1    |    0.12.2    |    0.11.0    |
21|    17.3.1    |   14.18.0    |    0.12.1    |    0.9.12    |
22|    17.3.0    |   14.17.6    |    0.12.0    |    0.9.11    |
23|    17.2.0    |   14.17.5    |   0.10.48    |    0.9.10    |
Node 有两个主要版本: Current 和 ** LTS** 用于长期支持. 为了开发目的,建议安装LTS版本。
然后,您将使用以下命令从此列表中安装最新LTS版本:
1nvm install 16.16.0
Node.js 版本 16.16.0 将安装在您的计算机上:
1[secondary_label Output]
2Downloading node.js version 16.16.0 (64-bit)...
3Extracting...
4Complete
5
6Installation complete. If you want to use this version, type
7
8nvm use 16.16.0
查看您计算机上安装的 Node 版本:
1nvm list
您将看到可用的 Node 版本的列表:
1[secondary_label Output]
2    16.16.0
3  * 16.15.0 (Currently using 64-bit executable)
4    14.16.0
5    8.12.0
如果您安装了多个版本,您可以从此列表中选择一个不同的版本,并指定您想要使用的版本:
1nvm use 16.16.0
你会看到这样的输出:
1[secondary_label Output]
2Now using node v16.16.0 (64-bit)
使用以下命令来验证 Node 版本:
1node --version
您将在输出中看到 Node 版本:
1[secondary_label Output]
2v16.16.0
Node 还会安装 Node Package Manager (NPM) 来安装和管理 Node 包. 使用以下命令来验证 NPM 版本:
1npm --version
您将在输出中看到 NPM 版本:
1[secondary_label Output]
28.11.0
要完成本地开发环境的设置,您还需要在您的 Windows 计算机上安装 Git Bash,您将在下一步安装它。
第2步:安装Git Bash
在此步骤中,您将在您的计算机上安装 Git Bash. Git 是一个流行的版本控制系统,而 Bash 是 Linux 操作系统的流行的终端程序。
作为 Windows 用户,您可以使用内置的 Windows 命令提示或 PowerShell 完成大多数任务,但是基于 Linux 的命令是现代开发工作流中的标准。
如果您运行的是 Windows 11 或运行的是 Windows 10 的最新开发版本,则可以使用 winget命令行实用程序安装 Git:
1winget install --id Git.Git -e --source winget
winget 工具是 Windows 包管理器服务的客户端接口。
--id 旗告诉 winget 安装其独特 ID 标识的包裹. -e 或 exact 旗帜需要案例敏感性. --source 旗帜确保安装来自给定源:在这种情况下, winget 存储库。
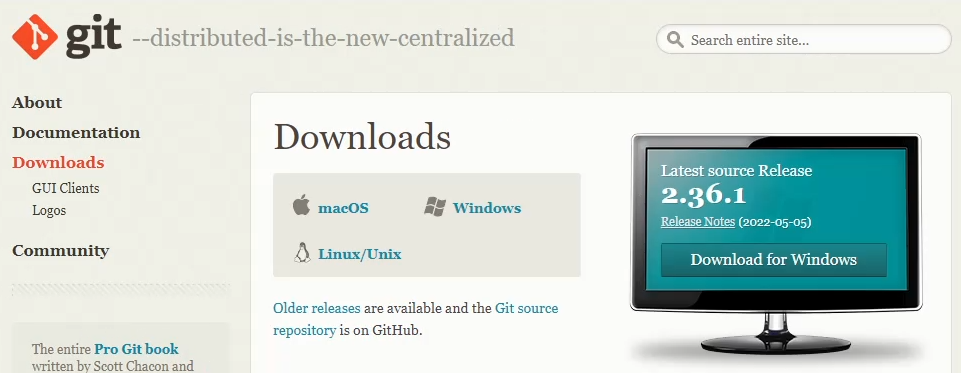
您也可以通过访问 Git 网站来安装 Git Bash:

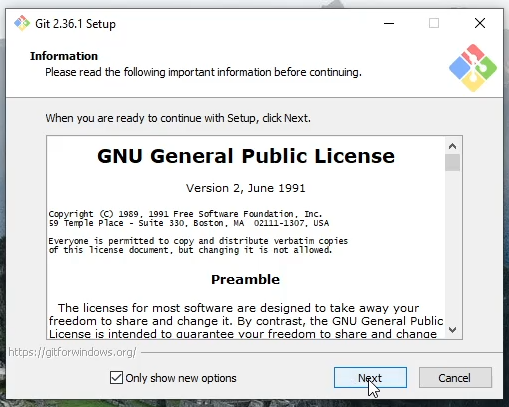
如果您选择使用安装向导,您可以在下载完成后使用默认设置运行安装文件:

要验证您的 Git 安装,请运行以下命令:
1git --version
你会看到这个版本:
1[secondary_label Output]
2git version 2.30.2.windows.1
在您的计算机上使用必要的工具,您现在可以创建一个简单的 Node.js 程序来测试一切是否按预期工作。
步骤三:创建一个简单的程序
在此步骤中,您将创建一个简单的Hello, World应用程序来测试 Node.js 运行时间。
打开您刚刚安装的 Git Bash 应用程序,然后使用以下命令创建一个新的文件,使用命令行文本编辑器nano:
1nano hello.js
或者,您可以在您喜爱的编辑器中打开此文件,例如 VSCode。
将以下行添加到hello.js文件中:
1[label hello.js]
2let message = "Hello, World!";
3console.log(message);
首先,您将用Hello, World!字符串定义消息变量,然后在运行文件时,console.log将显示消息变量的内容。
保存并关闭文件。
现在用 Node 运行此程序:
1node hello.js
该程序执行并显示其输出到屏幕上:
1[secondary_label Output]
2Hello, World!
Node.js允许您在没有浏览器的情况下执行JavaScript代码,这就是为什么您可以运行hello.js文件的原因。
结论
Node 是一个强大的 JavaScript 运行环境. 在本教程中,您在 Windows 10 中创建了本地 Node 开发环境。
现在你已经在 Windows 中设置了本地开发环境,你可以设置一个节点服务器并开始构建前端应用程序,通过遵循我们的教程为 React, Angular和 Vue.js。