介绍
Nagios是一个流行的开源监控系统,它保留您的服务器的库存,并监控它们,以便您知道您的关键服务正在运行。使用像Nagios这样的监控系统对于任何生产环境都是必不可少的工具,因为通过监控工作时间,CPU使用或磁盘空间,您可以在发生之前或用户打电话之前解决问题。
在本教程中,您将安装Nagios 4并配置它,以便您可以通过Nagios的Web接口监控主机资源,您还将设置Nagios远程插件执行器(NRPE),它在远程主机上作为代理运行,以便您可以监控他们的资源。
前提条件
要完成本教程,您将需要以下内容:
*两台Ubuntu 16.04服务器,配置了私人联网,设置时遵循Ubuntu 16.04初始服务器设置指南,包括一个sudo非root用户和一个防火墙. 您将使用第一个服务器运行Nagios,第二个服务器将配置为Nagios可以监控的远程主机.
- 运行Nagios的服务器也需要安装Apache和PHP,您可以通过跟随[How To Instruction Linux, Apache, MySQL, PHP (LAMP stack) on Ubuntu 16.04] (https://andsky.com/tech/tutorials/how-to-install-linux-apache-mysql-php-lamp-stack-on-ubuntu-16-04)来完成. 您可以在该教程中跳过 MySQL 步骤 。
- 通常, Nagios 运行在硬件防火墙或 VPN 后面 。 如果您的Nagios服务器被公共互联网所曝光,你应该与TLS确保Nagios网络接口的安全. 要做到这一点,你应该做以下之一:
- 配置一个域名来指向您的服务器. 您可以遵循 [如何用 DigitalOcean (LINK3) 设置主机名的教程, 学习如何将域指向 DigitalOcean Droplets, 然后遵循 [如何用 Ubuntu 16. 04 加密方式保护 Apache (https://andsky.com/tech/tutorials/how-to-secure-apache-with-let-s-encrypt-on-ubuntu-16-04) 设置 HTTPS 支持...
- Security Apache 带有自签名的证书,通过跟随[如何在Ubuntu 16.04 为Apache创建自签名的SSL证书 (https://andsky.com/tech/tutorials/how-to-create-a-self-signed-ssl-certificate-for-apache-in-ubuntu-16-04) (韩语)_
本教程假定您的服务器已启用 私人网络,以便监控发生在私人网络而不是公共网络上。
步骤 1 – 安装 Nagios 4
安装 Nagios 的方法有很多,但我们会从源头上安装 Nagios 及其组件,以确保我们获得最新的功能、安全更新和错误修复。
登录运行Apache的服务器,我们将称之为 Nagios服务器 。
1[environment local]
2ssh sammy@your_nagios_server_ip
创建一个 nagios 用户和 ** nagcmd** 组. 您将使用这些来运行 Nagios 过程。
1sudo useradd nagios
2sudo groupadd nagcmd
然后将用户添加到组:
1sudo usermod -a -G nagcmd nagios
由于我们正在从源头构建 Nagios 及其组件,我们必须安装几个开发库来完成构建,包括编译器、开发标题和 OpenSSL。
更新您的包列表,以确保您可以下载最新版本的先决条件:
1sudo apt-get update
然后安装所需的包:
1sudo apt-get install build-essential libgd2-xpm-dev openssl libssl-dev unzip
安装前提条件后,我们可以自行安装Nagios。下载Nagios Core最新稳定版本的源代码。前往 Nagios下载页面,然后点击表单下方的 Skip to download 链接。复制最新稳定版本的链接地址,以便您可以下载到您的Nagios服务器。
通过curl命令将该版本下载到您的主目录:
1cd ~
2curl -L -O https://assets.nagios.com/downloads/nagioscore/releases/nagios-4.3.4.tar.gz
提取Nagios档案:
1tar zxf nagios-*.tar.gz
然后更改到提取的目录:
1cd nagios-*
在构建 Nagios 之前,运行配置脚本来指定您希望 Nagios 使用的用户和组。
1./configure --with-nagios-group=nagios --with-command-group=nagcmd
<$>[注]
如果你想Nagios使用Postfix发送电子邮件,你必须 安装Postfix并配置Nagios以使用它,通过添加 --with-mail=/usr/sbin/sendmail到配置命令。
您将从配置命令中看到以下输出:
 1[secondary_label Output]
 2*** Configuration summary for nagios 4.3.4 2017-08-24 ***:
 3
 4 General Options:
 5 -------------------------
 6        Nagios executable:  nagios
 7        Nagios user/group:  nagios,nagios
 8       Command user/group:  nagios,nagcmd
 9             Event Broker:  yes
10        Install ${prefix}:  /usr/local/nagios
11    Install ${includedir}:  /usr/local/nagios/include/nagios
12                Lock file:  /run/nagios.lock
13   Check result directory:  ${prefix}/var/spool/checkresults
14           Init directory:  /etc/init.d
15  Apache conf.d directory:  /etc/apache2/sites-available
16             Mail program:  /bin/mail
17                  Host OS:  linux-gnu
18          IOBroker Method:  epoll
19
20 Web Interface Options:
21 ------------------------
22                 HTML URL:  http://localhost/nagios/
23                  CGI URL:  http://localhost/nagios/cgi-bin/
24 Traceroute (used by WAP):
25
26Review the options above for accuracy. If they look okay,
27type 'make all' to compile the main program and CGIs.
现在用这个命令编译 Nagios:
1make all
现在运行这些做命令来安装Nagios,其 init脚本和默认配置文件:
1sudo make install
2sudo make install-commandmode
3sudo make install-init
4sudo make install-config
您将使用 Apache 来服务 Nagios 的 Web 界面,因此将样本 Apache 配置文件复制到 /etc/apache2/sites-available 文件夹:
1sudo /usr/bin/install -c -m 644 sample-config/httpd.conf /etc/apache2/sites-available/nagios.conf
要通过 Web 界面发出外部命令到 Nagios,请将 Web 服务器用户 www-data 添加到 ** nagcmd** 组:
1sudo usermod -G nagcmd www-data
现在安装了Nagios,让我们安装一个插件,它将允许Nagios从各种主机收集数据。
步骤 2 — 安装 check_nrpe 插件
Nagios 使用 Nagios Remote Plugin Executor,或 NRPE 监控远程主机。
- 由 Nagios 服务器使用的
check_nrpe插件. - 在远程主机上运行并将数据发送到 Nagios 服务器的 NRPE 戴蒙。
让我们在我们的Nagios服务器上安装check_nrpe插件。
请在 Nagios Exchange 网站找到 NRPE 最新稳定版本的下载 URL。
将其下载到您的家庭目录中,使用curl:
1cd ~
2curl -L -O https://github.com/NagiosEnterprises/nrpe/releases/download/nrpe-3.2.1/nrpe-3.2.1.tar.gz
提取 NRPE 档案:
1tar zxf nrpe-*.tar.gz
然后更改到提取的目录:
1cd nrpe-*
设置check_nrpe插件:
1./configure
现在构建并安装check_nrpe:
1make check_nrpe
2sudo make install-plugin
接下来我们来配置 Nagios 服务器。
步骤 3 – 配置 Nagios
现在,让我们执行初始的Nagios配置,这涉及编辑一些配置文件并配置Apache来服务Nagios Web接口。
在文本编辑器中打开主 Nagios 配置文件:
1sudo nano /usr/local/nagios/etc/nagios.cfg
在文件中找到这个行:
1[label /usr/local/nagios/etc/nagios.cfg]
2...
3#cfg_dir=/usr/local/nagios/etc/servers
4...
通过从行的前面删除# 字符来删除此行:
1[label /usr/local/nagios/etc/nagios.cfg]
2cfg_dir=/usr/local/nagios/etc/servers
保存文件并离开编辑器。
现在创建将为您监控的每个服务器存储配置文件的目录:
1sudo mkdir /usr/local/nagios/etc/servers
在文本编辑器中打开 Nagios 联系人配置:
1sudo nano /usr/local/nagios/etc/objects/contacts.cfg
找到电子邮件指令,并用自己的电子邮件地址替换其值:
1[label /usr/local/nagios/etc/objects/contacts.cfg]
2...
3define contact{
4        contact_name nagiosadmin             ; Short name of user
5        use generic-contact         ; Inherit default values from generic-contact template (defined above)
6        alias Nagios Admin            ; Full name of user
7        email your_email@your_domain.com        ; <<***** CHANGE THIS TO YOUR EMAIL ADDRESS ******
8...
保存和退出编辑器。
接下来,将新命令添加到您的 Nagios 配置中,允许您在 Nagios 服务定义中使用check_nrpe命令。
1sudo nano /usr/local/nagios/etc/objects/commands.cfg
将下列内容添加到文件的末尾,以定义名为check_nrpe的新命令:
1[label /usr/local/nagios/etc/objects/commands.cfg]
2...
3define command{
4        command_name check_nrpe
5        command_line $USER1$/check_nrpe -H $HOSTADDRESS$ -c $ARG1$
6}
这定义了名称并指定了执行插件的命令行选项,您将在步骤 5 中使用此命令。
保存和退出编辑器。
现在配置 Apache 来服务 Nagios 用户界面. 使用a2enmod命令启用 Apache 重写和cgi模块:
1sudo a2enmod rewrite
2sudo a2enmod cgi
使用htpasswd命令创建一个名为 nagiosadmin 的管理员用户,可以访问Nagios Web 界面:
1sudo htpasswd -c /usr/local/nagios/etc/htpasswd.users nagiosadmin
请记住这个密码,因为您将需要它来访问Nagios Web接口。
<$>[warning]
** 注意:** 如果您创建一个用户名,而不是 ** nagiosadmin** ,您将需要编辑 /usr/local/nagios/etc/cgi.cfg 并更改所有 ** nagiosadmin** 引用到您创建的用户。
现在,创建一个象征性的链接为nagios.conf到Sites-enabled目录,从而启用Nagios虚拟主机。
1sudo ln -s /etc/apache2/sites-available/nagios.conf /etc/apache2/sites-enabled/
接下来,打开 Apache 配置文件为 Nagios。
1sudo nano /etc/apache2/sites-available/nagios.conf
如果您已配置 Apache 以通过 HTTPS 服务页面,请查找本行中的两种情况:
1[label /etc/apache2/sites-available/nagios.conf]
2#  SSLRequireSSL
通过删除# 符号来消除这两种情况。
如果您想限制可以访问 Nagios Web 接口的 IP 地址,以便只有某些 IP 地址才能访问接口,请找到以下两行:
1[label /etc/apache2/sites-available/nagios.conf]
2Order allow,deny
3Allow from all
通过在它们前面添加# 符号来评论它们:
1[label /etc/apache2/sites-available/nagios.conf]
2# Order allow,deny
3# Allow from all
然后找到以下几条线:
1[label /etc/apache2/sites-available/nagios.conf]
2#  Order deny,allow
3#  Deny from all
4#  Allow from 127.0.0.1
通过删除# 符号,并添加您希望在允许行中允许的IP地址或范围(空间划分):
1[label /etc/apache2/sites-available/nagios.conf]
2Order deny,allow
3Deny from all
4Allow from 127.0.0.1 your_ip_address
这些行在配置文件中出现两次,所以请确保您改变两种情况,然后保存并退出编辑器。
重启 Apache 以加载新的 Apache 配置:
1sudo systemctl restart apache2
有了 Apache 配置,您可以为 Nagios 设置服务。Nagios 没有提供 Systemd 单元文件来管理服务,所以让我们创建一个。
1sudo nano /etc/systemd/system/nagios.service
将下列定义输入到文件中. 此定义规定了 Nagios 何时开始,以及 Systemd 可以在哪里找到 Nagios 应用程序。 了解有关 Systemd 单元文件的更多信息,请参阅教程 理解 Systemd 单元和单元文件
 1[label /etc/systemd/system/nagios.service]
 2[Unit]
 3Description=Nagios
 4BindTo=network.target
 5
 6[Install]
 7WantedBy=multi-user.target
 8
 9[Service]
10Type=simple
11User=nagios
12Group=nagios
13ExecStart=/usr/local/nagios/bin/nagios /usr/local/nagios/etc/nagios.cfg
保存文件并离开编辑器。
然后启动Nagios,并在服务器启动时启动:
1sudo systemctl enable /etc/systemd/system/nagios.service
2sudo systemctl start nagios
Nagios 现在正在运行,所以让我们登录到其 Web 界面。
步骤 4 – 访问 Nagios Web 界面
打开你最喜欢的网页浏览器,然后访问你的Nagios服务器,访问http://nagios_server_public_ip/nagios。
输入 Web 接口的登录凭证在出现的 popup 中. 使用 nagiosadmin 为用户名和您为该用户创建的密码。
验证后,您将看到默认的 Nagios 主页. 点击左导航栏中的 ** Hosts** 链接以查看 Nagios 正在监控哪些主机:
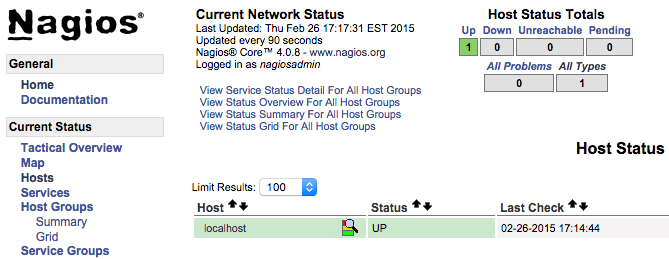
正如你所看到的,Nagios只监控本地主机或自己。
让我们用Nagios监控我们的其他服务器,
步骤 5 — 在主机上安装 NPRE
我们将在远程主机上安装Nagios远程插件执行器(NRPE),安装一些插件,然后配置Nagios服务器来监控这个主机。
登录到第二个服务器,我们将称之为监控服务器。
1[environment local]
2ssh sammy@your_monitored_server_ip
首先创建创建一个nagios用户,它将运行NRPE代理。
1[environment second]
2sudo useradd nagios
我们将从源头安装 NRPE,这意味着您需要在步骤 1 中安装在 Nagios 服务器上相同的开发库,更新您的包源并安装 NRPE 前提条件:
1[environment second]
2sudo apt-get update
3sudo apt-get install build-essential libgd2-xpm-dev openssl libssl-dev unzip
NRPE 要求在远程主机上安装 Nagios 插件。
在 Nagios Plugins Download页面上找到最新版本的Nagios Plugins。 复制最新版本的链接地址,并复制链接地址,以便您可以下载到您的Nagios服务器。
下载 Nagios Plugins 到您的主目录用curl:
1[environment second]
2cd ~
3curl -L -O http://nagios-plugins.org/download/nagios-plugins-2.2.1.tar.gz
提取 Nagios 插件档案:
1[environment second]
2tar zxf nagios-plugins-*.tar.gz
更改到提取的目录:
1[environment second]
2cd nagios-plugins-*
在构建 Nagios 插件之前,请将其配置为使用 nagios 用户和组,并配置 OpenSSL 支持:
1[environment second]
2./configure --with-nagios-user=nagios --with-nagios-group=nagios --with-openssl
现在将 Plugins 编译成:
1[environment second]
2make
然后安装它们:
1[environment second]
2sudo make install
接下来,安装 NRPE. 在 Nagios Exchange 网站找到 NRPE 最新稳定版本的下载 URL,就像您在步骤 1 中所做的一样。
1[environment second]
2cd ~
3curl -L -O https://github.com/NagiosEnterprises/nrpe/releases/download/nrpe-3.2.1/nrpe-3.2.1.tar.gz
使用此命令提取 NRPE 档案:
1[environment second]
2tar zxf nrpe-*.tar.gz
然后更改到提取的目录:
1[environment second]
2cd nrpe-*
通过指定 Nagios 用户和组来配置 NRPE,并告诉它您想要 SSL 支持:
1[environment second]
2./configure --enable-command-args --with-nagios-user=nagios --with-nagios-group=nagios --with-ssl=/usr/bin/openssl --with-ssl-lib=/usr/lib/x86_64-linux-gnu
现在使用以下命令构建和安装 NRPE 及其启动脚本:
1[environment second]
2make all
3sudo make install
4sudo make install-config
5sudo make install-init
接下来,让我们更新 NRPE 配置文件:
1[environment second]
2sudo nano /usr/local/nagios/etc/nrpe.cfg
查找允许_主机指令,并将您的Nagios服务器的私人IP地址添加到命令列表中:
1[environment second]
2[label /usr/local/nagios/etc/nrpe.cfg]
3allowed_hosts=127.0.0.1,::1,your_nagios_server_private_ip
这将 NRPE 配置为通过其私人 IP 地址接受您 Nagios 服务器的请求。
保存并退出您的编辑器. 现在您可以启动 NRPE:
1[environment second]
2sudo systemctl start nrpe.service
通过检查其状态来确保服务运行:
1[environment second]
2sudo systemctl status nrpe.service
您将看到以下输出:
1[environment second]
2[secondary_label Output]
3...
4Oct 16 07:10:00 nagios systemd[1]: Started Nagios Remote Plugin Executor.
5Oct 16 07:10:00 nagios nrpe[14653]: Starting up daemon
6Oct 16 07:10:00 nagios nrpe[14653]: Server listening on 0.0.0.0 port 5666.
7Oct 16 07:10:00 nagios nrpe[14653]: Server listening on :: port 5666.
8Oct 16 07:10:00 nagios nrpe[14653]: Listening for connections on port 5666
9Oct 16 07:10:00 nagios nrpe[14653]: Allowing connections from: 127.0.0.1,::1,207.154.249.232
接下来,通过防火墙允许访问端口 5666. 如果您正在使用 UFW,请将其配置为允许 TCP 连接到端口 `5666':
1[environment second]
2sudo ufw allow 5666/tcp
您可以了解有关 UFW 的更多信息,请参阅 如何在 Ubuntu 16.04 上设置使用 UFW 的防火墙。
现在您可以检查与远程 NRPE 服务器的通信,在 Nagios 服务器上运行以下命令:
1/usr/local/nagios/libexec/check_nrpe -H remote_host_ip
您将看到以下输出:
1[secondary_label Output]
2NRPE v3.2.1
现在,让我们配置一些Nagios可以监控的基本检查。
首先,让我们监控这个服务器的磁盘使用率。 使用df -h命令来搜索根文件系统。 您将在 NRPE 配置中使用此文件系统名称:
1[environment second]
2df -h /
你会看到类似于此的输出:
 1[secondary_label Output]
 2Filesystem Size Used Avail Use% Mounted on
 3udev 490M 0 490M 0% /dev
 4tmpfs 100M 3.1M 97M 4% /run
 5/dev/vda1 29G 1.4G 28G 5% /
 6tmpfs 497M 0 497M 0% /dev/shm
 7tmpfs 5.0M 0 5.0M 0% /run/lock
 8tmpfs 497M 0 497M 0% /sys/fs/cgroup
 9/dev/vda15 105M 3.4M 102M 4% /boot/efi
10tmpfs 100M 0 100M 0% /run/user/0
在 Droplet 上,您想要的文件系统可能是 `/dev/vda1′。
现在在您的编辑器中打开 /usr/local/nagios/etc/nrpe.cfg 文件:
1[environment second]
2sudo nano /usr/local/nagios/etc/nrpe.cfg
NRPE配置文件非常长,充满了评论,有几个行你需要找到和修改:
- server_address : 设置为监控服务器的私人IP地址
- command[check_hda1] : 将
/dev/hda1更改为您的根文件系统称为
查找这些设置并相应地更改它们:
1[environment second]
2[label /usr/local/nagios/etc/nrpe.cfg]
3...
4server_address=monitored_server_private_ip
5...
6command[check_vda1]=/usr/lib/nagios/plugins/check_disk -w 20% -c 10% -p /dev/vda1
7...
保存和退出编辑器。
重新启动 NRPE 服务以执行更改:
1[environment second]
2sudo systemctl restart nrpe.service
重复本节中的步骤,对于您要监控的每个额外服务器。
一旦你完成了在你想要监控的主机上安装和配置NRPE,你将不得不将这些主机添加到你的Nagios服务器配置,然后它将开始监控它们。
步骤 6 – 使用 Nagios 监控主机
要使用 Nagios 监控您的主机,您将为每个主机添加配置文件,指定您想要监控的内容。
在您的 Nagios 服务器上,为您希望在 /usr/local/nagios/etc/servers/ 中监控的每个远程主机创建一个新的配置文件。
1sudo nano /usr/local/nagios/etc/servers/your_monitored_server_host_name.cfg
添加以下主机定义,将host_name值替换为您的远程主机名,alias值以主机的描述,以及地址值以远程主机的私人IP地址:
 1[label /usr/local/nagios/etc/servers/your_monitored_server_host_name.cfg]
 2define host {
 3        use linux-server
 4        host_name your_monitored_server_host_name
 5        alias My client server
 6        address your_monitored_server_private_ip
 7        max_check_attempts 5
 8        check_period 24x7
 9        notification_interval 30
10        notification_period 24x7
11}
有了这个配置,Nagios 只会告诉你主机是否在上或下,让我们添加一些服务来监控。
首先,添加此块来监控CPU使用:
1[label /usr/local/nagios/etc/servers/your_monitored_server_host_name.cfg]
2define service {
3        use generic-service
4        host_name your_monitored_server_host_name
5        service_description CPU load
6        check_command check_nrpe!check_load
7}
使用通用服务指令要求Nagios继承名为通用服务 的服务模板的值,该服务由Nagios预定义。
接下来,添加此块来监控磁盘使用:
1[label /usr/local/nagios/etc/servers/your_monitored_server_host_name.cfg]
2define service {
3        use generic-service
4        host_name your_monitored_server_host_name
5        service_description             /dev/vda1 free space
6        check_command check_nrpe!check_vda1
7}
现在保存并停止. 重新启动 Nagios 服务以使任何更改生效:
1sudo systemctl restart nagios
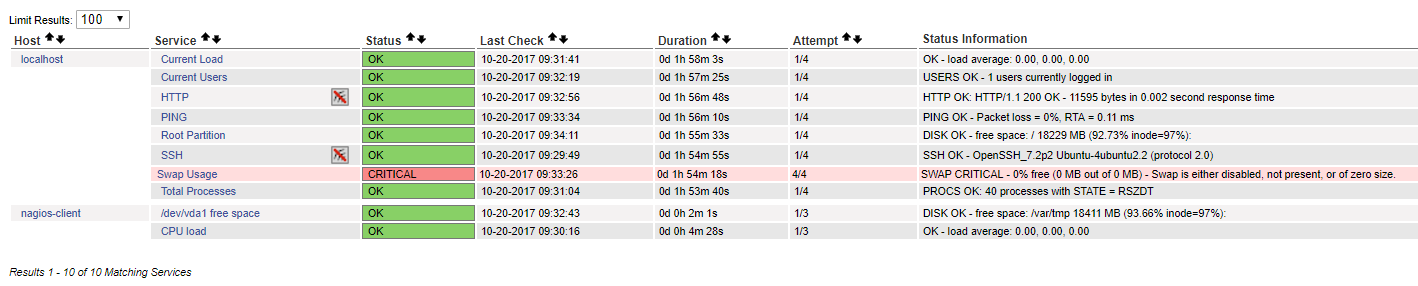
几分钟后,Nagios会检查新的主机,你会在Nagios的Web界面中看到它们。
结论
您已在服务器上安装了 Nagios,并将其配置为监控至少一个远程计算机的 CPU 和磁盘使用情况。
现在你正在监控主机及其部分服务,你可以开始使用 Nagios 来监控你的关键任务服务. 你可以使用 Nagios 设置关键事件的通知. 例如,当你的磁盘使用率达到警告或关键门槛时,你可以收到电子邮件,或者当你的主要网站停机时,你可以立即解决情况,甚至在出现问题之前。