作者选择了 自由和开源基金作为 写给捐款计划的一部分接受捐款。
介绍
LOMP是LiteSpeed网络服务器的开源选项,LiteSpeed服务器以其快速性能而闻名,尤其是在PHP等语言中,它们与LiteSpeed服务器应用程序编程接口(LSAPI)很好集成(LINK4))。LiteSpeed是LiteSpeed网络服务器的开源选项。LiteSpeed服务器通过其专有的LS-API以更快的速度服务动态PHP页面。API与HTTP服务器集成,从而缩短了服务器响应请求的总时间。OpenLiteSpeed正在成为基于WordPress和其他动态应用程序的首选内容。
在本教程中,您将设置运行在Ubuntu 22.04上的LOMP服务器。在写作时,当前版本是PHP 8.1,MariaDB 10.7和OpenLiteSpeed 1.7.
前提条件
在您开始本指南之前,您将需要以下内容:
- 一台 Ubuntu 22.04 服务器具有 sudo 非 root 用户、防火墙和至少 1 GB 的 RAM,您可以通过遵循 Ubuntu 22.04 初始服务器设置指南
- 一个完全合格的域名(需要 SSL 配置并建议公共网站使用)。您可以在 Namecheap、 Freenom或您选择的域名注册器上获取域名。 遵循 DNS Quickstart 将域名指向您的服务器。
- 对您的域名提供的 SSL 证书和密钥。 遵循 [How To Use Certbot Standalone Mode to Retrieve Let's Encrypt SSL Certificates on Ubuntu 22.04]
步骤 1 – 安装 OpenLiteSpeed
在此步骤中,您将安装OpenLiteSpeed Web 服务器,然后将所需的包库导入到您的服务器中. 如果这是您第一次在SSH会话中使用sudo,您可能需要输入非根用户的密码。
首先,更新包管理器的缓存:
1sudo apt update
然后,通过运行以下命令升级所需的包:
1sudo apt upgrade -y
<$>[note]
注: 如果被要求更新内核,请键入y以继续。如果被要求重新启动,请运行命令sudo reboot以重新启动系统。
与 Apache和 Nginx不同,OpenLiteSpeed 将其代码托管在自己的存储库中。
1sudo wget -O - https://repo.litespeed.sh | sudo bash
wget 接收位于 OpenLiteSpeed 服务器上的远程存储库的壳脚本,而 -O 旗将文件的内容打印到终端。 Átha 管道将内容传送到一个新的 bash shell,由 sudo bash 命令启动。
你会看到这样的输出:
 1[secondary_label Output]
 2Redirecting output to ‘wget-log’.
 3--2022-09-08 08:27:42--  http://rpms.litespeedtech.com/debian/lst_debian_repo.gpg
 4Resolving rpms.litespeedtech.com (rpms.litespeedtech.com)... 52.55.120.73
 5Connecting to rpms.litespeedtech.com (rpms.litespeedtech.com)|52.55.120.73|:80... connected.
 6HTTP request sent, awaiting response... 200 OK
 7Length: 1198 (1.2K) [application/octet-stream]
 8Saving to: ‘/etc/apt/trusted.gpg.d/lst_debian_repo.gpg’
 9
10/etc/apt/trusted.gpg.d/l 100%[==================================>]   1.17K  --.-KB/s in 0s
11
122022-09-08 08:27:42 (139 MB/s) - ‘/etc/apt/trusted.gpg.d/lst_debian_repo.gpg’ saved [1198/1198]
13
14--2022-09-08 08:27:42--  http://rpms.litespeedtech.com/debian/lst_repo.gpg
15Resolving rpms.litespeedtech.com (rpms.litespeedtech.com)... 52.55.120.73
16Connecting to rpms.litespeedtech.com (rpms.litespeedtech.com)|52.55.120.73|:80... connected.
17HTTP request sent, awaiting response... 200 OK
18Length: 2336 (2.3K) [application/octet-stream]
19Saving to: ‘/etc/apt/trusted.gpg.d/lst_repo.gpg’
20
21/etc/apt/trusted.gpg.d/l 100%[==================================>]   2.28K  --.-KB/s in 0s
22
232022-09-08 08:27:42 (226 MB/s) - ‘/etc/apt/trusted.gpg.d/lst_repo.gpg’ saved [2336/2336]
24
25LiteSpeed repository has been setup!
更新存储库列表以确保新添加的存储库通过apt包管理器进行扫描:
1sudo apt update
接下来,安装openlitespeed包:
1sudo apt install openlitespeed
如果被提示,输入您的密码,然后用Y确认安装。
一旦安装完成,请通过服务命令检查 OpenLiteSpeed 是否安装并正常工作:
1sudo systemctl status lsws
systemctl 状态命令获得了由其关键字识别的服务的状态。 OpenLiteSpeed Web Server 服务的关键字是lsws。
您将获得以下输出:
 1[secondary_label Output]
 2● lshttpd.service - OpenLiteSpeed HTTP Server
 3     Loaded: loaded (/etc/systemd/system/lshttpd.service; enabled; vendor preset: enabled)
 4     Active: active (running) since Wed 2022-03-16 08:59:09 UTC; 2min 26s ago
 5    Process: 32997 ExecStart=/usr/local/lsws/bin/lswsctrl start (code=exited, status=0/SUCCESS)
 6   Main PID: 33035 (litespeed)
 7     CGroup: /system.slice/lshttpd.service
 8             ├─33035 openlitespeed (lshttpd - main)
 9             ├─33044 openlitespeed (lscgid)
10             └─33073 openlitespeed (lshttpd - #01)
您现在有一个 OpenLiteSpeed Web 服务器以其默认配置运行,您可能无法访问基于 GUI 的管理面板和示例网站,因为防火墙阻止了这些端口的流量。
随着您的 OpenLiteSpeed Web 服务器运行,您可以更新防火墙并打开必要的端口,以允许用户访问网站。
第2步:更新防火墙
在此步骤中,您将为您的服务器配置防火墙. 您将允许通过 TCP 访问基于 GUI 的管理面板和示例网站的选定的端口,以及 HTTP 和 HTTPS 网站的端口 80 和 443。
OpenLiteSpeed 服务器将基于 GUI 的管理面板和示例网站与服务器结合在一起。 管理面板是一个易于使用的界面,用于配置倾听器、虚拟主机、SSL 和监控日志。 示例网站具有示例 CGI 脚本、PHP 脚本、错误页面和密码保护页面。
基于GUI的管理面板在默认配置中在端口7080上倾听,而示例网站则在端口8088上倾听。
若要提供访问,请运行以下命令:
1sudo ufw allow 7080,80,443,8088/tcp
然后,检查防火墙规则的状态:
1sudo ufw status
你的输出将看起来像这样:
1[secondary_label Output]
2Status: active
3
4To Action From
5--                                ------      ----
6OpenSSH ALLOW Anywhere
780,443,7080,8088/tcp ALLOW Anywhere
8OpenSSH (v6)                      ALLOW Anywhere (v6)
980,443,7080,8088/tcp (v6)         ALLOW Anywhere (v6)
您可以通过端口 8088 查看示例网站:
1http://your_server_ip:8088
它应该看起来像下面的屏幕截图:

您可以环顾示例网站,探索 Web 服务器提供的功能。
要查看基于 GUI 的管理面板,请访问端口 7080:
1http://your_server_ip:7080
在本教程中,您将使用 OpenLiteSpeed GUI 管理面板来配置您的 Web 服务器。
您现在已经在Ubuntu实例上设置了OpenLiteSpeed服务器,这将允许您根据不同的后端语言和框架服务各种Web应用程序。
步骤 3 – 安装 MariaDB
随着 O penLiteSpeed 服务器在 ** L** inux 上运行,您现在可以设置 ** M** ariaDB 数据库服务器. 该数据库服务器将允许您在您的网站上存储,检索和管理数据。 MariaDB 是一个流行的数据库引擎,因为它提供了 SQL 和 NoSQL 功能,并可以集成多个数据库引擎,如 MyISAM和 InnoDB。
使用以下命令安装 MariaDB 服务器:
1sudo apt install mariadb-server
当被提示进行确认时,键入Y来确认。
安装完成后,用以下命令完成初始服务器设置:
1sudo mysql_secure_installation
默认安装没有根密码,因此在提示时可以按Enter。
安装后,您将收到这样的输出:
 1[secondary_label Output]
 2
 3NOTE: RUNNING ALL PARTS OF THIS SCRIPT IS RECOMMENDED FOR ALL MariaDB
 4      SERVERS IN PRODUCTION USE! PLEASE READ EACH STEP CAREFULLY!
 5
 6In order to log into MariaDB to secure it, we'll need the current
 7password for the root user. If you've just installed MariaDB, and
 8you haven't set the root password yet, the password will be blank,
 9so you should just press enter here.
10
11Enter current password for root (enter for none):
12OK, successfully used password, moving on...
当被问及是否要切换到 unix_socket 身份验证,键入Y:
 1[secondary_label Output]
 2Setting the root password or using the unix_socket ensures that nobody
 3can log into the MariaDB root user without the proper authorisation.
 4
 5You already have your root account protected, so you can safely answer 'n'.
 6
 7Switch to unix_socket authentication [Y/n] y
 8Enabled successfully!
 9Reloading privilege tables..
10 ... Success!
当下一个提示询问您是否要设置根密码,键入Y,然后输入您偏好的根密码两次:
1[secondary_label Output]
2You already have your root account protected, so you can safely answer 'n'.
3
4Change the root password? [Y/n] y
5New password:
6Re-enter new password:
7Password updated successfully!
8Reloading privilege tables..
9 ... Success!
下一个提示会问你是否想删除匿名用户。
1[secondary_label Output]
2By default, a MariaDB installation has an anonymous user, allowing anyone
3to log into MariaDB without having to have a user account created for
4them. This is intended only for testing, and to make the installation
5go a bit smoother. You should remove them before moving into a
6production environment.
7
8Remove anonymous users? [Y/n] y
9 ... Success!
除非您计划从其他服务器或本地计算机访问数据库作为 root 用户,否则您还应该远程禁用 root 登录。
1[secondary_label Output]
2Normally, root should only be allowed to connect from 'localhost'. This
3ensures that someone cannot guess at the root password from the network.
4
5Disallow root login remotely? [Y/n] y
6 ... Success!
您也可以通过键入Y来删除测试数据库和相关权限:
 1[secondary_label Output]
 2By default, MariaDB comes with a database named 'test' that anyone can
 3access. This is also intended only for testing, and should be removed
 4before moving into a production environment:
 5
 6Remove test database and access to it? [Y/n] y
 7 - Dropping test database...
 8 ... Success!
 9 - Removing privileges on test database...
10 ... Success!
最后,您将确认重新加载特权表,以便所有上述更改都应用于服务器:
 1[secondary_label Output]
 2Reloading the privilege tables will ensure that all changes made so far
 3will take effect immediately.
 4
 5Reload privilege tables now? [Y/n] y
 6 ... Success!
 7
 8Cleaning up...
 9
10All done!  If you've completed all of the above steps, your MariaDB
11installation should now be secure.
12
13Thanks for using MariaDB!
您现在已在您的 Ubuntu 实例上安装、配置和保护 MariaDB 数据库服务器. 数据库将在其默认配置中在端口 3306 上收听 MySQL 连接. 由于数据库将被内部访问(在大多数情况下在相同的服务器上),您将不会打开该端口到防火墙中的外部流量。
接下来,您将安装PHP用于OpenLiteSpeed。
第4步:安装特定版本的PHP
OpenLiteSpeed Web 服务器配备了一个 PHP 版本,这可能不是 PHP 的最新稳定版本,您可以使用预先安装的 PHP 版本,或者您可以安装特定实例。
要了解您的 OpenLiteSpeed 服务器预安装了哪个版本的 PHP,请点击示例网站的 Test PHP 部分中的按钮,或访问下面的 URL:
1http://your_server_ip:8088/phpinfo.php
PHP 版本将显示在信息页面上。
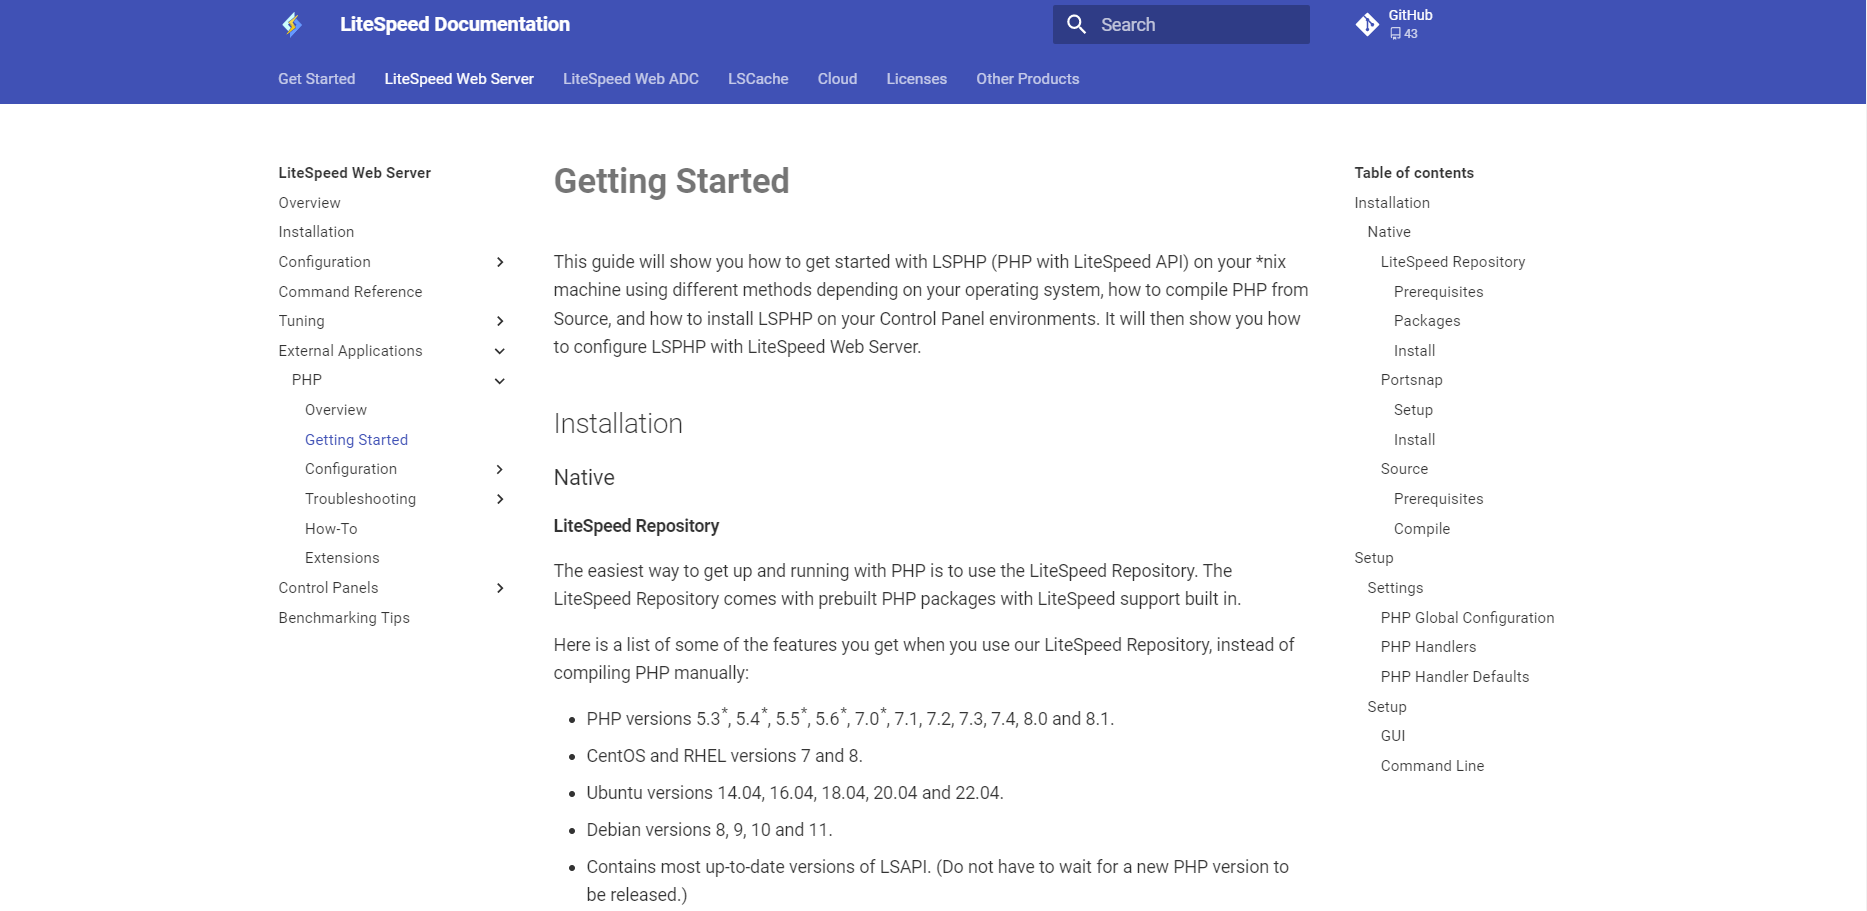
要在 OpenLiteSpeed Web 服务器上安装特定版本的 PHP,请在官方 OpenLiteSpeed 网站的 Getting Started page 中检查可用的版本列表以及它们的兼容性。
您还可以通过以下命令检查 Ubuntu 可用的 LSPHP (LiteSpeed PHP) 包:
1sudo apt-cache search lsphp
从包列表中,您可以使用包名称的尾声识别php版本,您将看到这样的包列表:
1[secondary_label Output]
2...
3lsphp81 - server-side, HTML-embedded scripting language (LSAPI binary)
4...
在本示例中,lsphp81表示这是PHP v8.1,而lsphp74意味着PHP v7.4。
要安裝特定「lsphp」套件,請使用下列命令(用您偏好版本的補充詞取代「81」):
1sudo apt install lsphp81 lsphp81-{common,mysql}
输入Y来确认安装。
您只安装了lsphp包,但您尚未配置 OpenLiteSpeed 以使用此版本的 PHP. 示例网站将继续显示默认的 PHP 版本,直到您将其配置为使用新版本。
步骤 5 – 配置 OpenLiteSpeed
在此步骤中,您将为 OpenLiteSpeed Web 服务器配置基于 GUI 的管理面板的凭证,并将 Web 服务器配置为使用您选择的 PHP 版本。
要配置 OpenLiteSpeed Web 服务器,请访问 GUI 管理面板在端口 7080:
1http://your_server_ip:7080
在您的终端中,用以下命令设置管理员帐户凭证:
1sudo /usr/local/lsws/admin/misc/admpass.sh
这些登录凭证将与您在之前的步骤中设置的不同,并且只适用于 OpenLiteSpeed 服务器的 GUI 管理面板。
您将看到以下输出,这将提示您输入用户名和密码:
 1[secondary_label Output]
 2Please specify the user name of administrator.
 3This is the user name required to login the administration Web interface.
 4
 5User name [admin]: sammy
 6
 7Please specify the administrators password.
 8This is the password required to login the administration Web interface.
 9
10Password:
11Retype password:
12Administrators username/password is updated successfully!
设置证书后,您可以配置服务器使用指定的版本。
通过http://your_server_ip:7080,登录到 Admin Panel (使用您刚刚设置的身份证件)并导航到 ** 服务器配置** 部分。
你会看到以下屏幕:
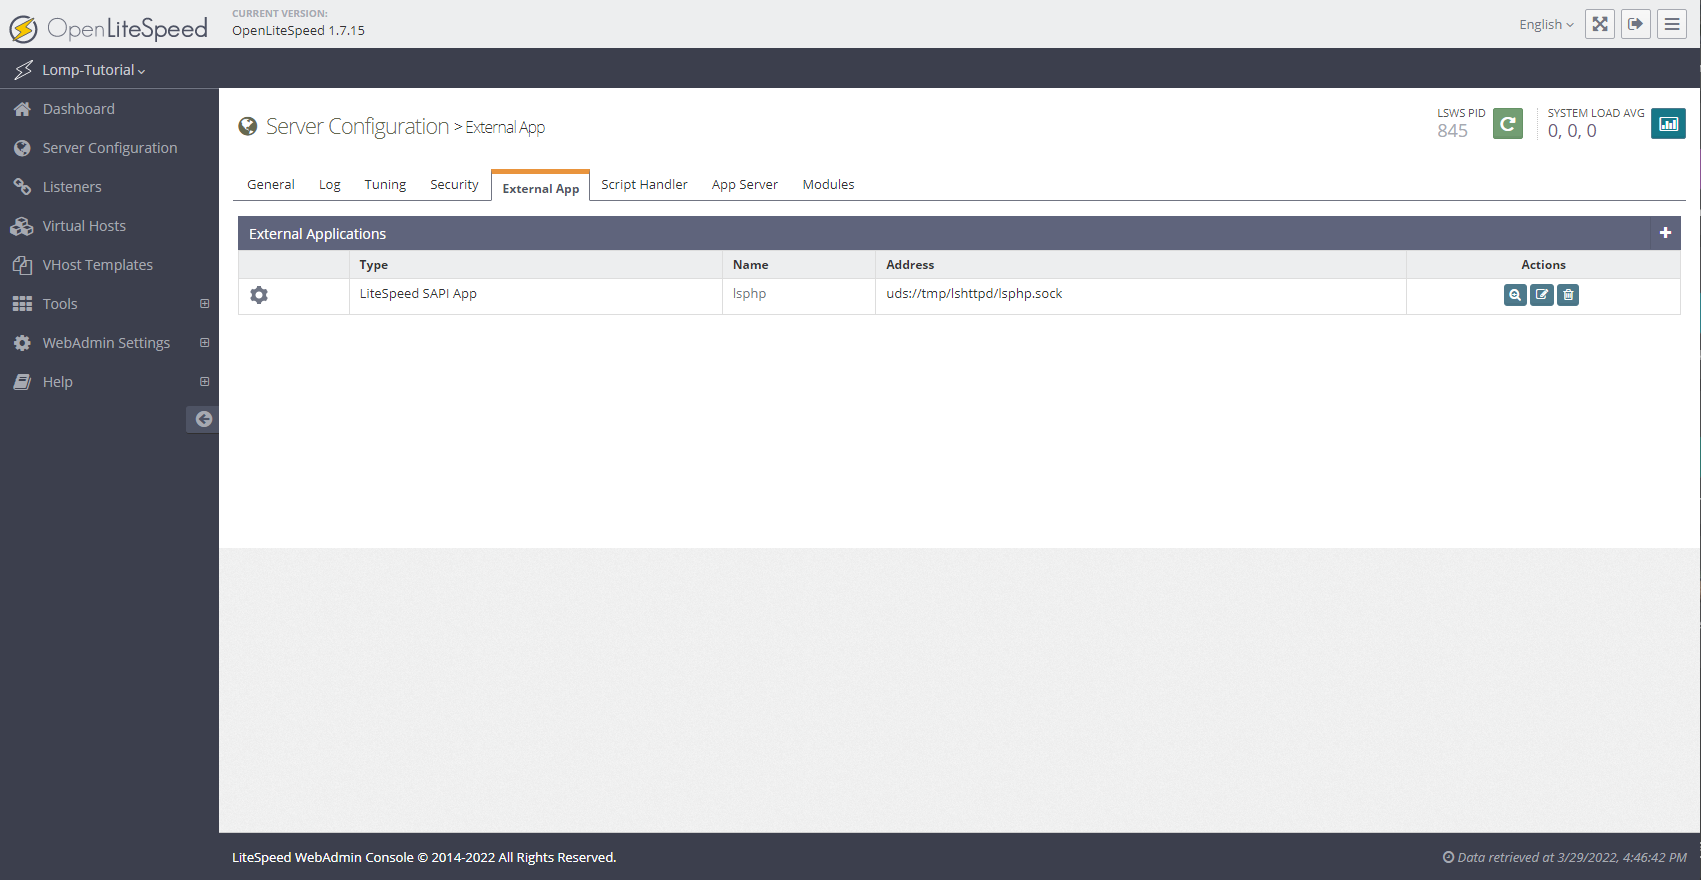
点击第一个行 LiteSpeed SAPI App 的 ** Actions** 列中的 ** edit** 按钮,这将打开一个名为 ** lsphp** 的应用程序。滚动到 ** Command** 字段,将其值更改为 lsphp81/bin/lsphp(按照步骤 4中的命名惯例)。
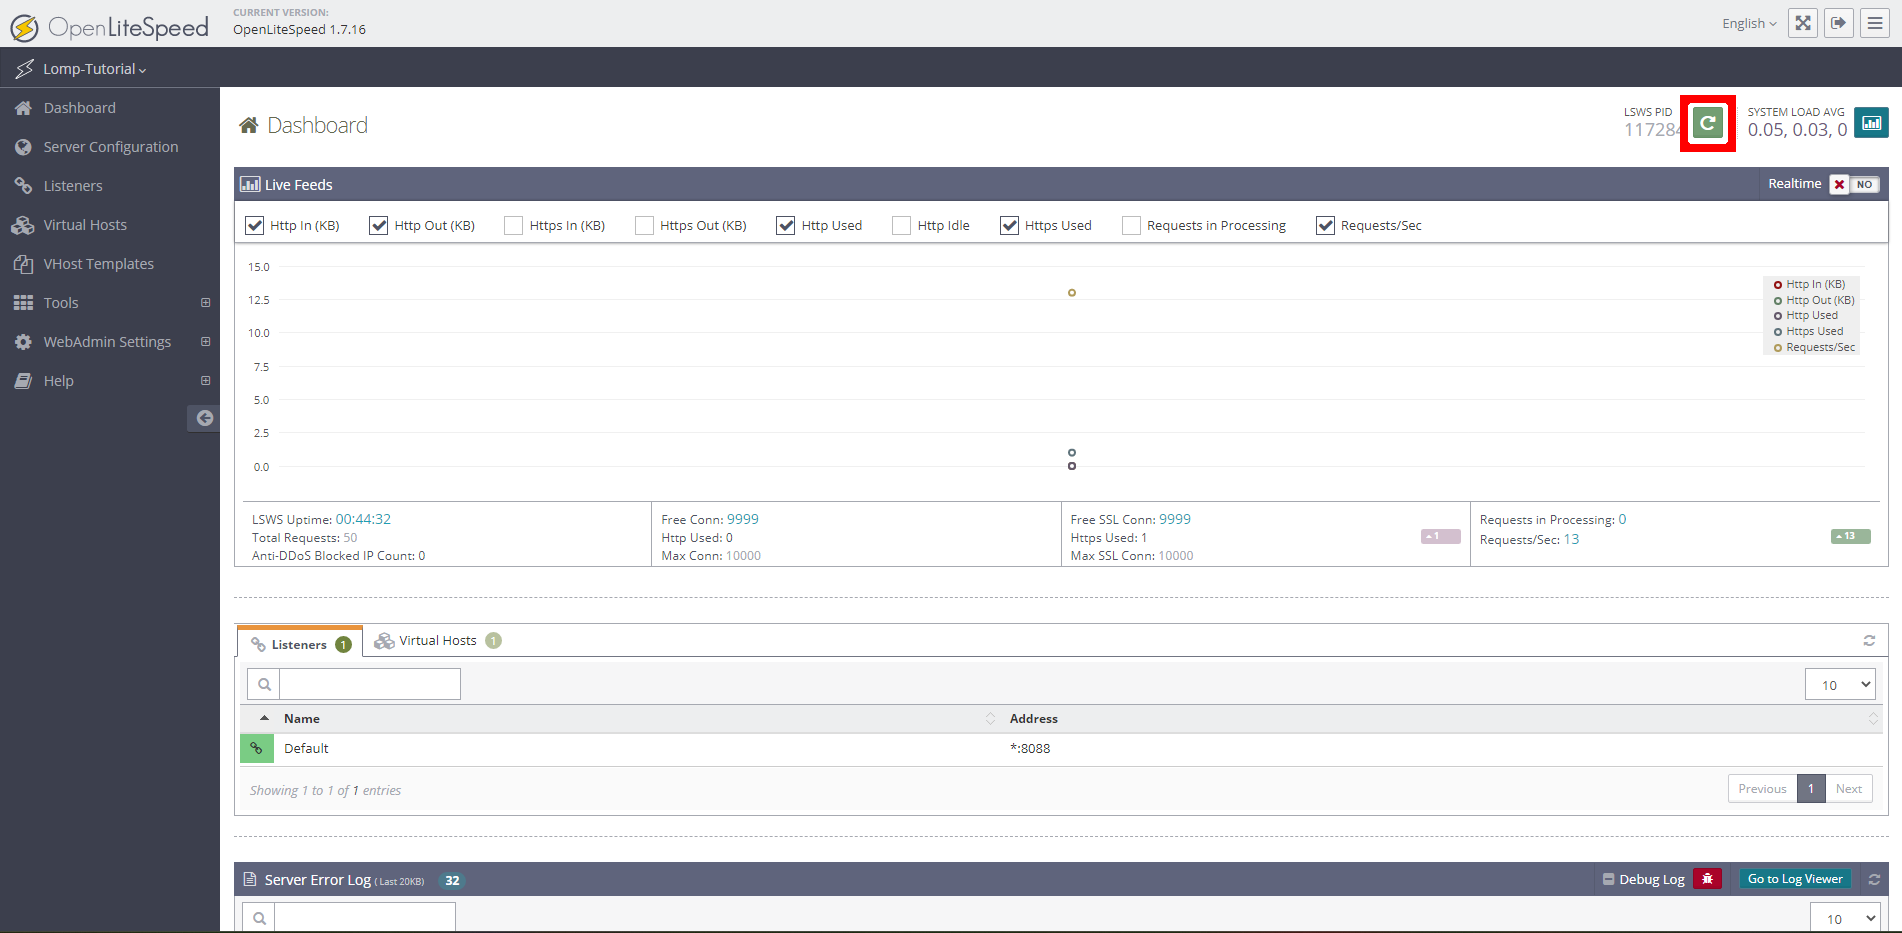
使用右上角的 Graceful Restart 按钮重新启动 Web 服务器. 在下面的屏幕截图右上角突出显示的 ** Graceful Restart** 按钮:
請確認您的伺服器現在正在使用指定的 PHP 版本,請前往「8088」端口的資訊頁面:
1http://your_server_ip:8088/phpinfo.php
此页面将显示指定的版本号。
在此步骤中,您配置了管理面板的凭据,并将其设置为使用所需的PHP版本,接下来,您将为您计划在这个Web服务器上托管的不同网站设置虚拟主机。
步骤6:设置虚拟主机
在此步骤中,您将为您的 Web 服务器设置虚拟主机,并为您的网站的所有流量配置 TLS 加密。
虚拟主机允许您通过一个单一的Web服务器服务多个网站,通过独特的主机名称。OpenLiteSpeed可以服务多个虚拟主机,然后将其绘制到倾听者;然后将倾听者绘制到特定端口。OpenLiteSpeed允许虚拟主机拥有自定义的重定向规则,并且可以为每个虚拟主机配置不同的PHP版本。
仍然在 GUI 管理面板中,导航到 ** 虚拟主机** 部分. 在显示表的右上角,点击加(** +** )按钮添加一个新的虚拟主机。
然后,您可以添加您选择的虚拟主机名称,以设置虚拟主机根源和虚拟主机的配置文件的路径,使用变量,如$SERVER_ROOT(指向OpenLiteSpeed Web Server的根目录)或$VH_ROOT(指向虚拟主机的根目录)。
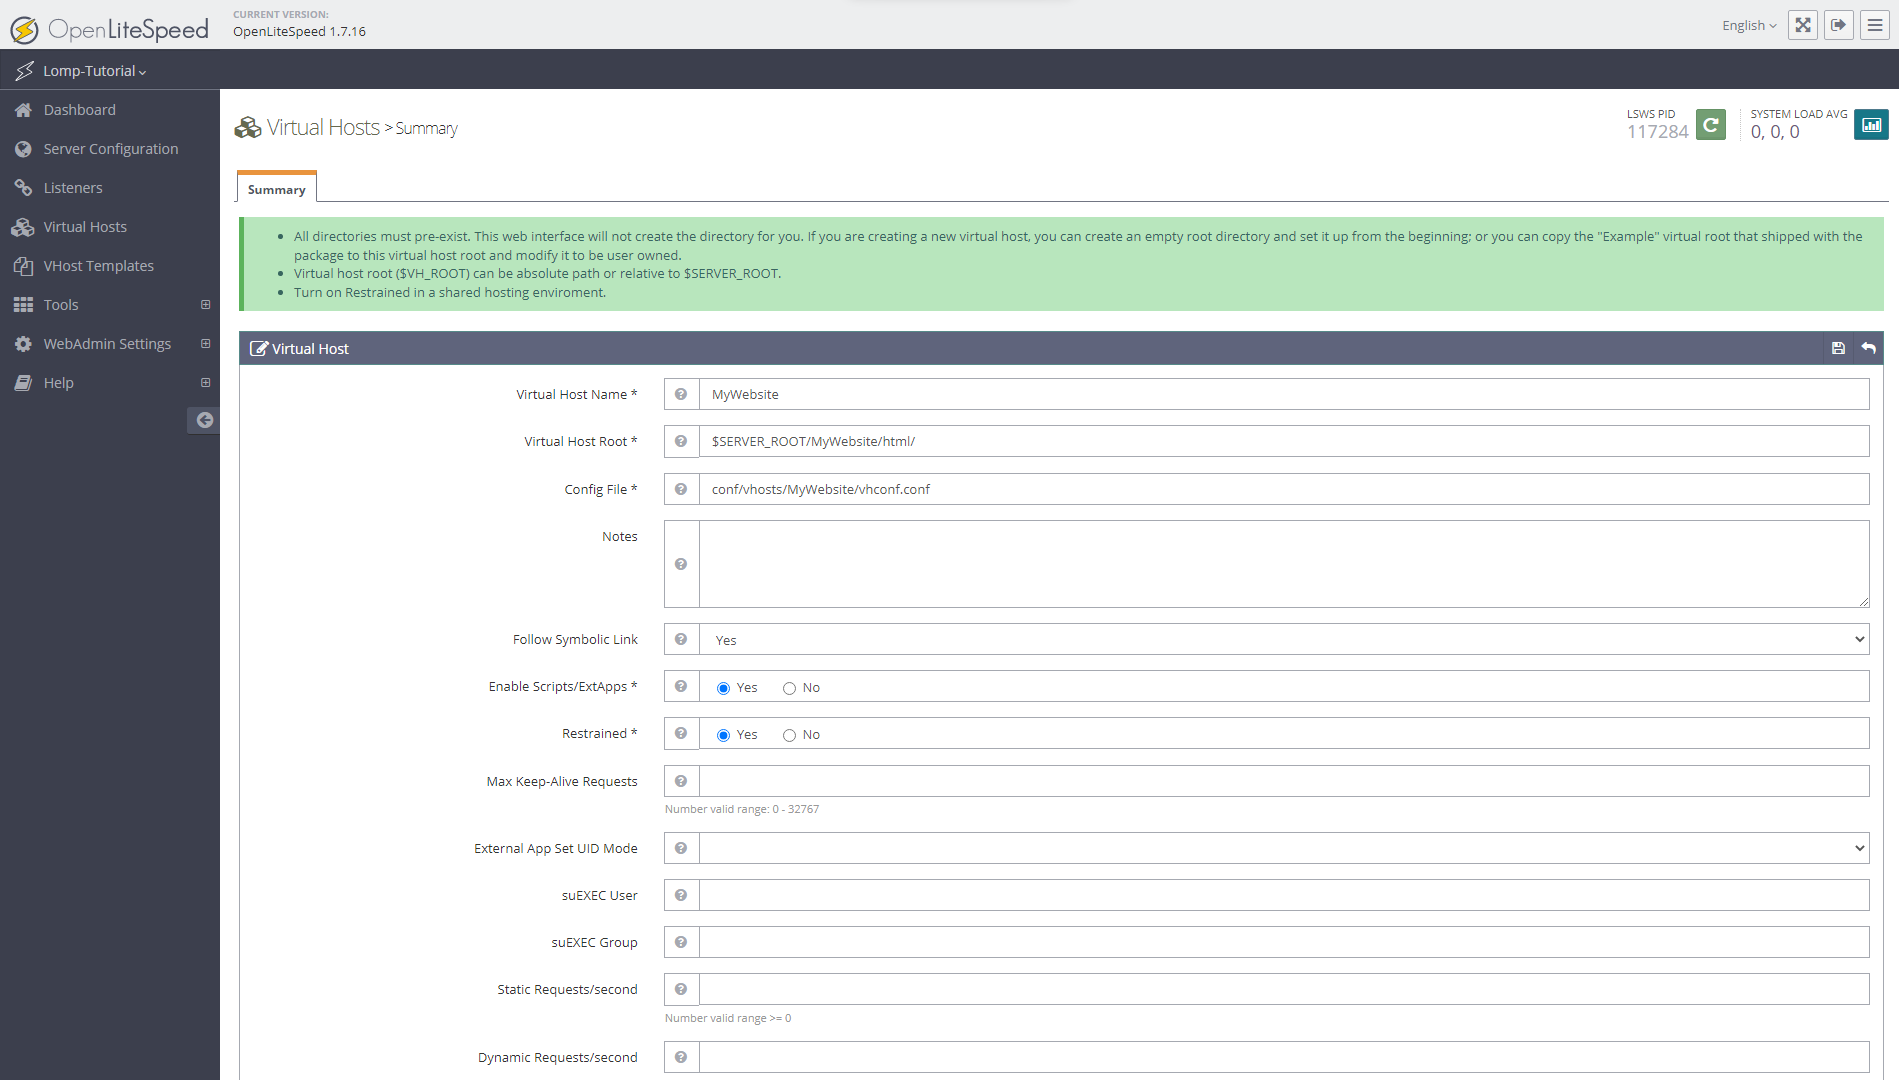
在设置虚拟主机时,请用您想要的值填写以下字段(下面的值为示例):
- 虚拟主机名称:
MyWebsite - 虚拟主机根:
$SERVER_ROOT/MyWebsite/html/ - 配置文件:
conf/vhosts/MyWebsite/vhconf.conf - 启用脚本/ExtApps:
Yes - 限制:
Yes
您可以用您在前提条件期间创建的域名代替MyWebsite。
<$>[注] 注: 如果配置文件不存在,则可能会收到错误。
在启用脚本/ExtApps上是允许您在配置的外部应用部分中指定自定义的PHP解释器版本,如果您不打算配置自定义PHP版本,则可以关闭。
Yes 在Restrained上阻止用户访问虚拟主机根目录中的文件,即使有符号链接指向虚拟主机根目录以外的文件。
完成配置后,单击 ** 保存 ** 按钮在 ** 虚拟主机 ** 行的右侧。
管理面板可能会显示提示执行 Graceful Restart 以将更改应用于配置. 您可以在此时执行 Graceful Restart,因为它不会影响配置步骤。
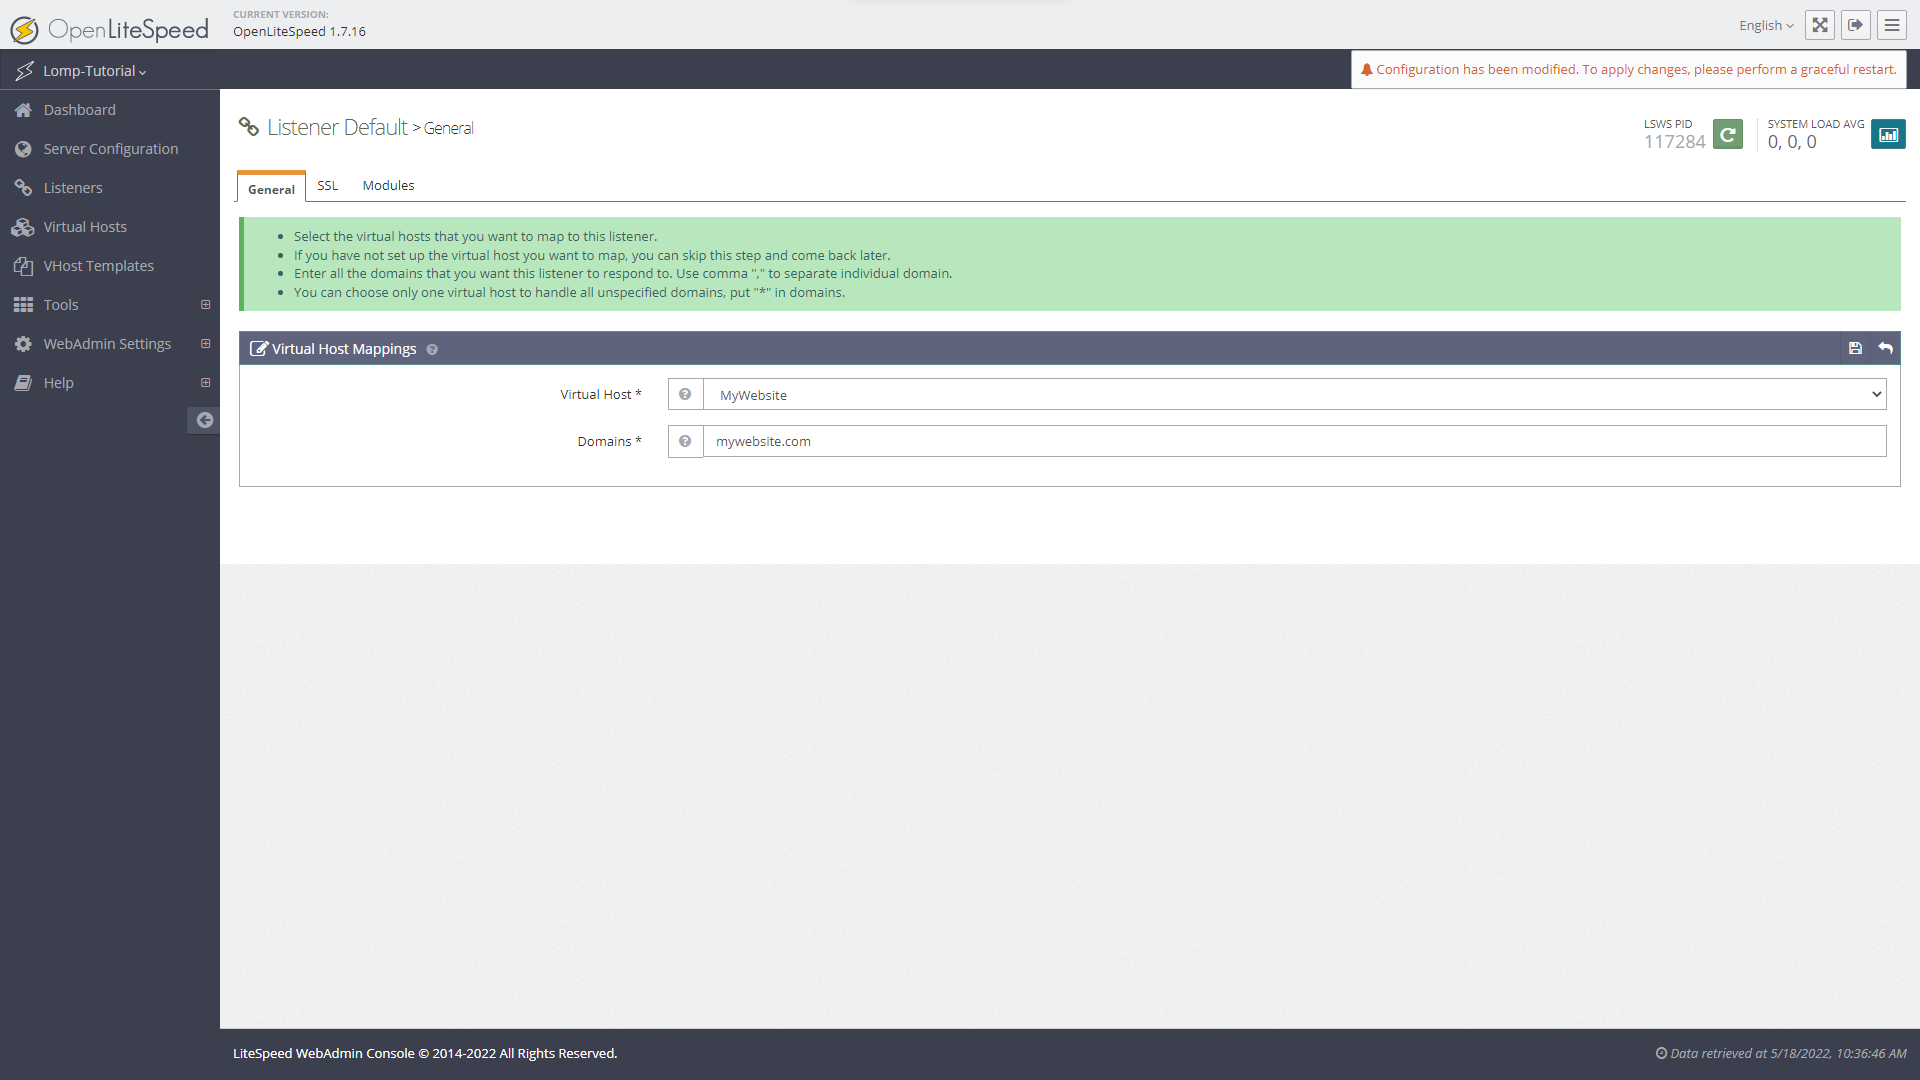
配置虚拟主机后,您将配置 Listener . 导航到 ** Admin Panel** 的 ** Listeners** 部分. 点击 ** Default** 倾听器,然后点击 ** Virtual Host Mappings** 表的右上角的加(** +** )按钮。
从虚拟主机字符串中,选择您在虚拟主机配置中分配的虚拟主机名称。
在域名文本框中,输入您将使用的完全合格和注册的域名来服务您配置的虚拟主机。在下面的屏幕截图中,样本值设置为mywebsite.com,但将其更新为您为your_domain使用的值。
<$>[注]
注: 默认倾听器已配置为在端口8088上倾听。用于到您的网站的 HTTP 流量的端口为80,如果启用了 SSL/TLS 加密,则您的 HTTPS 网站预计将在端口443上倾听。
点击 ** 保存 ** 在 ** 虚拟主机地图 ** 行右上方。
强烈建议您为您的网站启用 TLS 安全性。在普通设置下,更新安全选项到是并将端口从8088更改为443用于服务 HTTPS 页面的倾听者。
由于您在前提条件期间从证书授权机构生成的证书和密钥文件,您现在可以将其添加到您的 OpenLiteSpeed 设置中。
如果您遵循前提条件中提到的指南,Let's Encrypt 生成的证书和密钥文件将位于以下位置:
- 私钥文件 :
/etc/letsencrypt/live/your_domain.privkey.pem - 证书文件 :
/etc/letsencrypt/live/your_domain.fullchain.pem
对于 Let's Encrypt 生成的证书,您必须将 ** Chained Certificate** 选项设置为Yes,根据 Official Documentation for Configuring Let's Encrypt SSL on OpenLiteSpeed的建议。
以下为Listener Configuration** SSL 部分中的 TLS 证书和关键文件的示例配置(请确保更新文件路径以匹配您的域):
如果您遇到任何问题,您可以查看 OpenLiteSpeed 文档中配置 OpenLiteSpeed for SSL 的指南(https://openlitespeed.org/kb/lets-encrypt-ssl-on-openlitespeed/)。
配置和保存这些设置后,请点击屏幕右上角的 Graceful Restart 按钮来应用更改。
您现在已经配置了一个虚拟主机和一个倾听器,并为您的网站的所有流量设置了TLS加密,在配置您的DNS以将其映射到您的服务器的公共IP地址后,您的网站将在您指定的域中访问。
<$>[note] [label Enable HTTP/3 over ** QUIC** ] 注: OpenLiteSpeed 是第一个将 HTTP3 协议嵌入 Quick UDP Internet Connections (QUIC) 协议的开源服务器之一。
要启用 HTTP3/QUIC,您必须为您的域设置 SSL,并通过 Admin Panel 配置证书和密钥。
如果您想使用 HTTP3,您还必须允许UDP流量将您的服务器的端口443。
1sudo ufw allow 443/udp
美元
结论
在本教程中,您将设置一个 MariaDB 数据库服务器和一个 OpenLiteSpeed Web 服务器,可以为 PHP 应用程序提供指定的 PHP 版本,您现在可以在您的服务器上托管各种 PHP 应用程序和框架,如 WordPress, Laravel和 Joomla。
如果您还没有,您可以在 Web 服务器上设置 TLS 安全性,并通过 QUIC 启用 HTTP/3 以最大限度地利用 OpenLiteSpeed Web 服务器。