介绍
TensorFlow是开源的机器学习软件,用于训练神经网络。TensorFlow的神经网络以稳定的数据流图表的形式表达。图表中的每个节点代表了神经网络在多维数组中执行的操作。
TensorFlow是一个深度学习(LINK0)软件系统,它适用于信息检索,正如Google在其机器学习人工智能系统(RankBrain)中的搜索排名中所证明的那样。TensorFlow可以执行图像识别,如Google的Inception(LINK2)所示,以及人类语言音频识别。
TensorFlow 架构允许在桌面、服务器或移动设备中部署多个 CPU 或 GPU. 还提供与 Nvidia 的一种平行计算平台 CUDA的集成扩展。
在本教程中,我们将安装TensorFlow的仅支持CPU版本,此安装非常适合想要安装和使用TensorFlow的人,但没有Nvidia图形卡或不需要运行性能关键应用程序。
您可以通过多种方式安装 TensorFlow,每个方法都有不同的用例和开发环境:
- Python 和 Virtualenv : 在这种方法中,你会安装 TensorFlow 和在 Python 虚拟环境中使用 TensorFlow 所需的所有套件。这将你的 TensorFlow 环境与同一台机器上的其他 Python 程序隔离。
- Native pip :在这种方法中,你会在你的系统上安装 TensorFlow 全球范围内。这对于希望在多用户系统上让 TensorFlow 可供所有人使用的人来说是非常有用的。 这种安装方法不会在包含的环境中隔离 TensorFlow 并可能干扰其他 Python 安装或库。
- Docker :Docker 是一个集装箱运行环境,并且完全将其内容从系统上现有的包隔离出来
在本教程中,您将安装TensorFlow在Python虚拟环境中使用virtualenv。这种方法将TensorFlow安装隔离,并使事情快速运行.一旦完成安装,您将通过运行一个短的TensorFlow程序验证您的安装,然后使用TensorFlow进行图像识别。
前提条件
在您开始本教程之前,您将需要以下内容:
- 一个 Ubuntu 18.04 服务器,至少有 1 GB 的 RAM 设置,按照 Ubuntu 18.04 初始服务器设置指南,包括一个 sudo 非根用户和防火墙. 您需要至少 1 GB 的 RAM 才能成功地执行本教程中的最后一个例子。
- Python 3.3 或更高版本和
virtualenv安装。 按照 如何在 Ubuntu 18.04 上安装 Python 3来配置 Python 和virtualenv. - Git 安装,您可以按照 如何在 Ubuntu 18.04 上安装 Git来完成。
第1步:安装TensorFlow
在此步骤中,我们将创建一个虚拟环境并安装TensorFlow。
首先,创建一个项目目录,我们将其称为tf-demo,用于演示目的,但选择一个对您有意义的目录名称:
1mkdir ~/tf-demo
导航到您新创建的tf-demo目录:
1cd ~/tf-demo
然后创建一个名为tensorflow-dev的新虚拟环境,例如运行以下命令来创建环境:
1python3 -m venv tensorflow-dev
这将创建一个新的tensorflow-dev目录,该目录将包含您在启用此环境时安装的所有包,还包括pip和Python的独立版本。
现在启用您的虚拟环境:
1source tensorflow-dev/bin/activate
一旦激活,您将在您的终端中看到类似的东西:
1(tensorflow-dev)username@hostname:~/tf-demo $
现在您可以在虚拟环境中安装TensorFlow。
运行以下命令来安装并升级到 PyPi中可用的最新版本的 TensorFlow:
1pip install --upgrade tensorflow
TensorFlow 将安装,你应该得到输出,表明安装和任何依赖的包都成功了。
1[secondary_label Output]
2...
3Successfully installed absl-py-0.7.1 astor-0.7.1 gast-0.2.2 grpcio-1.19.0 h5py-2.9.0 keras-applications-1.0.7 keras-preprocessing-1.0.9 markdown-3.0.1 mock-2.0.0 numpy-1.16.2 pbr-5.1.3 protobuf-3.7.0 setuptools-40.8.0 tensorboard-1.13.1 tensorflow-1.13.1 tensorflow-estimator-1.13.0 termcolor-1.1.0 werkzeug-0.15.0 wheel-0.33.1
4...
5
6Successfully installed bleach-1.5.0 enum34-1.1.6 html5lib-0.9999999 markdown-2.6.9 numpy-1.13.3 protobuf-3.5.0.post1 setuptools-38.2.3 six-1.11.0 tensorflow-1.4.0 tensorflow-tensorboard-0.4.0rc3 werkzeug-0.12.2 wheel-0.30.0
<$>[note] 您可以使用以下命令随时禁用虚拟环境:
1deactivate
若要稍后重新激活环境,请导航到您的项目目录并运行 source tensorflow-dev/bin/activate。
现在你已经安装了TensorFlow,让我们确保TensorFlow安装工作。
步骤2 - 验证安装
为了验证TensorFlow的安装,我们将作为非根用户在TensorFlow中运行一个简单的程序,我们将使用典型的初学者的例子你好,世界!作为验证的一种形式。
要编写程序,请启动您的Python解释器:
1python
您将在您的终端中看到以下提示:
1>>>
这是Python解释器的提示,它表明它已经为您准备好开始输入一些Python陈述。
首先,键入此行以导入 TensorFlow 包,并将其作为本地变量 tf 提供。
1import tensorflow as tf
接下来,添加此代码行以设置你好,世界!的消息:
1hello = tf.constant("Hello, world!")
然后创建一个新的 TensorFlow 会话,并将其分配到变量sess:
1sess = tf.Session()
<$>[注] 注 :根据您的环境,您可能会看到以下输出:
1[secondary_label Output]
22019-03-20 16:22:45.956946: W tensorflow/core/platform/cpu_feature_guard.cc:45] The TensorFlow library wasn't compiled to use SSE4.1 instructions, but these are available on your machine and could speed up CPU computations.
32019-03-20 16:22:45.957158: W tensorflow/core/platform/cpu_feature_guard.cc:45] The TensorFlow library wasn't compiled to use SSE4.2 instructions, but these are available on your machine and could speed up CPU computations.
42019-03-20 16:22:45.957282: W tensorflow/core/platform/cpu_feature_guard.cc:45] The TensorFlow library wasn't compiled to use AVX instructions, but these are available on your machine and could speed up CPU computations.
52019-03-20 16:22:45.957404: W tensorflow/core/platform/cpu_feature_guard.cc:45] The TensorFlow library wasn't compiled to use AVX2 instructions, but these are available on your machine and could speed up CPU computations.
62019-03-20 16:22:45.957527: W tensorflow/core/platform/cpu_feature_guard.cc:45] The TensorFlow library wasn't compiled to use FMA instructions, but these are available on your machine and could speed up CPU computations.
這告訴你,你有一個 指令集,它有可能被用 TensorFlow 優化以達到更好的性能. 如果你看到這個,你可以安全地忽略它並繼續。
最后,输入此代码行以打印您在以前的代码行中构建的你好 TensorFlow 会话的结果:
在Python 3中,sess.run()将返回一个字节字符串,如果单独运行print(sess.run(hello)),它将返回为b’Hello, world!。
1print(sess.run(hello).decode())
您将在您的控制台中看到此输出:
1[secondary_label Output]
2Hello, world!
这表明一切都在工作,你可以开始使用TensorFlow。
通过按CTRL+D或键入quit()来退出 Python 交互式控制台。
接下来,让我们使用TensorFlow的图像识别API来更熟悉TensorFlow。
步骤 3 — 使用 TensorFlow 用于图像识别
现在TensorFlow已安装,您通过运行一个简单的程序验证了它,我们可以看看TensorFlow的图像识别功能。
为了分类一个图像,你需要训练一个模型,然后你需要写一些代码来使用该模型. 要了解更多关于机器学习的概念,请考虑阅读[机器学习的介绍](https://andsky.com/tech/tutorials/an-introduction-to-machine-learning)。
TensorFlow提供一个模型和示例库(https://github.com/tensorflow/models),包括代码和训练有素的图像分类模型。
使用 Git 将 TensorFlow 模型存储库从 GitHub 克隆到您的项目目录:
1git clone https://github.com/tensorflow/models.git
您将收到以下输出,因为Git将存储库检查到一个名为模型的新文件夹:
1[secondary_label Output]
2Cloning into 'models'...
3remote: Enumerating objects: 32, done.
4remote: Counting objects: 100% (32/32), done.
5remote: Compressing objects: 100% (26/26), done.
6remote: Total 24851 (delta 17), reused 12 (delta 6), pack-reused 24819
7Receiving objects: 100% (24851/24851), 507.78 MiB | 32.73 MiB/s, done.
8Resolving deltas: 100% (14629/14629), done.
9Checking out files: 100% (2858/2858), done.
转到模型 / 教程 / 图像 / 图像网目录:
1cd models/tutorials/image/imagenet
该目录包含使用 TensorFlow 识别图像的 classify_image.py 文件. 该程序在首次运行时从 `tensorflow.org 下载了一种训练有素的模型. 下载此模型需要您有 200 MB 的可用磁盘空间。
在本示例中,我们将分类 预先提供的 Panda 图像。
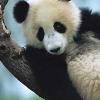
1python classify_image.py
您将收到类似于此的输出:
1[secondary_label Output]
2giant panda, panda, panda bear, coon bear, Ailuropoda melanoleuca (score = 0.89107)
3indri, indris, Indri indri, Indri brevicaudatus (score = 0.00779)
4lesser panda, red panda, panda, bear cat, cat bear, Ailurus fulgens (score = 0.00296)
5custard apple (score = 0.00147)
6earthstar (score = 0.00117)
您已使用 TensorFlow 的图像识别功能对您的第一个图像进行分类。
如果您想使用另一个图像,您可以通过将 -- image_file 参数添加到您的 python3 classify_image.py 命令中来做到这一点。
结论
在本教程中,您已在Python虚拟环境中安装了TensorFlow,并通过运行一些示例验证了TensorFlow的工作,您现在拥有工具,使您能够探索其他主题,包括 Convolutional Neural Networks和 Word Embeddings。
TensorFlow 的 程序员指南为 TensorFlow 开发提供了有用的资源和参考信息,您还可以探索 Kaggle,一个用于实际应用机器学习概念的竞争环境,这将使您与其他机器学习、数据科学和统计爱好者对抗。