介绍
Docker 是一个应用程序,使在容器中运行应用程序过程变得简单和容易,它们就像虚拟机一样,只是更便携式,更易于资源使用,更依赖主机操作系统。
安装Docker在Ubuntu 16.04 有两种方法:一种方法是将它安装在操作系统的现有安装上;另一种方法是使用一个名为Docker Machine(https://andsky.com/tech/tutorials/how-to-provision-and-manage-remote-docker-hosts-with-docker-machine-on-ubuntu-16-04)的工具将Docker自动安装在其上。
在本教程中,您将学习如何在 Ubuntu 16.04 的现有安装上安装和使用它。
前提条件
要遵循本教程,您将需要以下内容:
- 一个 Ubuntu 16.04 服务器设置了具有 sudo 特权和基本防火墙的非根用户,如在 Ubuntu 16.04 初始设置指南
- 在 Docker Hub上设置帐户,如果您想创建自己的图像并将它们推到 Docker Hub,如步骤 7 和 8 所示
步骤 1 - 安装 Docker
在官方 Ubuntu 16.04 存储库中可用的 Docker 安装包可能不是最新版本. 要获取最新版本,请从官方 Docker 存储库中安装 Docker。
首先,为了确保下载有效,请将官方 Docker 存储库的 GPG 密钥添加到您的系统中:
1curl -fsSL https://download.docker.com/linux/ubuntu/gpg | sudo apt-key add -
将 Docker 存储库添加到 APT 源:
1sudo add-apt-repository "deb [arch=amd64] https://download.docker.com/linux/ubuntu $(lsb_release -cs) stable"
接下来,从新添加的 Repo 更新包数据库以使用 Docker 包:
1sudo apt-get update
请确保您即将从Docker repo安装,而不是默认Ubuntu 16.04 repo:
1apt-cache policy docker-ce
你应该看到类似于以下的输出:
1[label Output of apt-cache policy docker-ce]
2docker-ce:
3  Installed: (none)
4  Candidate: 18.06.1~ce~3-0~ubuntu
5  Version table:
6     18.06.1~ce~3-0~ubuntu 500
7        500 https://download.docker.com/linux/ubuntu xenial/stable amd64 Packages
请注意,docker-ce尚未安装,但安装候选人来自 Ubuntu 16.04 的 Docker 存储库(xenial).
最后,安装Docker:
1sudo apt-get install -y docker-ce
Docker现在应该安装,戴蒙开始,并启用了启动过程。
1sudo systemctl status docker
输出应类似于以下,表明服务是活跃和运行的:
1[secondary_label Output]
2● docker.service - Docker Application Container Engine
3   Loaded: loaded (/lib/systemd/system/docker.service; enabled; vendor preset: enabled)
4   Active: active (running) since Thu 2018-10-18 20:28:23 UTC; 35s ago
5     Docs: https://docs.docker.com
6 Main PID: 13412 (dockerd)
7   CGroup: /system.slice/docker.service
8           ├─13412 /usr/bin/dockerd -H fd://
9           └─13421 docker-containerd --config /var/run/docker/containerd/containerd.toml
现在安装Docker不仅为您提供Docker服务(daemon),还为您提供Docker命令行实用程序或Docker客户端,我们将在本教程中进一步探索如何使用Docker命令。
步骤 2 — 执行Docker命令而无需Sudo(可选)
默认情况下,运行docker命令需要 root 权限 - 也就是说,您必须先用sudo命令执行命令。 它也可以由 docker 组中的用户运行,该命令在安装 Docker 时自动创建。
1[secondary_label Output]
2docker: Cannot connect to the Docker daemon. Is the docker daemon running on this host?.
3See 'docker run --help'.
如果您想避免在运行docker命令时键入sudo,请将您的用户名添加到docker组:
1sudo usermod -aG docker ${USER}
若要应用新的组会员资格,您可以退出服务器并重新登录,或者您可以键入以下内容:
1su - ${USER}
您将被要求输入您的用户密码以继续。之后,您可以通过键入以下方式确认您的用户已被添加到docker组中:
1id -nG
1[secondary_label Output]
2sammy sudo docker
如果您需要将用户添加到未登录的docker组中,请明示该用户名使用:
1sudo usermod -aG docker username
本文的其余部分假定您正在作为 docker 用户组中的用户运行docker命令. 如果您选择不,请将命令预先设置为sudo。
步骤 3 – 使用 Docker 命令
随着Docker安装和工作,现在是时候熟悉命令行实用程序了。使用docker是通过一个选项和命令链,然后是参数。
1docker [option] [command] [arguments]
要查看所有可用的子命令,键入:
1docker
从 Docker 18.06.1 开始,可用的子命令的完整列表包括:
 1[secondary_label Output]
 2
 3  attach Attach local standard input, output, and error streams to a running container
 4  build Build an image from a Dockerfile
 5  commit Create a new image from a container's changes
 6  cp Copy files/folders between a container and the local filesystem
 7  create Create a new container
 8  diff Inspect changes to files or directories on a container's filesystem
 9  events Get real time events from the server
10  exec Run a command in a running container
11  export Export a container's filesystem as a tar archive
12  history Show the history of an image
13  images List images
14  import Import the contents from a tarball to create a filesystem image
15  info Display system-wide information
16  inspect Return low-level information on Docker objects
17  kill Kill one or more running containers
18  load Load an image from a tar archive or STDIN
19  login Log in to a Docker registry
20  logout Log out from a Docker registry
21  logs Fetch the logs of a container
22  pause Pause all processes within one or more containers
23  port List port mappings or a specific mapping for the container
24  ps List containers
25  pull Pull an image or a repository from a registry
26  push Push an image or a repository to a registry
27  rename Rename a container
28  restart Restart one or more containers
29  rm Remove one or more containers
30  rmi Remove one or more images
31  run Run a command in a new container
32  save Save one or more images to a tar archive (streamed to STDOUT by default)
33  search Search the Docker Hub for images
34  start Start one or more stopped containers
35  stats Display a live stream of container(s) resource usage statistics
36  stop Stop one or more running containers
37  tag Create a tag TARGET_IMAGE that refers to SOURCE_IMAGE
38  top Display the running processes of a container
39  unpause Unpause all processes within one or more containers
40  update Update configuration of one or more containers
41  version Show the Docker version information
42  wait Block until one or more containers stop, then print their exit codes
若要查看特定命令可用的开关,请键入:
1docker docker-subcommand --help
若要查看有关 Docker 的全系统信息,请使用:
1docker info
步骤 4 – 使用 Docker 图像
默认情况下,它将这些图像从Docker Hub中提取,这是由Docker管理的Docker注册表,这是Docker项目背后的公司。任何人都可以在Docker Hub上构建和托管他们的Docker图像,所以大多数应用程序和Linux发行版你需要运行Docker容器的图像都在Docker Hub上托管。
若要检查您是否可以从 Docker Hub 访问和下载图像,请键入:
1docker run hello-world
在输出中,您应该看到以下消息,该消息表明 Docker 正在正常工作:
1[secondary_label Output]
2...
3Hello from Docker!
4This message shows that your installation appears to be working correctly.
5...
您可以使用docker命令与search子命令搜索在Docker Hub上可用的图像,例如,要搜索Ubuntu图像,键入:
1docker search ubuntu
该脚本将扫描 Docker Hub,并返回所有名称匹配搜索字符串的图像列表,在这种情况下,输出将类似于以下:
 1[secondary_label Output]
 2
 3NAME DESCRIPTION STARS OFFICIAL AUTOMATED
 4ubuntu Ubuntu is a Debian-based Linux operating sys…   8564                [OK]
 5dorowu/ubuntu-desktop-lxde-vnc Ubuntu with openssh-server and NoVNC 230                                     [OK]
 6rastasheep/ubuntu-sshd Dockerized SSH service, built on top of offi…   176                                     [OK]
 7consol/ubuntu-xfce-vnc Ubuntu container with "headless" VNC session…   129                                     [OK]
 8ansible/ubuntu14.04-ansible Ubuntu 14.04 LTS with ansible 95                                      [OK]
 9ubuntu-upstart Upstart is an event-based replacement for th…   91                  [OK]
10neurodebian NeuroDebian provides neuroscience research s…   54                  [OK]
111and1internet/ubuntu-16-nginx-php-phpmyadmin-mysql-5 ubuntu-16-nginx-php-phpmyadmin-mysql-5 48                                      [OK]
12ubuntu-debootstrap debootstrap --variant=minbase --components=m…   39                  [OK]
13nuagebec/ubuntu Simple always updated Ubuntu docker images w…   23                                      [OK]
14tutum/ubuntu Simple Ubuntu docker images with SSH access 18
15i386/ubuntu Ubuntu is a Debian-based Linux operating sys…   14
161and1internet/ubuntu-16-apache-php-7.0 ubuntu-16-apache-php-7.0 13                                      [OK]
17ppc64le/ubuntu Ubuntu is a Debian-based Linux operating sys…   12
18eclipse/ubuntu_jdk8 Ubuntu, JDK8, Maven 3, git, curl, nmap, mc, …   6                                       [OK]
191and1internet/ubuntu-16-nginx-php-5.6-wordpress-4 ubuntu-16-nginx-php-5.6-wordpress-4 6                                       [OK]
20codenvy/ubuntu_jdk8 Ubuntu, JDK8, Maven 3, git, curl, nmap, mc, …   4                                       [OK]
21darksheer/ubuntu Base Ubuntu Image -- Updated hourly 4                                       [OK]
22pivotaldata/ubuntu A quick freshening-up of the base Ubuntu doc…   2
231and1internet/ubuntu-16-sshd ubuntu-16-sshd 1                                       [OK]
24smartentry/ubuntu ubuntu with smartentry 1                                       [OK]
25ossobv/ubuntu Custom ubuntu image from scratch (based on o…   0
26paasmule/bosh-tools-ubuntu Ubuntu based bosh-cli 0                                       [OK]
271and1internet/ubuntu-16-healthcheck ubuntu-16-healthcheck 0                                       [OK]
28pivotaldata/ubuntu-gpdb-dev Ubuntu images for GPDB development 0
在 OFFICIAL 列中, ** OK** 表示由该项目背后的公司构建和支持的图像。一旦您确定了您想要使用的图像,您可以使用拖子命令将其下载到您的计算机。
1docker pull ubuntu
在下载图像后,您可以使用下载图像使用运行子命令运行一个容器.如果在使用运行子命令执行docker时没有下载图像,则 Docker 客户端首先将下载图像,然后使用它运行一个容器:
1docker run ubuntu
要查看已下载到您的计算机的图像,键入:
1docker images
输出应该与以下相似:
1[secondary_label Output]
2REPOSITORY TAG IMAGE ID CREATED SIZE
3ubuntu latest ea4c82dcd15a 16 hours ago 85.8MB
4hello-world latest 4ab4c602aa5e 5 weeks ago 1.84kB
正如您将在本教程中稍后看到的那样,您用于运行容器的图像可以被修改并用于生成新图像,然后可以上传(_pushed_是技术术语)到Docker Hub或其他Docker注册表。
步骤 5 – 运行 Docker 容器
你在上一步中运行的你好世界容器是发出测试消息后运行的和离开的容器的一个例子。容器比这更有用,并且可以互动。
作为一个例子,让我们使用Ubuntu的最新图像运行一个容器. -i 和 ** -t** 交换机的组合为您提供交互式容器访问:
1docker run -it ubuntu
<$>[注]
** 注:** 运行命令的默认行为是启动新容器.一旦运行前一命令,您将打开第二个ubuntu容器的壳界面。
您的命令提示应该改变以反映您现在在容器内部工作的事实,并应采取以下形式:
1[secondary_label Output]
2root@9b0db8a30ad1:/#
<$>[注]
注: 请记住命令提示中的容器ID 在上一个示例中,它是 9b0db8a30ad1。
现在您可以运行容器内部的任何命令,例如,让我们更新容器内部的包数据库,您不需要用sudo预先定义任何命令,因为您作为 root 用户在容器内部运行:
1[environment second]
2apt-get update
然后安装任何应用程序,让我们安装Node.js:
1[environment second]
2apt-get install -y nodejs
此操作将 Node.js 安装到官方 Ubuntu 存储库中的容器中. 安装完成后,请验证 Node.js 已安装:
1[environment second]
2node -v
您将看到在您的终端中显示的版本号:
1[secondary_label Output]
2[environment second]
3v8.10.0
您在容器内部所做的任何更改只适用于该容器。
要退出容器,请在提示处键入退出。
让我们来看看我们系统上的集装箱的管理。
步骤6:管理 Docker 容器
使用 Docker 一段时间后,您的计算机上将有许多活跃(运行)和不活跃的容器。
1docker ps
您将看到类似于以下的输出:
1[secondary_label Output]
2CONTAINER ID IMAGE COMMAND CREATED
在本教程中,你开始了三个容器;一个来自你好世界图像和两个来自ubuntu图像。
要查看所有容器 - 活跃和不活跃 - 使用-a交换机运行docker ps:
1docker ps -a
你会看到类似于此的输出:
1[secondary_label Output]
2CONTAINER ID IMAGE COMMAND CREATED STATUS PORTS NAMES
39b0db8a30ad1 ubuntu              "/bin/bash"         21 minutes ago Exited (0) About a minute ago xenodochial_neumann
4d7851eb12e23 ubuntu              "/bin/bash"         24 minutes ago Exited (0) 24 minutes ago boring_chebyshev
5d54945b6510b hello-world         "/hello"            32 minutes ago Exited (0) 32 minutes ago youthful_roentgen
要查看您创建的最新容器,请通过-l开关:
1docker ps -l
1[secondary_label Output]
2CONTAINER ID IMAGE COMMAND CREATED STATUS PORTS NAMES
39b0db8a30ad1 ubuntu              "/bin/bash"         22 minutes ago Exited (127) About a minute ago xenodochial_neumann
要启动一个停止的容器,请使用docker start,然后是容器ID或容器名称。
1docker start 9b0db8a30ad1
容器将启动,您可以使用docker ps查看其状态:
1[secondary_label Output]
2CONTAINER ID IMAGE COMMAND CREATED STATUS PORTS NAMES
39b0db8a30ad1 ubuntu              "/bin/bash"         23 minutes ago Up 11 seconds xenodochial_neumann
要阻止运行容器,请使用docker stop,然后是容器ID或名称.这次,我们将使用Docker分配给容器的名称,即xenodochial_neumann:
1docker stop xenodochial_neumann
一旦您决定不再需要一个容器,请使用docker rm命令删除它,再次使用容器ID或名称。
1docker rm youthful_roentgen
您可以使用--name交换机启动一个新的容器并给它一个名称,您也可以使用--rm交换机创建一个在停止时自行移除的容器,请参阅docker run help命令,了解有关这些选项和其他信息。
容器可以转化为图像,您可以使用这些图像来构建新的容器。
步骤 7 — 对 Docker 图像的容器进行更改
当您启动 Docker 图像时,您可以创建、修改和删除文件,就像您可以使用虚拟机一样。您所做的更改只适用于该容器。
本节向您展示如何将容器的状态保存为新 Docker 图像。
在 Ubuntu 容器内安装 Node.js 后,您现在有一个容器运行图像,但容器与您创建它时使用的图像不同。
要做到这一点,请使用以下命令结构对新 Docker 图像实例进行更改:
1docker commit -m "What did you do to the image" -a "Author Name" container-id repository/new_image_name
-m 交换器用于请求信息,帮助您和其他人知道您所做的更改,而 ** -a** 用于指定作者。 container ID 是您在启动交互式 Docker 会话时在教程中提到的信息。
例如,对于用户 sammy ,其容器ID为 d9b100f2f636,该命令将是:
1docker commit -m "added node.js" -a "sammy" d9b100f2f636 sammy/ubuntu-nodejs
<$>[注] 注: 当你 commit 一个图像时,新图像被保存在本地,即在您的计算机上。
完成此操作后,现在在您的计算机上列出 Docker 图像应该显示新图像,以及原始图像:
1docker images
结果应该是这样的:
1[secondary_label Output]
2REPOSITORY TAG IMAGE ID CREATED SIZE
3sammy/ubuntu-nodejs latest 6a1784a63edf 2 minutes ago 170MB
4ubuntu latest ea4c82dcd15a 17 hours ago 85.8MB
5hello-world latest 4ab4c602aa5e 5 weeks ago 1.84kB
在上面的例子中, ubuntu-nodejs 是新的图像,它是从Docker Hub的现有ubuntu图像中提取的。大小差异反映了所做的更改。
您还可以从Dockerfile构建图像,这允许您在新图像中自动安装软件。
现在让我们与其他人分享新图像,以便他们可以从中创建容器。
步骤 8 — 将 Docker 图像推到 Docker 存储库
在从现有图像创建新图像后,下一个逻辑步骤是将其与几个朋友共享,在Docker Hub上的整个世界或您可以访问的其他Docker注册表。
要了解如何创建自己的私人 Docker 注册表,请参阅 如何在 Ubuntu 14.04 上设置私人 Docker 注册表。
若要按一下圖像,請先登入 Docker Hub:
1docker login -u docker-registry-username
您将被要求使用您的 Docker Hub 密码进行身份验证. 如果您指定了正确的密码,则该身份验证应该成功。
<$>[note] ** 注意:** 如果您的 Docker 注册表用户名与您创建图像时使用的本地用户名不同,则需要用您的注册表用户名标记您的图像。
1docker tag sammy/ubuntu-nodejs docker-registry-username/ubuntu-nodejs
美元
然后你可以推自己的图像使用:
1docker push docker-registry-username/ubuntu-nodejs
要将ubuntu-nodejs图像推到 sammy 存储库,命令将是:
1docker push sammy/ubuntu-nodejs
该过程可能需要一些时间来完成,因为它上传图像,但当完成时,输出将看起来像这样:
1[secondary_label Output]
2The push refers to repository [docker.io/sammy/ubuntu-nodejs]
31aa927602b6a: Pushed
476c033092e10: Pushed
52146d867acf3: Pushed
6ae1f631f14b7: Pushed
7102645f1cf72: Pushed
8latest: digest: sha256:2be90a210910f60f74f433350185feadbbdaca0d050d97181bf593dd85195f06 size: 1362
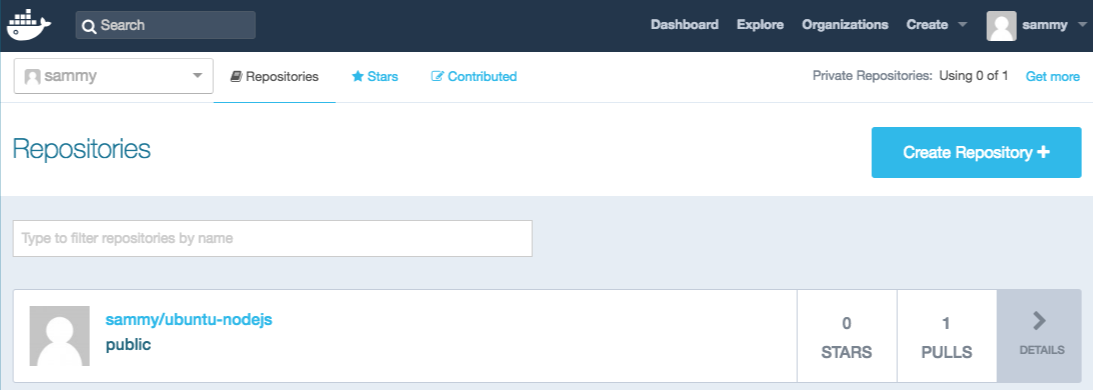
将图像推到注册表后,该图像应列入您的帐户仪表板,如下图像所示。
如果推试导致以下错误,很可能你没有登录:
1[secondary_label Output]
2The push refers to a repository [docker.io/sammy/ubuntu-nodejs]
3e3fbbfb44187: Preparing
45f70bf18a086: Preparing
5a3b5c80a4eba: Preparing
67f18b442972b: Preparing
73ce512daaf78: Preparing
87aae4540b42d: Waiting
9unauthorized: authentication required
登录,然后重复 push 尝试。
结论
在本教程中,你已经学会了如何开始在Ubuntu 16.04上使用Docker的基本知识,就像大多数开源项目一样,Docker是从快速发展的代码库中构建的,所以习惯于访问该项目的博客页面(https://blog.docker.com/)以获取最新的信息。
有关进一步的探索,请参阅 DigitalOcean 社区中的 其他 Docker 教程。