前提条件
本教程将说明在数字海洋VPS上安装和配置Slim Framework所需的步骤. 到本教程结束时,您将有一个有组织的Slim Framework工作实例,完整的文件夹结构,您可以基于您的项目。
本教程假设您在Ubuntu上安装了LAMP(或您最喜欢的)堆栈. 如果您没有,您可以参考这篇文章,帮助您 在Ubuntu上安装LAMP堆栈。
如果你的应用程序不使用MySQL,你可以跳过安装它。你需要安装的最小是Apache Web 服务器(与Mod_Rewrite)和PHP(最少 5.3 版本)。
快速设置前提条件
1、安装Apache
1apt-get update
2apt-get install apache2
2、安装PHP
1apt-get install php5 libapache2-mod-php5 php5-mcrypt
启用mod_rewrite
1a2enmod rewrite
更改 Apache 配置文件
更改 Apache 配置文件并将 AllowOverride None 更改为 AllowOverride All 用于文档根。
/etc/apache2/apache2.conf/etc/apache2/sites-enabled/000-default/etc/apache2/sites-available/default
在配置文件中,查找看起来如下的部分:
1<Directory /var/www/>
2        Options Indexes FollowSymLinks
3        AllowOverride None
4        Require all granted
5</Directory>
将此更改为以下,并保存文件:
1<Directory /var/www/>
2        Options Indexes FollowSymLinks
3        AllowOverride All
4        Require all granted
5</Directory>
5、重新启动Apache
1service apache2 restart
本教程还假定你熟悉了 Linux 基本。
什么是Slim框架?
Slim 是市场上最受欢迎的开源 PHP 微框架之一. 它非常高效,快速,易于使用. 虽然它非常适合开发小到中等规模的 Web 应用程序,但它也可以非常有效地用于构建大型可扩展的 PHP 应用程序。
Slim 配备了您在框架中期望的最常见的实用工具:
- 易于使用、强大和灵活的路由器
- 定制视图以渲染模板
- 安全 Cookie
- HTTP 缓存
- 易于使用的错误处理和调试
- 简单的配置
安装
安装 Slim Framework 包括三个步骤
- 下载Slim Framework 2.从Zip文件中提取 3.将Slim Framework复制到一个常见的位置
1、下载Slim框架
您可以使用以下命令下载 Slim Framework:
1wget https://github.com/codeguy/Slim/zipball/master
这将将框架作为一个zip文件,并将其存储在当前目录中,名称为master。
2、从 zip 文件中提取
可以使用以下命令提取 zip 文件的内容:
1unzip master -d ./
注: 如果您收到一个错误,即 unzip 未安装,您可以使用命令 apt-get install unzip 安装它,然后执行上面的命令来提取所有文件。
上面的命令将将文件提取到名为codeguy-Slim-3a2ac72的文件夹中,该文件夹包含名为Slim的文件夹,它是框架文件夹。
将Slim框架复制到一个常见的位置
我们现在将将codeguy-Slim-3a2ac72/Slim文件夹复制到一个常见的位置,如/usr/local/Slim,从那里它将可访问使用Slim的这个服务器上的所有项目。
让我们使用以下命令复制文件夹:
1cp -r ./codeguy-Slim-3a2ac72/Slim /usr/local/Slim
** 注意:** 提取的文件夹的名称(在这种情况下,‘codeguy-Slim-3a2ac72’)如果您下载了Slim的不同版本,可能会略有不同。
一旦完成,使用Slim Framework的任何项目都可以从这个位置引用它。
** 重要提示:** 许多教程在公共文件夹/文档根中安装框架(如 /var/www/Slim)。
组织你的Slim基于项目
Slim 项目通常分布在三个主要目录中:
1. Slim 框架目录 此目录包含框架文件,是上一步复制的目录(/usr/local/Slim)
2.项目目录 此目录包含您的项目文件,如路由器,视图,模型等作为一个微框架,Slim不强制任何特定的项目结构。
此目录可以位于服务器上的任何地方,但理想情况下它不应该位于一个可访问的网站位置. 您可以将其放置在/usr/local或在您的主文件夹中. 例如,如果您在项目中创建一个名为HelloSlim的文件夹,它可能会位于/usr/local/HelloSlim或~/HelloSlim或您喜欢的任何其他位置。
以下是该文件夹中的文件如何安排的一种方法:
 1HelloSlim
 2|- Routes
 3|  |- route1.php
 4|  |- route2.php
 5|- Models
 6|  |- model1.php
 7|  |- model2.php
 8|- Views
 9|  |- footer.php
10|  |- header.php
11|  |- sidebar.php
12|  |- view1.php
13|  |- view2.php
14|- Class
15|  |- class1.php
16|  |- class2.php
17|- routes.php       //contains 'include' statements for all routes in the 'Routes' folder
18|- includes.php     //contains 'include' statements for all models/classes in the 'Models/Class' folders
您可以通过执行以下命令创建此文件夹结构:
1mkdir /usr/local/HelloSlim
2mkdir /usr/local/HelloSlim/Routes
3mkdir /usr/local/HelloSlim/Models
4mkdir /usr/local/HelloSlim/Views
5mkdir /usr/local/HelloSlim/Class
** 注意: ** 您可以使用此文件夹结构或完全更改以适应您的偏好。
3. 文档根/公共文件夹
这是一个可访问的网络文件夹(通常位于 /var/www)。
- index.php *.htaccess
此文件夹还将包含所有项目脚本、风格和图像文件. 要保持事物的组织,您可以将这些文件夹分别分为脚本,风格和图像文件夹。
以下是文档根文件夹的示例结构:
 1Document Root (eg. /var/www/)
 2|- scripts
 3|  |- jquery.min.js
 4|  |- custom.js
 5|- styles
 6|  |- style.css
 7|  |- bootstrap.min.css
 8|- images
 9|  |- logo.png
10|  |- banner.jpg
11|- .htaccess
12|- index.php
文件内容
假设您的项目具有上述定义的结构,您将需要分别填写.htaccess和index.php文件(在文档根中)中的下列内容:
.htaccess
1RewriteEngine On
2RewriteCond %{REQUEST_FILENAME} !-f
3RewriteRule ^ index.php [QSA,L]
标签:index.php
 1<?php
 2
 3require '/usr/local/Slim/Slim.php';     //include the framework in the project
 4\Slim\Slim::registerAutoloader();       //register the autoloader
 5
 6$projectDir = '/usr/local/HelloSlim';   //define the directory containing the project files
 7
 8require "$projectDir/includes.php";     //include the file which contains all the project related includes
 9
10$app = new \Slim\Slim(array(
11    'templates.path' => '/usr/local/HelloSlim/Views'
12));      //instantiate a new Framework Object and define the path to the folder that holds the views for this project
13
14require "$projectDir/routes.php";       //include the file which contains all the routes/route inclusions
15
16$app->run();                            //load the application
要完成本教程,假设项目已按前一节定义的文件夹结构进行排序,则routes.php和includes.php文件(在项目目录中)应包含以下内容:
routes.php
1<?php
2
3require '/usr/local/HelloSlim/Routes/route1.php';
4require '/usr/local/HelloSlim/Routes/route2.php';
** 注意: ** 您可以直接在此文件中创建路线,而不是包括其他包含路线的文件。
此分類上一篇:php
1<?php
2
3require "/usr/local/HelloSlim/Class/class1.php";
4require "/usr/local/HelloSlim/Class/class2.php";
5
6require "/usr/local/HelloSlim/Models/model1.php";
7require "/usr/local/HelloSlim/Models/model2.php";
Sample Slim 应用程序
现在你知道如何设置Slim应用程序,让我们创建一个简单的应用程序,它可以做到以下几点:
- 处理静态路线(GET & POST)
- 处理动态路线
- 使用视图
** 注意: ** 此样本应用程序将假定Slim已部署如上所述。
让我们来绘制这个样本应用程序的要求:
| Route | Type | Action |
|---|---|---|
| /hello | GET (static) | Displays a static View |
| /hello/NAME | GET (dynamic) | Displays a dynamic View |
| /greet | POST | Displays a View after a POST request |
此项目将需要在应用程序文件夹中创建以下文件(/usr/local/HelloSlim/):
 1HelloSlim
 2|- Routes
 3|  |- getRoutes.php
 4|  |- postRoutes.php
 5|- Views
 6|  |- footer.php
 7|  |- header.php
 8|  |- hello.php
 9|  |- greet.php
10|- routes.php
公共文件夹/文档根将看起来如下:
以下是文档根文件夹的示例结构:
1Document Root (eg. /var/www/)
2|- .htaccess
3|- index.php
现在填充这些文件如下:
网页 / 网页 / 网页 / www / htaccess
1RewriteEngine On
2RewriteCond %{REQUEST_FILENAME} !-f
3RewriteRule ^ index.php [QSA,L]
您可以访问: www/index.php
 1<?php
 2
 3require '/usr/local/Slim/Slim.php';     //include the framework in the project
 4\Slim\Slim::registerAutoloader();       //register the autoloader
 5
 6$projectDir = '/usr/local/HelloSlim';   //define the directory containing the project files
 7
 8$app = new \Slim\Slim(array(
 9    'templates.path' => '/usr/local/HelloSlim/Views'
10));      //instantiate a new Framework Object and define the path to the folder that holds the views for this project
11
12require "$projectDir/routes.php";       //include the file which contains all the routes/route inclusions
13
14$app->run();                            //load the application
3 /usr/本地/HelloSlim/路线/getRoutes.php
 1<?php
 2
 3$app->get('/', function(){
 4    echo 'This is a simple starting page';
 5});
 6
 7//The following handles any request to the /hello route
 8
 9$app->get('/hello', function() use ($app){
10    // the following statement invokes and displays the hello.php View
11    $app->render('hello.php');
12});
13
14//The following handles any dynamic requests to the /hello/NAME routes (like /hello/world)
15
16$app->get('/hello/:name', function($name) use ($app){
17    // the following statement invokes and displays the hello.php View. It also passes the $name variable in an array so that the view can use it.
18    $app->render('hello.php', array('name' => $name));
19});
4. /usr/本地/HelloSlim/路线/postRoutes.php
 1<?php
 2
 3 //The following handles the POST requests sent to the /greet route
 4
 5$app->post('/greet', function() use ($app){
 6    //The following statement checks if 'name' has been POSTed. If it has, it assigns the value to the $name variable. If it hasn't been set, it assigns a blank string.
 7    $name = (null !== $app->request->post('name'))?$app->request->post('name'):'';
 8
 9    //The following statement checks if 'greeting' has been POSTed. If it has, it assigns the value to the $greeting variable. If it hasn't been set, it assigns a blank string.
10    $greeting = (null !== $app->request->post('greeting'))?$app->request->post('greeting'):'';
11
12    // the following statement invokes and displays the 'greet.php' View. It also passes the $name & $greeting variables in an array so that the view can use them.
13    $app->render('greet.php', array(
14        'name' => $name,
15        'greeting' => $greeting
16    ));
17});
5、 /usr/local/HelloSlim/Views/footer.php
1<small>Copyright notice...</small>
2    </body>
3</html>
6、 /usr/local/HelloSlim/Views/header.php
<!DOCTYPE html>
      <html>
          <head>
               <title>Sample Slim Application</title>
          </head<
          <body>
7、 /usr/local/HelloSlim/Views/hello.php
 1***
 2<?php include('header.php'); ?>
 3
 4***
 5<h1>Hello <?php echo isset($name)?$name:''; ?></h1>
 6<!-- The above line handles both the dynamic and the static GET routes that we implemented in the getRoutes.php file.
 7
 8***
 9
10<h2>Send a greeting</h2>
11<form method='POST' action='/greet'>
12    <label>Name</label><br>
13    <input name='name' placeholder='Who do you want to greet?'><br>
14    <label>Greeting</label><br>
15    <input name='greeting' placeholder='Your greeting message'><br>
16    <input type='submit' value='Greet!'>
17</form>
18
19***
20<?php include('footer.php'); ?>
8、 /usr/local/HelloSlim/Views/greet.php
1<?php
2
3    include('header.php');
4
5    echo "<p>$greeting, $name</p><p><a href='/hello'>First Page</a></p>";
6
7    include('footer.php');
9. /usr/local/HelloSlim/routes.php
1<?php
2
3    include 'Routes/getRoutes.php';
4    include 'Routes/postRoutes.php';
样本应用程序屏幕截图
如果你访问你的新创建的样本应用程序在http://yourdomain.com/`,你会看到这样的东西:
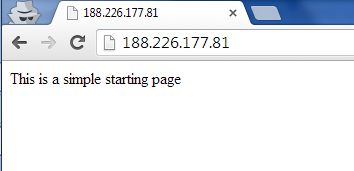
** 注意:** 如果您不使用域名与您的数字海洋滴,使用滴的IP地址。
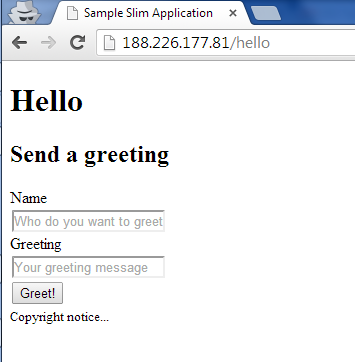
如果您访问http://yourdomain.com/hello,您将收到以下信息:
如果您访问http://yourdomain.com/hello/World,您将收到以下信息:
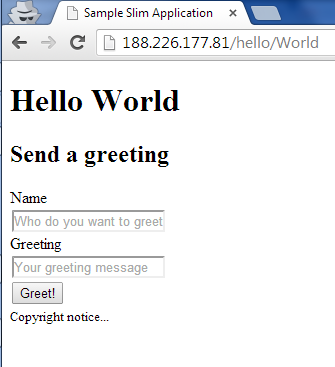
注: 如果您用另一个词代替URL中的世界,页面的内容将相应地改变。
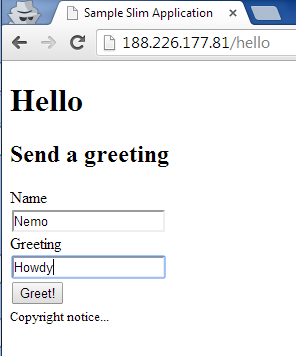
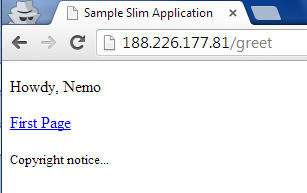
要测试 POST 路线,请在可用的字段中输入一个名称和问候,然后按下问候!按钮:
点击问候!按钮后,你应该得到如下的东西:
最后一句话
现在你已经安装了Slim框架的精心组织的工作实例,你已经准备好开始工作,如果你需要Slim的额外帮助,你可以随时参考全面的官方文档。