作者选择了 开源精神疾病以作为 写给捐赠计划的一部分获得捐赠。
介绍
测试对于确保软件产品按预期工作至关重要。传统上,QA团队通常会手动执行许多网页应用程序的端到端测试。然而,QA团队花费大量精力准备测试数据,实施测试,并在时间的推移下维持它们。测试也很困难,因为它们需要在多个服务、第三方依赖和数据库之间进行集成。这些问题就是为什么Web应用程序的组件测试很重要,现在软件开发人员和QA工程师都越来越关注。
Playwright,一个方便的工具,用于端到端测试和与网页浏览器的互动,最近开始支持组件测试。Playwright允许开发人员为他们的GUI编写测试,而无需等待后端服务完成,而无需在模拟服务器中创建一堆模拟API来集成。此外,Playwright还具有支持某些流行的网页框架的组件测试功能,如 React,一个开源的JavaScript库,用于构建用户界面。它还支持主要的浏览器,如 Chromium, Firefox,和基于浏览器的 [WebKit(INKL4])。你也可以使用多个客户端语言,如 [Java]([LINK
在本教程中,您将使用 React 部署一个天气应用程序,然后使用 Playwright 为应用程序编写和运行组件测试,以确保组件正常工作。
前提条件
要跟随本教程,您将需要以下内容:
- 一个 Ubuntu 20.04 服务器具有 sudo-enabled,非 root 用户和至少 2GB 的 RAM. 要开始,请遵循我们的 Initial Server Setup Guide for Ubuntu 20.04 ]。
- Node.js版本 16 或更高版本安装在您的服务器上。 要安装 Node.js,请遵循 Option 2我们的教程 How To Install Node.js on Ubuntu 20.04] 以确保您正在安装正确的版本。
- Git 安装在服务器上。 阅读我们的教程 How To Install Git on Ubuntu 20.04 安装 Git 如果它尚未安装。
步骤 1 — 使用 React 部署天气应用程序
在此步骤中,您将部署基于React的天气应用程序,您将需要这个教程. 该应用程序使用免费版本的 OpenWeather的API访问任何城市的当前天气数据。
要在您的服务器上部署应用程序,请先创建一个新的目录来存储应用程序的代码,然后更改到新创建的目录。
1mkdir Projects
2cd Projects
接下来,从 GitHub克隆应用程序代码:
1git clone https://github.com/do-community/react-component-testing-demo.git
然后,切换到react-component-testing-demo目录,并使用git checkout命令检查app分支:
1cd react-component-testing-demo
2git checkout app
接下来,安装天气应用程序的依赖:
1npm install
安装完成后,打开应用程序:
1npm run start
控制台将显示以下输出:
1[secondary_label Output]
2Compiled successfully!
3
4You can now view demo-playwright-component-testing in the browser.
5
6  Local:            http://localhost:3000/demo-playwright-component-testing
7  On Your Network:  http://192.168.1.7:3000/demo-playwright-component-testing
8
9Note that the development build is not optimized.
<$>[注意] 注意: 如果您在支持图形用户界面(GUI)的本地机器上执行这些命令,并且已经安装了 Chrome 或 Firefox 等浏览器,则天气应用程序将在导航到输出中显示的 URL 时打开: http://localhost:3000/demo-playwright-component-testing. 但是,如果您在远程服务器上执行这些命令,则需要通过 SSH 使用端口转发来打开本地机器上的应用程序。
在新终端中,运行以下命令:
1ssh -L 3000:localhost:3000 your_non_root_user@your_server_ip
在连接到服务器时,请在本地机器的网页浏览器上导航到 http://localhost:3000/demo-playwright-component-testing。
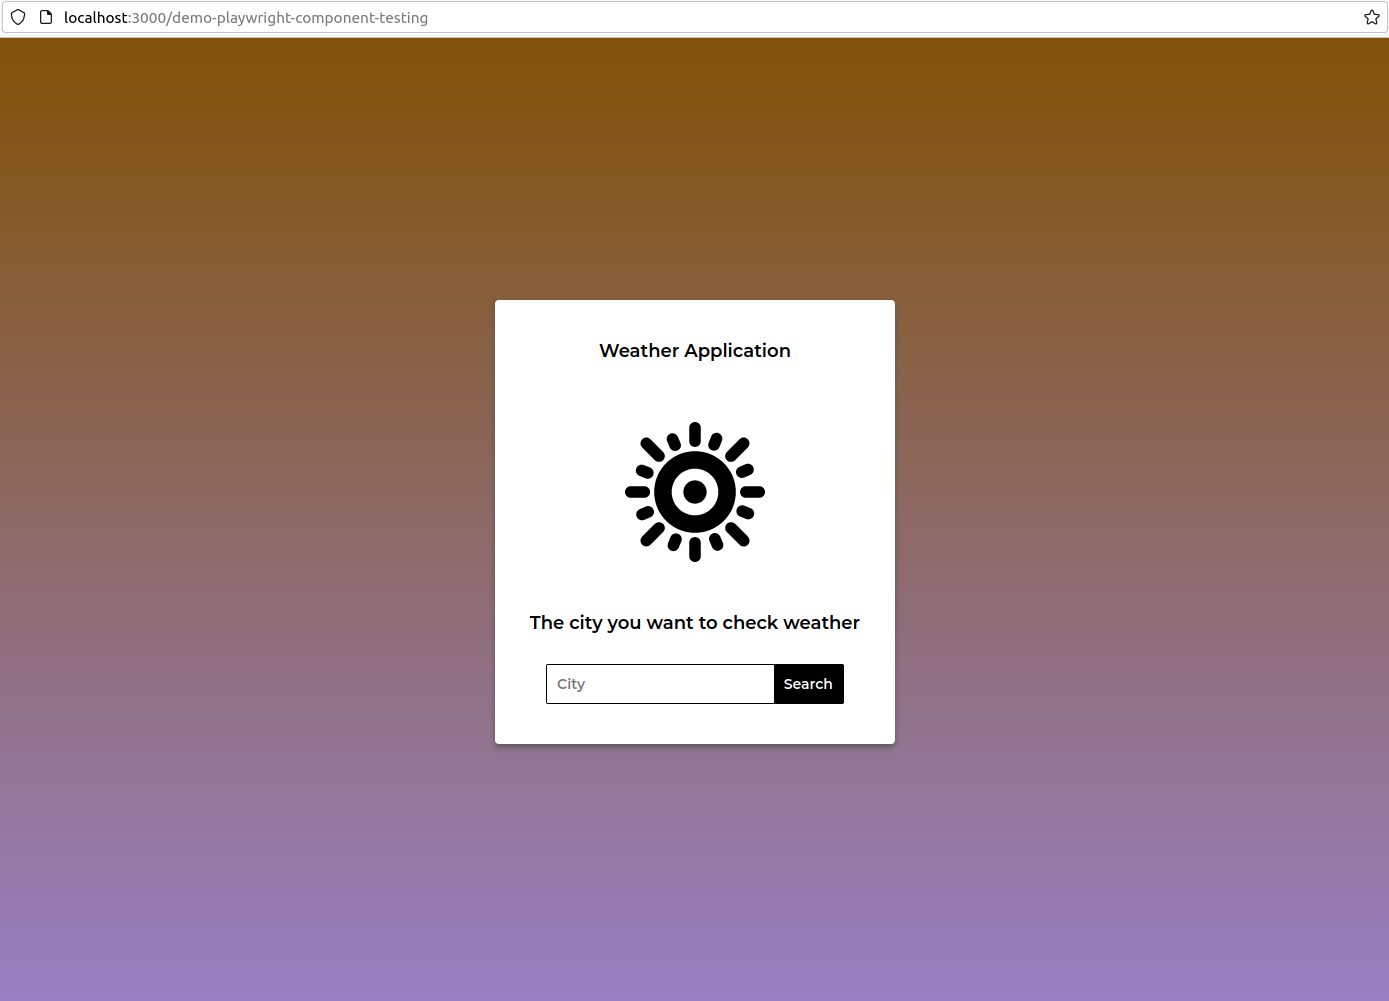
您的浏览器将打开应用程序的首页,显示一个 城市搜索框,用户将键入他们想要检查天气的城市:
在搜索框中输入汉诺伊 (位于越南),应用程序会显示汉诺伊的当前天气:
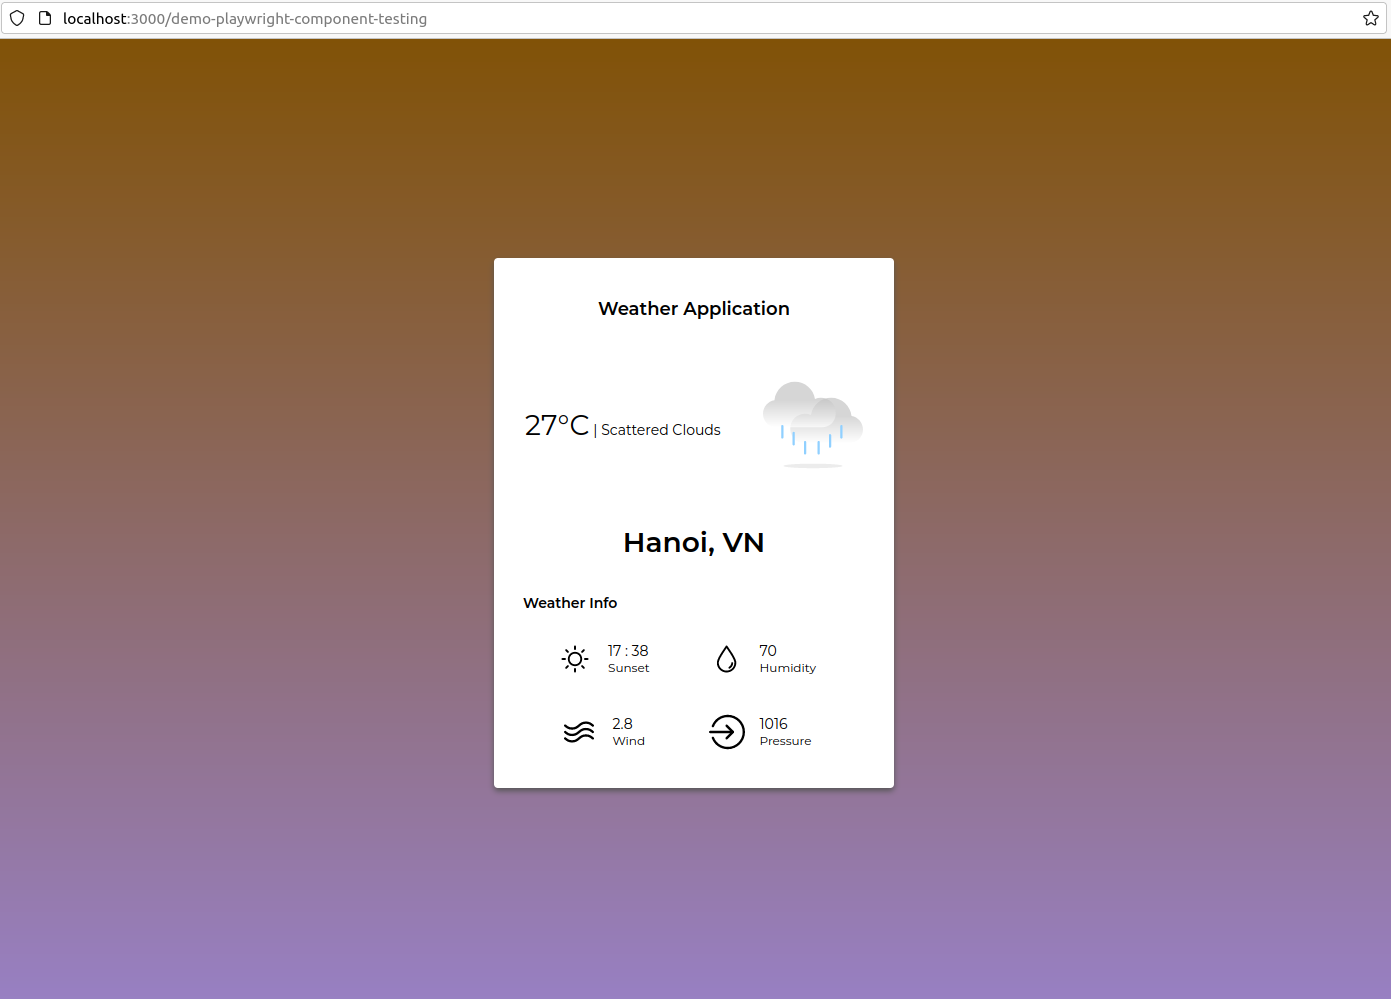
根據結果,當搜尋進行時,越南河內的天氣為27°C,雲分散,日落發生在17點38分,湿度為70%,風速為每秒2.8米(m/s),大氣壓力為1016公分巴斯克(hPa)。
现在您已经成功部署了应用程序,您将为其安装测试依赖。
步骤 2 – 安装测试依赖
在此步骤中,您将安装测试依赖,以便您可以在 步骤 3中使用 Playwright 实现组件测试。
首先,运行以下命令:
1npm init playwright@latest -- --ct
根据您选择的选择,无论您是使用 TypeScript还是 JavaScript,还是使用 React框架或 Vue框架进行开发,自动生成的代码都会有所不同。
您将在您的控制台中获得以下输出:
1[secondary_label Output]
2Need to install the following packages:
3  [email protected]
4Ok to proceed? (y)
然后按Y,然后按Enter,然后您将获得选择您是否希望在项目中使用TypeScript或JavaScript:
1[secondary_label Output]
2Getting started with writing end-to-end tests with Playwright:
3Initializing project in '.'
4? Do you want to use TypeScript or JavaScript? …
5  TypeScript
6▸ JavaScript
选择JavaScript,因为您将在以后的 步骤 3中使用它来测试组件。
1[secondary_label Output]
2? Which framework do you use? (experimental) …
3▸ react
4  vue
5  svelte
选择响应,因为这是天气应用程序使用的。输出将询问您是否想要安装Playwright浏览器:
1[secondary_label Output]
2? Install Playwright browsers (can be done manually via 'npx playwright install')? (Y/n) ‣ true
选择Y来安装它们,以便您以后不必手动安装它们。
接下来,您将被问及是否要安装操作系统依赖:
1[secondary_label Output]
2 Install Playwright operating system dependencies (requires sudo / root - can be done manually via 'sudo npx playwright install-deps')? (y/N) ‣ yes
选择Y,以便您无需手动安装依赖性,请注意,您需要输入当前运行机器的用户密码,以便安装系统依赖性。
现在将安装所有必要的依赖,以及三个浏览器:Chromium,Firefox和WebKit. 此外,创建了一个名为playwright的新目录,其中包括在测试过程中渲染组件所需的index.html和index.js文件。 此外,一个名为playwright-ct.config.js的新配置文件也被生成用于运行组件测试。 您可以自定义此配置文件以改变组件测试的行为,例如您是否希望它只在Chromium浏览器中运行。
<$>[注]
注:在package.json文件中应自动生成test-ct脚本,如下所示:
1"scripts": {
2    "start": "react-scripts start",
3    "test-ct": "playwright test -c playwright-ct.config.js"
4  },
您需要此脚本稍后在 步骤 5中运行应用程序组件测试。
您现在已经完成了组件测试的依赖设置,在下一步,您将为两个天气应用程序组件之一编写测试。
步骤 3 — 编写CityComponent的组件测试
天气应用程序有两个组件:‘CityComponent’和‘WeatherInfoComponent’. 在此步骤中,您将为‘CityComponent’编写组件测试的脚本。 在此代码中,您将为‘CityComponent’编写两个测试。第一个测试会检查城市输入框是否接受文本输入。第二个测试会检查‘搜索’按钮在按钮后是否执行‘fetchWeather’方法。
首先,导航到src目录:
1cd src
然后,创建测试目录来存储您的测试:
1mkdir tests
接下来,导航到新创建的目录:
1cd tests
现在,在测试目录中,使用nano或您喜爱的代码编辑器创建并打开名为CityComponent.spec.jsx的新测试文件:
1nano CityComponent.spec.jsx
每个测试框架都配备了测试文件的定义语法,以便测试运行者知道在他们想要收集测试文件并执行它们时在哪里寻找文件。
.jsx扩展是JavaScript XML的缩写,允许您在JavaScript文件中添加HTML标签. .jsx文件允许您在测试中安装CityComponent,并通过添加CityComponent标签来实现这一目标。
现在,您将开始构建您刚刚创建的 CityComponent.spec.jsx 文件. 将以下代码添加到您的文件中:
1[label src/tests/CityComponent.spec.jsx]
2import { test, expect } from '@playwright/experimental-ct-react';
3import { CityComponent } from '../modules/CityComponent';
在此代码中,您正在从 @playwright/experimental-ct-react库中导入 test和 expect方法,以便在 Playwright 中为您的测试运行组件测试。
使用第二个导入命令,您将CityComponent文件放入src/modules目录中,该文件实现了搜索页面的代码,允许用户输入城市名称并搜索城市的天气。
接下来,将以下代码添加到您的 CityComponent.spec.jsx 文件中:
1[label src/tests/CityComponent.spec.jsx]
2...
3
4const cityLocator = '[placeholder="City"]'
5const searchButtonLocator = '[type="submit"]'
6
7const cityName = 'Hanoi'
在Playwright中,您需要元素的UI locator才能与所需的UI元素进行交互。在这里,您定义了两个名为cityLocator和searchButtonLocator的const变量。
在第三行代码中,您正在创建一个新的变量cityName,以存储您要搜索的城市名称,在这种情况下,是Hanoi。
接下来,您将将您的第一个测试代码块添加到您的CityComponent.spec.jsx文件中,这将检查cityField是否接受文本值。
 1[label src/tests/CityComponent.spec.jsx]
 2...
 3
 4test('cityField accepts text input', async ({ mount }) => {
 5    const cityComponent = await mount(<CityComponent /> );
 6    const cityField = cityComponent.locator(cityLocator)
 7
 8    await cityField.fill(cityName)
 9
10    await expect(cityField).toHaveValue(cityName)
11});
在测试代码块中,您在 async 函数中添加了 mount 方法作为参数。这个 mount 方法来自您在 Step 2中使用 npm init playwright@latest -- --ct' 安装的 experimental-ct-react' 方法。
通过将async的关键字添加到测试块中,test('cityField accepts text input', async ({mount }) => {..}),您正在告诉Playwright以不同步的方式运行此测试。
接下来,您通过将CityComponent标签添加到mount方法来定义cityComponent。 React 框架也以非同步的方式运行代码,因此在与 React 组件一起工作时,您需要在安装CityComponent之前添加等待关键字。
然后,您可以使用其定位器找到cityField,您将其创建为cityLocator变量。
最后,您将cityField填写为cityName,并检查cityField是否具有与cityName相同的值。
现在,您将将您的第二个测试代码块添加到您的CityComponent.spec.jsx文件中,这将检查搜索按钮是否调用fetchWeather方法。
 1[label src/tests/CityComponent.spec.jsx]
 2...
 3
 4test('Click on `Search` button executes fetchWeather prop', async ({ mount }) => {
 5    let isCalled = false
 6    const cityComponent = await mount(
 7        <CityComponent
 8        fetchWeather={() => isCalled = true}
 9        />
10    );
11
12    await cityComponent.locator(cityLocator).fill(cityName)
13    await cityComponent.locator(searchButtonLocator).click()
14
15    expect(isCalled).toBeTruthy()
16});
在这个第二个测试区块中,与第一个测试区块一样,你在async函数中作为参数添加了mount方法. 通过将async关键字添加到测试区块中,test('Click on Search button executes fetchWeather prop', async({mount }))`,你告诉Playwright以不同步的方式运行这个测试。
在测试函数中,您首先创建一个名为isCalled的新变量,以便您稍后可以检查是否被调用了fetchWeather方法。
然后,您定义cityComponent并将其分配到mount方法,以便注入实际的CityComponent。在CityComponent标签中,您添加了fetchWeather={() => isCalled = true}行,这意味着如果调用fetchWeather方法,则isCalled值将更新为true。
接下来,您用cityName填写城市文本输入,然后使用cityName方法(LINK0)模拟用户在用户界面页面上点击搜索按钮的行动。
最后,您检查isCalled变量是否为true或不使用toBeTruthy方法(https://jestjs.io/docs/expect#tobetruthy)。
在此时,您的文件将包含以下代码:
 1[label src/tests/CityComponent.spec.jsx]
 2import { test, expect } from '@playwright/experimental-ct-react';
 3import { CityComponent } from '../modules/CityComponent';
 4
 5const cityLocator = '[placeholder="City"]'
 6const searchButtonLocator = '[type="submit"]'
 7
 8const cityName = 'Hanoi'
 9
10test('cityField accepts text input', async ({ mount }) => {
11    const cityComponent = await mount(<CityComponent /> );
12    const cityField = cityComponent.locator(cityLocator)
13
14    await cityField.fill(cityName)
15
16    await expect(cityField).toHaveValue(cityName)
17});
18
19test('Click on `Search` button executes fetchWeather prop', async ({ mount }) => {
20    let isCalled = false
21    const cityComponent = await mount(
22        <CityComponent
23        fetchWeather={() => isCalled = true}
24        />
25    );
26
27    await cityComponent.locator(cityLocator).fill(cityName)
28    await cityComponent.locator(searchButtonLocator).click()
29
30    expect(isCalled).toBeTruthy()
31});
保存并关闭您的文件. 如果使用nano,请按CTRL+X来保存和退出。
您现在已经编写了CityComponent的组件测试脚本,其中包含两个测试块:一个检查城市输入框是否接受汉诺伊作为输入,一个检查搜索按钮是否在点击按钮后执行fetchWeather方法。
步骤 4 — 编写WeatherInfoComponent的组件测试
在此步骤中,您将为WeatherInfoComponent写入测试,这是您正在测试的天气应用程序的第二个组件,测试在收到Hanoi作为weatherInfo输入后检查WeatherComponent是否包含文本Hanoi。
首先,在测试目录中,创建并打开名为WeatherInfoComponent.spec.jsx的新测试文件:
1nano WeatherInfoComponent.spec.jsx
将下列内容添加到WeatherInfoComponent.spec.jsx文件中:
1[label src/tests/WeatherInfoComponent.spec.jsx]
2import { test, expect } from '@playwright/experimental-ct-react';
3import { WeatherComponent } from '../modules/WeatherInfoComponent';
在这里,您正在从@playwright/experimental-ct-react库中导入 test和 expect方法,以便在Playwright中运行组件测试。
然后,您将WeatherInfoComponent插入测试中,输入WeatherInfoComponent。WeatherInfoComponent文件填充了结果页,显示了用户提供的城市的天气,位于src/modules目录中。
接下来,将以下代码块添加到测试文件WeatherInfoComponent.spec.jsx:
 1[label src/tests/WeatherInfoComponent.spec.jsx]
 2...
 3
 4test('WeatherInfo accepts name and value', async ({ mount }) => {
 5    const weatherInfo = {"coord":{"lon":105.8412,"lat":21.0245},"weather":[{"id":800,"main":"Clear","description":"clear sky","icon":"01n"}],"base":"stations","main":{"temp":302.15,"feels_like":301.35,"temp_min":302.15,"temp_max":302.15,"pressure":1003,"humidity":35,"sea_level":1003,"grnd_level":1002},"visibility":10000,"wind":{"speed":2.71,"deg":73,"gust":3.29},"clouds":{"all":0},"dt":1673694125,"sys":{"type":1,"id":9308,"country":"VN","sunrise":1673652961,"sunset":1673692464},"timezone":25200,"id":1581130,"name":"Hanoi","cod":200}
 6    const weatherComponent = await mount(<WeatherComponent
 7    weather={(weatherInfo)}
 8    /> );
 9    await expect(weatherComponent).toContainText('Hanoi')
10});
在这里,您定义了一个名为 weatherInfo’的 [const](https://developer.mozilla.org/en-US/docs/Web/JavaScript/Reference/Statements/const)变量,因为 const` 是一个恒定变量,所以在分配一个初始值后,您无法更改其值。
然后,您定义另一个名为weatherComponent的const,该值从WeatherComponent中获取。
由于 React 框架不同步地运行代码,因此安装 WeatherComponent 时需要使用等待。
最后,在等待等待(WeatherComponent).toContainText('Hanoi')中,您正在检查WeatherComponent变量是否包含文本Hanoi。
您的完整的WeatherInfoComponent.spec.jsx文件将包含以下代码行:
 1[label src/tests/WeatherInfoComponent.spec.jsx]
 2import { test, expect } from '@playwright/experimental-ct-react';
 3import { WeatherComponent } from '../modules/WeatherInfoComponent';
 4
 5test('WeatherInfo accepts name and value', async ({ mount }) => {
 6    const weatherInfo = {"coord":{"lon":105.8412,"lat":21.0245},"weather":[{"id":800,"main":"Clear","description":"clear sky","icon":"01n"}],"base":"stations","main":{"temp":302.15,"feels_like":301.35,"temp_min":302.15,"temp_max":302.15,"pressure":1003,"humidity":35,"sea_level":1003,"grnd_level":1002},"visibility":10000,"wind":{"speed":2.71,"deg":73,"gust":3.29},"clouds":{"all":0},"dt":1673694125,"sys":{"type":1,"id":9308,"country":"VN","sunrise":1673652961,"sunset":1673692464},"timezone":25200,"id":1581130,"name":"Hanoi","cod":200}
 7    const weatherComponent = await mount(<WeatherComponent
 8    weather={(weatherInfo)}
 9    /> );
10    await expect(weatherComponent).toContainText('Hanoi')
11});
保存和退出您的文件,按CTRL+X。
您现在已经完成了WeatherInfoComponent的测试,接下来,您将为所有三个安装的浏览器运行CityComponent和WeatherInfoComponent的测试。
步骤 5 – 运行组件测试
在此步骤中,您将为所有三个安装的浏览器(Chromium、Firefox 和 WebKit)运行CityComponent和WeatherInfoComponent测试,以确保这两个组件在这些浏览器上正常工作。
首先,导航到 root 项目目录:
1cd ../..
运行命令后,您将位于react-component-testing-demo文件夹中,然后运行以下命令来执行测试:
1npm run test-ct
Playwright将为所有三个浏览器运行两个测试文件:Chromium,Firefox和WebKit.您将获得类似于以下输出的结果:
 1Running 9 tests using 2 workers
 2
 3vite v3.2.5 building for production...
 4✓ 89 modules transformed.
 5playwright/.cache/playwright/index.html 0.32 KiB
 6playwright/.cache/assets/index.2b5442e2.js 313.68 KiB / gzip: 81.07 KiB
 7
 8  9 passed (12s)
 9
10To open last HTML report run:
11
12  npx playwright show-report
若要以 GUI 格式查看报告,请运行以下命令:
1npx playwright show-report
<$>[注] 注: 如果您在支持图形用户界面(GUI)的本地计算机上执行这些命令,并且已安装 Chrome 或 Firefox 等浏览器,则天气应用程序将在您的浏览器中自动打开。
在新终端中,运行以下命令:
1ssh -L 9223:localhost:9223 your_non_root_user@your_server_ip
您现在可以从本地机器访问测试报告。
测试报告概述将在您的浏览器中显示:
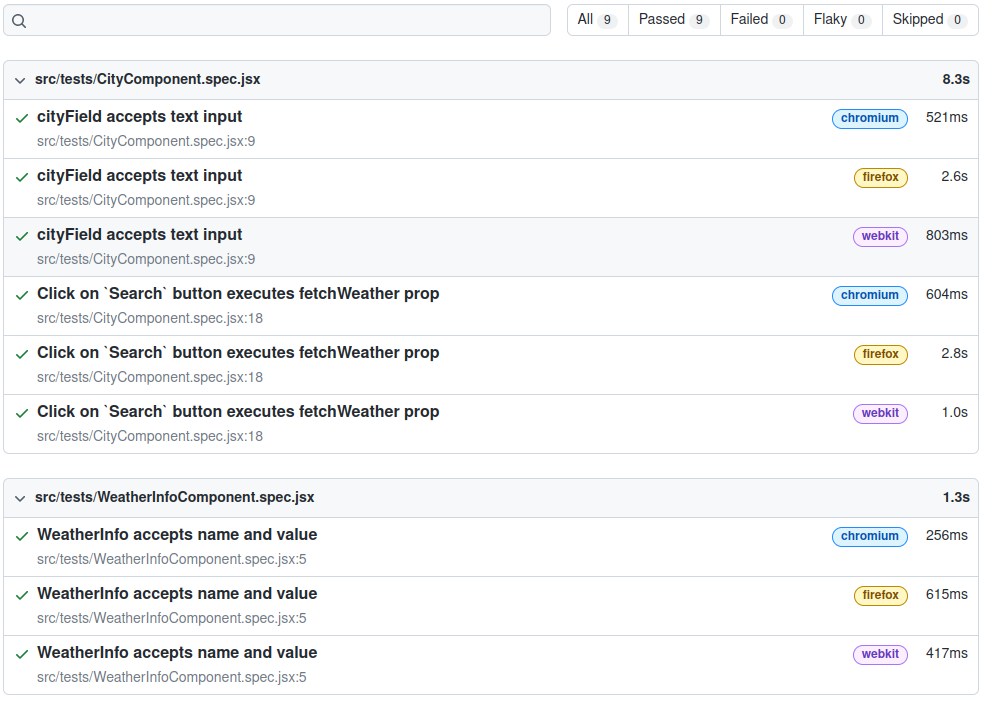
测试报告分为三个不同的测试: cityField接受文本输入, Click on Search button executes fetchWeather prop,和 WeatherInfo接受名称和值,每个测试显示了测试运行所需的总时间,以及每个浏览器测试运行所需的时间。
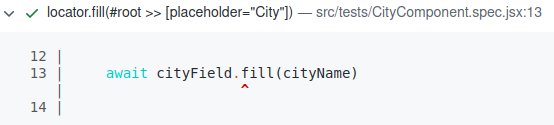
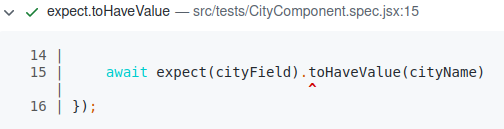
通过点击每个测试(例如, cityField 接受文本输入),您将获得测试中的每个步骤的详细时间和代码行:
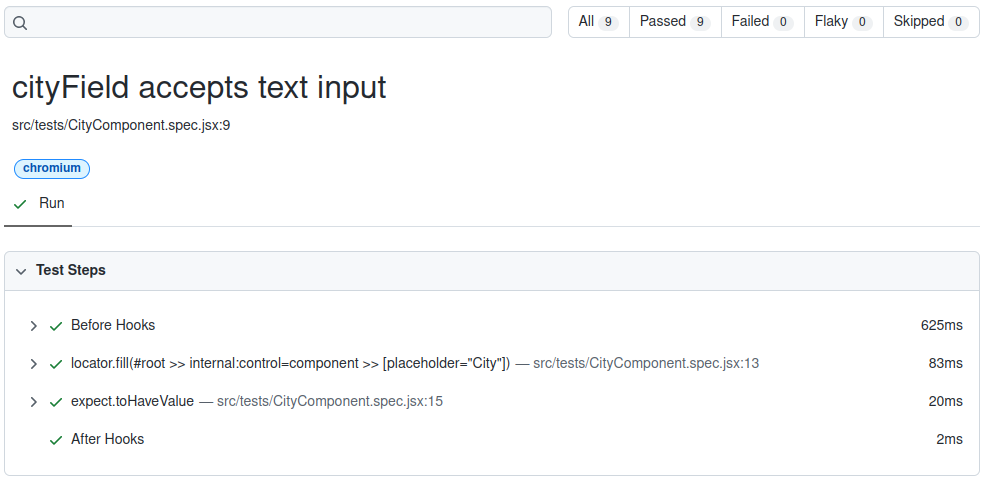
结果表明,CityComponent测试验证了 City输入框是否接受文本,因为输入成功运行在Chromium上。在细节部分中,测试执行步骤将默认地包含前胡克和后胡克步骤。前胡克部分通常用于初始设置,例如登录控制台或阅读测试数据。
locator.fill() 行显示了该元素在测试实现中的位置;在这种情况下,该元素通过使用 CSS 选择器以值 `[placeholder="City"] 来定位。
expect.toHaveValue 行显示测试的声明是什么. 在此测试中,您预计cityField 将具有cityName 的值。
您现在已经完全实施并运行了天气应用程序的CityComponent和WeatherInfoComponent测试,并审查了测试报告,以确保两个组件在Chromium,Firefox和WebKit上工作。
结论
您现在使用 Playwright 在基于 React 的天气应用程序上实施了组件测试. 首先,您为天气应用程序组件CityComponent和WeatherInfoComponent安装了必要的测试依赖性。
若要了解有关 Playwright 和其支持组件测试的其他功能,请访问 Playwright 文档。