作者选择了 Electronic Frontier Foundation作为 Write for Donations计划的一部分接受捐款。
介绍
[WordPress] (https://wordpress.com/)是一个受欢迎的内容管理系统,根据W3Techs(Web Techs (Web Technology Surveys)),权力超过互联网上33%的网站. 其受欢迎的一个原因是,很容易用清晰,直立的文献建立起来. 此外,还有大量的社区资源支持WordPress开发者. 单词 新闻用廉价甚至免费的外出解决方案可以解决许多用例. 最后,WordPress带有一个定义明确的插件系统,允许开发者编写自定义代码来添加自己的功能. 这个插件系统有很好的文件记录,效果很好,你们以后在这个教程中可以看到,很容易使用.
想要提供最丰富,最交互式经验的开发者可以使用JavaScript,由[React](https://reactjs.org/]等框架支持. React是一个JavaScript库,旨在方便开发者创建动态,交互式的UI,超越了典型的静态页面或形式. React由Facebook创建,并因此为安全,稳定和方便使用而得到很好的维护,它很受欢迎,因为它拥有良好的文献记录以及一个完善的由社区驱动的文献和插件生态系统.
此教程将引导您通过在 WordPress 网站上嵌入反应应用程序的最佳做法 。 例如,它将使用一个常用的大小写: 创建一个部件, 意在嵌入多页, 有时在多页上。 在服务器方面,它将作为WordPress shortcode被执行. 简码类似于HTML标记,但它使用方括号(.')来代替角括号(<. 它不直接渲染出HTML元素,而是引用了PHP函数,这反过来又使HTML与数据库的数据相插.
到本教程结束时,您将创建自己的短代码,将其插入到WP Admin中的页面中,并发布该页面。
前提条件
为了遵循这个教程,你必须有:
- Ubuntu 18.04 服务器与 [初始服务器设置 Ubuntu 18.04] (https://andsky.com/tech/tutorials/initial-server-setup-with-ubuntu-18-04) 教程相搭建,用于配置您服务器的防火墙,同时配置有根权限的新用户.
- 一个完全注册的域名。 此教程将在整个过程中以`你的域'为例。 您可以在 [Namecheap] (https://namecheap.com) 上购买域名, 在 [Freenom] (http://www.freenom.com/en/index.html 上免费获取域名, 或者使用您选择的域名登记员 。
- 为您的服务器设置的下列DNS记录。 您可以跟随DigitalOcean DNS来了解如何添加它们的细节.
- 以
你的域名标示服务器公开IP地址的记录。 - 以
www.your_domain标示服务器公共IP地址的记录。
- 在您的服务器上安装 Apache, MySQL 和 PHP 。 您可以在 Ubuntu 18. 04 (https://andsky.com/tech/tutorials/how-to-install-linux-apache-mysql-php-lamp-stack-ubuntu-18-04) 上跟踪 [How to Instruction Linux, Apache, MySQL, PHP (LAMP) stack] 获取此数据。
- 带有让我们加密的安全Apache,通过跟随[如何用Ubuntu 18.04加密来安全Apache(https://andsky.com/tech/tutorials/how-to-secure-apache-with-let-s-encrypt-on-ubuntu-18-04),生成免费的SSL证书.
- WordPress安装,您可以通过跟踪在Ubuntu 18.04上如何安装LAMP的WordPress及其先决条件获得.
- 安装Node.js,方法是在如何在Ubuntu 18.04上安装
使用一个PPA的总和选项。 该教程将使用11.1.5.0'版本,因此,在使用curl'下载安装脚本时,将10.x'改为11.x',与该教程中的程序一并使用。 .
步骤 1 — 更新和配置文件系统权限
当您登录为在 初始服务器设置与Ubuntu 18.04]前提下创建的非根用户时,您将无法访问查看或编辑WordPress目录中的任何文件,这是一个问题,因为您将在以后添加和修改文件来创建您的WordPress插件和您的React应用程序。
运行以下命令,取代sammy为您的非根用户的名称和/var/www/wordpress为您的WordPress目录的路径(这是您在前提条件下创建的Apache文档根文件夹):
1sudo chown -R sammy:www-data /var/www/wordpress
让我们打破这个命令:
sudo ' -- 这使得您能够以root方式执行此命令, 因为您正在修改文件Sammy` 无法访问 。- " 色 " -- -- 此命令更改文件所有权 。
- `-R ' - 此旗帜会递归改变所有者, 包括所有子文件夹和文件 。
萨米语:www-data' - 它将所有者设定为您的非源用户(Sammy'),并将该组保留为`www-data',以便Apache仍然可以访问文件,以服务它们。- `/var/www/wordpress' -- 在此指定您 WordPress 目录的路径 。 此目录将更改所有权 。 .
要验证这个命令是否成功,请列出WordPress目录的内容:
1ls -la /var/www/wordpress
您将看到目录中的内容列表:
 1[secondary_label Output]
 2total 216
 3drwxr-x---  5 sammy www-data 4096 Apr 13 15:42 .
 4drwxr-xr-x 4 root root 4096 Apr 13 15:39 ..
 5-rw-r-----  1 sammy www-data 235 Apr 13 15:54 .htaccess
 6-rw-r-----  1 sammy www-data 420 Nov 30 2017 index.php
 7-rw-r-----  1 sammy www-data 19935 Jan 1 20:37 license.txt
 8-rw-r-----  1 sammy www-data 7425 Jan 9 02:56 readme.html
 9-rw-r-----  1 sammy www-data 6919 Jan 12 06:41 wp-activate.php
10drwxr-x---  9 sammy www-data 4096 Mar 13 00:18 wp-admin
11-rw-r-----  1 sammy www-data 369 Nov 30 2017 wp-blog-header.php
12-rw-r-----  1 sammy www-data 2283 Jan 21 01:34 wp-comments-post.php
13-rw-r-----  1 sammy www-data 2898 Jan 8 04:30 wp-config-sample.php
14-rw-r-----  1 sammy www-data 3214 Apr 13 15:42 wp-config.php
15drwxr-x---  6 sammy www-data 4096 Apr 13 15:54 wp-content
16-rw-r-----  1 sammy www-data 3847 Jan 9 08:37 wp-cron.php
17drwxr-x--- 19 sammy www-data 12288 Mar 13 00:18 wp-includes
18-rw-r-----  1 sammy www-data 2502 Jan 16 05:29 wp-links-opml.php
19-rw-r-----  1 sammy www-data 3306 Nov 30 2017 wp-load.php
20-rw-r-----  1 sammy www-data 38883 Jan 12 06:41 wp-login.php
21-rw-r-----  1 sammy www-data 8403 Nov 30 2017 wp-mail.php
22-rw-r-----  1 sammy www-data 17947 Jan 30 11:01 wp-settings.php
23-rw-r-----  1 sammy www-data 31085 Jan 16 16:51 wp-signup.php
24-rw-r-----  1 sammy www-data 4764 Nov 30 2017 wp-trackback.php
25-rw-r-----  1 sammy www-data 3068 Aug 17 2018 xmlrpc.php
这些文件是包含在WordPress核心中的名为latest.tar.gz的文件,您从WordPress.org下载(https://wordpress.org/)在前提条件下(How To Install WordPress with LAMP on Ubuntu 18.04)(https://andsky.com/tech/tutorials/how-to-embed-a-react-application-in-wordpress-on-ubuntu-18-04)。
在此步骤中,您更新了您的WordPress安装,以便您可以访问其文件,在下一步,您将使用该访问来创建构成WordPress插件的文件。
步骤2 — 创建一个基本的WordPress插件
现在你可以访问修改WordPress目录中的文件,你将创建一个基本的WordPress插件,并将其添加到安装中。
一个WordPress插件可以像这样简单:
- 在
wp-content/plugins内部的目录 2. 该目录内部的文件具有相同的名称和一个.php文件扩展. 3. 该文件顶部的特殊评论提供了WordPress重要的插件元数据。
要创建一个React代码的插件,你会写后,开始创建一个WordPress插件的目录。为了简单,本教程将命名插件react-wordpress。
1mkdir /var/www/wordpress/wp-content/plugins/react-wordpress
然后,导航到新创建的目录. 随后的命令将从这里执行。
1cd /var/www/wordpress/wp-content/plugins/react-wordpress
让我们现在创建插件文件。本教程将使用 nano,呼吁命令 nano,作为命令行文本编辑器的所有文件. 您也可以自由使用任何其他文本编辑器的选择,如 Pico, Vim,或 Emacs。
打开react-wordpress.php来编辑:
1nano react-wordpress.php
将以下行添加到您的文件中,以创建插件的开始:
1[label /var/www/wordpress/wp-content/plugins/react-wordpress/react-wordpress.php]
2<?php
3/**
4 * @wordpress-plugin
5 * Plugin Name:       Embedding React In Wordpress
6 */
7
8defined( 'ABSPATH' ) or die( 'Direct script access disallowed.' );
顶部的评论部分为插件提供了元数据,并且检查ABSPATH常数的行防止坏人通过其URL直接访问这个脚本。
<$>[注] 注: 对于插件元数据评论,有很多字段可用,但只需要插件名称。
接下来,打开一个网页浏览器并导航到您的域的 插件 页面(https://your_domain/wp-admin/plugins.php)。

点击启用来启用您的插件。
一旦您激活了插件,包含您的插件的行将以蓝色标志,左侧有蓝色边界,而不是在其下方的链接中说 激活 ,将有一个说 ** 禁用** :

接下来,您将建立您的插件的结构。
回到您的终端,打开react-wordpress.php:
1nano react-wordpress.php
然后更新它以添加以下突出的行,这些行定义了有用的常数:
 1[label /var/www/wordpress/wp-content/plugins/react-wordpress/react-wordpress.php]
 2<?php
 3/**
 4 * @wordpress-plugin
 5 * Plugin Name:       Embedding React In Wordpress
 6 */
 7
 8defined( 'ABSPATH' ) or die( 'Direct script access diallowed.' );
 9
10define( 'ERW_WIDGET_PATH', plugin_dir_path( __FILE__ ) . '/widget' );
11define( 'ERW_ASSET_MANIFEST', ERW_WIDGET_PATH . '/build/asset-manifest.json' );
12define( 'ERW_INCLUDES', plugin_dir_path( __FILE__ ) . '/includes' );
在新添加的行中,您定义了三个常数:
ERW_WIDGET_PATH- 這將是通往React應用程式的路徑。2.ERW_ASSET_MANIFEST- 這是通往React資產宣言的路徑,該檔案包含需要在您的應用程式工作頁面上列出的JavaScript和CSS檔案列表。
请注意,每个 define() 都指 plugin_dir_path( __FILE__ ),这代表了该文件的目录路径。
添加常数定义后,保存文件并退出编辑器。
<$>[注] ** 注意:** 重要的是 namespace你的常数. 在这种情况下,我们正在使用名空间 ERW_,这代表了 ** 在WordPress中嵌入反应** 。
要创建包含/文件夹,其中将包含其他 PHP 文件,请从插件目录的顶层开始,/var/www/your_domain/wp-content/plugins/react-wordpress`. 然后,创建该文件夹:
1mkdir includes
现在你已经填写了创建WordPress插件所需的PHP相关文件和文件夹,你将创建React的初始文件和文件夹。
步骤 3 – 初始化 React 应用程序
在此步骤中,您将使用 Create React App来初始化您的 React 应用程序。
此教程是使用 Create React App 版本 3.0.1 进行测试的。 版本 3.0.0 对 asset-manifest.json 的结构进行了突破性更改,因此此早期版本不兼容本教程,没有任何更改。
1sudo npm install --global [email protected]
這個命令會安裝 Create React App 的版本 3.0.1. 這個「--global」旗號會在整個系統上安裝它. 安裝在整個系統上確保當你執行 create-react-app(或 npx create-react-app)而沒有指定任何路徑時,你會使用你剛剛安裝的版本。
安装 Create React App 后,使用它来创建 React 应用程序. 本教程将命名应用程序为widget:
1sudo create-react-app widget
此命令使用了 npx,这是一个与 NPM相连的二进制。它旨在方便使用在 NPM 上托管的 CLI 工具和其他可执行的工具。
create-react-app命令将生成一个项目文件夹和基本的React应用程序所需的所有文件,其中包括一个index.html文件,从JavaScript、CSS和测试文件开始,以及一个package.json来定义您的项目和依赖。
一旦您设置了widget应用程序,终端中的输出将看起来像这样:
 1[secondary_label Output]
 2...
 3Success! Created widget at /var/www/wordpress/wp-content/plugins/react-wordpress/widget
 4Inside that directory, you can run several commands:
 5
 6  npm start
 7    Starts the development server.
 8
 9  npm run build
10    Bundles the app into static files for production.
11
12  npm test
13    Starts the test runner.
14
15  npm run eject
16    Removes this tool and copies build dependencies, configuration files
17    and scripts into the app directory. If you do this, you can’t go back!
18
19We suggest that you begin by typing:
20
21  cd widget
22  npm start
23
24Happy hacking!
接下来,导航到新创建的目录:
1cd widget
您现在可以使用 默认构建命令构建您的应用程序,npm run build这个构建命令看到了名为构建的脚本的脚本下面的package.json文件:
 1[label /var/www/wordpress/wp-content/plugins/react-wordpress/widget/package.json]
 2{
 3  "name": "widget",
 4  "version": "0.1.0",
 5  "private": true,
 6  "dependencies": {
 7    "react": "^16.9.0",
 8    "react-dom": "^16.9.0",
 9    "react-scripts": "3.1.1"
10  },
11  "scripts": {
12    "start": "react-scripts start",
13    "build": "react-scripts build",
14    "test": "react-scripts test",
15    "eject": "react-scripts eject"
16  },
17  "eslintConfig": {
18    "extends": "react-app"
19  },
20  "browserslist": {
21    "production": [
22      ">0.2%",
23      "not dead",
24      "not op_mini all"
25    ],
26    "development": [
27      "last 1 chrome version",
28      "last 1 firefox version",
29      "last 1 safari version"
30    ]
31  }
32}
这叫做react-scripts.js的可执行,由react-scripts节点模块提供,这是由create-react-app提供的核心组件之一。这反过来叫做构建脚本,它使用webpack(https://webpack.js.org/)来编译您的项目文件为您浏览器理解的静态资产文件。
- 解决依赖性 * 将 SASS文件编译成 CSS 和 JSX 或 TypeScript到 JavaScript. * 将 ES6语法转换为 ES5语法,具有更好的跨浏览器兼容性。
现在你知道一些关于构建,在终端中运行命令:
1sudo npm run build
一旦命令完成,您将收到类似于以下的输出:
 1[secondary_label Output]
 2> widget@0.1.0 build /var/www/wordpress/wp-content/plugins/react-wordpress/widget
 3> react-scripts build
 4
 5Creating an optimized production build...
 6Compiled successfully.
 7
 8File sizes after gzip:
 9
10  36.83 KB (+43 B)  build/static/js/2.6efc73d3.chunk.js
11  762 B (+44 B)     build/static/js/runtime~main.a8a9905a.js
12  710 B (+38 B)     build/static/js/main.2d1d08c1.chunk.js
13  539 B (+44 B)     build/static/css/main.30ddb8d4.chunk.css
14
15The project was built assuming it is hosted at the server root.
16You can control this with the homepage field in your package.json.
17For example, add this to build it for GitHub Pages:
18
19  "homepage" : "http://myname.github.io/myapp",
20
21The build folder is ready to be deployed.
22You may serve it with a static server:
23
24  npm install -g serve
25  serve -s build
26
27Find out more about deployment here:
28
29  https://bit.ly/CRA-deploy
您的项目现在正在构建中,但在进入下一步之前,最好确保您的应用程序仅在存在时加载。
React 使用 DOM 中的 HTML 元素来渲染应用程序. 此元素被称为目标元素. 默认情况下,此元素具有 root ID。 要确保这个root节点是您正在创建的应用程序,请更改src/index.js以检查target的erw-root ID。 要做到这一点,先打开src/index.js:
1sudo nano src/index.js
更改并添加突出的行:
 1[label /var/www/wordpress/wp-content/plugins/react-wordpress/widget/src/index.js]
 2import React from 'react';
 3import ReactDOM from 'react-dom';
 4import './index.css';
 5import App from './App';
 6import * as serviceWorker from './serviceWorker';
 7
 8const target = document.getElementById('erw-root');
 9if (target) { ReactDOM.render(<App />, target); }
10
11serviceWorker.unregister();
最后,在完成编辑后保存并停止文件。
在此文件中,您对默认 index.js 文件进行了两项重要更改:
- 您已将目标元素从
更改为 <div id="erw-root"></div>,以便为您的应用程序提供名称空间。
<美元 > [注] ** 注:** 如果您期望每个页面都显示部件,您也不妨添加一行错误处理,如果找不到带有 " erw-root " 的元素,则会向控制台打印信件。 然而,这个教程会省略这个步骤. 这样一行会在每一个没有元素的页面上产生控制台错误,包括您没有计划包含元素的错误. 这些多起JavaScript控制台出错可能会降低您网站的搜索引擎排名. < $ > (美元)
在你的src/目录中更改任何JavaScript或CSS文件后,重要的是重新编译你的应用程序,以便你的更改被集成。
1sudo npm run build
现在你的构建/目录包含一个工作React应用程序以JavaScript和CSS文件的形式。下一步涉及设置一些PHP文件,将查询你的JavaScript和CSS在页面。
步骤 4 – 查询 JavaScript 和 CSS 文件
在此步骤中,您将使用 WordPress 操作和过滤器来:
- 在WordPress页面加载周期中在适当的时间输出脚本加载代码 2. 加载您的JavaScript和CSS文件以最不影响页面加载速度的方式。
WordPress 使用 actions and filters作为其主要链接. 操作使您可以在页面加载周期中指定时间执行代码,并且过滤器通过改变您不属于的函数的返回值来修改特定行为。
要使用这些链接,您将创建一个PHP文件,其中包含解析资产宣言的代码. 这是您以后将使用的相同文件来查询所有资产,以便脚本被写入<head>标签。
在创建文件之前,请使用下面的命令来导航包含您的 React 应用程序的目录,并进入顶级react-wordpress插件目录:
1cd /var/www/wordpress/wp-content/plugins/react-wordpress
创建enqueue.php文件在包括/文件夹中:
1nano includes/enqueue.php
首先,在文件顶部放置开头标签<?php标签,并添加检查ABSPATH的行,如前所述,这是每个PHP文件中的最佳做法:
1[label /var/www/wordpress/wp-content/plugins/react-wordpress/includes/enqueue.php]
2<?php
3// This file enqueues scripts and styles
4
5defined( 'ABSPATH' ) or die( 'Direct script access disallowed.' );
保存并删除此文件。
然后,更新react-wordpress.php以要求项目的enqueue.php。
1nano react-wordpress.php
添加以下突出的一行:
 1[label /var/www/wordpress/wp-content/plugins/react-wordpress/react-wordpress.php]
 2<?php
 3/**
 4 * @wordpress-plugin
 5 * Plugin Name:       Embedding React In Wordpress
 6 */
 7
 8defined( 'ABSPATH' ) or die( 'Direct script access diallowed.' );
 9
10define( 'ERW_WIDGET_PATH', plugin_dir_path( __FILE__ ) . '/widget' );
11define( 'ERW_ASSET_MANIFEST', ERW_WIDGET_PATH . '/build/asset-manifest.json' );
12define( 'ERW_INCLUDES', plugin_dir_path( __FILE__ ) . '/includes' );
13
14require_once( ERW_INCLUDES . '/enqueue.php' );
WordPress插件中的一种常见模式是,要求包含/目录中的其他PHP文件将重要任务分割成块。 require_once () 函数将所通过文件的内容描述为一个参数, 仿佛该文件的 PHP 代码就写在其中 。 与类似命令包括'不同,如果找不到你试图要求的文件,要求'将提出例外。 使用 要求 () (与仅仅要求()'相反,如果要求(战争遗留爆炸物_INCLUDES.)'/要求.'/要求.')指令是多次下达的,则`要求.php'不会被多次解释).
保存和退出文件。
现在重新打开包括/enqueue.php:
1nano includes/enqueue.php
然后添加以下突出的代码:
 1[label /var/www/wordpress/wp-content/plugins/react-wordpress/includes/enqueue.php]
 2<?php
 3// This file enqueues scripts and styles
 4
 5defined( 'ABSPATH' ) or die( 'Direct script access diallowed.' );
 6
 7add_action( 'init', function() {
 8
 9  add_filter( 'script_loader_tag', function( $tag, $handle ) {
10    if ( ! preg_match( '/^erw-/', $handle ) ) { return $tag; }
11    return str_replace( ' src', ' async defer src', $tag );
12  }, 10, 2 );
13
14  add_action( 'wp_enqueue_scripts', function() {
15
16  });
17});
将函数添加到init操作中意味着该代码将在加载过程的init阶段运行,即您的主题和其他插件加载后。
使用script_loader_tag过滤器将async和defer属性设置在<script>标签上,会告诉浏览器以无同步的方式加载脚本,而不是阻止 DOM 构建和页面渲染。
wp_enqueue_scripts 操作将引入前端项目,请参阅 此页面以获取更多细节。
请确保写入文件和退出。
你现在已经告诉WordPress写脚本和风格表标签到页面上。在下一步,你将解析一个名为资产宣言的文件,这将给你所有你需要查询的文件的路径。
步骤5 - 分析资产宣言
在此步骤中,您将将 React 构建生成的资产宣言解析到 JavaScript 和 CSS 文件的列表中。
在构建应用程序时,React构建脚本会将您的项目构建成多部JavaScript和CSS文件. 文件数量和名称将因不同的构建而异,因为每个构建都包含文件内容的散列. 资产列表提供了最后一个构建中生成的每个文件的名称以及该文件的路径. 通过在程序上解析它,可以保证您写到页面的脚本和样式表标记总是指向正确的文件,即使名称发生变化.
首先,用cat命令检查asset-manifest.json:
1cat widget/build/asset-manifest.json
它将看起来像这样的东西:
 1[secondary_label Output]
 2{
 3  "files": {
 4    "main.css": "/static/css/main.2cce8147.chunk.css",
 5    "main.js": "/static/js/main.a284ff71.chunk.js",
 6    "main.js.map": "/static/js/main.a284ff71.chunk.js.map",
 7    "runtime~main.js": "/static/js/runtime~main.fa565546.js",
 8    "runtime~main.js.map": "/static/js/runtime~main.fa565546.js.map",
 9    "static/js/2.9ca06fd6.chunk.js": "/static/js/2.9ca06fd6.chunk.js",
10    "static/js/2.9ca06fd6.chunk.js.map": "/static/js/2.9ca06fd6.chunk.js.map",
11    "index.html": "/index.html",
12    "precache-manifest.e40c3c7a647ca45e36eb20f8e1a654ee.js": "/precache-manifest.e40c3c7a647ca45e36eb20f8e1a654ee.js",
13    "service-worker.js": "/service-worker.js",
14    "static/css/main.2cce8147.chunk.css.map": "/static/css/main.2cce8147.chunk.css.map",
15    "static/media/logo.svg": "/static/media/logo.5d5d9eef.svg"
16  }
17}
要分析它,您的代码将搜索以.js和.css结束的对象密钥。
打开您的 enqueue.php 文件:
1nano includes/enqueue.php
添加突出的片段:
 1[label /var/www/wordpress/wp-content/plugins/react-wordpress/includes/enqueue.php]
 2<?php
 3// This file enqueues scripts and styles
 4
 5defined( 'ABSPATH' ) or die( 'Direct script access disallowed.' );
 6
 7add_action( 'init', function() {
 8
 9  add_filter( 'script_loader_tag', function( $tag, $handle ) {
10    if ( ! preg_match( '/^erw-/', $handle ) ) { return $tag; }
11    return str_replace( ' src', ' async defer src', $tag );
12  }, 10, 2 );
13
14  add_action( 'wp_enqueue_scripts', function() {
15
16    $asset_manifest = json_decode( file_get_contents( ERW_ASSET_MANIFEST ), true )['files'];
17
18    if ( isset( $asset_manifest[ 'main.css' ] ) ) {
19      wp_enqueue_style( 'erw', get_site_url() . $asset_manifest[ 'main.css' ] );
20    }
21
22    wp_enqueue_script( 'erw-runtime', get_site_url() . $asset_manifest[ 'runtime~main.js' ], array(), null, true );
23
24    wp_enqueue_script( 'erw-main', get_site_url() . $asset_manifest[ 'main.js' ], array('erw-runtime'), null, true );
25
26    foreach ( $asset_manifest as $key => $value ) {
27      if ( preg_match( '@static/js/(.*)\.chunk\.js@', $key, $matches ) ) {
28        if ( $matches && is_array( $matches ) && count( $matches ) === 2 ) {
29          $name = "erw-" . preg_replace( '/[^A-Za-z0-9_]/', '-', $matches[1] );
30          wp_enqueue_script( $name, get_site_url() . $value, array( 'erw-main' ), null, true );
31        }
32      }
33
34      if ( preg_match( '@static/css/(.*)\.chunk\.css@', $key, $matches ) ) {
35        if ( $matches && is_array( $matches ) && count( $matches ) == 2 ) {
36          $name = "erw-" . preg_replace( '/[^A-Za-z0-9_]/', '-', $matches[1] );
37          wp_enqueue_style( $name, get_site_url() . $value, array( 'erw' ), null );
38        }
39      }
40    }
41
42  });
43});
当你完成时,写下来关闭文件。
突出的代码是如下:
- 联合国 读取资产列表文件并将其解析为 JSON 文件 。 它访问存储在密钥
'文件'上的内容并将其存储到$set_manifest'变量上。 - 联合国 如果 CSS 主文件存在, 请选中它 。
3个 先将 React 运行时间排出,然后是主JavaScript文件,将运行时间设定为依赖,以确保它先被加载到页面中.
4.四. 分析名为
static/js/<hash>.chunk.js'的任何JavaScript文件的资产表文件列表,并将其排入主文件后页。 5 (韩语). 分析名为static/css/.chunk.cs' 的任何 CSS 文件的资产清单文件列表,并将其排入主 CSS 文件之后的页面。 .
注意:使用wp_enqueue_script()和wp_enqueue_style会导致在每个页面上出现<script>和<link>标签,最后一个参数true告诉WordPress将文件放置在页面内容脚下,而不是在<head>元素的底部。
在下一步中,您将确保这些文件路径指向您的 React 应用程序的构建目录,并且您从浏览器中无法访问任何源文件。
步骤6 - 服务和保护静态文件
此时,您已经告诉 WordPress 要加载哪些 JavaScript 和 CSS 文件以及在哪里找到它们,但是,如果您访问浏览器中的 https://your_domain 并查看 JavaScript 控制台,您将看到 HTTP 404 错误。

这是因为到文件的URL路径(例如, /static/js/main.2d1d08c1.chunk.js)不匹配到文件的实际路径(例如, /wp-content/plugins/react-wordpress/widget/build/static/js/main.2d1d08c1.chunk.js)。
在此步骤中,您将通过告诉 React 构建目录的位置来修复此问题,您还将向.htaccess 文件添加一个 Apache 重写规则,以保护您的源文件不会在浏览器中被查看。
要给 React 正确的路径,请在 React 应用程序目录中打开package.json:
1sudo nano widget/package.json
然后添加突出的主页行:
 1[label /var/www/wordpress/wp-content/plugins/react-wordpress/widget/package.json]
 2{
 3  "name": "widget",
 4  "version": "0.1.0",
 5  "private": true,
 6  "homepage": "/wp-content/plugins/react-wordpress/widget/build",
 7  "dependencies": {
 8    "react": "^16.9.0",
 9    "react-dom": "^16.9.0",
10    "react-scripts": "3.1.1"
11  },
12  "scripts": {
13    "start": "react-scripts start",
14    "build": "react-scripts build",
15    "test": "react-scripts test",
16    "eject": "react-scripts eject"
17  },
18  "eslintConfig": {
19    "extends": "react-app"
20  },
21  "browserslist": {
22    "production": [
23      ">0.2%",
24      "not dead",
25      "not op_mini all"
26    ],
27    "development": [
28      "last 1 chrome version",
29      "last 1 firefox version",
30      "last 1 safari version"
31    ]
32  }
33}
然后重建您的 React 应用程序. 移动到widget/的顶级级别:
1cd widget
然后运行构建命令:
1sudo npm run build
完成 build 命令后,通过将其内容输出到终端来检查资产显示:
1cat build/asset-manifest.json
您将看到所有文件路径都发生了变化:
 1[label /var/www/wordpress/wp-content/plugins/react-wordpress/widget/build/asset-manifest.json]
 2{
 3  "files": {
 4    "main.css": "/wp-content/plugins/react-wordpress/widget/build/static/css/main.2cce8147.chunk.css",
 5    "main.js": "/wp-content/plugins/react-wordpress/widget/build/static/js/main.a28d856a.chunk.js",
 6    "main.js.map": "/wp-content/plugins/react-wordpress/widget/build/static/js/main.a28d856a.chunk.js.map",
 7    "runtime~main.js": "/wp-content/plugins/react-wordpress/widget/build/static/js/runtime~main.2df87c4b.js",
 8    "runtime~main.js.map": "/wp-content/plugins/react-wordpress/widget/build/static/js/runtime~main.2df87c4b.js.map",
 9    "static/js/2.9ca06fd6.chunk.js": "/wp-content/plugins/react-wordpress/widget/build/static/js/2.9ca06fd6.chunk.js",
10    "static/js/2.9ca06fd6.chunk.js.map": "/wp-content/plugins/react-wordpress/widget/build/static/js/2.9ca06fd6.chunk.js.map",
11    "index.html": "/wp-content/plugins/react-wordpress/widget/build/index.html",
12    "precache-manifest.233e0a9875cf4d2df27d6280d12b780d.js": "/wp-content/plugins/react-wordpress/widget/build/precache-manifest.233e0a9875cf4d2df27d6280d12b780d.js",
13    "service-worker.js": "/wp-content/plugins/react-wordpress/widget/build/service-worker.js",
14    "static/css/main.2cce8147.chunk.css.map": "/wp-content/plugins/react-wordpress/widget/build/static/css/main.2cce8147.chunk.css.map",
15    "static/media/logo.svg": "/wp-content/plugins/react-wordpress/widget/build/static/media/logo.5d5d9eef.svg"
16  }
17}
這會告訴您的應用程式在哪裡找到正確的檔案,但也會出現問題:它會暴露到您的應用程式的「src」目錄的路徑,而熟悉「create-react-app」的人可能會訪問「https://your_domain/wp-content/plugins/react-wordpress/widget/src/index.js」並開始探索您的應用程式的來源檔案。
为了保护您不希望用户访问的路径,请将Apache重写规则添加到您的WordPress .htaccess文件中。
1nano /var/www/wordpress/.htaccess
添加四个突出线条:
 1[label /var/www/wordpress/.htaccess]
 2<IfModule mod_rewrite.c>
 3RewriteRule ^wp-content/plugins/react-wordpress/widget/(build|public)/(.*) - [L]
 4RewriteRule ^wp-content/plugins/react-wordpress/widget/* totally-bogus-erw.php [L]
 5</IfModule>
 6
 7# BEGIN WordPress
 8<IfModule mod_rewrite.c>
 9RewriteEngine On
10RewriteBase /
11RewriteRule ^index\.php$ - [L]
12RewriteCond %{REQUEST_FILENAME} !-f
13RewriteCond %{REQUEST_FILENAME} !-d
14RewriteRule . /index.php [L]
15</IfModule>
16
17# END WordPress
这告诉Apache允许浏览器请求到任何东西在wp-content/plugins/react-wordpress/widget/build/或wp-content/react-wordpress/widget/public/. 任何其他东西都将重定向到totally-bogus-erw.php。
有 WordPress 插件,如 Stream,它会监控请求活动并记录 404s. 在日志中,请求将显示用户收到 404 时请求的 IP 地址和页面。
请确保写入并删除文件。
现在你已经建立了必要的路由来将你的JavaScript和CSS文件加载到页面上,是时候使用短代码将HTML元素添加到JavaScript将相互作用的页面来渲染你的应用程序了。
第7步:创建短代码
短代码允许插入复杂的HTML块与服务器侧数据的交互,使用非常简单的页面语法. 在此步骤中,您将创建和注册一个WordPress短代码,并使用它将您的应用程序嵌入到页面中。
导航到您的插件的顶层:
1cd /var/www/wordpress/wp-content/plugins/react-wordpress/
创建一个新的PHP文件,其中将包含短代码:
1touch includes/shortcode.php
然后,编辑您的主要PHP文件,以便在您的插件加载时需要包含/shortcode.php。
1nano react-wordpress.php
然后添加以下突出的一行:
 1[label /var/www/wordpress/wp-content/plugins/react-wordpress/react-wordpress.php]
 2<?php
 3/**
 4 * @wordpress-plugin
 5 * Plugin Name:       Embedding React In Wordpress
 6 */
 7
 8defined( 'ABSPATH' ) or die( 'Direct script access diallowed.' );
 9
10define( 'ERW_WIDGET_PATH', plugin_dir_path( __FILE__ ) . '/widget' );
11define( 'ERW_ASSET_MANIFEST', ERW_WIDGET_PATH . '/build/asset-manifest.json' );
12define( 'ERW_INCLUDES', plugin_dir_path( __FILE__ ) . '/includes' );
13
14require_once( ERW_INCLUDES . '/enqueue.php' );
15require_once( ERW_INCLUDES . '/shortcode.php' );
写下并删除文件。
现在,打开新创建的短代文件:
1nano includes/shortcode.php
添加以下代码:
 1[label /var/www/wordpress/wp-content/plugins/react-wordpress/includes/shortcode.php]
 2<?php
 3// This file enqueues a shortcode.
 4
 5defined( 'ABSPATH' ) or die( 'Direct script access disallowed.' );
 6
 7add_shortcode( 'erw_widget', function( $atts ) {
 8  $default_atts = array();
 9  $args = shortcode_atts( $default_atts, $atts );
10
11  return "<div id='erw-root'></div>";
12});
该代码主要包含 boilerplate. 它注册了一个名为 erw_widget’ 的短代码,当被召唤时,将 React 应用的根元素
保存并停止shortcode.php。
要看到React应用程序在行动中,您需要创建一个新的WordPress页面并添加短代码。
在网页浏览器中导航到https://your_domain/wp-admin。在页面的顶部,你会看到一个黑色栏,在左侧有WordPress标志,随后是一个家标志,你的网站的名称,评论气泡图标和号码,以及另一个链接,说 + 新 . 绕过 ** +新** 按钮,一个菜单将下降。 点击表示 ** 页面** 的菜单项目。

当屏幕加载时,你的标注器将集中在文本框中,其中说 添加标题 . 点击那里并开始键入以给新页面一个相关的标题。

假设你正在使用 WordPress Gutenberg 编辑器,你会看到一行文本在页面顶部,标题下面,读到 开始写字或键入 / 选择一个块 。

然后,点击窗口右上角的蓝色 ** 发布 ** 按钮,然后按一下 ** 发布 ** 以确认。

您将看到一个绿色栏,确认该页面已发布. 点击 View Page 链接:

在屏幕上,你会看到你的应用程序:

现在您在页面上有基本的 React 应用程序渲染,您可以使用管理员提供的服务器侧选项来定制该应用程序。
第8步:注入服务器生成的设置
在此步骤中,您将使用服务器生成的数据和用户提供的数据向应用程序注入设置,这将使您能够在应用程序中显示动态数据,并在页面中多次使用小组件。
首先,打开 index.js 文件:
1sudo nano widget/src/index.js
然后,删除从./App中导入应用程序行,并用以下突出的行更新index.js的内容:
 1[label /var/www/wordpress/wp-content/plugins/react-wordpress/widget/src/index.js]
 2import React from 'react';
 3import ReactDOM from 'react-dom';
 4import './index.css';
 5import * as serviceWorker from './serviceWorker';
 6
 7const App = () => (
 8  <div className="App">
 9    <span className="App__Message">Hello,<br />World!</span>
10  </div>
11);
12
13const target = document.getElementById('erw-root');
14if (target) { ReactDOM.render(<App />, target); }
15
16serviceWorker.unregister();
这会修改您的 React 应用程序,以便而不是返回默认 Create React App 屏幕,它会返回一个包含Hello, World!的元素。
保存并停止文件. 然后打开index.css 来编辑:
1nano widget/src/index.css
用以下代码取代index.css的内容:
 1[label /var/www/wordpress/wp-content/plugins/react-wordpress/widget/src/index.css]
 2.App {
 3  width: 100px;
 4  height: 100px;
 5  border: 1px solid;
 6  display: inline-block;
 7  margin-right: 20px;
 8  position: relative;
 9}
10
11.App .App__Message {
12  font-size: 15px;
13  line-height: 15px;
14  position: absolute;
15  top: 50%;
16  transform: translateY(-50%);
17  text-align: center;
18  width: 100%;
19}
.app 的风格将显示一个 100 像素的方块,具有固定的边界,而.app__ Message 的风格将显示在方块内部的文本,无论是垂直还是横向。
写下并关闭文件,然后重建应用程序:
1cd widget
2sudo npm run build
一旦构建成功,请在您的浏览器中刷新 https://your_domain/index.php/my-react-app/. 您现在将看到您用 CSS 设计的框,以及文本 Hello, World!:

接下来,您将添加自定义设置,由用户提供的边界颜色和大小组成,您还将从服务器传输当前用户的显示名称。
更新短代码以接受参数
要通过一个用户提供的论点,你必须首先给用户一个通过论点的方式. 回到终端,返回你的插件的顶层:
1cd ..
接下来,打开你的‘shortcode.php’文件来编辑:
1nano includes/shortcode.php
更新您的短代文件以包含以下突出的行:
 1<?php
 2[label /var/www/wordpress/wp-content/plugins/react-wordpress/includes/shortcode.php]
 3// This file enqueues your shortcode.
 4
 5defined( 'ABSPATH' ) or die( 'Direct script access disallowed.' );
 6
 7add_shortcode( 'erw_widget', function( $atts ) {
 8  $default_atts = array( 'color' => 'black' );
 9  $args = shortcode_atts( $default_atts, $atts );
10
11  return "<div class='erw-root'></div>";
12});
写并退出文件. 注意代码如何在 $default_ ats 阵列中添加 color QQ black 。 阵列键 color 指示 WordPress 期望将 color 属性传递给 erw_ widget' 短码 。 数组值 黑色 ` 设置默认值。 所有shortcode属性都作为字符串传递给shortcode函数,因此如果不想设置默认值,可以使用空字符串(''')取而代之. 最后一行更改为使用类而不是ID,因为预计页面中将有一个以上的元素.
现在,回到您的浏览器并点击您的Hello, World!框底下的Edit**按钮。 更新您的浏览器中的WordPress页面以添加短代码的第二个实例,并为两种实例添加颜色属性。

点击蓝色 **更新 ** 按钮来保存。
<$>[注] 注: 第二个小工具尚未显示,您需要更新 React 应用程序,以期通过类识别多个实例,而不是通过 ID识别一个单个实例。
接下来,打开index.js来编辑:
1sudo nano widget/src/index.js
更新它以以下方式:
 1[label /var/www/wordpress/wp-content/plugins/react-wordpress/widget/src/index.js]
 2import React from 'react';
 3import ReactDOM from 'react-dom';
 4import './index.css';
 5import * as serviceWorker from './serviceWorker';
 6
 7const App = () => (
 8  <div className="App">
 9    <span className="App__Message">Hello,<br />World!</span>
10  </div>
11);
12
13const targets = document.querySelectorAll('.erw-root');
14Array.prototype.forEach.call(targets, target => ReactDOM.render(<App />, target));
15
16serviceWorker.unregister();
寫下並停止檔案. 更新的行將在每個實例上召喚 React 應用程式,並使用「erw-root」類別. 因此,如果使用短碼兩次,頁面會出現兩個方塊。
最后,打开 index.css 来编辑:
1sudo nano widget/src/index.css
更新文件以包含以下突出的行:
 1[label /var/www/wordpress/wp-content/plugins/react-wordpress/widget/src/index.css]
 2.erw-root { display: inline-block; }
 3
 4.App {
 5  width: 100px;
 6  height: 100px;
 7  border: 1px solid;
 8  display: inline-block;
 9  margin-right: 20px;
10  position: relative;
11}
12
13.App .App__Message {
14  font-size: 15px;
15  line-height: 15px;
16  position: absolute;
17  top: 50%;
18  transform: translateY(-50%);
19  text-align: center;
20  width: 100%;
21}
有了这个添加的行,多个旁边的widget 将出现在旁边,而不是一个在对方之上。
保存并删除文件。
现在,重新编译您的 React 应用程序:
1cd widget
2sudo npm run build
现在,如果您在浏览器中刷新页面,您将看到两种 widget:

请注意,widget 仍然不显示边界颜色,这将在未来部分中讨论。
单独识别每个 Widget 实例
为了单独识别每个小组件,需要从服务器传递一个ID。这可以通过根元素的data-id属性进行。这很重要,因为页面上的每个小组件可能有不同的设置。
要做到这一点,回到你的顶级插件目录,并打开shortcode.php进行编辑:
1cd ..
2nano includes/shortcode.php
更新它以具有以下突出线条:
 1[label /var/www/wordpress/wp-content/plugins/react-wordpress/includes/shortcode.php]
 2<?php
 3// This file enqueues your shortcode.
 4
 5defined( 'ABSPATH' ) or die( 'Direct script access disallowed.' );
 6
 7add_shortcode( 'erw_widget', function( $atts ) {
 8  $default_atts = array( 'color' => 'black' );
 9  $args = shortcode_atts( $default_atts, $atts );
10  $uniqid = uniqid('id');
11
12  return "<div class='erw-root' data-id='{$uniqid}'></div>";
13});
第一个新行会生成一个具有前缀 id 的独特 ID. 更新后的行会使用 data-id 属性将 ID 附加到 React 根中,从而使 ID 在 React 中可访问。
保存文件,但尚未退出它。
写入 JavaScript window 对象的设置
在短代码文件中,您将写入窗口全球JavaScript对象中的页面设置,使用窗口对象确保它可以从React内部访问。
如果shortcode.php仍然打开,请将其更新为包含以下内容:
 1[label /var/www/wordpress/wp-content/plugins/react-wordpress/includes/shortcode.php]
 2<?php
 3// This file enqueues your shortcode.
 4
 5defined( 'ABSPATH' ) or die( 'Direct script access disallowed.' );
 6
 7add_shortcode( 'erw_widget', function( $atts ) {
 8  $default_atts = array( 'color' => 'black' );
 9  $args = shortcode_atts( $default_atts, $atts );
10  $uniqid = uniqid('id');
11
12  global $current_user;
13  $display_name = $current_user ? $current_user->display_name : 'World';
14
15  ob_start(); ?>
16  <script>
17  window.erwSettings = window.erwSettings || {};
18  window.erwSettings["<?= $uniqid ?>"] = {
19    'color': '<?= $args["color"] ?>',
20    'name': '<?= $display_name ?>',
21  }
22  </script>
23  <div class="erw-root" data-id="<?= $uniqid ?>"></div>
24
25  <?php
26  return ob_get_clean();
27});
这些更新在每个元素前写一个<script>块,该元素初始化了窗口全球设置对象,并填充了 WP Admin 中提供的数据。
<$>[注] 注: 语法 <?= 是指 <?php echo <$> 的缩写。
保存并删除文件。
现在, inspect是您的网页浏览器中的WordPress页面,这将向您显示您的网页的HTML。如果您选择CTRL+F并搜索window.erwSettings,您将看到您的网页的HTML设置如下:
1...
2  window.erwSettings = window.erwSettings || {};
3  window.erwSettings["id5d5f1958aa5ae"] = {
4    'color': '#cf6f1a',
5    'name': 'sammy',
6  }
7...
从 React 获取设置
在 React 应用程序中,您将根据 ID 获取设置,并将边界颜色值传递给应用组件作为属性(prop).这使得应用组件可以使用该值,而无需知道它来自哪里。
打开index.js来编辑:
1sudo nano widget/src/index.js
更新它以便包含以下突出的行:
 1[label /var/www/wordpress/wp-content/plugins/react-wordpress/widget/src/index.js]
 2import React from 'react';
 3import ReactDOM from 'react-dom';
 4import './index.css';
 5import * as serviceWorker from './serviceWorker';
 6
 7const App = ({ settings }) => (
 8  <div className="App" style={{borderColor: settings.color}}>
 9    <span className="App__Message">Hello,<br />{settings.name}!</span>
10  </div>
11);
12
13const targets = document.querySelectorAll('.erw-root');
14Array.prototype.forEach.call(targets, target => {
15  const id = target.dataset.id;
16  const settings = window.erwSettings[id];
17  ReactDOM.render(<App settings={settings} />, target)
18});
19
20serviceWorker.unregister();
保存文件并离开您的文本编辑器。
您的 React 应用程序现在将使用窗口全球window.erwSettings对象的唯一 ID 来检索设置并将其传输到App组件中。
1cd widget
2sudo npm run build
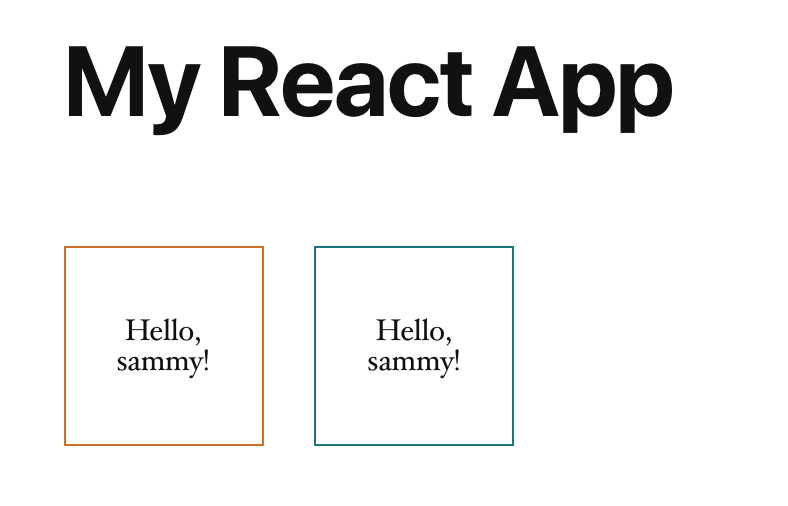
完成此最后一步后,在您的浏览器中更新WordPress页面,您将看到用户提供的边界颜色和服务器提供的显示名称显示在小工具中:
结论
在本教程中,你创建了自己的WordPress插件,里面有一个React应用程序,然后你建立了一个短代码作为一个桥梁,使你的应用程序可以在WP Admin页面构建器中嵌入,最后,你在页面上定制了你的widget。
现在,您可以以信心扩展您的React应用程序,您的交付机制已经在场,WordPress的这个基础确保您可以专注于客户端体验,随着应用程序的扩展和增长,您可以轻松地添加更多以生产为导向的工具和技术,这些工具和技术将与任何WordPress安装一起工作。
若要进一步阅读您可以用坚实的 React 基础做些什么,请尝试探索这些教程之一:
- How To Display Data from the DigitalOcean API with React为React提供了一个有趣而实用的用例。 * How To Build a Customer List Management App with React and TypeScript提供了更先进的React与TypeScript的使用。