介绍
MySQL 集群是一个软件技术,提供高可用性和输出量. 如果你已经熟悉其他集群技术,你会发现 MySQL 集群类似于它们. 简而言之,有一个或多个管理节点控制数据节点(数据存储的地方)。
你可能想知道MySQL复制是如何与MySQL集群相关的。在集群中没有数据的典型复制,而是数据节点的同步化。 为此,必须使用一个特殊的数据引擎 - NDBCluster(NDB)。想想集群作为一个单一的逻辑MySQL环境,具有冗余的组件。因此,MySQL集群可以与其他MySQL集群进行复制。
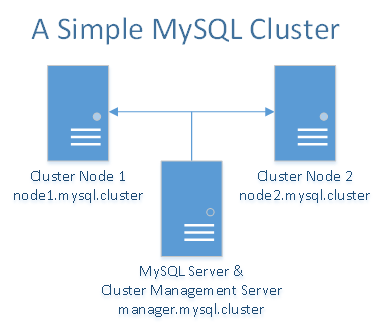
MySQL集群在共享-无所事事的环境中最有效. 理想的情况是,任何两个组件都不应共享相同的硬件. 为了简单起见,为了演示起见,我们将仅限于使用三个滴滴. 将有两个Droplets作为数据节点,它们正在相互之间同步数据。 第三个Droplet将用于集群管理器,同时用于MySQL服务器/客户端. 如果您有更多的 Droplets , 您可以添加更多的数据节点, 将集群管理器从 MySQL 服务器/客户端中分离出来, 甚至会添加更多的 Droplets 作为集群管理器和 MySQL 服务器/客户端 .
前提条件
您将需要总共三个Droplets - 一个Droplet用于MySQL群集管理器和MySQL服务器/客户端,以及两个Droplets用于多余的MySQL数据节点。
在相同的 DigitalOcean 数据中心中,创建以下 Droplets 与 私人网络启用 :
- 至少有 1 GB RAM 和 私人网络启用的三个 Ubuntu 16.04 Droplets * 每个 Droplet 的非 root 用户都有 sudo 特权(Initial Server Setup with Ubuntu 16.04解释了如何设置此功能)。
MySQL集群在RAM中存储大量信息,每个Dropplet都应该至少有1GB的RAM。
正如在私人网络教程中所提到的(https://andsky.com/tech/tutorials/how-to-set-up-and-use-digitalocean-private-networking),请确保为 3 个 Droplets 设置自定义记录。 为了简单和方便,我们将在 `/etc/hosts’ 文件中为每个 Droplet 使用以下自定义记录:
10.XXX.XX.X node1.mysql.cluster 10.YYY.YY.Y node2.mysql.cluster 10.ZZZ.ZZ.Z manager.mysql.cluster
请相应地将突出的 IP 替换为您的 Droplets 的私人 IP。
除非另有说明,本教程中需要 root 特权的所有命令都应该作为具有 sudo 特权的非 root 用户运行。
第1步:下载和安装MySQL集群
在撰写本教程时,MySQL集群的最新GPL版本是7.4.11。
- 集群管理软件 * 数据节点管理软件 * MySQL 5.6 服务器和客户端二进制
您可以从 官方 MySQL 集群下载页面下载免费的,一般可用 (GA) MySQL 集群版本。从此页面中,选择 Debian Linux 平台包,这也适合Ubuntu。
安装说明将是相同的所有滴滴,所以完成这些步骤在所有 3 滴滴。
在启动安装之前,必须安装libaio1包,因为它是一种依赖性:
1sudo apt-get install libaio1
然后,安装 MySQL 集群包:
1sudo dpkg -i mysql-cluster-gpl-7.4.11-debian7-x86_64.deb
现在您可以在目录中找到 MySQL 集群安装 /opt/mysql/server-5.6/. 我们将特别与 Bin 目录 (/opt/mysql/server-5.6/bin/) 一起工作。
在所有三个Dropplets上都应该执行相同的安装步骤,无论每一个都具有不同的功能 - 管理器或数据节点。
接下来,我们将在每个Droplet上配置MySQL群集管理器。
步骤 2 — 配置和启动集群管理器
在此步骤中,我们将配置MySQL集群管理器(‘manager.mysql.cluster’)。它的正确配置将确保数据节点之间的正确同步和负载分布。
集群管理器是任何集群中必须启动的第一个组件. 它需要一个配置文件,作为一个参数传递给其二进制文件. 为了方便,我们将使用文件 /var/lib/mysql-cluster/config.ini 进行配置。
在manager.mysql.cluster Droplet 上,首先创建该文件所在的目录(/var/lib/mysql-cluster):
1sudo mkdir /var/lib/mysql-cluster
然后创建一个文件,并开始用 nano 编辑它:
1sudo nano /var/lib/mysql-cluster/config.ini
该文件应包含以下代码:
 1[label  /var/lib/mysql-cluster/config.ini]
 2[ndb_mgmd]
 3# Management process options:
 4hostname=manager.mysql.cluster  # Hostname of the manager
 5datadir=/var/lib/mysql-cluster  # Directory for the log files
 6
 7[ndbd]
 8hostname=node1.mysql.cluster    # Hostname of the first data node
 9datadir=/usr/local/mysql/data   # Remote directory for the data files
10
11[ndbd]
12hostname=node2.mysql.cluster    # Hostname of the second data node
13datadir=/usr/local/mysql/data   # Remote directory for the data files
14
15[mysqld]
16# SQL node options:
17hostname=manager.mysql.cluster  # In our case the MySQL server/client is on the same Droplet as the cluster manager
对于上述每个组件,我们已经定义了一个主机名参数,这是一个重要的安全措施,因为只有指定的主机名将被允许连接到管理员并根据其指定角色参与集群。
此外,主机名参数规定服务将运行在哪个界面上。这很重要,而且对于安全来说很重要,因为在我们的情况下,上述主机名指向我们在/etc/hosts文件中指定的私人IP。
在上面的文件中,您可以添加更多多余的组件,如数据节点(ndbd)或MySQL服务器(mysqld),只需以相同的方式定义额外的实例。
现在,您可以通过执行ndb_mgmd二进制来首次启动管理器,并用-f参数这样指定配置文件:
1sudo /opt/mysql/server-5.6/bin/ndb_mgmd -f /var/lib/mysql-cluster/config.ini
您应该看到一个类似于此的成功开始的消息:
1[secondary_label Output of ndb_mgmd]
2MySQL Cluster Management Server mysql-5.6.29 ndb-7.4.11
您可能希望管理服务从服务器自动启动 。 GA集群发布没有带合适的起动脚本,但有一些可以在线使用. 首先,您只需将启动命令添加到/etc/rc.local文件中,服务将在启动时自动启动。 但首先,你必须确保在服务器启动期间执行`/etc/rc.local'。 在Ubuntu 16.04,这需要运行额外的命令:
1sudo systemctl enable rc-local.service
然后打开文件 /etc/rc.local 进行编辑:
1sudo nano /etc/rc.local
在出口行前添加开始命令,如下:
1[label  /etc/rc.local]
2...
3/opt/mysql/server-5.6/bin/ndb_mgmd -f /var/lib/mysql-cluster/config.ini
4exit 0
保存和退出文件。
集群管理器不需要一直运行,它可以启动、停止和重新启动,而不需要集群停机时间,只需要在集群节点和MySQL服务器/客户端的初始启动时。
步骤 3 – 配置和启动数据节点
接下来,我们将配置数据节点(‘node1.mysql.cluster’和‘node2.mysql.cluster’),以存储数据文件并正确支持NDB引擎. 所有命令应在两个节点上执行. 您可以先从‘node1.mysql.cluster’开始,然后在‘node2.mysql.cluster’上重复相同的步骤。
数据节点从标准的MySQL配置文件 /etc/my.cnf 读取配置,更具体地说,在行后的部分 [mysql_cluster]。
1sudo nano /etc/my.cnf
指定管理员的主机名称如下:
1[label  /etc/my.cnf]
2[mysql_cluster]
3ndb-connectstring=manager.mysql.cluster
保存和退出文件。
指定管理员的位置是节点引擎启动所需的唯一配置,其余的配置将直接从管理员那里进行。在我们的示例中,数据节点将发现其数据目录为 /usr/local/mysql/data 根据管理员的配置。
1sudo mkdir -p /usr/local/mysql/data
之后,您可以使用以下命令首次启动数据节点:
1sudo /opt/mysql/server-5.6/bin/ndbd
成功开始后,你应该看到类似的输出:
1[secondary_label Output of ndbd]
22016-05-11 16:12:23 [ndbd] INFO     -- Angel connected to 'manager.mysql.cluster:1186'
32016-05-11 16:12:23 [ndbd] INFO     -- Angel allocated nodeid: 2
您应该将 ndbd 服务自动启动到服务器上,GA 集群版本也不会为此提供一个合适的启动脚本,就像我们对集群管理器一样,让我们将启动命令添加到 /etc/rc.local 文件中。
1sudo systemctl enable rc-local.service
然后打开文件 /etc/rc.local 进行编辑:
1sudo nano /etc/rc.local
将开始命令添加到出口行前,如下:
1[label  /etc/rc.local]
2...
3/opt/mysql/server-5.6/bin/ndbd
4exit 0
保存和退出文件。
一旦您完成了第一个节点,在我们的示例中重复对另一个节点的相同步骤,即node2.mysql.cluster。
第4步:配置和启动MySQL服务器和客户端
标准的MySQL服务器,如在Ubuntu的默认apt存储库中提供的服务器,不支持MySQL集群引擎NDB,这就是为什么您需要定制的MySQL服务器安装的原因。
配置将再次存储默认 /etc/my.cnf 文件. 在 manager.mysql.cluster 上,打开配置文件:
1sudo nano /etc/my.cnf
然后添加以下内容:
1[label  /etc/my.cnf]
2[mysqld]
3ndbcluster # run NDB storage engine
4...
保存和退出文件。
根据最佳做法,MySQL服务器应该在属于自己的组(又称mysql)的用户(mysql)下运行。
1sudo groupadd mysql
然后创建属于该组的mysql用户,并通过将其壳路径设置为/bin/false来确保它不能使用壳:
1sudo useradd -r -g mysql -s /bin/false mysql
定制MySQL服务器安装的最后一个要求是创建默认数据库,您可以使用命令:
1sudo /opt/mysql/server-5.6/scripts/mysql_install_db --user=mysql
要启动 MySQL 服务器,我们将使用从 /opt/mysql/server-5.6/support-files/mysql.server 的启动脚本。
1sudo cp /opt/mysql/server-5.6/support-files/mysql.server /etc/init.d/mysqld
启用启动脚本并使用命令将其添加到默认的运行级别:
1sudo systemctl enable mysqld.service
现在,我们可以用以下命令首次手动启动MySQL服务器:
1sudo systemctl start mysqld
作为一个MySQL客户端,我们将再次使用与集群安装一起的自定义二进制,它有以下路径: /opt/mysql/server-5.6/bin/mysql. 为了方便,让我们在默认 /usr/bin路径中创建一个象征链接:
1sudo ln -s /opt/mysql/server-5.6/bin/mysql /usr/bin/
现在,您可以从命令行开始客户端,简单地键入‘mysql’如下:
1mysql
你应该看到一个类似的输出:
1[secondary_label Output of ndb_mgmd]
2Welcome to the MySQL monitor. Commands end with ; or \g.
3Your MySQL connection id is 3
4Server version: 5.6.29-ndb-7.4.11-cluster-gpl MySQL Cluster Community Server (GPL)
要退出MySQL提示,只需键入quit或同时按CTRL-D。
以上是第一个检查显示MySQL群集、服务器和客户端正在工作,接下来我们将进行更详细的测试,以确认群集正常工作。
测试群集
在此时,我们的简单的MySQL集群,一个客户端,一个服务器,一个管理员和两个数据节点应该是完整的。
1sudo /opt/mysql/server-5.6/bin/ndb_mgm
现在提示应该更改到集群管理控制台. 它看起来像这样:
1[secondary_label Inside the ndb_mgm console]
2-- NDB Cluster -- Management Client --
3ndb_mgm>
一旦进入控制台,执行SHOW命令如下:
1SHOW
你应该看到类似于此的输出:
 1[secondary_label Output of ndb_mgm]
 2Connected to Management Server at: manager.mysql.cluster:1186
 3Cluster Configuration
 4---------------------
 5[ndbd(NDB)]     2 node(s)
 6id=2    @10.135.27.42  (mysql-5.6.29 ndb-7.4.11, Nodegroup: 0, *)
 7id=3    @10.135.27.43  (mysql-5.6.29 ndb-7.4.11, Nodegroup: 0)
 8
 9[ndb_mgmd(MGM)] 1 node(s)
10id=1    @10.135.27.51  (mysql-5.6.29 ndb-7.4.11)
11
12[mysqld(API)]   1 node(s)
13id=4    @10.135.27.51  (mysql-5.6.29 ndb-7.4.11)
上面显示,有两个数据节点有 id 2 和 3. 它们是活跃和连接的. 还有一个管理节点有 id 1 和一个 MySQL 服务器有 id 4. 您可以通过输入其号码的命令 STATUS 来找到有关每个 id 的更多信息:
12 STATUS
The above command would show you the status of node 2 along with its MySQL and NDB versions:
1[secondary_label Output of ndb_mgm]
2Node 2: started (mysql-5.6.29 ndb-7.4.11)
To exit the management console type quit.
The management console is very powerful and gives you many other options for managing the cluster and its data, including creating an online backup. For more information check the official documentation.
Let's have a test with the MySQL client now. From the same Droplet, start the client with the mysql command for the MySQL root user. Please recall that we have created a symlink to it earlier.
1mysql -u root
\Your console will change to the MySQL client console. Once inside the MySQL client, run the command:
1SHOW ENGINE NDB STATUS \G
Now you should see all the information about the NDB cluster engine starting with the connection details:
1[secondary_label Output of mysql]
2
3*************************** 1. row ***************************
4  Type: ndbcluster
5  Name: connection
6Status: cluster_node_id=4, connected_host=manager.mysql.cluster, connected_port=1186, number_of_data_nodes=2, number_of_ready_data_nodes=2, connect_count=0
7...
The most important information from above is the number of ready nodes — 2. This redundancy will allow your MySQL cluster to continue operating even if one of the data nodes fails while. At the same time your SQL queries will be load balanced to the two nodes.
You can try shutting down one of the data nodes in order to test the cluster stability. The simplest thing would be just to restart the whole Droplet in order to have a full test of the recovery process. You will see the value of number_of_ready_data_nodes change to 1 and back to 2 again as the node is restarted.
Working with the NDB Engine
To see how the cluster really works, let's create a new table with the NDB engine and insert some data into it. Please note that in order to use the cluster functionality, the engine must be NDB. If you use InnoDB (default) or any other engine other than NDB, you will not make use of the cluster.
First, let's create a database called cluster with the command:
1CREATE DATABASE cluster;
Next, switch to the new database:
1USE cluster;
Now, create a simple table called cluster_test like this:
1CREATE TABLE cluster_test (name VARCHAR(20), value VARCHAR(20)) ENGINE=ndbcluster;
We have explicitly specified above the engine ndbcluster in order to make use of the cluster. Next, we can start inserting data with a query like this:
1INSERT INTO cluster_test (name,value) VALUES('some_name','some_value');
To verify the data has been inserted, run a select query like this:
1SELECT * FROM cluster_test;
When you are inserting and selecting data like this, you are load-balancing your queries between all the available data node, which are two in our example. With this scaling out you benefit both in terms of stability and performance.
Conclusion
As we have seen in this article, setting up a MySQL cluster can be simple and easy. Of course, there are many more advanced options and features which are worth mastering before bringing the cluster to your production environment. As always, make sure to have an adequate testing process because some problems could be very hard to solve later. For more information and further reading please go to the official documentation for MySQL cluster.