作者选择了 Electronic Frontier Foundation作为 Write for Donations计划的一部分接受捐款。
介绍
Apache 和 Nginx 是常用 PHP 的两种流行的开源 Web 服务器,在托管具有不同要求的多个网站时,在同一虚拟机上运行两种 Web 服务器可能是有用的。
具有 IPv4 和 IPv6 地址的服务器可以配置为服务于一个协议上的 Apache 站点和另一个协议上的 Nginx 站点,但这目前并不实用,因为 ISP 的 IPv6 采用仍然不普遍。为第二个 Web 服务器提供不同的端口号,如 81 或 8080 是另一种解决方案,但与端口号共享 URL(如 http://example.com:81)并不总是合理或理想的。
在本教程中,您将将 Nginx 配置为 Web 服务器和 Apache 的反向代理 - 所有在一个服务器上。
根据 Web 应用程序,可能需要对代码进行更改,以保持 Apache 反向代理警惕,特别是当配置 SSL 站点时。 为了避免这种情况,您将安装一个名为mod_rpaf的 Apache 模块,该模块会重写某些环境变量,以便 Apache 直接处理来自 Web 客户端的请求。
我们将在一个服务器上托管四个域名. 两个将由 Nginx 服务: example.com(默认虚拟主机)和 sample.org. 剩余的两个, foobar.net 和 test.io,将由 Apache 服务。
前提条件
要完成本教程,您将需要以下内容:
- 一个新的Ubuntu 18.04 server,通过遵循[初始服务器设置与Ubuntu 18.04] (https://andsky.com/tech/tutorials/initial-server-setup-with-ubuntu-18-04)来配置. 这包括一个sudo非根用户和一个防火墙.
- 联合国 配置了四个完全合格的域名,以指向您的服务器的IP地址. 请参看如何用数字海洋设置主机名的第3步,以说明如何这样做。 如果您将域名 DNS 设置在其它位置, 您应该在那里创建相应的 A 记录 。 .
第1步:安装Apache和PHP-FPM
让我们先安装Apache和PHP-FPM。
除了Apache和PHP-FPM之外,我们还将安装PHP FastCGI Apache模块libapache2-mod-fastcgi,以支持FastCGI Web应用程序。
首先,更新您的包列表,以确保您有最新的包。
1sudo apt update
接下来,安装 Apache 和 PHP-FPM 包:
1sudo apt install apache2 php-fpm
FastCGI Apache 模块在 Ubuntu 存储库中不可用,所以从 kernel.org下载并使用 dpkg 命令安装。
1wget https://mirrors.edge.kernel.org/ubuntu/pool/multiverse/liba/libapache-mod-fastcgi/libapache2-mod-fastcgi_2.4.7~0910052141-1.2_amd64.deb
2sudo dpkg -i libapache2-mod-fastcgi_2.4.7~0910052141-1.2_amd64.deb
接下来,让我们更改Apache的默认配置以使用PHP-FPM。
第2步:配置Apache和PHP-FPM
在此步骤中,我们将更改Apache的端口号为8080,并将其配置为使用mod_fastcgi模块的PHP-FPM。
1sudo mv /etc/apache2/ports.conf /etc/apache2/ports.conf.default
创建一个新的 ports.conf 文件,端口设置为 8080:
1echo "Listen 8080" | sudo tee /etc/apache2/ports.conf
注意:网页服务器在配置反向代理时通常会听127.0.0.1:8080,但这样做会将PHP的环境变量 SERVER_ADDR 的值设置为反向IP地址,而不是服务器的公共IP。
接下来,我们将为Apache创建一个虚拟主机文件. 该文件中的<VirtualHost>指令将设置为仅在端口8080上服务网站。
禁用默认虚拟主机:
1sudo a2dissite 000-default
然后创建一个新的虚拟主机文件,使用现有默认网站:
1sudo cp /etc/apache2/sites-available/000-default.conf /etc/apache2/sites-available/001-default.conf
现在打开新的配置文件:
1sudo nano /etc/apache2/sites-available/001-default.conf
将听力端口更改为8080:
1[label /etc/apache2/sites-available/000-default.conf]
2<VirtualHost *:8080>
3    ServerAdmin webmaster@localhost
4    DocumentRoot /var/www/html
5    ErrorLog ${APACHE_LOG_DIR}/error.log
6    CustomLog ${APACHE_LOG_DIR}/access.log combined
7</VirtualHost>
保存文件并激活新的配置文件:
1sudo a2ensite 001-default
然后重新加载Apache:
1sudo systemctl reload apache2
检查Apache是否正在听8080:
1sudo netstat -tlpn
输出应该看起来像下面的例子,在apache2听到8080:
1[secondary_label Output]
2Active Internet connections (only servers)
3Proto Recv-Q Send-Q Local Address Foreign Address State PID/Program name
4tcp 0 0 0.0.0.0:22 0.0.0.0:*            LISTEN 1086/sshd
5tcp6 0 0 :::8080           :::*                 LISTEN 4678/apache2
6tcp6 0 0 :::22             :::*                 LISTEN 1086/sshd
一旦您确认Apache在正确的端口上收听,您可以配置对PHP和FastCGI的支持。
步骤 3 — 配置 Apache 以使用 mod_fastcgi
Apache 默认情况下使用mod_php来服务 PHP 页面,但需要额外的配置来使用 PHP-FPM。
<$>[注] 注: 如果您在使用mod_php的现有LAMP安装上尝试此教程,请先用sudo a2dismod php7.2禁用它。
我们将为mod_fastcgi添加一个配置块,这取决于mod_action。mod_action是默认禁用的,所以我们首先需要启用它:
1sudo a2enmod actions
重命名现有的 FastCGI 配置文件:
1sudo mv /etc/apache2/mods-enabled/fastcgi.conf /etc/apache2/mods-enabled/fastcgi.conf.default
创建一个新的配置文件:
1sudo nano /etc/apache2/mods-enabled/fastcgi.conf
将下列指令添加到文件中,以将.php 文件的请求传送到 PHP-FPM UNIX 接口:
 1[label /etc/apache2/mods-enabled/fastcgi.conf]
 2<IfModule mod_fastcgi.c>
 3  AddHandler fastcgi-script .fcgi
 4  FastCgiIpcDir /var/lib/apache2/fastcgi
 5  AddType application/x-httpd-fastphp .php
 6  Action application/x-httpd-fastphp /php-fcgi
 7  Alias /php-fcgi /usr/lib/cgi-bin/php-fcgi
 8  FastCgiExternalServer /usr/lib/cgi-bin/php-fcgi -socket /run/php/php7.2-fpm.sock -pass-header Authorization
 9  <Directory /usr/lib/cgi-bin>
10    Require all granted
11  </Directory>
12</IfModule>
保存更改并进行配置测试:
1sudo apachectl -t
如果显示了 Syntax OK ,请重新加载 Apache:
1sudo systemctl reload apache2
如果您看到警告无法使用 127.0.1.1 可靠地确定服务器的完全合格域名,将ServerName指令设置为全球,以抑制此消息,您现在可以安全地忽略它。
现在让我们确保我们可以从Apache服务PHP。
第4步:验证PHP功能
让我们确保PHP通过创建一个phpinfo()文件并从Web浏览器访问它来工作。
创建文件 /var/www/html/info.php 其中包含呼叫到 phpinfo 函数:
1echo "<?php phpinfo(); ?>" | sudo tee /var/www/html/info.php
请注意,如果您遵循初始服务器设置的 前提条件 部分,那么您可能已经启用了Apache防火墙。让我们继续前进并确保我们可以在端口 8080上访问我们的IP,目前无法访问。
首先允许8080端口通过防火墙:
1sudo ufw allow 8080
既然我们要保护我们的Apache域,让我们继续前进,确保443端口的TLS流量可以进入。
允许Apache Full在80和443端口上允许流量:
1sudo ufw allow "Apache Full"
现在检查你的防火墙状态:
1sudo ufw status
如果您遵循前提条件,那么输出将是这样的:
1[secondary_label Output]
2To Action From
3--                         ------      ----
4OpenSSH ALLOW Anywhere
5Apache Full ALLOW Anywhere
68080 ALLOW Anywhere
7OpenSSH (v6)               ALLOW Anywhere (v6)
8Apache Full (v6)           ALLOW Anywhere (v6)
98080 (v6)                  ALLOW Anywhere (v6)
您将看到8080端口和Apache Full端口是允许的,除了其他任何防火墙规则。
要在浏览器中查看该文件,请访问http://your_server_ip:8080/info.php。这将为您提供PHP正在使用的配置设置列表。

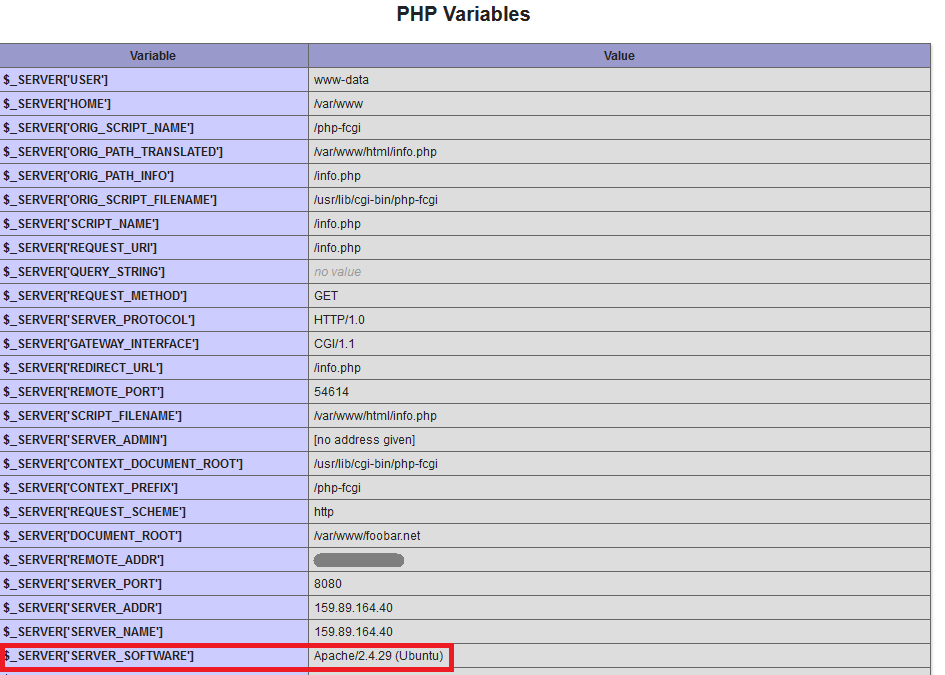
在页面顶部,检查 Server API 说** FPM/FastCGI** . 页面下方约三分之二的路径,** PHP变量** 部分会告诉你** SERVER_SOFTWARE** 是Ubuntu上的Apache. 这些证实mod_fastcgi是活跃的,而Apache正在使用PHP-FPM来处理PHP文件。
第5步:为Apache创建虚拟主机
让我们为域名foobar.net和test.io创建Apache虚拟主机文件,以便做到这一点,我们首先将为两个网站创建文档根目录,并在这些目录中放置一些默认文件,以便我们可以轻松地测试我们的配置。
首先,创建文档根目录:
1sudo mkdir -v /var/www/foobar.net /var/www/test.io
然后为每个网站创建一个索引文件:
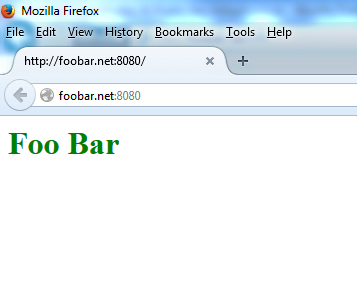
1echo "<h1 style='color: green;'>Foo Bar</h1>" | sudo tee /var/www/foobar.net/index.html
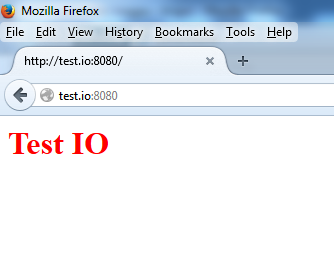
2echo "<h1 style='color: red;'>Test IO</h1>" | sudo tee /var/www/test.io/index.html
然后为每个网站创建一个phpinfo()文件,以便我们可以测试PHP是否正确配置。
1echo "<?php phpinfo(); ?>" | sudo tee /var/www/foobar.net/info.php
2echo "<?php phpinfo(); ?>" | sudo tee /var/www/test.io/info.php
现在为foobar.net域创建虚拟主机文件:
1sudo nano /etc/apache2/sites-available/foobar.net.conf
将下列代码添加到文件中以定义主机:
1[label /etc/apache2/sites-available/foobar.net.conf]
2    <VirtualHost *:8080>
3        ServerName foobar.net
4        ServerAlias www.foobar.net
5        DocumentRoot /var/www/foobar.net
6        <Directory /var/www/foobar.net>
7            AllowOverride All
8        </Directory>
9    </VirtualHost>
AllowOverride All 行允许支持.htaccess。
对于在 Apache 中设置虚拟主机的完整指南,请参阅 如何在 Ubuntu 16.04 上设置 Apache 虚拟主机。
保存并关闭文件. 然后为 test.io 创建类似的配置. 首先创建文件:
1sudo nano /etc/apache2/sites-available/test.io.conf
然后将配置添加到文件中:
1[label /etc/apache2/sites-available/test.io.conf]
2    <VirtualHost *:8080>
3        ServerName test.io
4        ServerAlias www.test.io
5        DocumentRoot /var/www/test.io
6        <Directory /var/www/test.io>
7            AllowOverride All
8        </Directory>
9    </VirtualHost>
保存文件并离开编辑器。
现在两个Apache虚拟主机已经设置了,使用a2ensite命令启用网站,在sites-enabled目录中创建一个符号链接到虚拟主机文件:
1sudo a2ensite foobar.net
2sudo a2ensite test.io
再次检查 Apache 对配置错误:
1sudo apachectl -t
如果没有错误,您将看到 Syntax OK 显示。
重新加载 Apache 以应用更改,一旦您的配置没有错误:
1sudo systemctl reload apache2
要确认网站正在工作,请在浏览器中打开http://foobar.net:8080和http://test.io:8080并检查每个网站是否显示其 index.html 文件。
你会看到以下结果:
此外,请确保 PHP 通过访问每个网站的 **info.php 文件来工作,请访问浏览器中的 http://foobar.net:8080/info.php 和 http://test.io:8080/info.php。
您将在每个网站上看到相同的PHP配置规格列表,就像您在步骤4中看到的那样。
我们现在有两个网站托管在Apache上的端口8080。
第6步:安装和配置 Nginx
在此步骤中,我们将安装 Nginx,并将域名) on Ubuntu 18.04](https://andsky.com/tech/tutorials/how-to-install-nginx-on-ubuntu-18-04# step-5-%E2%80%93-setting-up-server-blocks-(推荐))。
使用包管理器安装 Nginx:
1sudo apt install nginx
然后删除默认虚拟主机的simlink,因为我们将不再使用它:
1sudo rm /etc/nginx/sites-enabled/default
我们将在稍后创建自己的默认网站(‘example.com’)。
现在我们将使用我们在Apache中使用的相同程序为 Nginx创建虚拟主机,首先为两个网站创建文档根目录:
1sudo mkdir -v /usr/share/nginx/example.com /usr/share/nginx/sample.org
我們會將 Nginx 網站保留在 /usr/share/nginx,這就是 Nginx 默認想要的位置. 您可以將他們放置在 /var/www/html 以下與 Apache 網站,但這種分離可能有助於您將網站與 Nginx 聯繫起來。
与Apache的虚拟主机一样,在安装完成后创建)`文件进行测试:
1echo "<h1 style='color: green;'>Example.com</h1>" | sudo tee /usr/share/nginx/example.com/index.html
2echo "<h1 style='color: red;'>Sample.org</h1>" | sudo tee /usr/share/nginx/sample.org/index.html
3echo "<?php phpinfo(); ?>" | sudo tee /usr/share/nginx/example.com/info.php
4echo "<?php phpinfo(); ?>" | sudo tee /usr/share/nginx/sample.org/info.php
现在为域名 example.com 创建一个虚拟主机文件:
1sudo nano /etc/nginx/sites-available/example.com
Nginx 将配置文件中的服务器 {... } 区域称为服务器块 **. 创建主虚拟主机的服务器块,即example.com`。
 1[label /etc/nginx/sites-available/example.com]
 2server {
 3    listen 80 default_server;
 4
 5    root /usr/share/nginx/example.com;
 6    index index.php index.html index.htm;
 7
 8    server_name example.com www.example.com;
 9    location / {
10        try_files $uri $uri/ /index.php;
11    }
12
13    location ~ \.php$ {
14        fastcgi_pass unix:/run/php/php7.2-fpm.sock;
15        include snippets/fastcgi-php.conf;
16    }
17}
现在为 Nginx 的第二个域名, sample.org 创建一个虚拟主机文件:
1sudo nano etc/nginx/sites-available/sample.org
将以下内容添加到文件中:
 1[label /etc/nginx/sites-available/sample.org]
 2server {
 3    root /usr/share/nginx/sample.org;
 4    index index.php index.html index.htm;
 5
 6    server_name sample.org www.sample.org;
 7    location / {
 8        try_files $uri $uri/ /index.php;
 9    }
10
11    location ~ \.php$ {
12        fastcgi_pass unix:/run/php/php7.2-fpm.sock;
13        include snippets/fastcgi-php.conf;
14    }
15}
保存并关闭文件。
然后通过创建符号链接到网站启用目录来启用两个网站:
1sudo ln -s /etc/nginx/sites-available/example.com /etc/nginx/sites-enabled/example.com
2sudo ln -s /etc/nginx/sites-available/sample.org /etc/nginx/sites-enabled/sample.org
然后测试 Nginx 配置以确保没有配置问题:
1sudo nginx -t
然后重新加载 Nginx 如果没有错误:
1sudo systemctl reload nginx
现在通过访问 http://example.com/info.php 和 http://sample.org/info.php 访问您的 Nginx 虚拟主机的 phpinfo() 文件。
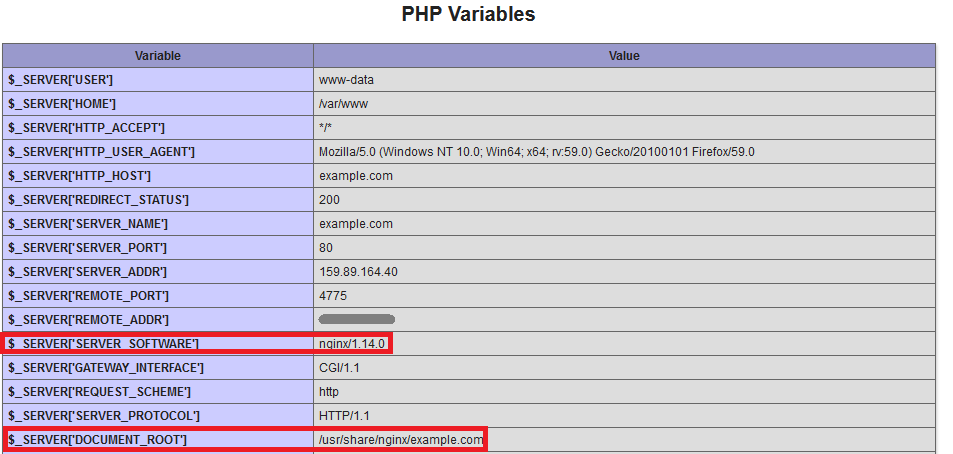
SERVER_SOFTWARE 应该说nginx,表示这些文件是由 Nginx 直接提供的。
在此时刻,我们已经安装了 Nginx 并创建了两个虚拟主机,接下来我们将配置 Nginx 来为在 Apache 上托管的域名提供代理请求。
第7步:为Apache的虚拟主机配置 Nginx
让我们在server_name指令中创建一个额外的 Nginx 虚拟主机,其中包含多个域名。
创建一个新的 Nginx 虚拟主机文件,将请求转发到 Apache:
1sudo nano /etc/nginx/sites-available/apache
添加以下代码块,指定Apache虚拟主机域的名称,并向Apache提供代理,请记住在proxy_pass中使用公共IP地址:
 1[label /etc/nginx/sites-available/apache]
 2server {
 3    listen 80;
 4    server_name foobar.net www.foobar.net test.io www.test.io;
 5
 6    location / {
 7        proxy_pass http://your_server_ip:8080;
 8        proxy_set_header Host $host;
 9        proxy_set_header X-Real-IP $remote_addr;
10        proxy_set_header X-Forwarded-For $proxy_add_x_forwarded_for;
11        proxy_set_header X-Forwarded-Proto $scheme;
12    }
13}
保存文件并通过创建象征链接启用这个新的虚拟主机:
1sudo ln -s /etc/nginx/sites-available/apache /etc/nginx/sites-enabled/apache
测试配置以确保没有错误:
1sudo nginx -t
如果没有错误,请重新加载 Nginx:
1sudo systemctl reload nginx
打开浏览器并访问您的浏览器中的 URL http://foobar.net/info.php. 向下滚动到 PHP 变量 部分并检查显示的值。
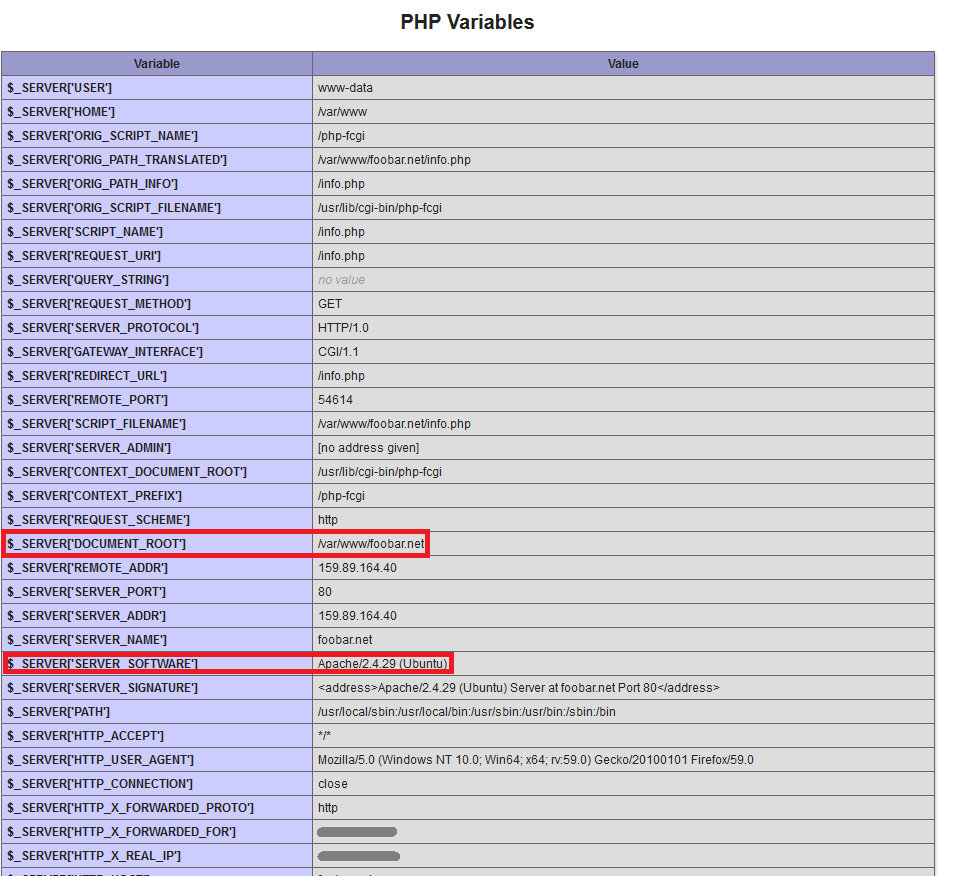
变量 SERVER_SOFTWARE 和** DOCUMENT_ROOT** 证实该请求由 Apache 处理。 变量** HTTP_X_REAL_IP** 和** HTTP_X_FORWARDED_FOR** 由 Nginx 添加,应该显示您正在使用的计算机的公共 IP 地址以访问 URL。
我们已经成功设置了 Nginx 来向 Apache 提供特定域的代理请求,接下来,让我们将 Apache 配置为将REMOTE_ADDR变量设置为直接处理这些请求。
第8步:安装和配置mod_rpaf
在此步骤中,您将安装一个名为mod_rpaf的Apache模块,该模块会根据反向代理提供的值重新编写 REMOTE_ADDR 、** HTTPS** 和** HTTP_PORT** 的值。如果没有这个模块,一些PHP应用程序将需要代码更改,以便从代理程序后面无缝工作。
安装构建模块所需的包:
1sudo apt install unzip build-essential apache2-dev
从GitHub下载最新稳定版本:
1wget https://github.com/gnif/mod_rpaf/archive/stable.zip
提取下载的文件:
1unzip stable.zip
更改包含文件的新目录:
1cd mod_rpaf-stable
编译和安装模块:
1make
2sudo make install
接下来,在mods-available目录中创建一个文件,该文件将加载rpaf模块:
1sudo nano /etc/apache2/mods-available/rpaf.load
将下列代码添加到文件中来加载模块:
1[label /etc/apache2/mods-available/rpaf.load]
2LoadModule rpaf_module /usr/lib/apache2/modules/mod_rpaf.so
保存文件并离开编辑器。
在此目录中创建另一个名为rpaf.conf的文件,该文件将包含对mod_rpaf的配置指令:
1sudo nano /etc/apache2/mods-available/rpaf.conf
添加以下代码块来配置mod_rpaf,确保您指定服务器的IP地址:
1[label /etc/apache2/mods-available/rpaf.conf]
2    <IfModule mod_rpaf.c>
3        RPAF_Enable On
4        RPAF_Header X-Real-Ip
5        RPAF_ProxyIPs your_server_ip
6        RPAF_SetHostName On
7        RPAF_SetHTTPS On
8        RPAF_SetPort On
9    </IfModule>
请参阅)以获得更多信息。
RPAF_Header - 用于客户端的实际IP地址的标题.* RPAF_ProxyIPs* - 调节HTTP请求的代理IP。** RPAF_SetHostName* - 更新vhost名称以便ServerName和ServerAlias工作。** RPAF_SetHTTPS* - 根据X-Forwarded-Proto中包含的值设置了HTTPS环境变量。
保存rpaf.conf并启用该模块:
1sudo a2enmod rpaf
这将创建mods-enabled目录中的rpaf.load和rpaf.conf文件的符号链接。
1sudo apachectl -t
重新加载Apache如果没有错误:
1sudo systemctl reload apache2
在您的浏览器中访问phpinfo()页面http://foobar.net/info.php和http://test.io/info.php并检查PHP变量部分。
现在让我们为每个网站设置TLS/SSL加密。
步骤 9 — 使用 Let's Encrypt 设置 HTTPS 网站(可选)
在此步骤中,我们将为在 Apache 上托管的两个域配置 TLS/SSL 证书。我们将通过 Let's Encrypt获取证书。 Nginx 支持 SSL 终止,因此我们可以设置 SSL 而不修改 Apache 的配置文件。 mod_rpaf 模块确保在 Apache 上设置所需的环境变量,以使应用程序在 SSL 反向代理程序后无缝工作。
首先,我们将将两个域的服务器 {...}块分开,以便每个域都有自己的SSL证书。在您的编辑器中打开文件 `/etc/nginx/sites-available/apache:
1sudo nano /etc/nginx/sites-available/apache
修改文件,使其看起来像这样,在自己的服务器块中使用foobar.net和test.io:
 1[label /etc/nginx/sites-available/apache]
 2    server {
 3        listen 80;
 4        server_name foobar.net www.foobar.net;
 5
 6        location / {
 7            proxy_pass http://your_server_ip:8080;
 8            proxy_set_header Host $host;
 9            proxy_set_header X-Real-IP $remote_addr;
10            proxy_set_header X-Forwarded-For $proxy_add_x_forwarded_for;
11            proxy_set_header X-Forwarded-Proto $scheme;
12        }
13    }
14    server {
15        listen 80;
16        server_name test.io www.test.io;
17
18        location / {
19            proxy_pass http://your_server_ip:8080;
20            proxy_set_header Host $host;
21            proxy_set_header X-Real-IP $remote_addr;
22            proxy_set_header X-Forwarded-For $proxy_add_x_forwarded_for;
23            proxy_set_header X-Forwarded-Proto $scheme;
24        }
25    }
我们将使用 Certbot来生成我们的TLS/SSL证书,其 Nginx插件将负责重新配置 Nginx,并在需要时重新加载配置。
首先,添加官方Certbot存储库:
1sudo add-apt-repository ppa:certbot/certbot
当被要求确认要添加新存储库时,请按ENTER,然后更新包列表以获取新存储库的包信息:
1sudo apt update
然后安装 Certbot 的 Nginx 包,使用apt:
1sudo apt install python-certbot-nginx
一旦安装,请使用certbot命令生成foobar.net和www.foobar.net的证书:
1sudo certbot --nginx -d foobar.net -d www.foobar.net
这个命令告诉Certbot使用nginx插件,使用-d来指定我们希望证书有效的名称。
如果这是你第一次运行certbot,你将被要求输入电子邮件地址并同意服务条款. 这样做后,certbot将与 Let’s Encrypt 服务器进行通信,然后运行一个挑战,以验证你控制的域,你正在请求证书。
接下来,Certbot 会问您如何配置您的 HTTPS 设置:
1[secondary_label Output]
2Please choose whether or not to redirect HTTP traffic to HTTPS, removing HTTP access.
3-------------------------------------------------------------------------------
41: No redirect - Make no further changes to the webserver configuration.
52: Redirect - Make all requests redirect to secure HTTPS access. Choose this for
6new sites, or if you're confident your site works on HTTPS. You can undo this
7change by editing your web server's configuration.
8-------------------------------------------------------------------------------
9Select the appropriate number [1-2] then [enter] (press 'c' to cancel):
选择你的选择,然后按ENTER。配置将被更新,Nginx将重新加载以获取新的设置。
现在执行第二个域的命令:
1sudo certbot --nginx -d test.io -d www.test.io
在您的浏览器中使用https://前缀访问Apache的域名之一;请访问https://foobar.net/info.php,您将看到以下内容:
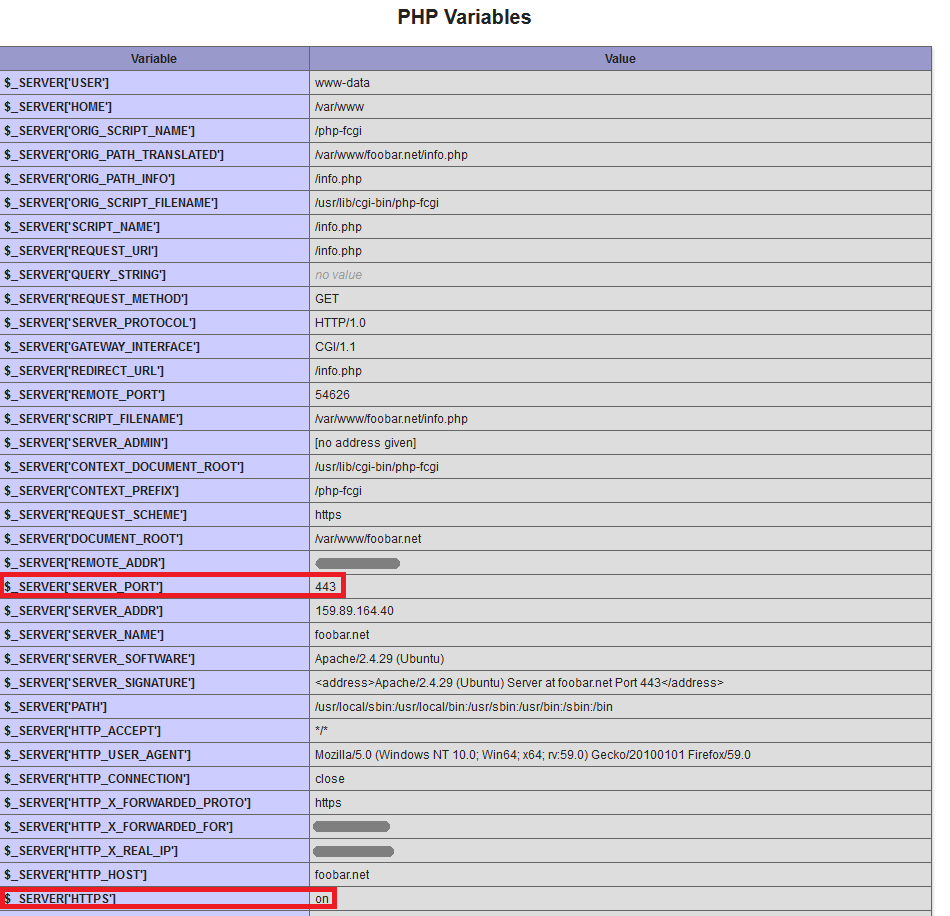
请参阅 PHP 变量 部分,变量** SERVER_PORT** 已设置为** 443** 和** HTTPS** 设置为** on** ,就好像 Apache 是通过 HTTPS 直接访问的。
现在,让我们禁用直接访问Apache。
步骤 10 — 阻止直接访问 Apache (可选)
由于Apache在公共IP地址上的端口8080上倾听,所以它可以被所有人访问,可以通过在您的防火墙规则集中使用以下IPtables命令来阻止它。
1sudo iptables -I INPUT -p tcp --dport 8080 ! -s your_server_ip -j REJECT --reject-with tcp-reset
请确保使用您的服务器的 IP 地址,而不是红色示例。一旦您的防火墙封锁了端口 8080,请测试它是否无法访问 Apache. 打开您的 Web 浏览器并尝试在端口 8080 上访问 Apache 的域名之一。
浏览器应该显示无法连接或网页不可用错误消息. IPtables的tcp-reset选项可用,外部用户不会看到端口8080和没有任何服务的端口之间的差异。
<$>[注] 注: IPtables 规则无法默认地重新启动系统。有几种方法可以保存 IPtables 规则,但最简单的方法是在 Ubuntu 存储库中使用 iptables-persistent。 探索 这篇文章以了解如何配置 IPTables。 <$>
现在,让我们配置 Nginx 来为 Apache 站点提供静态文件。
步骤 11 — 使用 Nginx 服务静态文件(可选)
当 Nginx 代理人请求 Apache 域时,它会将该域的每个文件请求发送给 Apache. Nginx 在服务像图像、JavaScript 和风格表等静态文件方面比 Apache 更快。
在您的编辑器中打开文件 /etc/nginx/sites-available/apache:
1sudo nano /etc/nginx/sites-available/apache
您需要为每个服务器块添加两个额外的位置块,以及修改现有的位置部分,此外,您还需要告诉 Nginx在哪里找到每个网站的静态文件。
如果您已决定不使用 SSL 和 TLS 证书,请修改您的文件以使其看起来如下:
 1[label /etc/nginx/sites-available/apache]
 2server {
 3    listen 80;
 4    server_name test.io www.test.io;
 5    root /var/www/test.io;
 6    index index.php index.htm index.html;
 7
 8    location / {
 9        try_files $uri $uri/ /index.php;
10    }
11
12    location ~ \.php$ {
13        proxy_pass http://your_server_ip:8080;
14        proxy_set_header Host $host;
15        proxy_set_header X-Real-IP $remote_addr;
16        proxy_set_header X-Forwarded-For $proxy_add_x_forwarded_for;
17        proxy_set_header X-Forwarded-Proto $scheme;
18    }
19
20    location ~ /\.ht {
21        deny all;
22    }
23}
24
25server {
26    listen 80;
27    server_name foobar.net www.foobar.net;
28    root /var/www/foobar.net;
29    index index.php index.htm index.html;
30
31    location / {
32        try_files $uri $uri/ /index.php;
33    }
34
35    location ~ \.php$ {
36        proxy_pass http://your_ip_address:8080;
37        proxy_set_header Host $host;
38        proxy_set_header X-Real-IP $remote_addr;
39        proxy_set_header X-Forwarded-For $proxy_add_x_forwarded_for;
40        proxy_set_header X-Forwarded-Proto $scheme;
41    }
42
43    location ~ /\.ht {
44        deny all;
45    }
46}
如果您也希望 HTTPS 可用,请使用以下配置:
 1[label /etc/nginx/sites-available/apache]
 2server {
 3    listen 80;
 4    server_name test.io www.test.io;
 5    root /var/www/test.io;
 6    index index.php index.htm index.html;
 7
 8    location / {
 9        try_files $uri $uri/ /index.php;
10    }
11
12    location ~ \.php$ {
13        proxy_pass http://your_server_ip:8080;
14        proxy_set_header Host $host;
15        proxy_set_header X-Real-IP $remote_addr;
16        proxy_set_header X-Forwarded-For $proxy_add_x_forwarded_for;
17        proxy_set_header X-Forwarded-Proto $scheme;
18    }
19
20    location ~ /\.ht {
21        deny all;
22    }
23
24    listen 443 ssl;
25    ssl_certificate /etc/letsencrypt/live/test.io/fullchain.pem;
26    ssl_certificate_key /etc/letsencrypt/live/test.io/privkey.pem;
27    include /etc/letsencrypt/options-ssl-nginx.conf;
28    ssl_dhparam /etc/letsencrypt/ssl-dhparams.pem;
29}
30
31server {
32    listen 80;
33    server_name foobar.net www.foobar.net;
34    root /var/www/foobar.net;
35    index index.php index.htm index.html;
36
37    location / {
38        try_files $uri $uri/ /index.php;
39    }
40
41    location ~ \.php$ {
42        proxy_pass http://your_ip_address:8080;
43        proxy_set_header Host $host;
44        proxy_set_header X-Real-IP $remote_addr;
45        proxy_set_header X-Forwarded-For $proxy_add_x_forwarded_for;
46        proxy_set_header X-Forwarded-Proto $scheme;
47    }
48
49    location ~ /\.ht {
50        deny all;
51    }
52
53    listen 443 ssl;
54    ssl_certificate /etc/letsencrypt/live/foobar.net/fullchain.pem;
55    ssl_certificate_key /etc/letsencrypt/live/foobar.net/privkey.pem;
56    include /etc/letsencrypt/options-ssl-nginx.conf;
57    ssl_dhparam /etc/letsencrypt/ssl-dhparams.pem;
58}
「try_files」指令使 Nginx 在文档根中搜索文件并直接服务它们. 如果文件具有 `.php' 扩展,请求将传递给 Apache. 即使在文档根中没有找到文件,请求也会传递给 Apache,以便应用程序功能如 permalinks 无问题地工作。
<$>[警告] 警告: 位置 ~ /\.ht指令非常重要;这防止 Nginx 服务于包含敏感信息的 Apache 配置文件的内容,如 .htaccess 和 .htpasswd。
保存文件并执行配置测试:
1sudo nginx -t
重新加载 Nginx 如果测试成功:
1sudo service nginx reload
要验证事情的运行,你可以检查Apache的日志文件在/var/log/apache2并查看info.php文件的GET请求test.io和foobar.net。
1sudo tail -f /var/log/apache2/other_vhosts_access.log
现在,请访问您的浏览器中的http://test.io/info.php,然后从日志中查看输出,你会看到Apache确实在响应:
1[secondary_label Output]
2    test.io:80 your_server_ip - - [01/Jul/2016:18:18:34 -0400] "GET /info.php HTTP/1.0" 200 20414 "-" "Mozilla/5.0 (Macintosh; Intel Mac OS X 10_10_5) AppleWebKit/537.36 (KHTML, like Gecko) Chrome/47.0.2526.111 Safari/537.36"
然后访问每个网站的index.html页面,你不会看到任何来自Apache的日志条目。
当您完成观察日志文件时,请按CTRL+C以停止尾声。
通过此设置,Apache将无法限制对静态文件的访问,静态文件的访问控制需要在Nginx的apache虚拟主机文件中进行配置,但这超出了本教程的范围。
结论
现在你有一个 Ubuntu 服务器, Nginx 服务于 example.com 和 sample.org,以及 Apache 服务于 foobar.net 和 test.io 虽然 Nginx 是 Apache 的反向代理,但 Nginx 的代理服务是透明的, Apache 域的连接似乎是直接从 Apache 服务的。