介绍
我们经常参与构建网络应用程序,在那里我们需要从远程服务器,API或数据库中获取大量数据记录。例如,如果您正在构建支付系统,它可能会收集数千个交易。
处理大数据集的一种方法是使用 pagination。当您提前知道数据集的大小(数据集中的总记录数量)时,页面化功能有效。第二,您仅根据最终用户与页面化控制的交互来从总数据集中加载所需的数据部分。
在本教程中,您将学习如何使用 React 构建定制页面组件来页面化大型数据集,您将构建世界各国的页面化视图 - 具有已知大小的数据集。
以下是您将在本教程中构建的演示:
前提条件
要完成本教程,您将需要:
- 安装在您的机器上。 步骤见如何安装节点.js并创建本地开发环境。
- [
创建-反应-app'](https://github.com/facebook/create-react-app) 命令行软件包,为您的反应应用创建锅炉板代码. 如果使用npm < 5.2',则可能需要安装`创建-反应-应用'作为全球依赖。 - 最后,本教程假设您已经熟悉反应。 如果不是这样,您可以查看[How To Code in React.js (https://www.digitalocean.com/community/tutorial_series/how-to-code-in-react-js)系列,以了解更多关于React的信息. .
本教程已通过 Node v14.2.0、npm v6.14.4、react v16.13.1 和react-scripts v3.4.1 进行验证。
步骤1 - 设置项目
使用create-react-app命令启动一个新的 React 应用程序. 您可以随意命名该应用程序,但本教程将命名它为react-pagination:
1npx create-react-app react-pagination
接下来,您将安装应用程序所需的依赖性,首先使用终端窗口导航到项目目录:
1cd react-pagination
运行以下命令来安装所需的依赖:
1npm install [email protected] [email protected] [email protected] [email protected] [email protected]
这将安装bootstrap,prop-types,react-flags,country-api和node-sass。
你安装了bootstrap包作为应用程序的依赖,因为你需要一些默认的样式。
要在应用程序中包含 Bootstrap,请编辑 src/index.js 文件:
1nano src/index.js
并在其他进口陈述前添加下列行:
1[label src/index.js]
2import "bootstrap/dist/css/bootstrap.min.css";
现在,Bootstrap 造型将在整个应用程序中提供。
您还为您的应用程序安装了react-flags作为依赖性。为了从您的应用程序中获取旗帜图标,您需要将图标图像复制到您的应用程序的公共目录。
在您的公共目录中创建一个img目录:
1mkdir public/img
将旗帜中的图像文件复制为img:
1cp -R node_modules/react-flags/vendor/flags public/img
这将为您的应用程序提供所有反应旗图像的副本。
现在你已经包括了某些依赖性,开始应用程序,从react-pagination项目目录中运行以下命令npm:
1npm start
现在你已经启动了应用程序,开发可以开始. 请注意,一个浏览器卡已经为你打开了 live reloading 功能,以保持与应用程序的同步,当你开发。
在此时,应用程序视图应该看起来像以下屏幕截图:
您现在已经准备好开始创建组件。
步骤 2 — 创建CountryCard组件
在此步骤中,您将创建CountryCard组件.CountryCard组件将返回特定国家的名称、地区和国旗。
首先,让我们在src目录中创建一个组件目录:
1mkdir src/components
然后,在src/components目录中创建一个新的CountryCard.js文件:
1nano src/components/CountryCard.js
并添加以下代码片段:
 1[label src/components/CountryCard.js]
 2import React from 'react';
 3import PropTypes from 'prop-types';
 4import Flag from 'react-flags';
 5
 6const CountryCard = props => {
 7  const {
 8    cca2: code2 = '', region = null, name = {}
 9  } = props.country || {};
10
11  return (
12    <div className="col-sm-6 col-md-4 country-card">
13      <div className="country-card-container border-gray rounded border mx-2 my-3 d-flex flex-row align-items-center p-0 bg-light">
14        <div className="h-100 position-relative border-gray border-right px-2 bg-white rounded-left">
15          <Flag country={code2} format="png" pngSize={64} basePath="./img/flags" className="d-block h-100" />
16        </div>
17        <div className="px-3">
18          <span className="country-name text-dark d-block font-weight-bold">{ name.common }</span>
19          <span className="country-region text-secondary text-uppercase">{ region }</span>
20        </div>
21      </div>
22    </div>
23  )
24}
25
26CountryCard.propTypes = {
27  country: PropTypes.shape({
28    cca2: PropTypes.string.isRequired,
29    region: PropTypes.string.isRequired,
30    name: PropTypes.shape({
31      common: PropTypes.string.isRequired
32    }).isRequired
33  }).isRequired
34};
35
36export default CountryCard;
CountryCard组件需要一个包含要渲染的国家数据的国家预告片,正如CountryCard组件的propTypes中所见,国家预告片对象必须包含以下数据:
cca2- 两位数的国家代码 *地区- 国家区域(例如,) *name.common- 国家的通用名称(例如,)
以下是样本国家对象:
1{
2  cca2: "NG",
3  region: "Africa",
4  name: {
5    common: "Nigeria"
6  }
7}
此外,请注意您如何使用)以了解有关所需的特许权以及如何使用该包的更多信息。
您现在已经完成了一个单独的CountryCard组件,最终,您将使用CountryCard的多个次,以在您的应用中显示不同的国旗和国家信息。
步骤 3 — 创建Pagination组件
在此步骤中,您将创建Pagination组件.Pagination组件包含在页面控制上构建、渲染和切换页面的逻辑。
在src/components目录中创建一个新的Pagination.js文件:
1nano src/components/Pagination.js
并添加以下代码片段:
 1[label src/components/Pagination.js]
 2import React, { Component, Fragment } from 'react';
 3import PropTypes from 'prop-types';
 4
 5class Pagination extends Component {
 6  constructor(props) {
 7    super(props);
 8    const { totalRecords = null, pageLimit = 30, pageNeighbours = 0 } = props;
 9
10    this.pageLimit = typeof pageLimit === 'number' ? pageLimit : 30;
11    this.totalRecords = typeof totalRecords === 'number' ? totalRecords : 0;
12
13    // pageNeighbours can be: 0, 1 or 2
14    this.pageNeighbours = typeof pageNeighbours === 'number'
15      ? Math.max(0, Math.min(pageNeighbours, 2))
16      : 0;
17
18    this.totalPages = Math.ceil(this.totalRecords / this.pageLimit);
19
20    this.state = { currentPage: 1 };
21  }
22}
23
24Pagination.propTypes = {
25  totalRecords: PropTypes.number.isRequired,
26  pageLimit: PropTypes.number,
27  pageNeighbours: PropTypes.number,
28  onPageChanged: PropTypes.func
29};
30
31export default Pagination;
Pagination组件可以按照propTypes对象所指定的四个特殊补丁。
- `onPageCchanged'是一个函数,只有在当前页面变化时才使用当前页面状态的数据调用。
- `总记录 ' 表示待查记录的总数。 这是必要的。
页数 ' 表示每页要显示的记录数目。 如未指明,则默认为建筑师()'所定义的`30'。page nearbours'表示在本页每一边显示的额外页码。 最低值为0',最高值为2'。 如果未指明,则默认为[ [] 构造者'所定义的`0'。 .
以下图像说明了pageNeighbours支撑的不同值的效果:

在constructor()函数中,您计算页面总数如下:
1this.totalPages = Math.ceil(this.totalRecords / this.pageLimit);
请注意,您在这里使用‘Math.ceil()’来确保您获得页面总数的整数值,这也确保在最后一页中捕获过剩记录,特别是当过剩记录的数量小于每页显示的记录数量的情况下。
最后,您将状态初始化为当前页面属性设置为1。
接下来,您将创建生成页面号码的方法。
在进口,但在Pagination类之前,添加以下常数和范围函数:
 1[label src/components/Pagination.js]
 2// ...
 3
 4const LEFT_PAGE = 'LEFT';
 5const RIGHT_PAGE = 'RIGHT';
 6
 7/**
 8 * Helper method for creating a range of numbers
 9 * range(1, 5) => [1, 2, 3, 4, 5]
10 */
11const range = (from, to, step = 1) => {
12  let i = from;
13  const range = [];
14
15  while (i <= to) {
16    range.push(i);
17    i += step;
18  }
19
20  return range;
21}
在Pagination类中,在constructor之后,添加以下fetchPageNumbers方法:
 1[label src/components/Pagination.js]
 2class Pagination extends Component {
 3  // ...
 4
 5  /**
 6   * Let's say we have 10 pages and we set pageNeighbours to 2
 7   * Given that the current page is 6
 8   * The pagination control will look like the following:
 9   *
10   * (1) < {4 5} [6] {7 8} > (10)
11   *
12   * (x) => terminal pages: first and last page(always visible)
13   * [x] => represents current page
14   * {...x} => represents page neighbours
15   */
16  fetchPageNumbers = () => {
17    const totalPages = this.totalPages;
18    const currentPage = this.state.currentPage;
19    const pageNeighbours = this.pageNeighbours;
20
21    /**
22     * totalNumbers: the total page numbers to show on the control
23     * totalBlocks: totalNumbers + 2 to cover for the left(<) and right(>) controls
24     */
25    const totalNumbers = (this.pageNeighbours * 2) + 3;
26    const totalBlocks = totalNumbers + 2;
27
28    if (totalPages > totalBlocks) {
29      const startPage = Math.max(2, currentPage - pageNeighbours);
30      const endPage = Math.min(totalPages - 1, currentPage + pageNeighbours);
31      let pages = range(startPage, endPage);
32
33      /**
34       * hasLeftSpill: has hidden pages to the left
35       * hasRightSpill: has hidden pages to the right
36       * spillOffset: number of hidden pages either to the left or to the right
37       */
38      const hasLeftSpill = startPage > 2;
39      const hasRightSpill = (totalPages - endPage) > 1;
40      const spillOffset = totalNumbers - (pages.length + 1);
41
42      switch (true) {
43        // handle: (1) < {5 6} [7] {8 9} (10)
44        case (hasLeftSpill && !hasRightSpill): {
45          const extraPages = range(startPage - spillOffset, startPage - 1);
46          pages = [LEFT_PAGE, ...extraPages, ...pages];
47          break;
48        }
49
50        // handle: (1) {2 3} [4] {5 6} > (10)
51        case (!hasLeftSpill && hasRightSpill): {
52          const extraPages = range(endPage + 1, endPage + spillOffset);
53          pages = [...pages, ...extraPages, RIGHT_PAGE];
54          break;
55        }
56
57        // handle: (1) < {4 5} [6] {7 8} > (10)
58        case (hasLeftSpill && hasRightSpill):
59        default: {
60          pages = [LEFT_PAGE, ...pages, RIGHT_PAGE];
61          break;
62        }
63      }
64
65      return [1, ...pages, totalPages];
66    }
67
68    return range(1, totalPages);
69  }
70}
在这里,您首先定义两个常数:『LEFT_PAGE』和『RIGHT_PAGE』. 这些常数将用于指示您分别使用页面控件向左和向右移动的点。
您还定义了一个帮助函数 range() 函数,可以帮助您生成数字范围。
注意:如果您在您的项目中使用像 Lodash这样的实用库,则可以使用 Lodash 提供的 .range() 函数。
1range(1, 5); // returns [1, 2, 3, 4, 5]
2_.range(1, 5); // returns [1, 2, 3, 4]
美元
接下来,您在)`方法,该方法处理生成页面号码的核心逻辑,以显示在页面控制上。
首先,您定义了几个变量。 TotalNumbers 表示将显示在控制器上的页面总数。 totalBlocks 表示要显示的页面总数,加上左侧和右侧指标的两个额外块。
如果「TotalPages」不大于「TotalBlocks」,则您将从「1」返回到「TotalPages」的数字范围,否则您将返回页面数组,分别在您有页面向左和向右的位置返回「LEFT_PAGE」和「RIGHT_PAGE」。
但是,请注意,您的页面控制确保第一页和最后一页始终可见。
现在,您将添加 render()方法,以允许您渲染页面控制。
在Pagination类中,在constructor和fetchPageNumbers方法之后,添加以下render方法:
1[label src/components/Pagination.js]
2class Pagination extends Component {
3 // ...
4
5 render() {
6 if (!this.totalRecords || this.totalPages === 1) return null;
7
8 const { currentPage } = this.state;
9 const pages = this.fetchPageNumbers();
10
11 return (
12 <Fragment>
13 <nav aria-label="Countries Pagination">
14 <ul className="pagination">
15 { pages.map((page, index) => {
16
17 if (page === LEFT_PAGE) return (
18 <li key={index} className="page-item">
19 <a className="page-link" href="#" aria-label="Previous" onClick={this.handleMoveLeft}>
20 <span aria-hidden="true">«</span>
21 <span className="sr-only">Previous</span>
22 </a>
23 </li>
24 );
25
26 if (page === RIGHT_PAGE) return (
27 <li key={index} className="page-item">
28 <a className="page-link" href="#" aria-label="Next" onClick={this.handleMoveRight}>
29 <span aria-hidden="true">»</span>
30 <span className="sr-only">Next</span>
31 </a>
32 </li>
33 );
34
35 return (
36 <li key={index} className={`page-item${ currentPage === page ? ' active' : ''}`}>
37 <a className="page-link" href="#" onClick={ this.handleClick(page) }>{ page }</a>
38 </li>
39 );
40
41 }) }
42
43 </ul>
44 </nav>
45 </Fragment>
46 );
47 }
48}
在这里,您通过呼叫您之前创建的)`来渲染每个页面号码。
另外,请注意,如果TotalRecords字符串未正确传输到Pagination组件,或在只有1页的情况下,将不会返回页面控制。
最后,您将定义事件处理方法。
在Pagination类中,在constructor和fetchPageNumbers方法和render方法之后,添加以下内容:
 1[label src/components/Pagination.js]
 2class Pagination extends Component {
 3  // ...
 4
 5  componentDidMount() {
 6    this.gotoPage(1);
 7  }
 8
 9  gotoPage = page => {
10    const { onPageChanged = f => f } = this.props;
11    const currentPage = Math.max(0, Math.min(page, this.totalPages));
12    const paginationData = {
13      currentPage,
14      totalPages: this.totalPages,
15      pageLimit: this.pageLimit,
16      totalRecords: this.totalRecords
17    };
18
19    this.setState({ currentPage }, () => onPageChanged(paginationData));
20  }
21
22  handleClick = page => evt => {
23    evt.preventDefault();
24    this.gotoPage(page);
25  }
26
27  handleMoveLeft = evt => {
28    evt.preventDefault();
29    this.gotoPage(this.state.currentPage - (this.pageNeighbours * 2) - 1);
30  }
31
32  handleMoveRight = evt => {
33    evt.preventDefault();
34    this.gotoPage(this.state.currentPage + (this.pageNeighbours * 2) + 1);
35  }
36}
您定义了gotoPage()方法,该方法修改状态并将当前Page设置为指定的页面。它确保页面参数具有最低值为1和页面总数的最大值。
当组件安装时,您可以通过在)`来进入第一页。
注意您如何在)中使用(This.pageNeighbours * 2)`以根据当前页面号码向左和向右滑动页数。
以下是左向右运动的互动演示。
您已经完成了Pagination组件,用户将能够与该组件的导航控制器进行交互,以显示不同的旗帜页面。
步骤 4 – 构建应用组件
现在你有一个CountryCard和Pagination组件,你可以在你的App组件中使用它们。
在src目录中修改App.js文件:
1nano src/App.js
将App.js的内容替换为以下代码行:
 1[label src/App.js]
 2import React, { Component } from 'react';
 3import Countries from 'countries-api';
 4import './App.css';
 5import Pagination from './components/Pagination';
 6import CountryCard from './components/CountryCard';
 7
 8class App extends Component {
 9  state = { allCountries: [], currentCountries: [], currentPage: null, totalPages: null }
10
11  componentDidMount() {
12    const { data: allCountries = [] } = Countries.findAll();
13    this.setState({ allCountries });
14  }
15
16  onPageChanged = data => {
17    const { allCountries } = this.state;
18    const { currentPage, totalPages, pageLimit } = data;
19    const offset = (currentPage - 1) * pageLimit;
20    const currentCountries = allCountries.slice(offset, offset + pageLimit);
21
22    this.setState({ currentPage, currentCountries, totalPages });
23  }
24}
25
26export default App;
在这里,您可以用以下属性初始化应用组件的状态:
allCountries- 这是您应用程序中的所有国家的数组。 初始化为空数组([])。 *currentCountries- 显示在当前活动页面上的所有国家的数组。 初始化为空数组([])。 *currentPage- 当前活动页面的页面号码. 初始化为null. *totalPages- 所有国家记录的页面总数。
接下来,在)`来获取世界所有国家的)以了解更多关于该包的信息。
最后,您定义了onPageChanged()方法,每次您从页面控制器导航到新页面时都会被调用。
在这种方法中有两条线是值得注意的,第一条线是这个线:
1const offset = (currentPage - 1) * pageLimit;
) 确保取消是基于零的。 例如,假设您显示每页的25 记录,而您目前正在查看页面5` 。
例如,如果您正在从数据库中提取按需求的记录,这是一个示例的 SQL 查询,可向您展示如何使用抵消:
1SELECT * FROM `countries` LIMIT 100, 25
由于您不是从数据库或任何外部源获取记录,您需要一种方法来提取所需的记录,以显示当前页面。
二是这条线:
1const currentCountries = allCountries.slice(offset, offset + pageLimit);
在这里,您使用)`作为结束片段的前的索引。
注意:在本教程中,您没有从任何外部来源提取记录,在真实的应用程序中,您可能会从数据库或API提取记录。
假设你有一个虚构的 API 终端 /api/countries?page={current_page}&limit={page_limit}. 下面的片段显示了如何使用 axios HTTP 包从 API 获取按需的国家:
1onPageChanged = data => {
2  const { currentPage, totalPages, pageLimit } = data;
3
4  axios.get(`/api/countries?page=${currentPage}&limit=${pageLimit}`)
5    .then(response => {
6      const currentCountries = response.data.countries;
7      this.setState({ currentPage, currentCountries, totalPages });
8    });
9}
美元
现在,您可以通过添加render()方法来完成应用组件。
在应用类中,但在componentDidMount和onPageChanged之后,添加以下渲染方法:
 1[label src/App.js]
 2class App extends Component {
 3  // ... other methods here ...
 4
 5  render() {
 6    const { allCountries, currentCountries, currentPage, totalPages } = this.state;
 7    const totalCountries = allCountries.length;
 8
 9    if (totalCountries === 0) return null;
10
11    const headerClass = ['text-dark py-2 pr-4 m-0', currentPage ? 'border-gray border-right' : ''].join(' ').trim();
12
13    return (
14      <div className="container mb-5">
15        <div className="row d-flex flex-row py-5">
16          <div className="w-100 px-4 py-5 d-flex flex-row flex-wrap align-items-center justify-content-between">
17            <div className="d-flex flex-row align-items-center">
18              <h2 className={headerClass}>
19                <strong className="text-secondary">{totalCountries}</strong> Countries
20              </h2>
21              { currentPage && (
22                <span className="current-page d-inline-block h-100 pl-4 text-secondary">
23                  Page <span className="font-weight-bold">{ currentPage }</span> / <span className="font-weight-bold">{ totalPages }</span>
24                </span>
25              ) }
26            </div>
27            <div className="d-flex flex-row py-4 align-items-center">
28              <Pagination totalRecords={totalCountries} pageLimit={18} pageNeighbours={1} onPageChanged={this.onPageChanged} />
29            </div>
30          </div>
31          { currentCountries.map(country => <CountryCard key={country.cca3} country={country} />) }
32        </div>
33      </div>
34    );
35  }
36}
在render()方法中,您会返回国家总数、当前页面、页面总数、<Pagination>控制器,然后返回当前页面中的每个国家的<CountryCard>。
请注意,您已将onPageChanged()方法转移到onPageChanged控件的onPageChanged支架上,这对于从Pagination组件中捕捉页面更改非常重要。
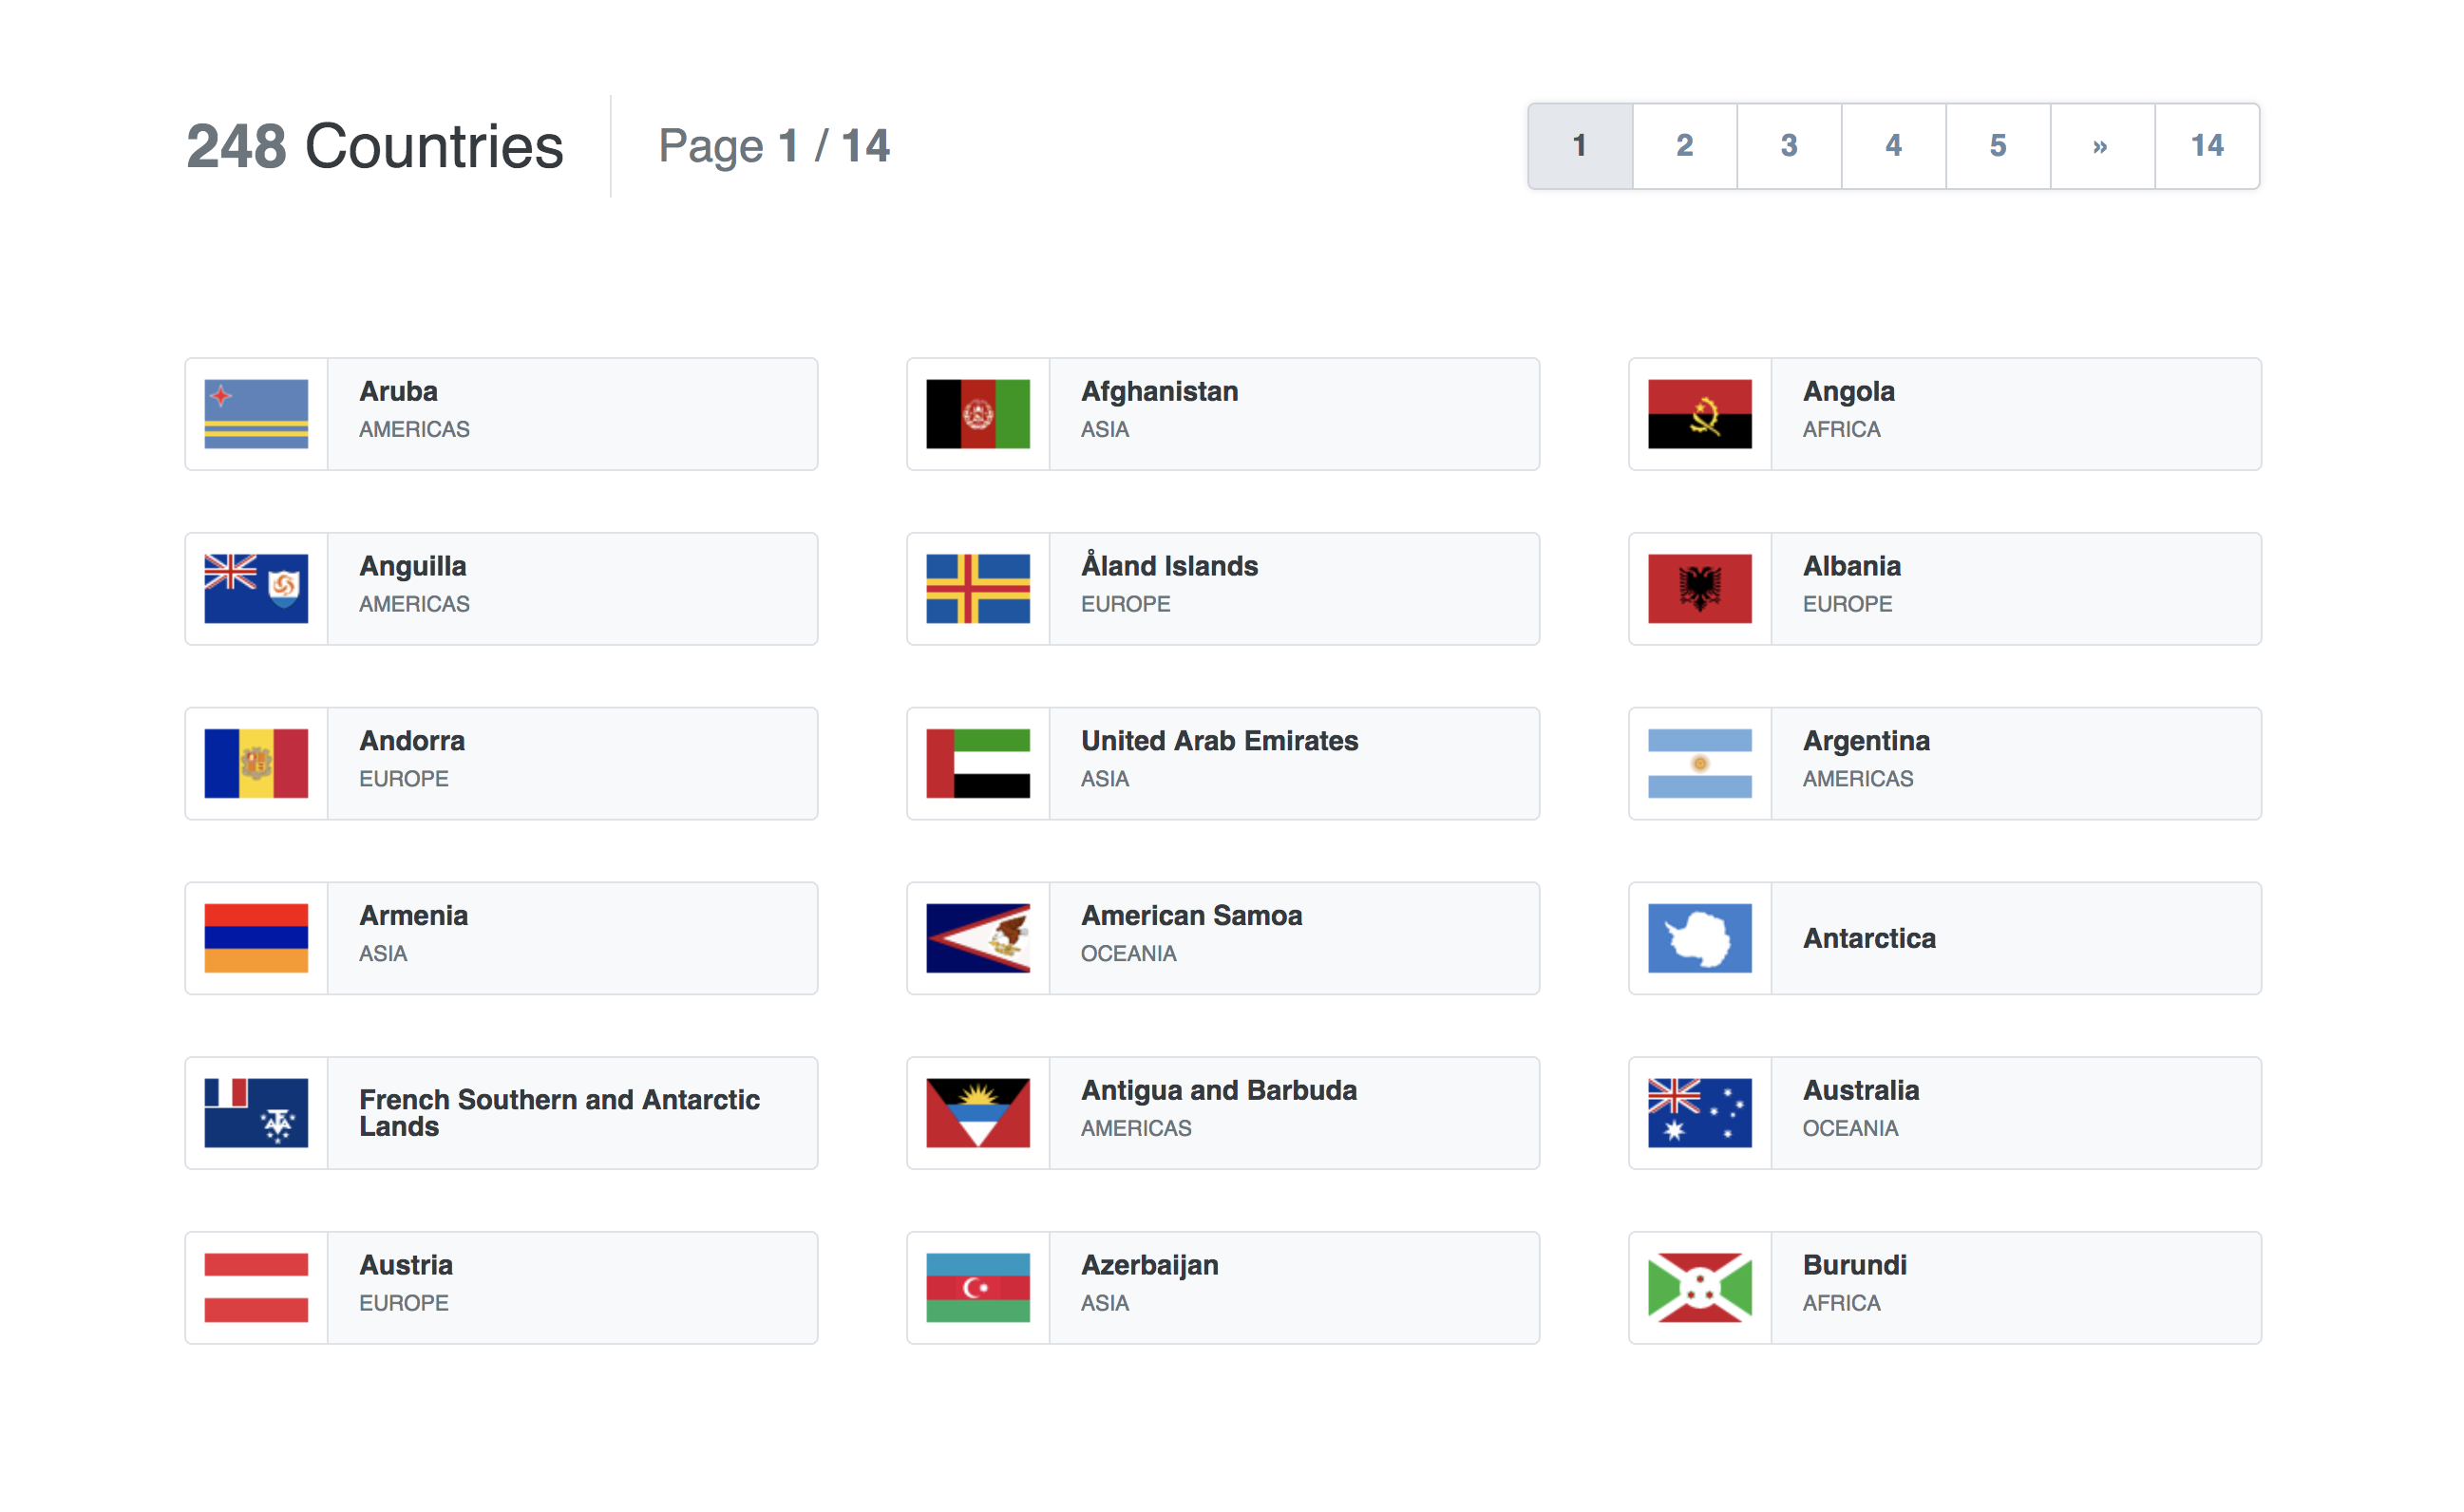
在此时,应用程序将看起来像下面的屏幕截图:
现在你有一个应用组件,显示多个CountryCard组件和一个Pagination组件,将内容分成单独的页面。
步骤5 - 添加自定义风格
您可能已经注意到,您已将一些自定义类添加到您之前创建的组件中,让我们在src/App.scss文件中为这些类别定义一些风格规则。
1nano src/App.scss
App.scss文件将看起来像下面的片段:
 1[label src/App.scss]
 2/* Declare some variables */
 3$base-color: #ced4da;
 4$light-background: lighten(desaturate($base-color, 50%), 12.5%);
 5
 6.current-page {
 7  font-size: 1.5rem;
 8  vertical-align: middle;
 9}
10
11.country-card-container {
12  height: 60px;
13  cursor: pointer;
14  position: relative;
15  overflow: hidden;
16}
17
18.country-name {
19  font-size: 0.9rem;
20}
21
22.country-region {
23  font-size: 0.7rem;
24}
25
26.current-page,
27.country-name,
28.country-region {
29  line-height: 1;
30}
31
32// Override some Bootstrap pagination styles
33ul.pagination {
34  margin-top: 0;
35  margin-bottom: 0;
36  box-shadow: 0 0 5px rgba(0, 0, 0, 0.1);
37
38  li.page-item.active {
39    a.page-link {
40      color: saturate(darken($base-color, 50%), 5%) !important;
41      background-color: saturate(lighten($base-color, 7.5%), 2.5%) !important;
42      border-color: $base-color !important;
43    }
44  }
45
46  a.page-link {
47    padding: 0.75rem 1rem;
48    min-width: 3.5rem;
49    text-align: center;
50    box-shadow: none !important;
51    border-color: $base-color !important;
52    color: saturate(darken($base-color, 30%), 10%);
53    font-weight: 900;
54    font-size: 1rem;
55
56    &:hover {
57      background-color: $light-background;
58    }
59  }
60}
将您的App.js文件修改为App.css而不是App.css。
<$>[注] 注: 有关此事的更多信息,请参阅(https://create-react-app.dev/docs/adding-a-sass-stylesheet/)。
1nano src/App.js
1[label src/App.js]
2import React, { Component } from 'react';
3import Countries from 'countries-api';
4import './App.scss';
5import Pagination from './components/Pagination';
6import CountryCard from './components/CountryCard';
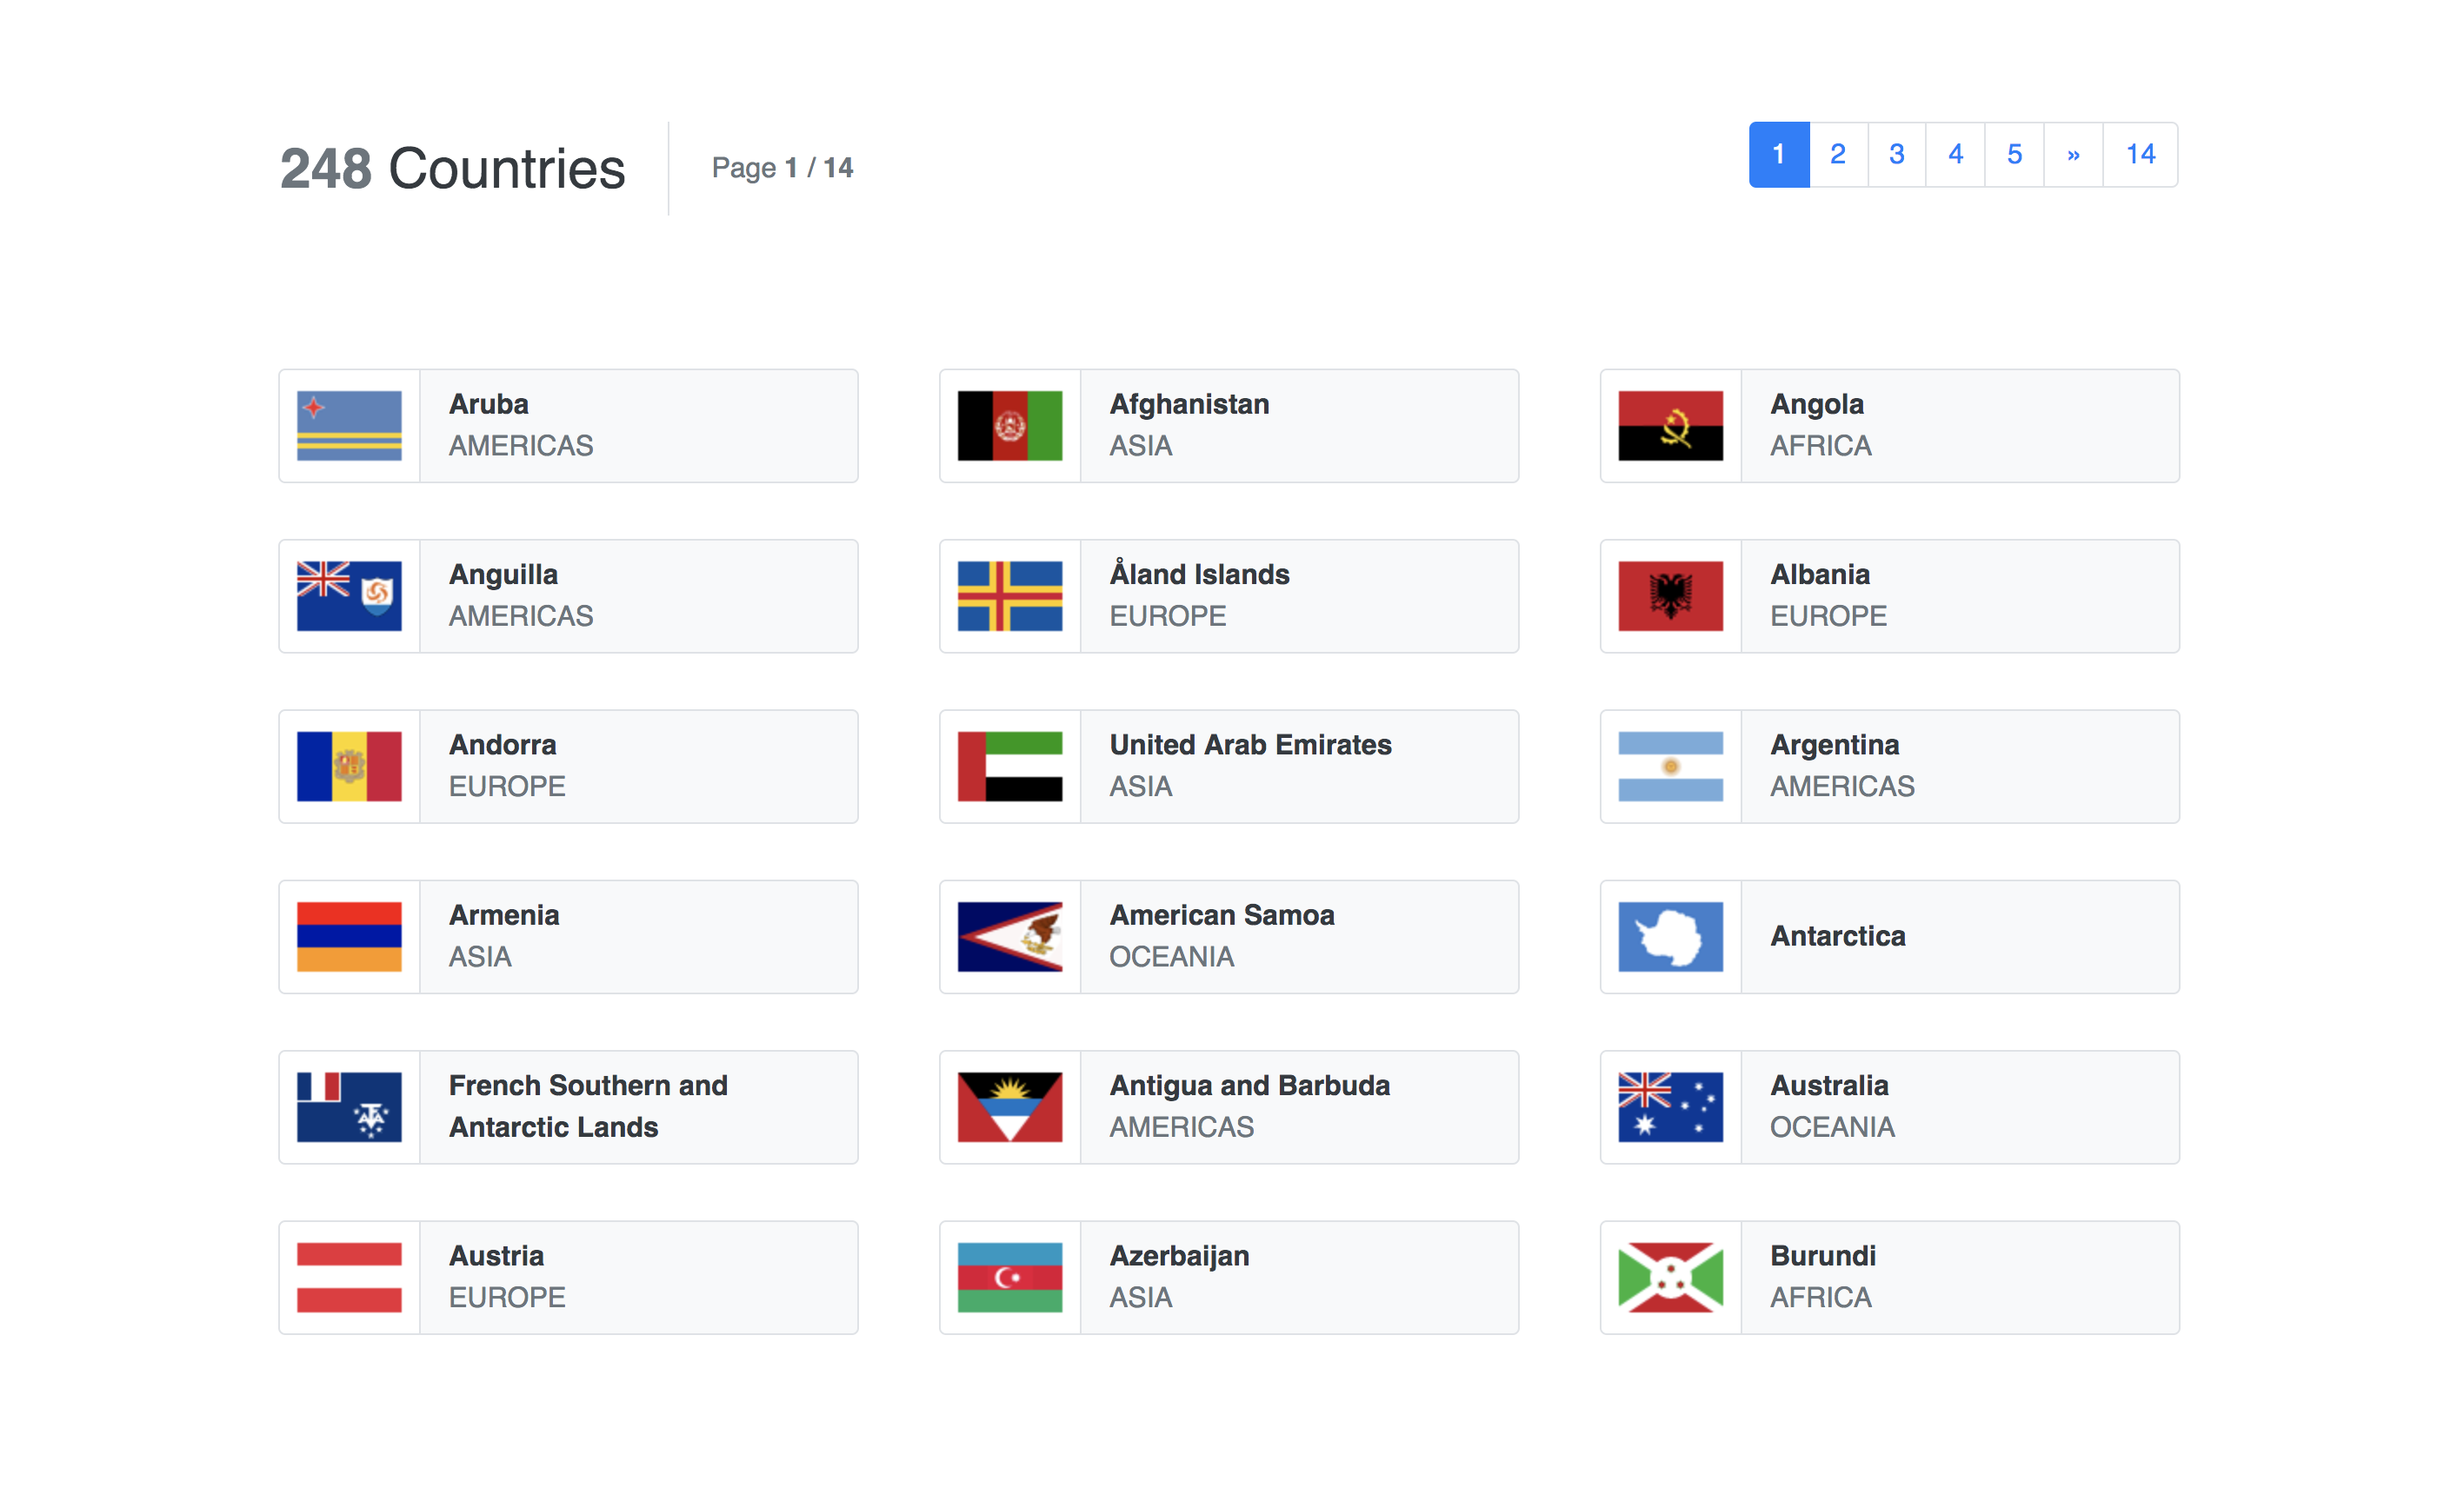
添加风格后,应用程序现在将看起来像下面的屏幕截图:
您现在有一个完整的应用程序,有额外的自定义风格. 您可以使用自定义风格来修改和增强任何由图书馆提供的默认风格,如 Bootstrap。
结论
在本教程中,您在您的 React 应用程序中创建了一个自定义页面化小工具包. 虽然您在本教程中没有拨打任何 API 或与任何数据库后端进行交互,但您的应用程序可能需要这样的交互。
对于本教程的完整源代码,请参阅 build-react-pagination-demo在GitHub上的存储库. 你也可以得到一个 现场演示本教程在代码沙盒。
如果您想了解更多关于 React 的信息,请查看我们的 [如何在 React.js 中编码] (https://www.digitalocean.com/community/tutorial_series/how-to-code-in-react-js) 系列,或查看 [我们的 React 主题页面] (https://andsky.com/tags/react) 有关练习和编程项目。