介绍
有很高的可能性,你已经与提供某种形式的语音体验的应用程序进行交互. 它可能是具有文本对话功能的应用程序,例如大声阅读你的文本消息或通知。
随着HTML5的出现,在Web平台上可用的API数量出现了非常快的增长,有几个API被称为Web语音API(https://developer.mozilla.org/en-US/docs/Web/API/Web_Speech_API)_,这些API已经开发出来,使其能够无缝地为Web构建各种语音应用程序和体验。
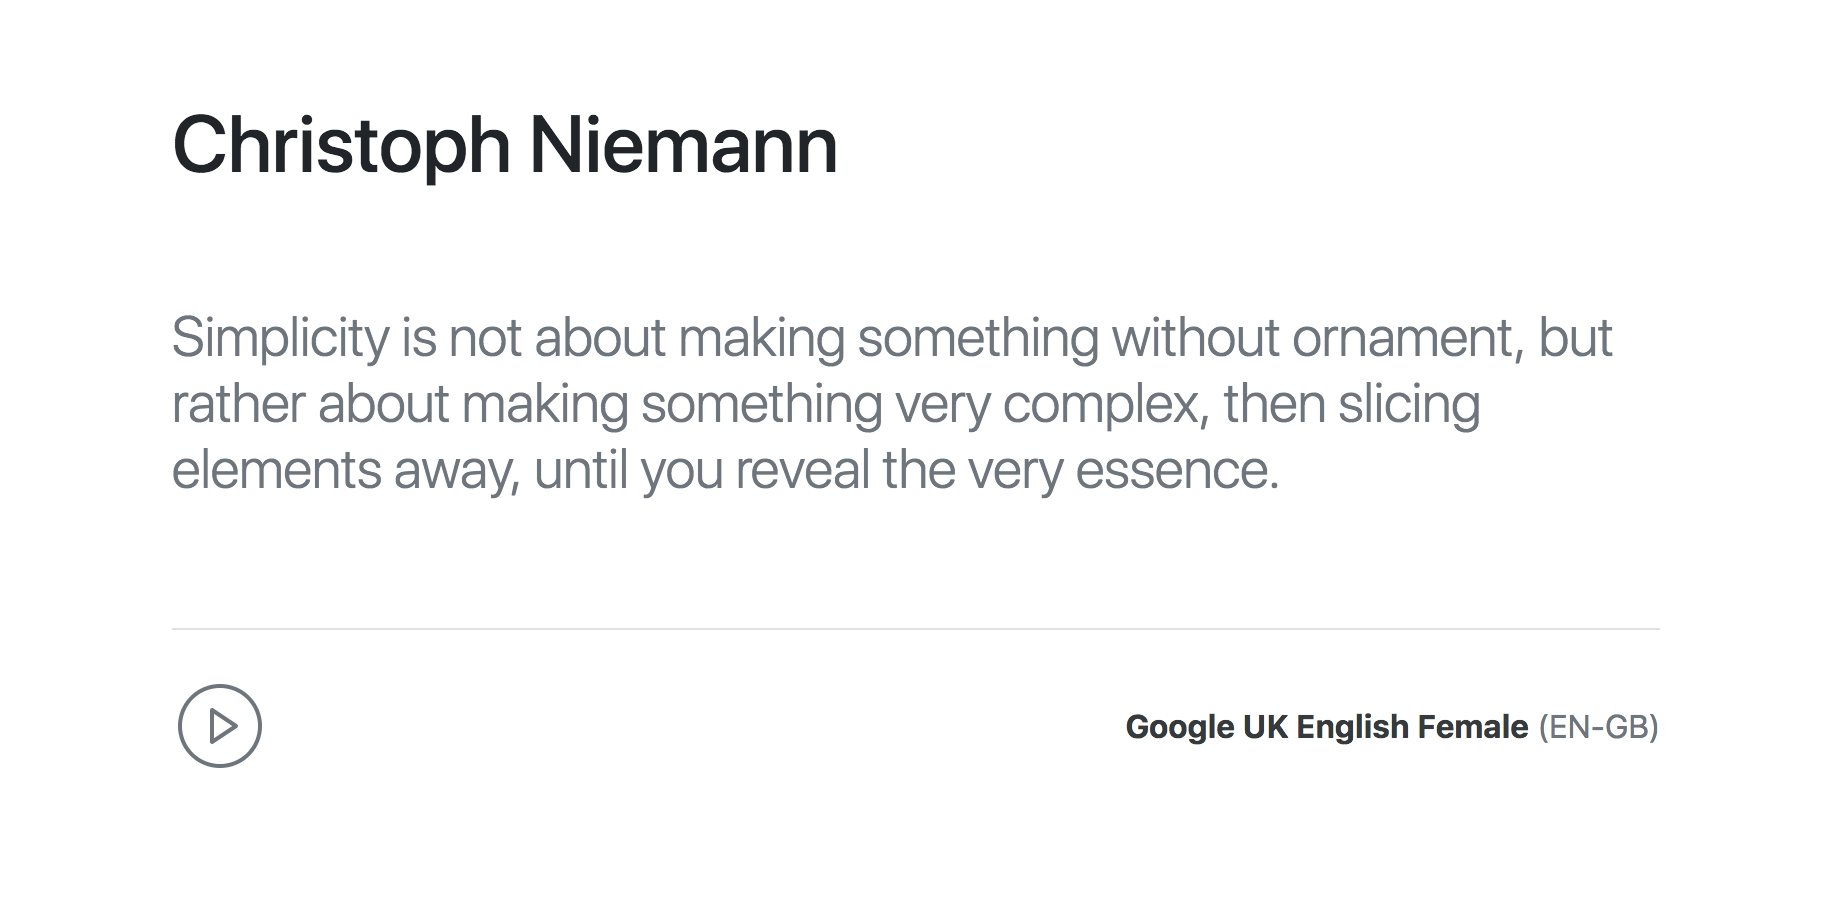
在本文中,您将构建一个应用程序,可以检索随机引文,显示引文,并为用户提供使用文本对话的能力,以便浏览器大声阅读引文。
前提条件
要完成本教程,您将需要:
- Node.js 是本地安装的,您可以按照 如何安装 Node.js 和创建本地开发环境来执行。
本教程已通过 Node v14.4.0、npm v6.14.5、axios v0.19.2、cors v2.8.5、express v4.17.1 和 jQuery v3.5.1 进行验证。
使用 Web 语音 API
Web 语音 API 有两个主要接口:
- SpeechSynthesis - 用于文本到语音应用程序. 这允许应用程序使用设备的语音合成器读取其文本内容。可用的语音类型由一个
SpeechSynthesisVoice对象表示,而要发音的文本则由一个SpeechSynthesisUtterance对象表示。请参阅SpeechSynthesis接口的支持表(LINK0)以了解有关浏览器支持的更多信息。 * ** SpeechRecognition** - 对于需要非同步语音识别的应用程序,此功能允许应用程序从音频输入中识别语音背景。可以使用构建器创建一个SpeechRecognition对象。SpeechGrammar接口
本教程将专注于语音合成。
获得参考
对一个SpeechSynthesis对象的引用可以用一个代码行完成:
1var synthesis = window.speechSynthesis;
以下代码片段显示如何检查浏览器支持:
1if ('speechSynthesis' in window) {
2  var synthesis = window.speechSynthesis;
3} else {
4  console.log('Text-to-speech not supported.');
5}
在使用它提供的功能之前,检查SpeechSynthesis是否受浏览器的支持非常有用。
获得可用的声音
在此步骤中,您将建立在现有的代码上,以获取可用的语音声音. getVoices() 方法返回代表设备上所有可用的语音的 SpeechSynthesisVoice 对象列表。
看看下面的代码片段:
 1if ('speechSynthesis' in window) {
 2  var synthesis = window.speechSynthesis;
 3
 4  // Regex to match all English language tags e.g en, en-US, en-GB
 5  var langRegex = /^en(-[a-z]{2})?$/i;
 6
 7  // Get the available voices and filter the list to only have English speakers
 8  var voices = synthesis
 9    .getVoices()
10    .filter((voice) => langRegex.test(voice.lang));
11
12  // Log the properties of the voices in the list
13  voices.forEach(function (voice) {
14    console.log({
15      name: voice.name,
16      lang: voice.lang,
17      uri: voice.voiceURI,
18      local: voice.localService,
19      default: voice.default,
20    });
21  });
22} else {
23  console.log('Text-to-speech not supported.');
24}
在此代码部分中,您可以获取设备上可用的声音列表,并使用langRegex常规表达式过滤列表,以确保我们仅为英语语言的用户获得声音。
构建言语表达式
在此步骤中,您将使用SpeechSynthesisUtterance构建器构建语音发音,并为可用的属性设置值。
下面的代码片段创建了一个语音发音来读取文本Hello World:
 1if ('speechSynthesis' in window) {
 2  var synthesis = window.speechSynthesis;
 3
 4  // Get the first `en` language voice in the list
 5  var voice = synthesis.getVoices().filter(function (voice) {
 6    return voice.lang === 'en';
 7  })[0];
 8
 9  // Create an utterance object
10  var utterance = new SpeechSynthesisUtterance('Hello World');
11
12  // Set utterance properties
13  utterance.voice = voice;
14  utterance.pitch = 1.5;
15  utterance.rate = 1.25;
16  utterance.volume = 0.8;
17
18  // Speak the utterance
19  synthesis.speak(utterance);
20} else {
21  console.log('Text-to-speech not supported.');
22}
在这里,您可以从可用的语音列表中获得第一个en语言语音。接下来,您使用SpeechSynthesisUtterance构建器创建一个新语音,然后您将语音对象的某些属性设置为语音,点,率和体积。
<$>[注] 注: 在发音中可以说话的文本大小有限制.每个发音中可以说话的文本的最大长度是 ** 32 767 ** 字符。
请注意,您已经通过了在构建器中发音的文本。
您也可以通过设置发音对象的文本属性来设置要发音的文本。
这里有一个简单的例子:
1var synthesis = window.speechSynthesis;
2var utterance = new SpeechSynthesisUtterance("Hello World");
3
4// This overrides the text "Hello World" and is uttered instead
5utterance.text = "My name is Glad.";
6
7synthesis.speak(utterance);
这取代了在构建者中传递的任何文本。
說出一句話
在之前的代码片段中,我们通过在SpeechSynthesis实例上调用speak()方法来发音发音,现在我们可以将SpeechSynthesisUtterance实例作为一个论点转移到speak()方法来发音发音。
1var synthesis = window.speechSynthesis;
2
3var utterance1 = new SpeechSynthesisUtterance("Hello World");
4var utterance2 = new SpeechSynthesisUtterance("My name is Glad.");
5var utterance3 = new SpeechSynthesisUtterance("I'm a web developer from Nigeria.");
6
7synthesis.speak(utterance1);
8synthesis.speak(utterance2);
9synthesis.speak(utterance3);
您可以使用SpeechSynthesis实例做一些其他事情,例如暂停、继续和取消发言,因此pause()、resume()和cancel()方法也在SpeechSynthesis实例中可用。
步骤 1 – 构建文本对话应用程序
我们已经看到了SpeechSynthesis界面的基本方面。我们现在将开始构建我们的文本对话应用程序。在我们开始之前,请确保您在您的机器上安装了 Node和 npm。
在终端上运行以下命令,为应用程序设置一个项目并安装依赖性。
创建一个新的项目目录:
1mkdir web-speech-app
转到新创建的项目目录:
1cd web-speech-app
启动项目:
1npm init -y
安装该项目所需的依赖性 - express, cors和 axios:
1npm install express cors axios
修改package.json文件的脚本部分,看起来像下面的片段:
1[label package.json]
2"scripts": {
3  "start": "node server.js"
4}
现在您已经为应用程序初始化了项目,您将使用 Express来设置应用程序的服务器。
创建一个新的 server.js 文件,并添加以下内容:
 1[label server.js]
 2const cors = require('cors');
 3const path = require('path');
 4const axios = require('axios');
 5const express = require('express');
 6
 7const app = express();
 8const PORT = process.env.PORT || 5000;
 9
10app.set('port', PORT);
11
12// Enable CORS (Cross-Origin Resource Sharing)
13app.use(cors());
14
15// Serve static files from the /public directory
16app.use('/', express.static(path.join(__dirname, 'public')));
17
18// A simple endpoint for fetching a random quote from QuotesOnDesign
19app.get('/api/quote', (req, res) => {
20  axios
21    .get(
22      'https://quotesondesign.com/wp-json/wp/v2/posts/?orderby=rand'
23    )
24    .then((response) => {
25      const [post] = response.data;
26      const { title, content } = post || {};
27
28      return title && content
29        ? res.json({ status: 'success', data: { title, content } })
30        : res
31            .status(500)
32            .json({ status: 'failed', message: 'Could not fetch quote.' });
33    })
34    .catch((err) =>
35      res
36        .status(500)
37        .json({ status: 'failed', message: 'Could not fetch quote.' })
38    );
39});
40
41app.listen(PORT, () => console.log(`> App server is running on port ${PORT}.`));
在这里,您使用 Express 设置了 Node 服务器。 您使用cors()中间软件启用了 CORS(跨源请求共享)。 您还使用express.static()中间软件服务项目根中的/public目录中的静态文件。
最后,您设置了一个GET路线,以从 QuotesOnDesign API 服务中获取随机报价,您正在使用 axios (一个基于承诺的 HTTP 客户端库)来执行 HTTP 请求。
以下是QuotesOnDesign API的样本响应的样子:
 1[secondary_label Output]
 2[
 3  {
 4    "title": { "rendered": "Victor Papanek" },
 5    "content": {
 6      "rendered": "<p>Any attempt to separate design, to make it a thing-by-itself, works counter to the inherent value of design as the primary, underlying matrix of life.</p>\n",
 7      "protected": false
 8    }
 9  }
10]
<$>[注] 注: 有关 QuotesOnDesign API 的更改的更多信息,请参阅他们的 页面文档 4.0 和 5.0 之间的变化。
当您成功提取引文时,引文的标题和内容将在 JSON 响应的数据字段中返回,否则将返回具有500 HTTP 状态代码的失败 JSON 响应。
接下来,您将为 app 视图创建一个索引页面。
首先,在项目的根部创建一个新的公共文件夹:
1mkdir public
接下来,在新创建的公共文件夹中创建一个新的index.html文件,并添加以下内容:
 1[label public/index.html]
 2<html>
 3
 4<head>
 5    <title>Daily Quotes</title>
 6    <meta charset="UTF-8" />
 7    <meta name="viewport" content="width=device-width, initial-scale=1, shrink-to-fit=no">
 8    <link rel="stylesheet" href="https://stackpath.bootstrapcdn.com/bootstrap/4.1.1/css/bootstrap.min.css" integrity="sha384-WskhaSGFgHYWDcbwN70/dfYBj47jz9qbsMId/iRN3ewGhXQFZCSftd1LZCfmhktB" crossorigin="anonymous">
 9</head>
10
11<body class="position-absolute h-100 w-100">
12    <div id="app" class="d-flex flex-wrap align-items-center align-content-center p-5 mx-auto w-50 position-relative"></div>
13
14    <script src="https://unpkg.com/jquery/dist/jquery.min.js"></script>
15    <script src="https://cdn.jsdelivr.net/npm/feather-icons/dist/feather.min.js"></script>
16    <script src="main.js"></script>
17</body>
18
19</html>
这将为应用程序创建一个基本的索引页面,只有一个<div id="app">,它将作为应用程序所有动态内容的安装点。
您还添加了 Bootstrap CDN 的链接,以获得应用程序的默认 Bootstrap 4样式。
步骤2 - 构建主脚本
现在,你已经到达了应用程序的最后一个功能,即主脚本,在应用程序的公共目录中创建一个新的main.js文件,并添加以下内容:
 1[label public/main.js]
 2jQuery(function ($) {
 3  let app = $('#app');
 4
 5  let SYNTHESIS = null;
 6  let VOICES = null;
 7
 8  let QUOTE_TEXT = null;
 9  let QUOTE_PERSON = null;
10
11  let VOICE_SPEAKING = false;
12  let VOICE_PAUSED = false;
13  let VOICE_COMPLETE = false;
14
15  let iconProps = {
16    'stroke-width': 1,
17    'width': 48,
18    'height': 48,
19    'class': 'text-secondary d-none',
20    'style': 'cursor: pointer'
21  };
22
23  function iconSVG(icon) {}
24
25  function showControl(control) {}
26
27  function hideControl(control) {}
28
29  function getVoices() {}
30
31  function resetVoice() {}
32
33  function fetchNewQuote() {}
34
35  function renderQuote(quote) {}
36
37  function renderVoiceControls(synthesis, voice) {}
38
39  function updateVoiceControls() {}
40
41  function initialize() {}
42
43  initialize();
44});
此代码使用jQuery来执行一个函数,当 DOM 被加载时. 您可以引用# app元素并初始化一些变量. 您还会声明在下面的部分中实现的一对空函数。
iconProps变量包含一对属性,用于将Feather图标作为SVG向DOM渲染。
有了这个代码,你就可以开始实现这些函数了. 更改public/main.js文件以实现以下函数:
 1[label public/main.js]
 2// Gets the SVG markup for a Feather icon
 3function iconSVG(icon) {
 4  let props = $.extend(iconProps, { id: icon });
 5  return feather.icons[icon].toSvg(props);
 6}
 7
 8// Shows an element
 9function showControl(control) {
10  control.addClass('d-inline-block').removeClass('d-none');
11}
12
13// Hides an element
14function hideControl(control) {
15  control.addClass('d-none').removeClass('d-inline-block');
16}
17
18// Get the available voices, filter the list to have only English filters
19function getVoices() {
20  // Regex to match all English language tags e.g en, en-US, en-GB
21  let langRegex = /^en(-[a-z]{2})?$/i;
22
23  // Get the available voices and filter the list to only have English speakers
24  VOICES = SYNTHESIS.getVoices()
25    .filter(function (voice) {
26      return langRegex.test(voice.lang);
27    })
28    .map(function (voice) {
29      return {
30        voice: voice,
31        name: voice.name,
32        lang: voice.lang.toUpperCase(),
33      };
34    });
35}
36
37// Reset the voice variables to the defaults
38function resetVoice() {
39  VOICE_SPEAKING = false;
40  VOICE_PAUSED = false;
41  VOICE_COMPLETE = false;
42}
「iconSVG(图标)」函数将Feather图标名序列作为一个参数(例如,play-circle)并返回该图标的SVG标记。 查看Feather网站(https://feathericons.com/)以查看可用的Feather图标的完整列表。
getVoices()函数使用SYNTHESIS对象来获取设备上所有可用的声音列表,然后使用常规表达式过滤列表以获取仅使用英语的声音。
接下來,您將在 DOM 上實施採取和渲染引文的功能. 修改「public/main.js」檔案以實施下列功能:
 1[label public/main.js]
 2function fetchNewQuote() {
 3  // Clean up the #app element
 4  app.html('');
 5
 6  // Reset the quote variables
 7  QUOTE_TEXT = null;
 8  QUOTE_PERSON = null;
 9
10  // Reset the voice variables
11  resetVoice();
12
13  // Pick a voice at random from the VOICES list
14  let voice =
15    VOICES && VOICES.length > 0
16      ? VOICES[Math.floor(Math.random() * VOICES.length)]
17      : null;
18
19  // Fetch a quote from the API and render the quote and voice controls
20  $.get('/api/quote', function (quote) {
21    renderQuote(quote.data);
22    SYNTHESIS && renderVoiceControls(SYNTHESIS, voice || null);
23  });
24}
25
26function renderQuote(quote) {
27  // Create some markup for the quote elements
28  let quotePerson = $('<h1 id="quote-person" class="mb-2 w-100"></h1>');
29  let quoteText = $('<div id="quote-text" class="h3 py-5 mb-4 w-100 font-weight-light text-secondary border-bottom border-gray"></div>');
30
31  // Add the quote data to the markup
32  quotePerson.html(quote.title.rendered);
33  quoteText.html(quote.content.rendered);
34
35  // Attach the quote elements to the DOM
36  app.append(quotePerson);
37  app.append(quoteText);
38
39  // Update the quote variables with the new data
40  QUOTE_TEXT = quoteText.text();
41  QUOTE_PERSON = quotePerson.text();
42}
在fetchNewQuote()方法中,您首先重置应用元素和变量,然后随机使用Math.random()从存储在VOICES变量中的语音列表中选择一个语音,然后使用$.get()向/api/quote终端发送AJAX请求,以随机引用,并将引用数据向视图转换为语音控制。
renderQuote(quote) 方法将引用对象作为其参数,并将内容添加到 DOM. 最后,它更新了引用变量: QUOTE_TEXT 和 QUOTE_PERSON。
如果您查看fetchNewQuote()函数,您会注意到您已调用renderVoiceControls()函数,该函数负责播放、停用和停止语音输出的控制。
对 public/main.js 文件进行以下修改,以实现 renderVoiceControls() 函数:
 1[label public/main.js]
 2function renderVoiceControls(synthesis, voice) {
 3  let controlsPane = $('<div id="voice-controls-pane" class="d-flex flex-wrap w-100 align-items-center align-content-center justify-content-between"></div>');
 4
 5  let voiceControls = $('<div id="voice-controls"></div>');
 6
 7  // Create the SVG elements for the voice control buttons
 8  let playButton = $(iconSVG('play-circle'));
 9  let pauseButton = $(iconSVG('pause-circle'));
10  let stopButton = $(iconSVG('stop-circle'));
11
12  // Helper function to enable pause state for the voice output
13  let paused = function () {
14    VOICE_PAUSED = true;
15    updateVoiceControls();
16  };
17
18  // Helper function to disable pause state for the voice output
19  let resumed = function () {
20    VOICE_PAUSED = false;
21    updateVoiceControls();
22  };
23
24  // Click event handler for the play button
25  playButton.on('click', function (evt) {});
26
27  // Click event handler for the pause button
28  pauseButton.on('click', function (evt) {});
29
30  // Click event handler for the stop button
31  stopButton.on('click', function (evt) {});
32
33  // Add the voice controls to their parent element
34  voiceControls.append(playButton);
35  voiceControls.append(pauseButton);
36  voiceControls.append(stopButton);
37
38  // Add the voice controls parent to the controlsPane element
39  controlsPane.append(voiceControls);
40
41  // If voice is available, add the voice info element to the controlsPane
42  if (voice) {
43    let currentVoice = $('<div class="text-secondary font-weight-normal"><span class="text-dark font-weight-bold">' + voice.name + '</span> (' + voice.lang + ')</div>');
44
45    controlsPane.append(currentVoice);
46  }
47
48  // Add the controlsPane to the DOM
49  app.append(controlsPane);
50
51  // Show the play button
52  showControl(playButton);
53}
在这里,您为语音控制和控制面板创建容器元素. 您使用先前创建的 iconSVG() 函数来获取控制按钮的 SVG 标记,并创建按钮元素。
最后,您将语音控制按钮和语音信息转换到 DOM. 它也被配置为仅显示 播放 按钮。
接下来,您将为您在上一节中定义的语音控制按钮实施点击事件处理器。
设置事件处理器,如下代码片段所示:
 1[label public/main.js]
 2// Click event handler for the play button
 3playButton.on('click', function (evt) {
 4  evt.preventDefault();
 5
 6  if (VOICE_SPEAKING) {
 7    // If voice is paused, it is resumed when the playButton is clicked
 8    if (VOICE_PAUSED) synthesis.resume();
 9    return resumed();
10  } else {
11    // Create utterances for the quote and the person
12    let quoteUtterance = new SpeechSynthesisUtterance(QUOTE_TEXT);
13    let personUtterance = new SpeechSynthesisUtterance(QUOTE_PERSON);
14
15    // Set the voice for the utterances if available
16    if (voice) {
17      quoteUtterance.voice = voice.voice;
18      personUtterance.voice = voice.voice;
19    }
20
21    // Set event listeners for the quote utterance
22    quoteUtterance.onpause = paused;
23    quoteUtterance.onresume = resumed;
24    quoteUtterance.onboundary = updateVoiceControls;
25
26    // Set the listener to activate speaking state when the quote utterance starts
27    quoteUtterance.onstart = function (evt) {
28      VOICE_COMPLETE = false;
29      VOICE_SPEAKING = true;
30      updateVoiceControls();
31    };
32
33    // Set event listeners for the person utterance
34    personUtterance.onpause = paused;
35    personUtterance.onresume = resumed;
36    personUtterance.onboundary = updateVoiceControls;
37
38    // Refresh the app and fetch a new quote when the person utterance ends
39    personUtterance.onend = fetchNewQuote;
40
41    // Speak the utterances
42    synthesis.speak(quoteUtterance);
43    synthesis.speak(personUtterance);
44  }
45});
46
47// Click event handler for the pause button
48pauseButton.on('click', function (evt) {
49  evt.preventDefault();
50
51  // Pause the utterance if it is not in paused state
52  if (VOICE_SPEAKING) synthesis.pause();
53  return paused();
54});
55
56// Click event handler for the stop button
57stopButton.on('click', function (evt) {
58  evt.preventDefault();
59
60  // Clear the utterances queue
61  if (VOICE_SPEAKING) synthesis.cancel();
62  resetVoice();
63
64  // Set the complete status of the voice output
65  VOICE_COMPLETE = true;
66  updateVoiceControls();
67});
在这里,您为语音控制按钮设置了点击事件倾听器. 当点击 播放 按钮时,它将开始发音,从quoteUtterance开始,然后是personUtterance。
您将VOICE_SPEAKING设置为true在quoteUtterance的开始事件处理器中。
Pause 按钮暂停语音输出,而 ** Stop** 按钮结束语音输出,并使用SpeechSynthesis接口的cancel()方法从排队中删除所有发音。
在之前的代码片段中,您已经对updateVoiceControls()函数进行了几次呼叫和引用,该函数负责更新语音控制,以便根据语音状态变量显示适当的控制。
对public/main.js文件进行以下修改,以实现updateVoiceControls()函数:
 1[label public/main.js]
 2function updateVoiceControls() {
 3  // Get a reference to each control button
 4  let playButton = $('#play-circle');
 5  let pauseButton = $('#pause-circle');
 6  let stopButton = $('#stop-circle');
 7
 8  if (VOICE_SPEAKING) {
 9    // Show the stop button if speaking is in progress
10    showControl(stopButton);
11
12    // Toggle the play and pause buttons based on paused state
13    if (VOICE_PAUSED) {
14      showControl(playButton);
15      hideControl(pauseButton);
16    } else {
17      hideControl(playButton);
18      showControl(pauseButton);
19    }
20  } else {
21    // Show only the play button if no speaking is in progress
22    showControl(playButton);
23    hideControl(pauseButton);
24    hideControl(stopButton);
25  }
26}
在此代码部分中,您首先会得到每个语音控制按钮元素的引用,然后,您将指定哪些语音控制按钮应在语音输出的不同状态中可见。
您现在已经准备好实施initialize()函数,该函数负责初始化应用程序,然后将以下代码片段添加到public/main.js文件中,以实现initialize()函数。
 1[label public/main.js]
 2function initialize() {
 3  if ('speechSynthesis' in window) {
 4    SYNTHESIS = window.speechSynthesis;
 5
 6    let timer = setInterval(function () {
 7      let voices = SYNTHESIS.getVoices();
 8
 9      if (voices.length > 0) {
10        getVoices();
11        fetchNewQuote();
12        clearInterval(timer);
13      }
14    }, 200);
15  } else {
16    let message = 'Text-to-speech not supported by your browser.';
17
18    // Create the browser notice element
19    let notice = $('<div class="w-100 py-4 bg-danger font-weight-bold text-white position-absolute text-center" style="bottom:0; z-index:10">' + message + '</div>');
20
21    fetchNewQuote();
22    console.log(message);
23
24    // Display non-support info on DOM
25    $(document.body).append(notice);
26  }
27}
此代码首先检查语音合成是否在窗口的全球对象中可用,然后分配给SYNTHESIS变量,如果可用。
你在这里使用间隔,因为在SpeechSynthesis.getVoices()中有已知的非同步行为,这使得它在初始调用时返回一个空数组,因为声音尚未加载。
您现在已经成功完成了文本对话应用程序,您可以通过在终端中运行以下命令来启动该应用程序:
1npm start
应用程序将在5000端口运行,如果可用。
在您的浏览器中访问localhost:5000,观察应用程序。
现在,与播放按钮进行交互,以便听到引文说话。
结论
在本教程中,您使用 Web Speech API 为 Web 构建了文本对语音应用程序,您可以了解有关 Web Speech API 的更多信息,并在 MDN Web Docs 中找到 一些有用的资源。
如果你想继续改进你的应用程序,还有几个有趣的功能,你仍然可以实施和实验,如音量控制,语音点控制,速度 / 速度控制,发音文本的百分比等。
完整的 本教程的源代码在GitHub上可用。