简介
Shipit是一款面向Node.js开发人员的通用自动化和部署工具。它的特点是任务流基于流行的Orchestrator 软件包,通过OpenSSH 登录和交互式 SSH 命令,以及可扩展的 API。开发人员可以使用 Shipit 为各种 Node.js 应用程序自动构建和部署工作流。
通过 Shipit 工作流程,开发人员不仅可以配置任务,还可以指定任务的执行顺序、同步运行还是异步运行以及在何种环境中运行。
在本教程中,您将安装和配置 Shipit,以便将 Node.js 应用程序从本地开发环境部署到生产环境。您将使用 Shipit 部署应用程序,并通过以下方式配置远程服务器:
- 将 Node.js 应用程序的文件从本地环境传输到生产环境(使用
rsync、git和ssh)。 - 安装应用程序的依赖项(Node 模块)。
- 使用 PM2 配置和管理远程服务器上运行的 Node.js 进程。
先决条件
在开始本教程之前,您需要准备以下材料:
- 两台 CentOS 7 服务器(本教程中将分别命名为 app 和 ** web** ),按照如何在 CentOS 7 上为生产设置 Node.js 应用程序 教程配置专用网络。
- 按照如何在 CentOS 7 上使用 Let's Encrypt 加密 Nginx教程,使用 TLS/SSL 保护 Nginx(在 web 服务器上)。注意,如果按时间顺序完成先决条件,则只需在 ** web** 服务器上完成步骤 1、4 和 6。
- 在开发环境中安装 Node.js 和 npm。本教程使用 10.17.0 版本。要在 macOS 或 Ubuntu 18.04 上安装,请按照如何在 macOS 上安装 Node.js 并创建本地开发环境 或如何在 Ubuntu 18.04 上安装 Node.js 的使用 PPA 安装 部分的步骤操作。安装了 Node.js 也就安装了 npm;本教程使用的是 6.11.3 版本。
- 安装了
rsync和git的本地开发计算机。- 在 macOS 上,你可以通过 Homebrew安装这些软件。
- 要在 Linux 发行版上安装
git,请参考 How To Install Git 教程。
- GitHub 或其他托管
git服务提供商的账户。本教程将使用 GitHub。
<$>[注] 注意: Windows 用户需要安装 Windows Subsystem for Linux 才能执行本指南中的命令。 <$>
步骤 1 - 设置远程存储库
Shipit 需要一个 Git 仓库来同步本地开发机器和远程服务器。在这一步中,你将在 Github.com 上创建一个远程仓库。虽然每个提供商略有不同,但命令在某种程度上是可以移植的。
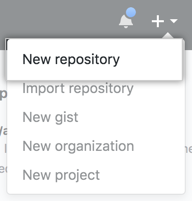
要创建一个版本库,请在网页浏览器中打开Github.com并登录。你会发现在任何页面的右上角都有一个**+** 符号。点击** +** ,然后点击** 新建版本库** 。
为你的版本库键入一个简短易记的名称,例如 "hello-world"。请注意,无论你在这里选择什么名称,都将复制为你在本地计算机上工作的项目文件夹。
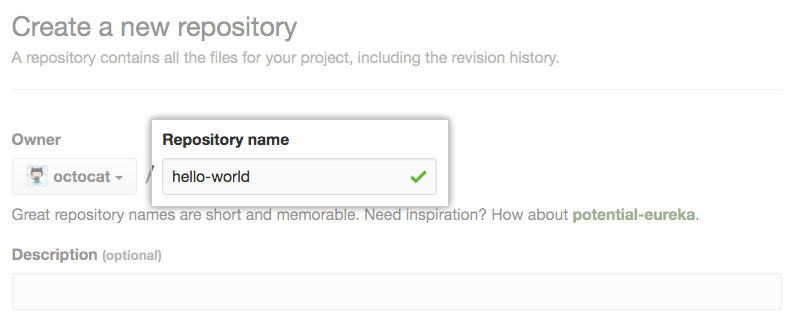
可选择添加对版本库的描述。
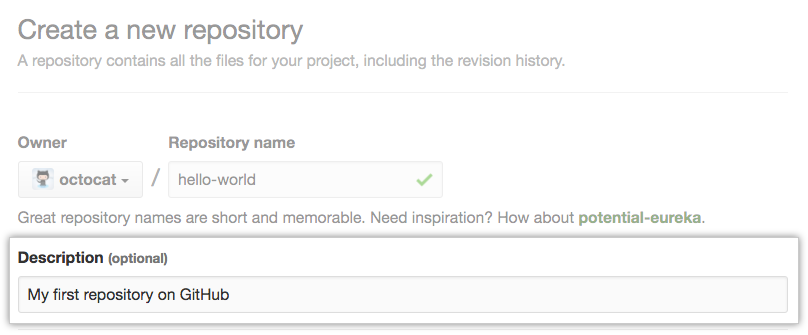
根据自己的偏好设置版本库的可见性(公开或私有)。
确保版本库初始化时有".gitignore",从 "添加 .gitignore "下拉列表中选择 "节点"。这一步很重要,可避免不必要的文件(如 node_modules 文件夹)被添加到版本库中。
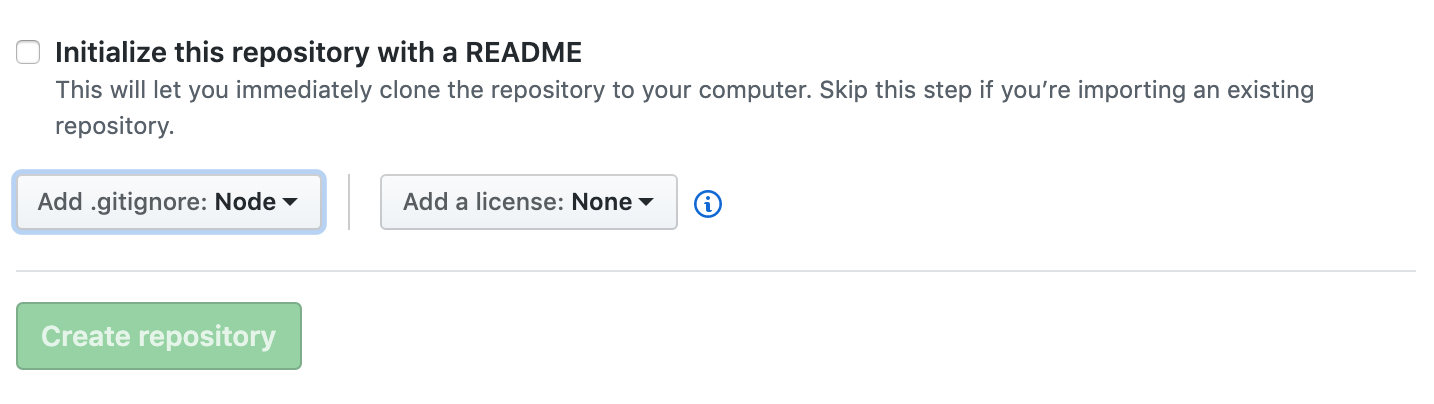
点击创建版本库 按钮。
现在需要将版本库从 Github.com 克隆到本地计算机。
打开终端,导航到您要存储所有 Node.js 项目文件的位置。请注意,此过程将在当前目录下创建一个子文件夹。要将版本库克隆到本地计算机,请运行以下命令:
1[environment local]
2git clone https://github.com/your-github-username/your-github-repository-name.git
您需要替换 your-github-username 和 your-github-repository-name 以反映您的 Github 用户名和之前提供的版本库名称。
<$>[注]
注意: 如果您已在 Github.com上启用双因素身份验证(2FA),则在命令行上访问 Github 时必须使用个人访问令牌或 SSH 密钥,而不是密码。有关 2FA 的 Github 帮助页面 提供了更多信息。
<$>
您将看到类似的输出结果:
1[secondary_label Output]
2Cloning into 'your-github-repository-name'...
3remote: Enumerating objects: 3, done.
4remote: Total 3 (delta 0), reused 0 (delta 0), pack-reused 3
5Unpacking objects: 100% (3/3), done.
运行以下命令移动到版本库:
1[environment local]
2cd your-github-repository-name
版本库中只有一个文件和一个文件夹,这两个文件都是 Git 用来管理版本库的文件。你可以用
1[environment local]
2ls -la
您将看到类似下面的输出:
1[secondary_label Output]
2total 8
30 drwxr-xr-x 4 asciant staff 128 22 Apr 07:16 .
40 drwxr-xr-x 5 asciant staff 160 22 Apr 07:16 ..
50 drwxr-xr-x 13 asciant staff 416 22 Apr 07:16 .git
68 -rw-r--r--   1 asciant staff 914 22 Apr 07:16 .gitignore
现在您已经配置了一个可用的 git 仓库,您将创建管理部署流程的 shipit.js 文件。
第 2 步 - 将 Shipit 集成到 Node.js 项目中
在本步骤中,您将创建一个示例 Node.js 项目,然后添加 Shipit 软件包。本教程提供了一个示例应用程序--Node.js Web 服务器,它接受 HTTP 请求,并以纯文本方式响应 "Hello World"。要创建应用程序,请运行以下命令:
1[environment local]
2nano hello.js
将以下示例程序代码添加到 hello.js 中(将 APP_PRIVATE_IP_ADDRESS 变量更新为 app 服务器的专用网络 IP 地址):
1[label hello.js]
2var http = require('http');
3http.createServer(function (req, res) {
4  res.writeHead(200, {'Content-Type': 'text/plain'});
5  res.end('Hello World\n');
6}).listen(8080, 'APP_PRIVATE_IP_ADDRESS');
7console.log('Server running at http://APP_PRIVATE_IP_ADDRESS:8080/');
现在为应用程序创建 package.json 文件:
1[environment local]
2npm init -y
该命令将创建一个 package.json 文件,用于配置 Node.js 应用程序。下一步,您将使用 npm 命令行界面为该文件添加依赖关系。
 1[secondary_label Output]
 2Wrote to ~/hello-world/package.json:
 3{
 4  "name": "hello-world",
 5  "version": "1.0.0",
 6  "description": "",
 7  "main": index.js",
 8  "scripts": {
 9    "test": "echo \"Error: no test specified\" && exit 1"
10  },
11  "keywords": [],
12  "author": "",
13  "license": "ISC"
14}
接下来,使用以下命令安装必要的 npm 软件包:
1[environment local]
2npm install --save-dev shipit-cli shipit-deploy shipit-shared
这里使用 -save-dev 标志,因为 Shipit 软件包只需要在本地机器上运行。你会看到类似下面的输出:
1[secondary_label Output]
2+ [email protected]
3+ [email protected]
4+ [email protected]
5updated 4 packages and audited 21356 packages in 11.671s
6found 62 low severity vulnerabilities run `npm audit fix` to fix them, or `npm audit` for details
这也会将这三个软件包作为开发依赖项添加到你的 package.json 文件中:
1[label package.json]
2. . .
3  "devDependencies": {
4    "shipit-cli": "^4.2.0",
5    "shipit-deploy": "^4.1.4",
6    "shipit-shared": "^4.4.2"
7  },
8. . .
配置好本地环境后,现在就可以为基于 Shipit 的部署准备远程 app 服务器了。
第 3 步 - 准备远程应用程序服务器
在这一步中,你将使用 ssh 连接到你的 app 服务器,并安装远程依赖程序 rsync 。Rsync 是一种实用工具,可通过比较文件的修改时间和大小,在本地计算机驱动器和联网计算机之间高效地传输和同步文件。
Shipit 使用 rsync 在本地计算机和远程 app 服务器之间传输和同步文件。你不会直接向rsync发出任何命令,Shipit 会帮你处理。
<$>[注] 注: 如何在 CentOS 7 上设置用于生产的 Node.js 应用程序 给您留下了两个服务器 ** app** 和 ** web** 。这些命令只能在 ** app** 上执行。 <$>
通过 ssh 连接到远程 app 服务器:
1[environment local]
2ssh deployer@your_app_server_ip
运行以下命令在服务器上安装 rsync:
1sudo yum install rsync
确认安装:
1rsync --version
你会在该命令的输出中看到类似的一行:
1[secondary_label Output]
2rsync version 3.1.2 protocol version 31
3. . .
输入 exit 可结束 ssh 会话。
安装了 rsync 并可在命令行上使用后,您就可以继续讨论部署任务及其与事件的关系了。
第 4 步 - 配置和执行部署任务
_events_和_tasks_都是 Shipit 部署的关键组成部分,了解它们如何与应用程序的部署相辅相成非常重要。Shipit 触发的事件代表了部署生命周期中的特定点。您的任务将根据 Shipit 生命周期的顺序执行,以响应这些事件。
在 Node.js 应用程序中,任务/事件系统非常有用,一个常见的例子就是在远程服务器上安装应用程序的依赖项(node_modules)。在这一步的后面,你将让 Shipit 监听 updated 事件(该事件在应用程序的文件传输后发出),并运行任务在远程服务器上安装应用程序的依赖项(npm install)。
要监听事件并执行任务,Shipit 需要一个配置文件,其中包含远程服务器(*应用 服务器)的信息,并注册事件监听器和这些任务要执行的命令。该文件位于本地开发计算机上的 Node.js 应用程序目录内。
要开始使用,请创建此文件,其中包括远程服务器的信息、要订阅的事件侦听器以及一些任务定义。运行以下命令,在本地计算机的应用程序根目录下创建 shipitfile.js 文件:
1[environment local]
2nano shipitfile.js
现在你已经创建了一个文件,它需要填充 Shipit 所需的初始环境信息。这些信息主要是远程Git仓库的位置,以及重要的app 服务器的公共 IP 地址和 SSH 用户账户。
添加此初始配置,并更新突出显示的行以匹配您的环境:
 1[label shipitfile.js]
 2module.exports = shipit => {
 3  require('shipit-deploy')(shipit);
 4  require('shipit-shared')(shipit);
 5
 6  const appName = 'hello';
 7
 8  shipit.initConfig({
 9    default: {
10      deployTo: '/home/sammy/your-domain',
11      repositoryUrl: 'https://git-provider.tld/YOUR_GIT_USERNAME/YOUR_GIT_REPO_NAME.git',
12      keepReleases: 5,
13      shared: {
14        overwrite: true,
15        dirs: ['node_modules']
16      }
17    },
18    production: {
19      servers: 'sammy@YOUR_APP_SERVER_PUBLIC_IP'
20    }
21  });
22
23  const path = require('path');
24  const ecosystemFilePath = path.join(
25    shipit.config.deployTo,
26    'shared',
27    'ecosystem.config.js'
28  );
29
30  // Our listeners and tasks will go here
31
32};
更新 shipit.initConfig 方法中的变量可为 Shipit 提供特定于您部署的配置。这些变量代表 Shipit 的以下内容:
- deployTo:
是 Shipit 将应用程序代码部署到远程服务器上的目录。在这里,你可以使用具有sudo权限的非 root 用户的/home/文件夹 (/home/sammy`),因为它是安全的,可以避免权限问题。/your-domain "组件是一个命名约定,用于将该文件夹与用户主文件夹中的其他文件夹区分开来。 - repositoryUrl:` 是指向完整 Git 仓库的 URL,Shipit 将使用此 URL 确保项目文件在部署前保持同步。
- keepReleases:` 是要在远程服务器上保留的版本数量。版本 "是一个带有日期戳记的文件夹,其中包含发布时的应用程序文件。这些文件对于 "回滚 "部署非常有用。
- 共享:"是与 "keepReleases "相对应的配置,允许在不同版本之间 "共享 "目录。在本例中,我们有一个在所有版本之间共享的
node_modules文件夹。 - production:
代表部署应用程序的远程服务器。在这种情况下,您有一台服务器(**应用程序** 服务器),命名为production,servers:配置与您的 SSH用户和公共 IP 地址`相匹配。production "与本教程最后使用的 Shipit 部署命令("npx shipit server name deploy "或在你的情况下 "npx shipit production deploy")相对应。
有关 Shipit 部署配置 对象的更多信息,请参阅 Shipit Github 存储库。
在继续更新 shipitfile.js 之前,让我们回顾一下下面的示例代码片段,以了解 Shipit 任务:
1[secondary_label Example event listener]
2shipit.on('deploy', () => {
3  shipit.start('say-hello');
4});
5
6shipit.blTask('say-hello', async () => {
7  shipit.local('echo "hello from your local computer"')
8});
这是一个使用 shipit.on 方法订阅 deploy 事件的示例任务。该任务将等待 Shipit 生命周期发出 "deploy "事件,然后在收到该事件时执行 "shipit.start "方法,告诉 Shipit "启动""say-hello "任务。
shipit.on` 方法需要两个参数,一个是要监听的事件名称,另一个是收到事件时要执行的回调函数。
在 shipit.on 方法声明下,任务是用 shipit.blTask 方法定义的。这将创建一个新的 Shipit 任务,该任务在执行期间将阻塞其他任务(它是一个同步任务)。shipit.blTask 方法也需要两个参数,一个是定义的任务名称,另一个是当任务被 shipit.start 触发时执行的回调函数。
在本例任务的回调函数(say-hello)中,shipit.local 方法会在本地计算机上执行一条命令。本地命令会在终端输出中回声 "hello from your local computer"。
如果要在远程服务器上执行命令,则需要使用 shipit.remote 方法。shipit.local "和 "shipit.remote "这两个方法提供了一个 API,用于在本地或远程发布命令,作为部署的一部分。
现在更新 shipitfile.js 以包含事件侦听器,从而使用 shipit.on 订阅 Shipit 生命周期。将事件侦听器添加到 shipitfile.js 中,将它们插入初始配置中的注释占位符 // 我们的任务将放在这里:
1[label shipitfile.js]
2. . .
3  shipit.on('updated', () => {
4    shipit.start('npm-install', 'copy-config');
5  });
6
7  shipit.on('published', () => {
8    shipit.start('pm2-server');
9  });
这两个方法正在监听作为 Shipit 部署生命周期一部分的 updated 和 published 事件。收到事件后,它们将分别使用 shipit.start 方法启动任务,与示例任务类似。
现在您已调度好监听器,可以添加相应的任务了。在shipitfile.js中添加以下任务,将它们插入事件侦听器之后:
 1[label shipitfile.js]
 2. . .
 3shipit.blTask('copy-config', async () => {
 4
 5const fs = require('fs');
 6
 7const ecosystem = `
 8module.exports = {
 9apps: [
10  {
11    name: '${appName}',
12    script: '${shipit.releasePath}/hello.js',
13    watch: true,
14    autorestart: true,
15    restart_delay: 1000,
16    env: {
17      NODE_ENV: 'development'
18    },
19    env_production: {
20      NODE_ENV: 'production'
21    }
22  }
23]
24};`;
25
26  fs.writeFileSync('ecosystem.config.js', ecosystem, function(err) {
27    if (err) throw err;
28    console.log('File created successfully.');
29  });
30
31  await shipit.copyToRemote('ecosystem.config.js', ecosystemFilePath);
32});
首先,您需要声明一个名为 "copy-config "的任务。该任务会创建一个名为 ecosystem.config.js 的本地文件,然后将该文件复制到远程 app 服务器。PM2 使用该文件管理 Node.js 应用程序。它向 PM2 提供必要的文件路径信息,以确保运行最新部署的文件。在构建过程的稍后阶段,您将创建一个任务,以 ecosystem.config.js 作为配置运行 PM2。
如果应用程序需要环境变量(如数据库连接字符串),可以在本地的 env: 或远程服务器上的 env_production: 中声明这些变量,方法与在这些对象中设置 NODE_ENV 变量相同。
在 copy-config 任务之后,将下一个任务添加到 shipitfile.js 中:
1[label shipitfile.js]
2. . .
3shipit.blTask('npm-install', async () => {
4  shipit.remote(`cd ${shipit.releasePath} && npm install --production`);
5});
接下来,你需要声明一个名为 npm-install的任务。该任务使用远程 bash 终端(通过 shipit.remote)安装应用程序的依赖项(npm 软件包)。
在 npm-install 任务之后,将最后一个任务添加到 shipitfile.js 中:
1[label shipitfile.js]
2. . .
3shipit.blTask('pm2-server', async () => {
4  await shipit.remote(`pm2 delete -s ${appName} || :`);
5  await shipit.remote(
6    `pm2 start ${ecosystemFilePath} --env production --watch true`
7  );
8});
最后,声明一个名为 pm2-server 的任务。该任务也使用远程 bash 终端,首先通过 delete 命令停止 PM2 管理之前的部署,然后启动 Node.js 服务器的新实例,并将 ecosystem.config.js 文件作为变量提供。您还让 PM2 知道它应该使用初始配置中 production 块的环境变量,并要求 PM2 监视应用程序,在其崩溃时重新启动。
完整的 shipitfile.js 文件:
 1[label shipitfile.js]
 2module.exports = shipit => {
 3  require('shipit-deploy')(shipit);
 4  require('shipit-shared')(shipit);
 5
 6  const appName = 'hello';
 7
 8  shipit.initConfig({
 9    default: {
10      deployTo: '/home/deployer/example.com',
11      repositoryUrl: 'https://git-provider.tld/YOUR_GIT_USERNAME/YOUR_GIT_REPO_NAME.git',
12      keepReleases: 5,
13      shared: {
14        overwrite: true,
15        dirs: ['node_modules']
16      }
17    },
18    production: {
19      servers: 'deployer@YOUR_APP_SERVER_PUBLIC_IP'
20    }
21  });
22
23  const path = require('path');
24  const ecosystemFilePath = path.join(
25    shipit.config.deployTo,
26    'shared',
27    'ecosystem.config.js'
28  );
29
30  // Our listeners and tasks will go here
31  shipit.on('updated', async () => {
32    shipit.start('npm-install', 'copy-config');
33  });
34
35  shipit.on('published', async () => {
36    shipit.start('pm2-server');
37  });
38
39  shipit.blTask('copy-config', async () => {
40    const fs = require('fs');
41    const ecosystem = `
42module.exports = {
43  apps: [
44    {
45      name: '${appName}',
46      script: '${shipit.releasePath}/hello.js',
47      watch: true,
48      autorestart: true,
49      restart_delay: 1000,
50      env: {
51        NODE_ENV: 'development'
52      },
53      env_production: {
54        NODE_ENV: 'production'
55      }
56    }
57  ]
58};`;
59
60    fs.writeFileSync('ecosystem.config.js', ecosystem, function(err) {
61      if (err) throw err;
62      console.log('File created successfully.');
63    });
64
65    await shipit.copyToRemote('ecosystem.config.js', ecosystemFilePath);
66  });
67
68  shipit.blTask('npm-install', async () => {
69    shipit.remote(`cd ${shipit.releasePath} && npm install --production`);
70  });
71
72  shipit.blTask('pm2-server', async () => {
73    await shipit.remote(`pm2 delete -s ${appName} || :`);
74    await shipit.remote(
75      `pm2 start ${ecosystemFilePath} --env production --watch true`
76    );
77  });
78};
准备就绪后,保存并退出文件。
配置好 "shipitfile.js"、事件监听器和相关任务后,就可以继续部署到 app 服务器了。
第 5 步 - 部署应用程序
在此步骤中,您将远程部署应用程序,并测试部署后应用程序是否可在互联网上使用。
由于 Shipit 会从远程 Git 仓库克隆项目文件,因此需要将本地 Node.js 应用程序文件从本地机器推送到 Github。导航到 Node.js 项目的应用程序目录("hello.js "和 "shiptitfile.js "所在的位置),然后运行以下命令:
1[environment local]
2git status
git status "命令显示工作目录和暂存区域的状态。通过它,你可以看到哪些变更已被暂存,哪些未被暂存,以及哪些文件未被 Git 跟踪。你的文件未被跟踪,在输出中显示为红色:
 1[secondary_label Output]
 2On branch master
 3Your branch is up to date with 'origin/master'.
 4
 5Untracked files:
 6  (use "git add <file>..." to include in what will be committed)
 7
 8    hello.js
 9    package-lock.json
10    package.json
11    shipitfile.js
12
13nothing added to commit but untracked files present (use "git add" to track)
您可以使用以下命令将这些文件添加到版本库中:
1[environment local]
2git add --all
这条命令不会产生任何输出,不过如果再次运行 git status,文件会显示为绿色,并注明有更改需要提交。
您可以运行以下命令创建提交:
1[environment local]
2git commit -m "Our first commit"
该命令的输出会提供一些有关文件的 Git 特有信息。
1[secondary_label Output]
2[master c64ea03] Our first commit
3 4 files changed, 1948 insertions(+)
4 create mode 100644 hello.js
5 create mode 100644 package-lock.json
6 create mode 100644 package.json
7 create mode 100644 shipitfile.js
现在只需将提交推送到远程仓库,以便 Shipit 在部署时克隆到您的 app 服务器。运行以下命令
1[environment local]
2git push origin master
输出包括与远程存储库同步的信息:
1[secondary_label Output]
2Enumerating objects: 7, done.
3Counting objects: 100% (7/7), done.
4Delta compression using up to 8 threads
5Compressing objects: 100% (6/6), done.
6Writing objects: 100% (6/6), 15.27 KiB | 7.64 MiB/s, done.
7Total 6 (delta 0), reused 0 (delta 0)
8To github.com:Asciant/hello-world.git
9   e274312..c64ea03 master -> master
要部署应用程序,请运行以下命令:
1[environment local]
2npx shipit production deploy
该命令的输出(因篇幅过大,无法全部收录)提供了正在执行的任务的详细信息以及特定函数的结果。下面的 pm2-server 任务输出显示 Node.js 应用程序已启动:
 1[secondary_label Output]
 2Running 'deploy:init' task...
 3Finished 'deploy:init' after 432 μs
 4. . .
 5Running 'pm2-server' task...
 6Running "pm2 delete -s hello || :" on host "centos-ap-app.asciant.com".
 7Running "pm2 start /home/deployer/example.com/shared/ecosystem.config.js --env production --watch true" on host "centos-ap-app.asciant.com".
 8@centos-ap-app.asciant.com [PM2][WARN] Node 4 is deprecated, please upgrade to use pm2 to have all features
 9@centos-ap-app.asciant.com [PM2][WARN] Applications hello not running, starting...
10@centos-ap-app.asciant.com [PM2] App [hello] launched (1 instances)
11@centos-ap-app.asciant.com ┌──────────┬────┬─────────┬──────┬──────┬────────┬─────────┬────────┬─────┬──────────┬──────────┬──────────┐
12@centos-ap-app.asciant.com │ App name │ id │ version │ mode │ pid  │ status │ restart │ uptime │ cpu │ mem      │ user     │ watching │
13@centos-ap-app.asciant.com ├──────────┼────┼─────────┼──────┼──────┼────────┼─────────┼────────┼─────┼──────────┼──────────┼──────────┤
14@centos-ap-app.asciant.com │ hello    │ 0  │ 1.0.0   │ fork │ 4177 │ online │ 0       │ 0s     │ 0%  │ 4.5 MB   │ deployer │ enabled  │
15@centos-ap-app.asciant.com └──────────┴────┴─────────┴──────┴──────┴────────┴─────────┴────────┴─────┴──────────┴──────────┴──────────┘
16@centos-ap-app.asciant.com Use `pm2 show <id|name>` to get more details about an app
17Finished 'pm2-server' after 5.27 s
18
19Running 'deploy:clean' task...
20Keeping "5" last releases, cleaning others
21Running "(ls -rd /home/deployer/example.com/releases/*|head -n 5;ls -d /home/deployer/example.com/releases/*)|sort|uniq -u|xargs rm -rf" on host "centos-ap-app.asciant.com".
22Finished 'deploy:clean' after 1.81 s
23
24Running 'deploy:finish' task...
25Finished 'deploy:finish' after 222 μs
26Finished 'deploy' [ deploy:init, deploy:fetch, deploy:update, deploy:publish, deploy:clean, deploy:finish ]
要像用户一样查看应用程序,您可以在浏览器中输入您的网站 URL "your-domain",访问您的web 服务器。这将通过反向代理,在部署文件的** app** 服务器上为 Node.js 应用程序提供服务。
您将看到世界你好 的问候语。
<$>[注]
注: 首次部署后,您的 Git 仓库将跟踪一个新创建的名为 ecosystem.config.js 的文件。由于该文件将在每次部署时重建,并可能包含已编译的应用程序机密,因此应在下一次 git 提交之前将其添加到本地计算机应用程序根目录下的 .gitignore 文件中。
1[label .gitignore]
2. . .
3# ecosystem.config
4ecosystem.config.js
<$>
您已将 Node.js 应用程序部署到您的 app 服务器,这是指您的新部署。一切就绪并开始运行后,您就可以继续监控应用程序进程了。
第 6 步 - 监控应用程序
PM2 是管理远程进程的绝佳工具,但它也提供了监控这些应用程序进程性能的功能。
使用此命令通过 SSH 连接远程 app 服务器:
1[environment local]
2ssh deployer@your_app_server_ip
要获取与 PM2 受管进程相关的具体信息,请运行以下程序:
1pm2 list
您将看到类似的输出:
1[secondary_label Output]
2┌─────────────┬────┬─────────┬──────┬──────┬────────┬─────────┬────────┬──────┬───────────┬──────────┬──────────┐
3│ App name    │ id │ version │ mode │ pid  │ status │ restart │ uptime │ cpu  │ mem       │ user     │ watching │
4├─────────────┼────┼─────────┼──────┼──────┼────────┼─────────┼────────┼──────┼───────────┼──────────┼──────────┤
5│ hello       │ 0  │ 0.0.1   │ fork │ 3212 │ online │ 0       │ 62m    │ 0.3% │ 45.2 MB   │ deployer │ enabled  │
6└─────────────┴────┴─────────┴──────┴──────┴────────┴─────────┴────────┴──────┴───────────┴──────────┴──────────┘
您将看到 PM2 收集到的信息摘要。要查看详细信息,您可以运行
1pm2 show hello
输出扩展了 pm2 list 命令提供的摘要信息。它还提供了一些辅助命令的信息,并提供了日志文件的位置:
 1[secondary_label Output]
 2  Describing process with id 0 - name hello
 3┌───────────────────┬─────────────────────────────────────────────────────────────┐
 4│ status            │ online                                                      │
 5│ name              │ hello                                                       │
 6│ version           │ 1.0.0                                                       │
 7│ restarts          │ 0                                                           │
 8│ uptime            │ 82s                                                         │
 9│ script path       │ /home/deployer/example.com/releases/20190531213027/hello.js │
10│ script args       │ N/A                                                         │
11│ error log path    │ /home/deployer/.pm2/logs/hello-error.log                    │
12│ out log path      │ /home/deployer/.pm2/logs/hello-out.log                      │
13│ pid path          │ /home/deployer/.pm2/pids/hello-0.pid                        │
14│ interpreter       │ node                                                        │
15│ interpreter args  │ N/A                                                         │
16│ script id         │ 0                                                           │
17│ exec cwd          │ /home/deployer                                              │
18│ exec mode         │ fork_mode                                                   │
19│ node.js version   │ 4.2.3                                                       │
20│ node env          │ production                                                  │
21│ watch & reload    │ ✔                                                           │
22│ unstable restarts │ 0                                                           │
23│ created at        │ 2019-05-31T21:30:48.334Z                                    │
24└───────────────────┴─────────────────────────────────────────────────────────────┘
25 Revision control metadata
26┌──────────────────┬────────────────────────────────────────────────────┐
27│ revision control │ git                                                │
28│ remote url       │ N/A                                                │
29│ repository root  │ /home/deployer/example.com/releases/20190531213027 │
30│ last update      │ 2019-05-31T21:30:48.559Z                           │
31│ revision         │ 62fba7c8c61c7769022484d0bfa46e756fac8099           │
32│ comment          │ Our first commit                                   │
33│ branch           │ master                                             │
34└──────────────────┴────────────────────────────────────────────────────┘
35 Divergent env variables from local env
36┌───────────────────────────┬───────────────────────────────────────┐
37│ XDG_SESSION_ID            │ 15                                    │
38│ HOSTNAME                  │ N/A                                   │
39│ SELINUX_ROLE_REQUESTED    │                                       │
40│ TERM                      │ N/A                                   │
41│ HISTSIZE                  │ N/A                                   │
42│ SSH_CLIENT                │ 44.222.77.111 58545 22                │
43│ SELINUX_USE_CURRENT_RANGE │                                       │
44│ SSH_TTY                   │ N/A                                   │
45│ LS_COLORS                 │ N/A                                   │
46│ MAIL                      │ /var/mail/deployer                    │
47│ PATH                      │ /usr/local/bin:/usr/bin               │
48│ SELINUX_LEVEL_REQUESTED   │                                       │
49│ HISTCONTROL               │ N/A                                   │
50│ SSH_CONNECTION            │ 44.222.77.111 58545 209.97.167.252 22 │
51└───────────────────────────┴───────────────────────────────────────┘
52. . .
PM2 还提供了一个终端内监测工具,可通过以下方式访问:
1pm2 monit
该命令的输出是一个交互式仪表盘,其中 pm2 提供实时进程信息、日志、度量和元数据。该仪表盘有助于监控资源和错误日志:
 1[secondary_label Output]
 2┌─ Process list ────────────────┐┌─ Global Logs ─────────────────────────────────────────────────────────────┐
 3│[ 0] hello Mem:  22 MB     ││                                                                           │
 4│                               ││                                                                           │
 5│                               ││                                                                           │
 6└───────────────────────────────┘└───────────────────────────────────────────────────────────────────────────┘
 7┌─ Custom metrics (http://bit.l─┐┌─ Metadata ────────────────────────────────────────────────────────────────┐
 8│ Heap Size 10.73  ││ App Name hello                                               │
 9│ Heap Usage 66.14  ││ Version N/A                                                 │
10│ Used Heap Size 7.10  ││ Restarts 0                                                   │
11│ Active requests 0  ││ Uptime 55s                                                 │
12│ Active handles 4  ││ Script path           /home/asciant/hello.js                              │
13│ Event Loop Latency 0.70  ││ Script args N/A                                                 │
14│ Event Loop Latency p95        ││ Interpreter node                                                │
15│                               ││ Interpreter args N/A                                                 │
16└───────────────────────────────┘└───────────────────────────────────────────────────────────────────────────┘
了解了如何使用 PM2 监控流程后,您就可以继续了解 Shipit 如何帮助您回滚到之前的工作部署。
运行 exit 结束在 app 服务器上的 ssh 会话。
第 7 步 - 回滚存在漏洞的部署
部署过程中偶尔会暴露出不可预见的错误或问题,导致您的网站失败。Shipit 的开发人员和维护人员已经预料到了这一点,并为您提供了回滚到您的应用程序的先前(工作)部署的功能。
为确保您的 PM2 配置持续存在,请在 rollback 事件上为 shipitfile.js 添加另一个事件监听器:
1[label shipitfile.js]
2. . .
3  shipit.on('rollback', () => {
4    shipit.start('npm-install', 'copy-config');
5  });
你需要为 rollback 事件添加监听器,以运行 npm-install 和 copy-config 任务。之所以需要这样做,是因为与 published 事件不同,当回滚部署时,Shipit 生命周期不会运行 updated 事件。添加此事件监听器可确保 PM2 进程管理器指向最新的部署,即使在回滚的情况下也是如此。
此过程与部署类似,只是命令略有不同。要尝试回滚到之前的部署,可以执行以下命令:
1[environment local]
2npx shipit production rollback
与 deploy 命令一样,rollback 也提供有关回滚过程和正在执行的任务的详细信息:
 1[secondary_label Output]
 2Running 'rollback:init' task...
 3Get current release dirname.
 4Running "if [ -h /home/deployer/example.com/current ]; then readlink /home/deployer/example.com/current; fi" on host "centos-ap-app.asciant.com".
 5@centos-ap-app.asciant.com releases/20190531213719
 6Current release dirname : 20190531213719.
 7Getting dist releases.
 8Running "ls -r1 /home/deployer/example.com/releases" on host "centos-ap-app.asciant.com".
 9@centos-ap-app.asciant.com 20190531213719
10@centos-ap-app.asciant.com 20190531213519
11@centos-ap-app.asciant.com 20190531213027
12Dist releases : ["20190531213719","20190531213519","20190531213027"].
13Will rollback to 20190531213519.
14Finished 'rollback:init' after 3.96 s
15
16Running 'deploy:publish' task...
17Publishing release "/home/deployer/example.com/releases/20190531213519"
18Running "cd /home/deployer/example.com && if [ -d current ] && [ ! -L current ]; then echo "ERR: could not make symlink"; else ln -nfs releases/20190531213519 current_tmp && mv -fT current_tmp current; fi" on host "centos-ap-app.asciant.com".
19Release published.
20Finished 'deploy:publish' after 1.8 s
21
22Running 'pm2-server' task...
23Running "pm2 delete -s hello || :" on host "centos-ap-app.asciant.com".
24Running "pm2 start /home/deployer/example.com/shared/ecosystem.config.js --env production --watch true" on host "centos-ap-app.asciant.com".
25@centos-ap-app.asciant.com [PM2][WARN] Node 4 is deprecated, please upgrade to use pm2 to have all features
26@centos-ap-app.asciant.com [PM2][WARN] Applications hello not running, starting...
27@centos-ap-app.asciant.com [PM2] App [hello] launched (1 instances)
28@centos-ap-app.asciant.com ┌──────────┬────┬─────────┬──────┬──────┬────────┬─────────┬────────┬─────┬──────────┬──────────┬──────────┐
29@centos-ap-app.asciant.com │ App name │ id │ version │ mode │ pid  │ status │ restart │ uptime │ cpu │ mem      │ user     │ watching │
30@centos-ap-app.asciant.com ├──────────┼────┼─────────┼──────┼──────┼────────┼─────────┼────────┼─────┼──────────┼──────────┼──────────┤
31@centos-ap-app.asciant.com │ hello    │ 0  │ 1.0.0   │ fork │ 4289 │ online │ 0       │ 0s     │ 0%  │ 4.5 MB   │ deployer │ enabled  │
32@centos-ap-app.asciant.com └──────────┴────┴─────────┴──────┴──────┴────────┴─────────┴────────┴─────┴──────────┴──────────┴──────────┘
33@centos-ap-app.asciant.com Use `pm2 show <id|name>` to get more details about an app
34Finished 'pm2-server' after 5.55 s
35
36Running 'deploy:clean' task...
37Keeping "5" last releases, cleaning others
38Running "(ls -rd /home/deployer/example.com/releases/*|head -n 5;ls -d /home/deployer/example.com/releases/*)|sort|uniq -u|xargs rm -rf" on host "centos-ap-app.asciant.com".
39Finished 'deploy:clean' after 1.82 s
40
41Running 'rollback:finish' task...
42Finished 'rollback:finish' after 615 μs
43Finished 'rollback' [ rollback:init, deploy:publish, deploy:clean, rollback:finish ]
您已通过 keepReleases:5 配置。Shipit 在内部跟踪这些发布版本,以确保在需要时能够回滚。Shipit 还提供了一种方便的方法,通过创建一个以时间戳(YYYYMMDDHHmmss - 例:/home/deployer/your-domain/releases/20190420210548)命名的目录来识别这些版本。
如果想进一步自定义回滚过程,可以监听回滚操作的特定事件。然后,您可以使用这些事件来执行任务,以补充您的回滚操作。您可以参考 Shipit 生命周期分解 中提供的事件列表,并在 shipitfile.js 中配置任务/监听器。
回滚功能意味着,即使部署引入了意想不到的错误/问题,您也可以始终向用户提供一个正常运行的应用程序版本。
结论
在本教程中,您将配置一个工作流,该工作流可让您创建一个高度可定制的平台即服务替代方案,而这一切只需几台服务器即可完成。该工作流允许自定义部署和配置、使用 PM2 进行流程监控、扩展和添加服务的可能性,或在需要时将额外的服务器或环境添加到部署中。
如果您有兴趣继续学习 Node.js 技能,请查看 DigtalOcean Node.js 内容 以及 如何使用 Node.js 编程系列。