作者选择Girls Who Code作为Write for DOnations计划的一部分接受捐赠。
简介
计算机视觉是计算机科学的一个子领域,旨在从图像和视频中提取更高阶的理解。该领域包括物体检测、图像复原(矩阵补全)和光流等任务。计算机视觉为自动驾驶汽车原型、无员工杂货店、有趣的 Snapchat 滤镜以及移动设备的人脸验证器等技术提供了支持。
在本教程中,您将探索计算机视觉,使用预先训练好的模型制作一个 Snapchat 风格的狗狗滤镜。对于那些不熟悉 Snapchat 的人来说,这款滤镜会检测你的脸部,然后在上面叠加一个狗面具。然后,您将训练一个脸部情绪分类器,这样滤镜就能根据情绪选择狗面具,比如快乐时选择柯基犬,悲伤时选择哈巴狗。在学习过程中,您还将探索普通最小二乘法和计算机视觉的相关概念,从而了解机器学习的基本原理。
狗过滤器](assets/python3_dogfilter/Hf5RDn3.gif)
在学习本教程的过程中,您将使用 "OpenCV"(计算机视觉库)、"numpy"(线性代数工具)和 "matplotlib"(绘图)。在构建计算机视觉应用程序时,您还将应用以下概念:
- 作为回归和分类技术的普通最小二乘法。
- 随机梯度神经网络的基础知识。
虽然完成本教程并非必要,但如果您熟悉这些数学概念,您会发现更容易理解一些更详细的解释:
- 基本线性代数概念:标量、向量和矩阵。
- 基础微积分:如何求导数。
您可以在 https://github.com/do-community/emotion-based-dog-filter 上找到本教程的完整代码。
让我们开始吧。
先决条件
要完成本教程,您需要以下材料:
- 至少 1GB 内存的 Python 3 本地开发环境。您可以按照 如何安装和设置 Python 3 的本地编程环境 来配置所需的一切。
- 一个可工作的网络摄像头,用于实时图像检测。
第 1 步 - 创建项目并安装依赖项
让我们为这个项目创建一个工作区,并安装我们需要的依赖项。 我们将工作区命名为 "DogFilter":
1mkdir ~/DogFilter
导航至 DogFilter 目录:
1cd ~/DogFilter
然后为项目创建一个新的 Python 虚拟环境:
1python3 -m venv dogfilter
激活你的环境。
1source dogfilter/bin/activate
提示发生变化,表明环境已激活。现在安装 PyTorch,这是 Python 的深度学习框架,我们将在本教程中使用它。安装过程取决于你使用的操作系统。
在 macOS 上,使用以下命令安装 Pytorch:
1python -m pip install torch==0.4.1 torchvision==0.2.1
在 Linux 上,使用以下命令:
1pip install http://download.pytorch.org/whl/cpu/torch-0.4.1-cp35-cp35m-linux_x86_64.whl
2pip install torchvision
对于 Windows,请使用以下命令安装 Pytorch:
1pip install http://download.pytorch.org/whl/cpu/torch-0.4.1-cp35-cp35m-win_amd64.whl
2pip install torchvision
现在安装 OpenCV 和 numpy 的预打包二进制文件,它们分别是计算机视觉库和线性代数库。前者提供图像旋转等实用程序,后者提供矩阵反转等线性代数实用程序。
1python -m pip install opencv-python==3.4.3.18 numpy==1.14.5
最后,为我们的资产创建一个目录,该目录将存放我们在本教程中使用的图片:
1mkdir assets
安装好依赖项后,让我们构建过滤器的第一个版本:人脸检测器。
第 2 步 - 构建人脸检测器
我们的第一个目标是检测图像中的所有人脸。我们将创建一个脚本,接受单张图像,并输出一张用方框勾勒出人脸的注释图像。
幸运的是,我们可以使用_预训练模型_来代替编写自己的人脸检测逻辑。我们将建立一个模型,然后加载预训练参数。OpenCV 提供了这两方面的功能,让这一切变得简单。
但我们需要本地安装的 OpenCV 的绝对路径才能使用这些参数。由于绝对路径可能不同,我们将下载自己的副本并将其放在 assets 文件夹中:
1wget -O assets/haarcascade_frontalface_default.xml https://github.com/opencv/opencv/raw/master/data/haarcascades/haarcascade_frontalface_default.xml
O "选项指定目标地址为 "assets/haarcascade_frontalface_default.xml"。第二个参数是源 URL。
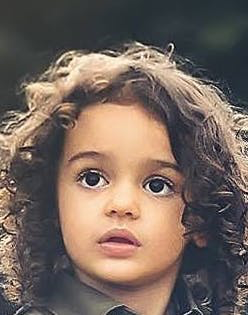
我们将检测下图中的所有面孔,图片来自 Pexels(CC0,原图链接)。
孩子们的照片](assets/python3_dogfilter/CfoBWbF.png)
首先,下载图像。以下命令会将下载的图片保存为assets文件夹中的children.png:
1wget -O assets/children.png assets/python3_dogfilter/CfoBWbF.png
为了检查检测算法是否有效,我们将在单个图像上运行该算法,并将得到的注释图像保存到磁盘中。为这些注释结果创建一个 "输出 "文件夹。
1mkdir outputs
现在为人脸检测器创建一个 Python 脚本。使用 nano 或你喜欢的文本编辑器创建文件 step_1_face_detect:
1nano step_2_face_detect.py
在文件中添加以下代码。这段代码导入了 OpenCV,其中包含图像工具和人脸分类器。其余代码是典型的 Python 程序模板。
 1[label step_2_face_detect.py]
 2"""Test for face detection"""
 3
 4import cv2
 5
 6def main():
 7    pass
 8
 9if __name__ == '__main__':
10    main()
现在用这段代码替换main函数中的pass,这段代码将使用下载到assets文件夹中的 OpenCV 参数初始化人脸分类器:
1[label step_2_face_detect.py]
2def main():
3    # initialize front face classifier
4    cascade = cv2.CascadeClassifier("assets/haarcascade_frontalface_default.xml")
接下来,添加这一行以加载图片 children.png.
1[label step_2_face_detect.py]
2    frame = cv2.imread('assets/children.png')
然后添加这段代码,将图像转换为黑白图像,因为分类器是在黑白图像上训练的。为此,我们将图像转换为灰度图像,然后将直方图离散化:
1[label step_2_face_detect.py]
2    # Convert to black-and-white
3    gray = cv2.cvtColor(frame, cv2.COLOR_BGR2GRAY)
4    blackwhite = cv2.equalizeHist(gray)
然后使用 OpenCV 的 detectMultiScale函数检测图像中的所有面孔。
1[label step_2_face_detect.py]
2    rects = cascade.detectMultiScale(
3        blackwhite, scaleFactor=1.3, minNeighbors=4, minSize=(30, 30),
4        flags=cv2.CASCADE_SCALE_IMAGE)
scaleFactor指定图像在每个维度上的缩小程度。minNeighbors表示需要保留多少个候选矩形的相邻矩形。minSize是允许的最小检测对象尺寸。小于此尺寸的物体将被丢弃。
返回类型是 tuples 列表,其中每个 tuple 包含四个数字,依次表示矩形的最小 x、最小 y、宽度和高度。
遍历所有检测到的对象,并使用 cv2.rectangle 在图像上用绿色绘制它们:
1[label step_2_face_detect.py]
2    for x, y, w, h in rects:
3        cv2.rectangle(frame, (x, y), (x + w, y + h), (0, 255, 0), 2)
- 第二个和第三个参数是矩形的对角。
- 第四个参数是要使用的颜色。(0, 255, 0)` 相当于 RGB 色彩空间中的绿色。
- 最后一个参数表示线条的宽度。
最后,将带有边界框的图像写入一个新文件,文件名为outputs/children_detected.png:
1[label step_2_face_detect.py]
2    cv2.imwrite('outputs/children_detected.png', frame)
完成后的脚本应该是这样的
 1[label step_2_face_detect.py]
 2"""Tests face detection for a static image."""
 3
 4import cv2
 5
 6def main():
 7
 8    # initialize front face classifier
 9    cascade = cv2.CascadeClassifier(
10        "assets/haarcascade_frontalface_default.xml")
11
12    frame = cv2.imread('assets/children.png')
13
14    # Convert to black-and-white
15    gray = cv2.cvtColor(frame, cv2.COLOR_BGR2GRAY)
16    blackwhite = cv2.equalizeHist(gray)
17
18    rects = cascade.detectMultiScale(
19        blackwhite, scaleFactor=1.3, minNeighbors=4, minSize=(30, 30),
20    flags=cv2.CASCADE_SCALE_IMAGE)
21
22    for x, y, w, h in rects:
23        cv2.rectangle(frame, (x, y), (x + w, y + h), (0, 255, 0), 2)
24
25    cv2.imwrite('outputs/children_detected.png', frame)
26
27if __name__ == '__main__':
28    main()
保存文件并退出编辑器。然后运行脚本:
1python step_2_face_detect.py
打开 outputs/children_detected.png。你会看到下图,其中显示了用方框勾勒出的面孔:
带边界框的儿童图片](assets/python3_dogfilter/x0fUqyk.png)
至此,你就拥有了一个正常工作的人脸检测器。它接受图像作为输入,并围绕图像中的所有面孔绘制边界框,输出注释图像。现在,让我们将同样的检测方法应用到实时摄像机画面中。
第 3 步 - 连接摄像机信号
下一个目标是将电脑摄像头与人脸检测器连接起来。与在静态图像中检测人脸不同,您将通过电脑摄像头检测所有人脸。您将收集摄像头输入,检测并注释所有人脸,然后将注释后的图像显示给用户。您将继续使用步骤 2 中的脚本,因此请从复制该脚本开始:
1cp step_2_face_detect.py step_3_camera_face_detect.py
然后在编辑器中打开新脚本:
1nano step_3_camera_face_detect.py
您将使用 OpenCV 官方文档中的测试脚本中的一些元素来更新main函数。首先初始化一个 VideoCapture 对象,将其设置为捕获计算机摄像头的实时画面。将其放在 main 函数的开头,在函数中的其他代码之前:
1[label step_3_camera_face_detect.py]
2def main():
3    cap = cv2.VideoCapture(0)
4    ...
从定义 frame 的一行开始,缩进所有现有代码,将所有代码放入一个 while 循环中。
1[label step_3_camera_face_detect.py]
2    while True:
3        frame = cv2.imread('assets/children.png')
4        ...
5        for x, y, w, h in rects:
6            cv2.rectangle(frame, (x, y), (x + w, y + h), (0, 255, 0), 2)
7
8        cv2.imwrite('outputs/children_detected.png', frame)
替换 while 循环开始处定义 frame 的一行。现在不是从磁盘上的图像读取,而是从摄像机读取:
1[label step_3_camera_face_detect.py]
2    while True:
3        # frame = cv2.imread('assets/children.png') # DELETE ME
4        # Capture frame-by-frame
5        ret, frame = cap.read()
替换while循环末尾的cv2.imwrite(...)行。您将不会把图像写入磁盘,而是把注释图像显示回用户屏幕:
1[label step_3_camera_face_detect.py]
2      cv2.imwrite('outputs/children_detected.png', frame)  # DELETE ME
3      # Display the resulting frame
4      cv2.imshow('frame', frame)
另外,添加一些代码来监视键盘输入,以便停止程序。检查用户是否点击了 q 字符,如果是,则退出程序。在 cv2.imshow(...) 之后添加以下内容:
1[label step_3_camera_face_detect.py]
2...
3        cv2.imshow('frame', frame)
4        if cv2.waitKey(1) & 0xFF == ord('q'):
5            break
6...
cv2.waitkey(1) "行将使程序停止运行 1 毫秒,以便向用户显示捕获的图像。
最后,释放捕获并关闭所有窗口。将此操作放在while循环之外,以结束main函数。
1[label step_3_camera_face_detect.py]
2...
3
4    while True:
5    ...
6
7    cap.release()
8    cv2.destroyAllWindows()
您的脚本应该如下所示:
 1[label step_3_camera_face_detect.py]
 2"""Test for face detection on video camera.
 3
 4Move your face around and a green box will identify your face.
 5With the test frame in focus, hit `q` to exit.
 6Note that typing `q` into your terminal will do nothing.
 7"""
 8
 9import cv2
10
11def main():
12    cap = cv2.VideoCapture(0)
13
14    # initialize front face classifier
15    cascade = cv2.CascadeClassifier(
16        "assets/haarcascade_frontalface_default.xml")
17
18    while True:
19        # Capture frame-by-frame
20        ret, frame = cap.read()
21
22        # Convert to black-and-white
23        gray = cv2.cvtColor(frame, cv2.COLOR_BGR2GRAY)
24        blackwhite = cv2.equalizeHist(gray)
25
26        # Detect faces
27        rects = cascade.detectMultiScale(
28            blackwhite, scaleFactor=1.3, minNeighbors=4, minSize=(30, 30),
29            flags=cv2.CASCADE_SCALE_IMAGE)
30
31        # Add all bounding boxes to the image
32        for x, y, w, h in rects:
33            cv2.rectangle(frame, (x, y), (x + w, y + h), (0, 255, 0), 2)
34
35        # Display the resulting frame
36        cv2.imshow('frame', frame)
37        if cv2.waitKey(1) & 0xFF == ord('q'):
38            break
39
40    # When everything done, release the capture
41    cap.release()
42    cv2.destroyAllWindows()
43
44if __name__ == '__main__':
45    main()
保存文件并退出编辑器。
现在运行测试脚本。
1python step_3_camera_face_detect.py
这将激活你的摄像头,并打开一个显示摄像头画面的窗口。你的脸会实时被绿色方块框住:
工作中的人脸检测器](assets/python3_dogfilter/a7lyf7q.gif)
<$>[注] 注意 :如果你发现自己必须一动不动才能工作,那么房间里的光线可能不够充足。试着换一个光线明亮的房间,在那里你和你的背景有很高的对比度。另外,避免头部附近有强光。例如,如果你背对着太阳,这个过程可能就不会很顺利。 <$>
我们的下一个目标是将检测到的人脸与狗面具叠加在一起。
第 4 步 - 建立狗狗过滤器
在制作滤镜之前,我们先来了解一下图像是如何用数字表示的。这将为您提供修改图像和最终应用狗狗滤镜所需的背景知识。
让我们来看一个例子。我们可以用数字构建黑白图像,其中 "0 "对应黑色,"1 "对应白色。
关注 1 和 0 之间的分界线。你看到了什么形状?
10 0 0 0 0 0 0 0 0
20 0 0 0 1 0 0 0 0
30 0 0 1 1 1 0 0 0
40 0 1 1 1 1 1 0 0
50 0 0 1 1 1 0 0 0
60 0 0 0 1 0 0 0 0
70 0 0 0 0 0 0 0 0
图像是一个钻石。如果把这个 matrix值保存为图像。就会得到下面的图片:

我们可以使用 0 和 1 之间的任何数值,例如 0.1、0.26 或 0.74391。接近 0 的数字颜色较深,接近 1 的数字颜色较浅。这样我们就可以表示白色、黑色和任何灰色。这对我们来说是个好消息,因为我们现在可以用 0、1 和任何介于 0 和 1 之间的数值来构建任何灰度图像。请看下面的例子。你能看出这是什么吗?同样,每个数字对应一个像素的颜色。
 11 1 1 1 1 1 1 1 1 1 1 1
 21 1 1 1 0 0 0 0 1 1 1 1
 31 1 0 0 .4 .4 .4 .4 0 0 1 1
 41 0 .4 .4 .5 .4 .4 .4 .4 .4 0 1
 51 0 .4 .5 .5 .5 .4 .4 .4 .4 0 1
 60 .4 .4 .4 .5 .4 .4 .4 .4 .4 .4 0
 70 .4 .4 .4 .4 0 0 .4 .4 .4 .4 0
 80 0 .4 .4 0 1 .7 0 .4 .4 0 0
 90 1 0 0 0 .7 .7 0 0 0 1 0
101 0 1 1 1 0 0 .7 .7 .4 0 1
111 0 .7 1 1 1 .7 .7 .7 .7 0 1
121 1 0 0 .7 .7 .7 .7 0 0 1 1
131 1 1 1 0 0 0 0 1 1 1 1
141 1 1 1 1 1 1 1 1 1 1 1
重新渲染成图像后,你现在可以看出这其实是一个神奇宝贝球:
宠物球图片](assets/python3_dogfilter/RwAXIGE.png)
你现在已经看到了黑白和灰度图像是如何用数字表示的。要引入颜色,我们需要一种编码更多信息的方法。 图像的高度和宽度用 h x w 表示。
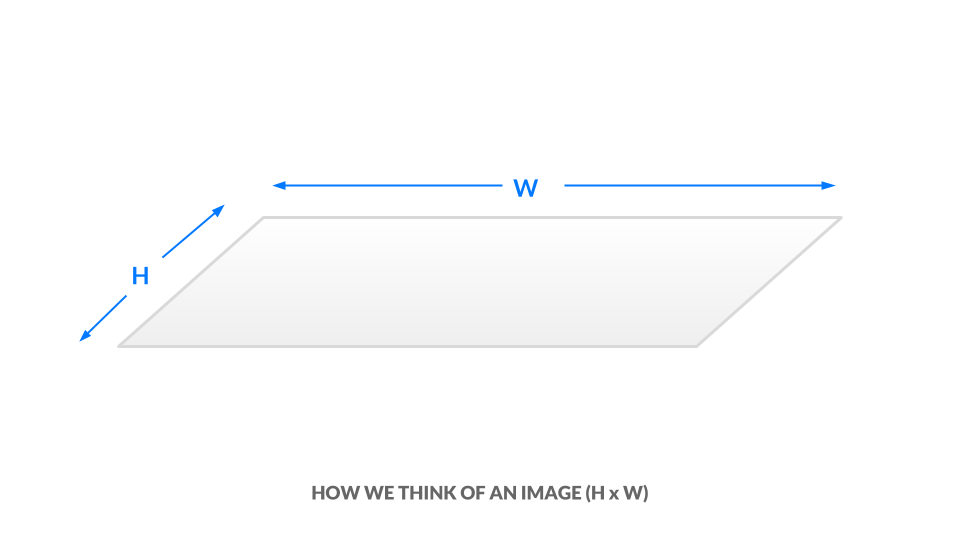
在当前的灰度表示法中,每个像素都是介于 0 和 1 之间的一个值。我们可以将图像的尺寸等同于 "h x w x 1"。换句话说,图像中的每个"(x, y) "位置都只有一个值。
灰度图像](assets/python3_dogfilter/58GGRPe.png)
在色彩表示法中,我们用三个介于 0 和 1 之间的数值来表示每个像素的颜色,其中一个数值对应 "红色度",一个对应 "绿色度",最后一个对应 "蓝色度"。我们称之为 _RGB 色彩空间。这意味着,对于图像中的每一个"(x, y) "位置,我们都有三个值"(r, g, b)"。 因此,我们的图像现在是 h x w x 3:
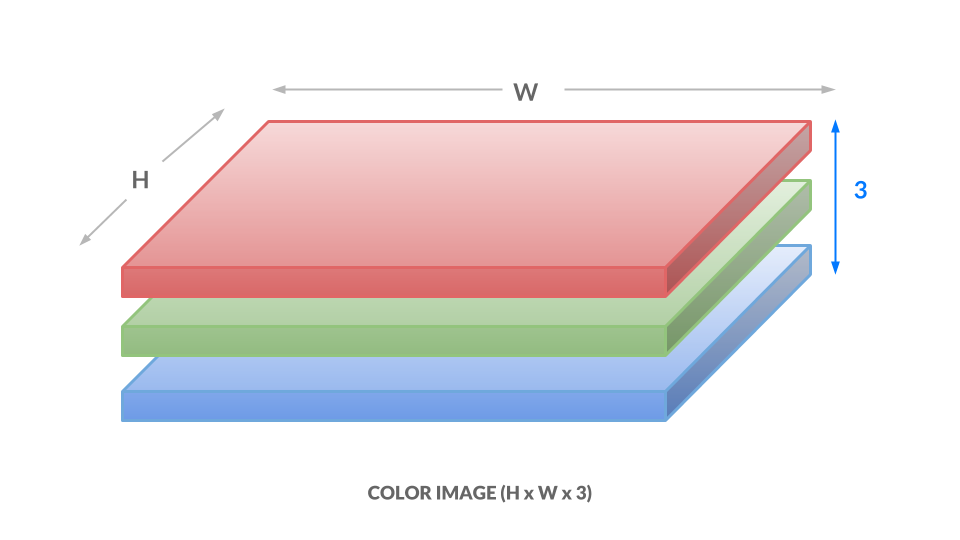
在这里,每个数字的范围是从 0 到 255,而不是 0 到 1,但想法是一样的。不同的数字组合对应不同的颜色,例如深紫色"(102,0,204)"或亮橙色"(255,153,51)"。启示如下:
1.每幅图像都将表示为一个数字框,它有三个维度:高度、宽度和颜色通道。 直接操作这个数字框就相当于操作图像。 2.我们也可以将这个方框扁平化,使其成为一个数字列表。这样,我们的图像就变成了一个 vector。稍后,我们将把图像称为矢量。
现在,您已经了解了图像是如何用数字表示的,可以开始对人脸应用狗头蒙版了。要应用 "狗头面具",您需要将子图像中的值替换为非白色的 "狗头面具 "像素。开始时,您只需处理一张图像。从步骤 2 中使用的图像中下载这张人脸裁剪图。
1wget -O assets/child.png assets/python3_dogfilter/alXjNK1.png
此外,请下载以下狗面具。本教程中使用的狗面具是我自己绘制的,现已以 CC0 许可发布到公共领域。
狗面具](assets/python3_dogfilter/ED32BCs.png)
用 wget 下载:
1wget -O assets/dog.png assets/python3_dogfilter/ED32BCs.png
创建一个名为 step_4_dog_mask_simple.py 的新文件,其中包含将狗面具应用到人脸的脚本代码:
1nano step_4_dog_mask_simple.py
为 Python 脚本添加以下模板,并导入 OpenCV 和 numpy 库:
 1[label step_4_dog_mask_simple.py]
 2"""Test for adding dog mask"""
 3
 4import cv2
 5import numpy as np
 6
 7def main():
 8    pass
 9
10if __name__ == '__main__':
11    main()
用这两行将原始图像和狗掩码加载到内存中,取代main函数中的pass。
1[label step_4_dog_mask_simple.py]
2...
3def main():
4    face = cv2.imread('assets/child.png')
5    mask = cv2.imread('assets/dog.png')
接下来,给孩子戴上狗面具。这个逻辑比我们之前所做的要复杂,因此我们将创建一个名为 apply_mask 的新函数来模块化我们的代码。在加载图像的两行之后,直接添加这一行,调用 apply_mask 函数:
1[label step_4_dog_mask_simple.py]
2...
3    face_with_mask = apply_mask(face, mask)
创建名为 apply_mask 的新函数,并将其置于 main 函数之上:
1[label step_4_dog_mask_simple.py]
2...
3def apply_mask(face: np.array, mask: np.array) -> np.array:
4    """Add the mask to the provided face, and return the face with mask."""
5    pass
6
7def main():
8...
此时,您的文件应该是这样的:
 1[label step_4_dog_mask_simple.py]
 2"""Test for adding dog mask"""
 3
 4import cv2
 5import numpy as np
 6
 7def apply_mask(face: np.array, mask: np.array) -> np.array:
 8    """Add the mask to the provided face, and return the face with mask."""
 9    pass
10
11def main():
12    face = cv2.imread('assets/child.png')
13    mask = cv2.imread('assets/dog.png')
14    face_with_mask = apply_mask(face, mask)
15
16if __name__ == '__main__':
17    main()
让我们来创建 "apply_mask "函数。我们的目标是将面具应用到孩子的脸上。但是,我们需要保持狗面具的长宽比。为此,我们需要明确计算狗面具的最终尺寸。在 apply_mask 函数中,将 pass 替换为提取两幅图像高度和宽度的两行:
1[label step_4_dog_mask_simple.py]
2...
3    mask_h, mask_w, _ = mask.shape
4    face_h, face_w, _ = face.shape
接下来,确定哪个维度需要 "缩得更小"。准确地说,我们需要两个约束中更严格的一个。在 apply_mask 函数中添加这一行:
1[label step_4_dog_mask_simple.py]
2...
3
4    # Resize the mask to fit on face
5    factor = min(face_h / mask_h, face_w / mask_w)
然后在函数中添加以下代码,计算出新的形状:
1[label step_4_dog_mask_simple.py]
2...
3    new_mask_w = int(factor * mask_w)
4    new_mask_h = int(factor * mask_h)
5    new_mask_shape = (new_mask_w, new_mask_h)
这里我们将数字转换为整数,因为resize函数需要整数维度。
现在添加以下代码,将狗面具的大小调整为新形状:
1[label step_4_dog_mask_simple.py]
2...
3
4    # Add mask to face - ensure mask is centered
5    resized_mask = cv2.resize(mask, new_mask_shape)
最后,将图像写入磁盘,这样您就可以在运行脚本后仔细检查调整后的狗面具是否正确:
1[label step_4_dog_mask_simple.py]
2    cv2.imwrite('outputs/resized_dog.png', resized_mask)
完成后的脚本应如下所示:
 1[label step_4_dog_mask_simple.py]
 2"""Test for adding dog mask"""
 3import cv2
 4import numpy as np
 5
 6def apply_mask(face: np.array, mask: np.array) -> np.array:
 7    """Add the mask to the provided face, and return the face with mask."""
 8    mask_h, mask_w, _ = mask.shape
 9    face_h, face_w, _ = face.shape
10
11    # Resize the mask to fit on face
12    factor = min(face_h / mask_h, face_w / mask_w)
13    new_mask_w = int(factor * mask_w)
14    new_mask_h = int(factor * mask_h)
15    new_mask_shape = (new_mask_w, new_mask_h)
16
17    # Add mask to face - ensure mask is centered
18    resized_mask = cv2.resize(mask, new_mask_shape)
19    cv2.imwrite('outputs/resized_dog.png', resized_mask)
20
21def main():
22    face = cv2.imread('assets/child.png')
23    mask = cv2.imread('assets/dog.png')
24    face_with_mask = apply_mask(face, mask)
25
26if __name__ == '__main__':
27    main()
保存文件并退出编辑器。运行新脚本:
1python step_4_dog_mask_simple.py
打开位于 "outputs/resized_dog.png "的图像,仔细检查遮罩的大小是否调整正确。它将与本节前面显示的狗遮罩相匹配。
现在给孩子添加狗面具。再次打开 step_4_dog_mask_simple.py 文件,返回 apply_mask 函数:
1nano step_4_dog_mask_simple.py
首先,从 apply_mask 函数中删除写入已调整大小的掩码的代码行,因为你不再需要它了:
1cv2.imwrite('outputs/resized_dog.png', resized_mask)  # delete this line
2    ...
取而代之的是,运用本节开头所学的图像表现知识来修改图像。首先复制子图像。在 apply_mask 函数中添加这一行:
1[label step_4_dog_mask_simple.py]
2...
3    face_with_mask = face.copy()
下一步,找到狗掩码不是白色或接近白色的所有位置。为此,请检查所有颜色通道中的像素值是否小于 250,因为我们希望近白像素靠近 [255,255,255]。添加以下代码
1[label step_4_dog_mask_simple.py]
2...
3    non_white_pixels = (resized_mask < 250).all(axis=2)
此时,狗图像最多与子图像一样大。我们希望将狗图像居中对准面部,因此在 apply_mask 中添加以下代码,计算将狗图像居中所需的偏移量:
1[label step_4_dog_mask_simple.py]
2...
3    off_h = int((face_h - new_mask_h) / 2)
4    off_w = int((face_w - new_mask_w) / 2)
将狗图像中的所有非白色像素复制到子图像中。由于子图像可能比狗图像大,我们需要从子图像中提取一个子集:
1[label step_4_dog_mask_simple.py]
2    face_with_mask[off_h: off_h+new_mask_h, off_w: off_w+new_mask_w][non_white_pixels] = \
3            resized_mask[non_white_pixels]
然后返回结果:
1[label step_4_dog_mask_simple.py]
2    return face_with_mask
在 main 函数中,添加以下代码,将 apply_mask 函数的结果写入输出图像,以便手动重复检查结果:
1[label step_4_dog_mask_simple.py]
2...
3    face_with_mask = apply_mask(face, mask)
4    cv2.imwrite('outputs/child_with_dog_mask.png', face_with_mask)
完成后的脚本将如下所示:
 1[label step_4_dog_mask_simple.py]
 2"""Test for adding dog mask"""
 3
 4import cv2
 5import numpy as np
 6
 7def apply_mask(face: np.array, mask: np.array) -> np.array:
 8    """Add the mask to the provided face, and return the face with mask."""
 9    mask_h, mask_w, _ = mask.shape
10    face_h, face_w, _ = face.shape
11
12    # Resize the mask to fit on face
13    factor = min(face_h / mask_h, face_w / mask_w)
14    new_mask_w = int(factor * mask_w)
15    new_mask_h = int(factor * mask_h)
16    new_mask_shape = (new_mask_w, new_mask_h)
17    resized_mask = cv2.resize(mask, new_mask_shape)
18
19    # Add mask to face - ensure mask is centered
20    face_with_mask = face.copy()
21    non_white_pixels = (resized_mask < 250).all(axis=2)
22    off_h = int((face_h - new_mask_h) / 2)
23    off_w = int((face_w - new_mask_w) / 2)
24    face_with_mask[off_h: off_h+new_mask_h, off_w: off_w+new_mask_w][non_white_pixels] = \
25         resized_mask[non_white_pixels]
26
27    return face_with_mask
28
29def main():
30    face = cv2.imread('assets/child.png')
31    mask = cv2.imread('assets/dog.png')
32    face_with_mask = apply_mask(face, mask)
33    cv2.imwrite('outputs/child_with_dog_mask.png', face_with_mask)
34
35if __name__ == '__main__':
36    main()
保存脚本并运行:
1python step_4_dog_mask_simple.py
您将在 outputs/child_with_dog_mask.png 中看到下面这张戴着狗面具的儿童图片:
戴着狗面具的儿童图片](assets/python3_dogfilter/ZEn0RsJ.png)
现在你已经有了一个可以为人脸添加狗面具的工具。现在,让我们使用您创建的工具实时添加狗面具。
我们将从步骤 3 离开的地方继续。将 step_3_camera_face_detect.py 复制到 step_4_dog_mask.py。
1cp step_3_camera_face_detect.py step_4_dog_mask.py
打开新脚本。
1nano step_4_dog_mask.py
首先,在脚本顶部导入 NumPy 库:
1[label step_4_dog_mask.py]
2import numpy as np
3...
然后将之前工作中的 apply_mask 函数添加到这个新文件的 main 函数之上:
 1[label step_4_dog_mask.py]
 2def apply_mask(face: np.array, mask: np.array) -> np.array:
 3    """Add the mask to the provided face, and return the face with mask."""
 4    mask_h, mask_w, _ = mask.shape
 5    face_h, face_w, _ = face.shape
 6
 7    # Resize the mask to fit on face
 8    factor = min(face_h / mask_h, face_w / mask_w)
 9    new_mask_w = int(factor * mask_w)
10    new_mask_h = int(factor * mask_h)
11    new_mask_shape = (new_mask_w, new_mask_h)
12    resized_mask = cv2.resize(mask, new_mask_shape)
13
14    # Add mask to face - ensure mask is centered
15    face_with_mask = face.copy()
16    non_white_pixels = (resized_mask < 250).all(axis=2)
17    off_h = int((face_h - new_mask_h) / 2)
18    off_w = int((face_w - new_mask_w) / 2)
19    face_with_mask[off_h: off_h+new_mask_h, off_w: off_w+new_mask_w][non_white_pixels] = \
20         resized_mask[non_white_pixels]
21
22    return face_with_mask
23...
其次,在 main 函数中找到这一行:
1[label step_4_dog_mask.py]
2    cap = cv2.VideoCapture(0)
在该行后添加以下代码,以加载狗面具:
1[label step_4_dog_mask.py]
2    cap = cv2.VideoCapture(0)
3
4    # load mask
5    mask = cv2.imread('assets/dog.png')
6    ...
接下来,在 while 循环中找到这一行:
1[label step_4_dog_mask.py]
2        ret, frame = cap.read()
在其后添加这一行,以提取图像的高度和宽度:
1[label step_4_dog_mask.py]
2        ret, frame = cap.read()
3        frame_h, frame_w, _ = frame.shape
4        ...
接下来,删除 main 中绘制边界框的一行。你可以在遍历检测到的面的 for 循环中找到这一行:
1[label step_4_dog_mask.py]
2        for x, y, w, h in rects:
3        ...
4            cv2.rectangle(frame, (x, y), (x + w, y + h), (0, 255, 0), 2) # DELETE ME
5        ...
取而代之的是添加这段代码来裁剪边框。 为美观起见,我们裁剪了一个比脸部稍大的区域。
1[label step_4_dog_mask.py]
2        for x, y, w, h in rects:
3            # crop a frame slightly larger than the face
4            y0, y1 = int(y - 0.25*h), int(y + 0.75*h)
5            x0, x1 = x, x + w
如果检测到的面太靠近边缘,则引入检查。
1[label step_4_dog_mask.py]
2            # give up if the cropped frame would be out-of-bounds
3            if x0 < 0 or y0 < 0 or x1 > frame_w or y1 > frame_h:
4                continue
最后,将带有蒙版的人脸插入图像中。
1[label step_4_dog_mask.py]
2            # apply mask
3            frame[y0: y1, x0: x1] = apply_mask(frame[y0: y1, x0: x1], mask)
验证您的脚本是否如下所示:
 1[label step_4_dog_mask.py]
 2"""Real-time dog filter
 3
 4Move your face around and a dog filter will be applied to your face if it is not out-of-bounds. With the test frame in focus, hit `q` to exit. Note that typing `q` into your terminal will do nothing.
 5"""
 6
 7import numpy as np
 8import cv2
 9
10def apply_mask(face: np.array, mask: np.array) -> np.array:
11    """Add the mask to the provided face, and return the face with mask."""
12    mask_h, mask_w, _ = mask.shape
13    face_h, face_w, _ = face.shape
14
15    # Resize the mask to fit on face
16    factor = min(face_h / mask_h, face_w / mask_w)
17    new_mask_w = int(factor * mask_w)
18    new_mask_h = int(factor * mask_h)
19    new_mask_shape = (new_mask_w, new_mask_h)
20    resized_mask = cv2.resize(mask, new_mask_shape)
21
22    # Add mask to face - ensure mask is centered
23    face_with_mask = face.copy()
24    non_white_pixels = (resized_mask < 250).all(axis=2)
25    off_h = int((face_h - new_mask_h) / 2)
26    off_w = int((face_w - new_mask_w) / 2)
27    face_with_mask[off_h: off_h+new_mask_h, off_w: off_w+new_mask_w][non_white_pixels] = \
28         resized_mask[non_white_pixels]
29
30    return face_with_mask
31
32def main():
33    cap = cv2.VideoCapture(0)
34
35    # load mask
36    mask = cv2.imread('assets/dog.png')
37
38    # initialize front face classifier
39    cascade = cv2.CascadeClassifier("assets/haarcascade_frontalface_default.xml")
40
41    while(True):
42        # Capture frame-by-frame
43        ret, frame = cap.read()
44        frame_h, frame_w, _ = frame.shape
45
46        # Convert to black-and-white
47        gray = cv2.cvtColor(frame, cv2.COLOR_BGR2GRAY)
48        blackwhite = cv2.equalizeHist(gray)
49
50        # Detect faces
51        rects = cascade.detectMultiScale(
52            blackwhite, scaleFactor=1.3, minNeighbors=4, minSize=(30, 30),
53            flags=cv2.CASCADE_SCALE_IMAGE)
54
55        # Add mask to faces
56        for x, y, w, h in rects:
57            # crop a frame slightly larger than the face
58            y0, y1 = int(y - 0.25*h), int(y + 0.75*h)
59            x0, x1 = x, x + w
60
61            # give up if the cropped frame would be out-of-bounds
62            if x0 < 0 or y0 < 0 or x1 > frame_w or y1 > frame_h:
63                continue
64
65            # apply mask
66            frame[y0: y1, x0: x1] = apply_mask(frame[y0: y1, x0: x1], mask)
67
68        # Display the resulting frame
69        cv2.imshow('frame', frame)
70        if cv2.waitKey(1) & 0xFF == ord('q'):
71            break
72
73    # When everything done, release the capture
74    cap.release()
75    cv2.destroyAllWindows()
76
77if __name__ == '__main__':
78    main()
保存文件并退出编辑器。然后运行脚本。
1python step_4_dog_mask.py
现在你就可以运行实时狗狗滤镜了。该脚本还能处理图片中的多张面孔,所以你可以把你的朋友聚在一起,让狗狗自动 "变身"。
至此,我们完成了本教程的第一个主要目标,即制作 Snapchat 风格的狗狗滤镜。现在,让我们利用面部表情来确定应用于面部的狗面具。
第 5 步 - 使用最小二乘法建立基本的人脸情感分类器
在本节中,您将创建一个情绪分类器,根据显示的情绪应用不同的遮罩。如果你微笑,过滤器就会应用柯基犬面具。如果你皱眉头,它就会应用哈巴狗面具。在此过程中,您将探索最小二乘框架,这是理解和讨论机器学习概念的基础。
要了解如何处理数据并进行预测,我们首先要简单了解一下机器学习模型。
对于我们考虑的每一种模式,我们都需要提出两个问题。目前,这两个问题足以区分不同的模型:
1.输入:模型得到了哪些信息? 2.输出:模型试图预测什么?
在高层次上,我们的目标是开发一个情绪分类模型。该模型是
1.输入:给定的人脸图像。 2.输出:预测相应的情绪。
1model: face -> emotion
我们使用的方法是_最小二乘法_;我们取一组点,然后找出一条最佳拟合线。下图所示的最佳拟合线就是我们的模型。
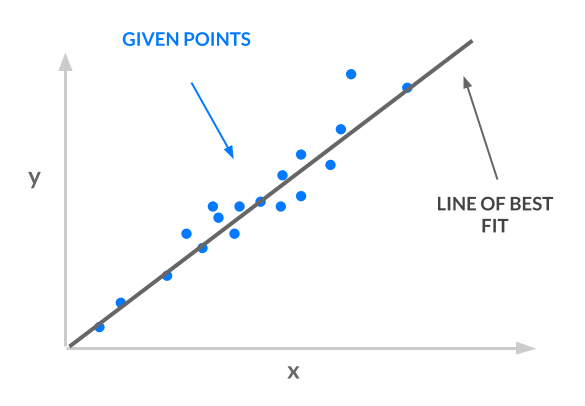
考虑一下我们生产线的输入和输出:
1.输入:给定的 x 坐标。
2.输出:预测相应的 $y$ 坐标。
1least squares line: x -> y
我们的输入 "x "必须代表面孔,输出 "y "必须代表情绪,这样我们才能使用最小二乘法进行情绪分类:
x -> face:我们将不使用 _ 个数字来表示x,而是使用 _ 个向量来表示x。因此,x可以表示人脸的图像。 文章 普通最小二乘法 解释了为什么可以使用x的值向量。y -> emotion:每种情绪将对应一个数字。例如,"愤怒 "是 0,"悲伤 "是 1,"快乐 "是 2。这样,y就可以代表情绪。然而,我们的行并不受限制地输出y值 0、1 和 2。它有无数可能的 y 值--可能是 1.2、3.5 或 10003.42。 我们该如何将这些y值转换成与类相对应的整数呢?请参阅文章 One-Hot Encoding,了解更多详情和解释。
有了这些背景知识,您将使用向量化图像和单次编码标签建立一个简单的最小二乘分类器。您将分三步完成这一任务:
1.预处理数据:正如本节开头所解释的,我们的样本是向量,每个向量编码一张人脸图像。我们的标签是与情绪相对应的整数,我们将对这些标签进行单次编码。
2.指定并训练模型:使用闭式最小二乘法求解,即 w^*。
3.使用模型进行预测:取 Xw^* 的最大值,得到预测的情绪。
让我们开始吧。
首先,建立一个包含数据的目录:
1mkdir data
然后下载由 Pierre-Luc Carrier 和 Aaron Courville 整理的 2013 年人脸情感分类[Kaggle 上的竞赛]数据(https://www.kaggle.com/c/challenges-in-representation-learning-facial-expression-recognition-challenge)。
1wget -O data/fer2013.tar https://bitbucket.org/alvinwan/adversarial-examples-in-computer-vision-building-then-fooling/raw/babfe4651f89a398c4b3fdbdd6d7a697c5104cff/fer2013.tar
导航至 data 目录并解压数据。
1cd data
2tar -xzf fer2013.tar
现在,我们将创建一个脚本来运行最小二乘模型。导航至项目根目录:
1cd ~/DogFilter
为脚本创建一个新文件:
1nano step_5_ls_simple.py
添加 Python 模板并导入所需的软件包:
 1[label step_5_ls_simple.py]
 2"""Train emotion classifier using least squares."""
 3
 4import numpy as np
 5
 6def main():
 7    pass
 8
 9if __name__ == '__main__':
10    main()
接下来,将数据加载到内存中。用以下代码替换main函数中的pass:
1[label step_5_ls_simple.py]
2
3    # load data
4    with np.load('data/fer2013_train.npz') as data:
5        X_train, Y_train = data['X'], data['Y']
6
7    with np.load('data/fer2013_test.npz') as data:
8        X_test, Y_test = data['X'], data['Y']
现在对标签进行一次性编码。为此,使用 numpy 构造身份矩阵,然后使用我们的标签列表在该矩阵中建立索引:
1[label step_5_ls_simple.py]
2    # one-hot labels
3    I = np.eye(6)
4    Y_oh_train, Y_oh_test = I[Y_train], I[Y_test]
在这里,我们利用了这样一个事实,即同一性矩阵中的第 i 行除了第 i 条目外都为零。因此,第 i 行是类别 i 标签的单次编码。此外,我们还使用了 numpy 的高级索引,即 [a, b, c, d][[1, 3]] = [b, d]。
计算 (X^TX)^{-1}在普通硬件上耗时过长,因为 X^TX 是一个有超过 400 万个值的 2304x2304 矩阵,所以我们只选择前 100 个特征来缩短计算时间。添加以下代码
1[label step_5_ls_simple.py]
2...
3    # select first 100 dimensions
4    A_train, A_test = X_train[:, :100], X_test[:, :100]
接下来,添加以下代码,以评估闭式最小二乘解法:
1[label step_5_ls_simple.py]
2...
3    # train model
4    w = np.linalg.inv(A_train.T.dot(A_train)).dot(A_train.T.dot(Y_oh_train))
然后为训练集和验证集定义一个评估函数。将其放在main函数之前:
1[label step_5_ls_simple.py]
2def evaluate(A, Y, w):
3    Yhat = np.argmax(A.dot(w), axis=1)
4    return np.sum(Yhat == Y) / Y.shape[0]
为了估算标签,我们对每个样本进行内积,并使用 np.argmax 获取最大值的指数。 然后计算平均正确分类数。这个最终数字就是准确率。
最后,在 "main "函数末尾添加以下代码,使用刚才编写的 "evaluate "函数计算训练和验证准确率:
1[label step_5_ls_simple.py]
2    # evaluate model
3    ols_train_accuracy = evaluate(A_train, Y_train, w)
4    print('(ols) Train Accuracy:', ols_train_accuracy)
5    ols_test_accuracy = evaluate(A_test, Y_test, w)
6    print('(ols) Test Accuracy:', ols_test_accuracy)
仔细检查您的脚本是否与以下内容一致:
 1[label step_5_ls_simple.py]
 2"""Train emotion classifier using least squares."""
 3
 4import numpy as np
 5
 6def evaluate(A, Y, w):
 7    Yhat = np.argmax(A.dot(w), axis=1)
 8    return np.sum(Yhat == Y) / Y.shape[0]
 9
10def main():
11
12    # load data
13    with np.load('data/fer2013_train.npz') as data:
14        X_train, Y_train = data['X'], data['Y']
15
16    with np.load('data/fer2013_test.npz') as data:
17        X_test, Y_test = data['X'], data['Y']
18
19    # one-hot labels
20    I = np.eye(6)
21    Y_oh_train, Y_oh_test = I[Y_train], I[Y_test]
22
23    # select first 100 dimensions
24    A_train, A_test = X_train[:, :100], X_test[:, :100]
25
26    # train model
27    w = np.linalg.inv(A_train.T.dot(A_train)).dot(A_train.T.dot(Y_oh_train))
28
29    # evaluate model
30    ols_train_accuracy = evaluate(A_train, Y_train, w)
31    print('(ols) Train Accuracy:', ols_train_accuracy)
32    ols_test_accuracy = evaluate(A_test, Y_test, w)
33    print('(ols) Test Accuracy:', ols_test_accuracy)
34
35if __name__ == '__main__':
36    main()
保存文件,退出编辑器,然后运行 Python 脚本。
1python step_5_ls_simple.py
您将看到以下输出:
1[secondary_label Output]
2(ols) Train Accuracy: 0.4748918316507146
3(ols) Test Accuracy: 0.45280545359202934
我们的模型的训练准确率为 47.5%。我们在验证集上重复这一过程,得到 45.3% 的准确率。对于三向分类问题来说,45.3% 的准确率比猜测准确率(33%)高出不少。这就是我们情绪检测的初始分类器,下一步,我们将在这个最小二乘模型的基础上提高准确率。准确率越高,基于情绪的狗狗过滤器就越能为每种检测到的情绪找到合适的狗狗过滤器。
步骤 6 - 通过对输入进行特征化处理来提高准确性
我们可以使用更具表现力的模型来提高准确率。要做到这一点,我们要对输入进行优化。
原始图像告诉我们,(0, 0)是红色,(1, 0)是棕色,以此类推。经过特征化处理的图像可能会告诉我们,图像左上方有一只狗,中间有一个人,等等。特征化功能强大,但其精确定义超出了本教程的范围。
我们将使用径向基函数(RBF)核的近似值,使用随机高斯矩阵。本教程将不再详述。相反,我们将把它当作一个黑盒子,为我们计算高阶特征。
我们将继续上一步的工作。复制之前的脚本,以便有一个良好的起点:
1cp step_5_ls_simple.py step_6_ls_simple.py
在编辑器中打开新文件:
1nano step_6_ls_simple.py
我们首先创建特征化随机矩阵。同样,我们将在新的特征空间中只使用 100 个特征。
找到下面一行,定义 A_train 和 A_test:
1[label step_6_ls_simple.py]
2    # select first 100 dimensions
3    A_train, A_test = X_train[:, :100], X_test[:, :100]
在A_train和A_test定义的正上方,添加一个随机特征矩阵:
1[label step_6_ls_simple.py]
2    d = 100
3    W = np.random.normal(size=(X_train.shape[1], d))
4    # select first 100 dimensions
5    A_train, A_test = X_train[:, :100], X_test[:, :100]  ...
然后替换A_train和A_test的定义。我们使用这种随机特征化重新定义矩阵,称为 design 矩阵。
1[label step_6_ls_simple.py]
2    A_train, A_test = X_train.dot(W), X_test.dot(W)
保存文件并运行脚本。
1python step_6_ls_simple.py
您将看到以下输出:
1[secondary_label Output]
2(ols) Train Accuracy: 0.584174642717
3(ols) Test Accuracy: 0.584425799685
现在,这种特征化方法的训练准确率为 58.4%,验证准确率为 58.4%,验证结果提高了 13.1%。我们将 X 矩阵修剪为 100 x 100,但选择 100 是任意的。我们也可以将 X 矩阵修剪为 1000 x 1000 或 50 x 50。假设 x 的维数是 d x d。我们可以通过将 X 矩阵修剪为 d x d 并重新计算一个新模型来测试更多的 d 值。
我们尝试了更多的 d 值,发现测试准确率又提高了 4.3%,达到 61.7%。在下图中,我们考虑了新分类器在改变 d 时的表现。直观地说,随着 d 的增加,准确率也应该增加,因为我们使用了越来越多的原始数据。然而,该图并没有描绘出一幅美好的图景,而是呈现出一种消极的趋势:
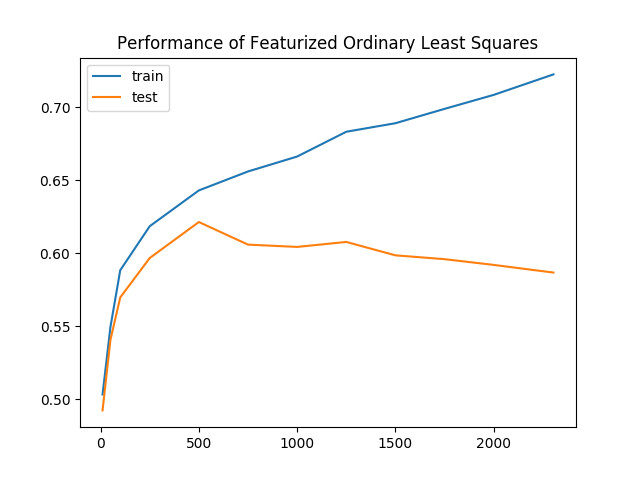
随着我们保留的数据越来越多,训练精度和验证精度之间的差距也越来越大。这就是过度拟合的明显证据,即我们的模型正在学习不再适用于所有数据的表征。为了解决过拟合问题,我们将通过惩罚复杂模型来规范我们的模型。
我们用正则化项修正普通最小二乘法的目标函数,从而得到一个新的目标。我们的新目标函数叫做_ridge regression_,它看起来像这样:
1min_w |Aw- y|^2 + lambda |w|^2
在这个等式中,"lambda "是一个可调整的超参数。将 lambda = 0 加入等式,脊回归就变成了最小二乘法。 将 lambda = infinity 加入等式中,你会发现最佳的 w 必须为零,因为任何非零的 w 都会带来无限的损失。事实证明,这个目标也能得到闭式解:
1w^* = (A^TA + lambda I)^{-1}A^Ty
仍然使用特征化样本,再次重新训练和评估模型。
在编辑器中再次打开 step_6_ls_simple.py:
1nano step_6_ls_simple.py
这一次,将新特征空间的维度增加到 d=1000。如以下代码块所示,将 d 的值从 100 改为 1000:
1[label step_6_ls_simple.py]
2...
3    d = 1000
4    W = np.random.normal(size=(X_train.shape[1], d))
5...
然后使用正则化为 lambda = 10^{10} 的脊回归。用以下两行替换定义 w 的行:
1[label step_6_ls_simple.py]
2...
3    # train model
4    I = np.eye(A_train.shape[1])
5    w = np.linalg.inv(A_train.T.dot(A_train) + 1e10 * I).dot(A_train.T.dot(Y_oh_train))
然后找到这个区块:
1[label step_6_ls_simple.py]
2...
3  ols_train_accuracy = evaluate(A_train, Y_train, w)
4  print('(ols) Train Accuracy:', ols_train_accuracy)
5  ols_test_accuracy = evaluate(A_test, Y_test, w)
6  print('(ols) Test Accuracy:', ols_test_accuracy)
将其替换为
1[label step_6_ls_simple.py]
2...
3
4  print('(ridge) Train Accuracy:', evaluate(A_train, Y_train, w))
5  print('(ridge) Test Accuracy:', evaluate(A_test, Y_test, w))
完成后的脚本应如下所示:
 1[label step_6_ls_simple.py]
 2"""Train emotion classifier using least squares."""
 3
 4import numpy as np
 5
 6def evaluate(A, Y, w):
 7    Yhat = np.argmax(A.dot(w), axis=1)
 8    return np.sum(Yhat == Y) / Y.shape[0]
 9
10def main():
11    # load data
12    with np.load('data/fer2013_train.npz') as data:
13        X_train, Y_train = data['X'], data['Y']
14
15    with np.load('data/fer2013_test.npz') as data:
16        X_test, Y_test = data['X'], data['Y']
17
18    # one-hot labels
19    I = np.eye(6)
20    Y_oh_train, Y_oh_test = I[Y_train], I[Y_test]
21    d = 1000
22    W = np.random.normal(size=(X_train.shape[1], d))
23    # select first 100 dimensions
24    A_train, A_test = X_train.dot(W), X_test.dot(W)
25
26    # train model
27    I = np.eye(A_train.shape[1])
28    w = np.linalg.inv(A_train.T.dot(A_train) + 1e10 * I).dot(A_train.T.dot(Y_oh_train))
29
30    # evaluate model
31    print('(ridge) Train Accuracy:', evaluate(A_train, Y_train, w))
32    print('(ridge) Test Accuracy:', evaluate(A_test, Y_test, w))
33
34if __name__ == '__main__':
35    main()
保存文件,退出编辑器,然后运行脚本:
1python step_6_ls_simple.py
您将看到以下输出:
1[secondary_label Output]
2(ridge) Train Accuracy: 0.651173462698
3(ridge) Test Accuracy: 0.622181436812
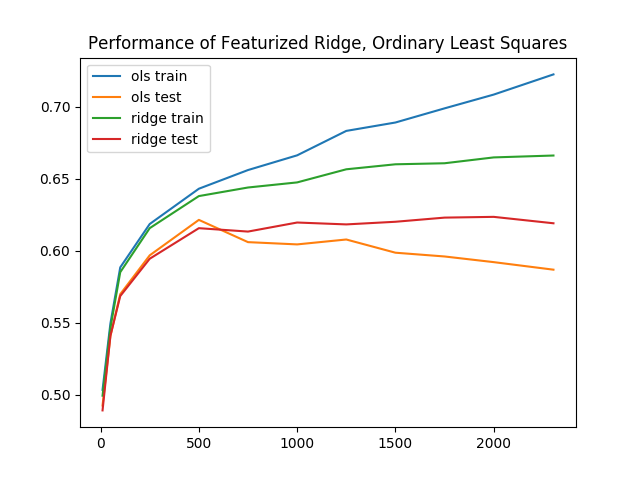
当训练精度下降到 65.1% 时,验证精度又提高了 0.4%,达到 62.2%。再次对不同的 "d "进行重新评估,我们发现脊回归的训练精度和验证精度之间的差距更小了。换句话说,脊回归的过拟合程度较低。
最小二乘法的基准性能,加上这些额外的增强功能,表现相当不错。即使是最好的结果,训练和推理时间加在一起也不会超过 20 秒。在下一节中,您将探索更复杂的模型。
第 7 步 - 在 PyTorch 中使用卷积神经网络构建人脸-动作分类器
在本节中,您将使用神经网络而不是最小二乘法建立第二个情绪分类器。同样,我们的目标是建立一个接受人脸作为输入并输出情绪的模型。最终,这个分类器将决定应用哪种狗面具。
有关神经网络可视化的简要介绍,请参阅文章 Understanding Neural Networks。 在这里,我们将使用一个名为 PyTorch 的深度学习库。目前有许多深度学习库在广泛使用,它们各有利弊。PyTorch 是一个特别好的起点。要实现这个神经网络分类器,我们还是要像使用最小二乘分类器那样,分三步进行:
1.预处理数据:应用单次编码,然后应用 PyTorch 抽象。 2.指定并训练模型使用 PyTorch 层建立神经网络。定义优化超参数并运行随机梯度下降。 3.使用模型进行预测评估神经网络。
创建一个新文件,命名为step_7_fer_simple.py。
1nano step_7_fer_simple.py
导入必要的实用程序并创建一个用于保存数据的 Python 类。在这里进行数据处理时,您将创建训练数据集和测试数据集。为此,需要实现 PyTorch 的 "Dataset "接口,这样就可以加载并使用 PyTorch 内置的数据管道来处理人脸-动作识别数据集:
 1[label step_7_fer_simple.py]
 2from torch.utils.data import Dataset
 3from torch.autograd import Variable
 4import torch.nn as nn
 5import torch.nn.functional as F
 6import torch.optim as optim
 7import numpy as np
 8import torch
 9import cv2
10import argparse
11
12class Fer2013Dataset(Dataset):
13    """Face Emotion Recognition dataset.
14
15    Utility for loading FER into PyTorch. Dataset curated by Pierre-Luc Carrier
16    and Aaron Courville in 2013.
17
18    Each sample is 1 x 1 x 48 x 48, and each label is a scalar.
19    """
20    pass
删除 Fer2013Dataset 类中的 pass 占位符。取而代之的是添加一个函数,用于初始化我们的数据持有者:
 1[label step_7_fer_simple.py]
 2    def __init__(self, path: str):
 3        """
 4        Args:
 5            path: Path to `.np` file containing sample nxd and label nx1
 6        """
 7        with np.load(path) as data:
 8            self._samples = data['X']
 9            self._labels = data['Y']
10        self._samples = self._samples.reshape((-1, 1, 48, 48))
11
12        self.X = Variable(torch.from_numpy(self._samples)).float()
13        self.Y = Variable(torch.from_numpy(self._labels)).float()
14...
该函数首先加载样本和标签。然后将数据封装到 PyTorch 数据结构中。
在 __init__ 函数之后,直接添加一个 __len__ 函数,因为这是实现 PyTorch 期望的 Dataset 接口所必需的:
1[label step_7_fer_simple.py]
2...
3    def __len__(self):
4        return len(self._labels)
最后,添加一个 __getitem__ 方法,返回一个包含样本和标签的 字典:
1[label step_7_fer_simple.py]
2    def __getitem__(self, idx):
3        return {'image': self._samples[idx], 'label': self._labels[idx]}
仔细检查您的文件是否如下所示:
 1[label step_7_fer_simple.py]
 2from torch.utils.data import Dataset
 3from torch.autograd import Variable
 4import torch.nn as nn
 5import torch.nn.functional as F
 6import torch.optim as optim
 7import numpy as np
 8import torch
 9import cv2
10import argparse
11
12class Fer2013Dataset(Dataset):
13    """Face Emotion Recognition dataset.
14    Utility for loading FER into PyTorch. Dataset curated by Pierre-Luc Carrier
15    and Aaron Courville in 2013.
16    Each sample is 1 x 1 x 48 x 48, and each label is a scalar.
17    """
18
19    def __init__(self, path: str):
20        """
21        Args:
22            path: Path to `.np` file containing sample nxd and label nx1
23        """
24        with np.load(path) as data:
25            self._samples = data['X']
26            self._labels = data['Y']
27        self._samples = self._samples.reshape((-1, 1, 48, 48))
28
29        self.X = Variable(torch.from_numpy(self._samples)).float()
30        self.Y = Variable(torch.from_numpy(self._labels)).float()
31
32    def __len__(self):
33        return len(self._labels)
34
35    def __getitem__(self, idx):
36        return {'image': self._samples[idx], 'label': self._labels[idx]}
接下来,加载 Fer2013Dataset 数据集。 在文件末尾的 Fer2013Dataset 类之后添加以下代码:
1[label step_7_fer_simple.py]
2trainset = Fer2013Dataset('data/fer2013_train.npz')
3trainloader = torch.utils.data.DataLoader(trainset, batch_size=32, shuffle=True)
4
5testset = Fer2013Dataset('data/fer2013_test.npz')
6testloader = torch.utils.data.DataLoader(testset, batch_size=32, shuffle=False)
这段代码将使用您创建的 Fer2013Dataset 类初始化数据集。然后,对于训练集和验证集,它将数据集封装在一个 DataLoader 中。这会将数据集转换为可迭代数据,以便稍后使用。
作为正确性检查,验证数据集实用程序是否正常运行。使用 DataLoader 创建一个示例数据集加载器,并打印该加载器的第一个元素。在文件末尾添加以下内容:
1[label step_7_fer_simple.py]
2if __name__ == '__main__':
3    loader = torch.utils.data.DataLoader(trainset, batch_size=2, shuffle=False)
4    print(next(iter(loader)))
验证您完成的脚本是否如下所示:
 1[label step_7_fer_simple.py]
 2from torch.utils.data import Dataset
 3from torch.autograd import Variable
 4import torch.nn as nn
 5import torch.nn.functional as F
 6import torch.optim as optim
 7import numpy as np
 8import torch
 9import cv2
10import argparse
11
12class Fer2013Dataset(Dataset):
13    """Face Emotion Recognition dataset.
14    Utility for loading FER into PyTorch. Dataset curated by Pierre-Luc Carrier
15    and Aaron Courville in 2013.
16    Each sample is 1 x 1 x 48 x 48, and each label is a scalar.
17    """
18
19    def __init__(self, path: str):
20        """
21        Args:
22            path: Path to `.np` file containing sample nxd and label nx1
23        """
24        with np.load(path) as data:
25            self._samples = data['X']
26            self._labels = data['Y']
27        self._samples = self._samples.reshape((-1, 1, 48, 48))
28
29        self.X = Variable(torch.from_numpy(self._samples)).float()
30        self.Y = Variable(torch.from_numpy(self._labels)).float()
31
32    def __len__(self):
33        return len(self._labels)
34
35    def __getitem__(self, idx):
36        return {'image': self._samples[idx], 'label': self._labels[idx]}
37
38trainset = Fer2013Dataset('data/fer2013_train.npz')
39trainloader = torch.utils.data.DataLoader(trainset, batch_size=32, shuffle=True)
40
41testset = Fer2013Dataset('data/fer2013_test.npz')
42testloader = torch.utils.data.DataLoader(testset, batch_size=32, shuffle=False)
43
44if __name__ == '__main__':
45    loader = torch.utils.data.DataLoader(trainset, batch_size=2, shuffle=False)
46    print(next(iter(loader)))
退出编辑器并运行脚本。
1python step_7_fer_simple.py
这样就会输出以下一对 张量。我们的数据管道输出了两个样本和两个标签。这表明我们的数据管道已经启动并准备就绪:
 1[secondary_label Output]
 2{'image':
 3(0 ,0 ,.,.) =
 4   24 32 36  ... 173 172 173
 5   25 34 29  ... 173 172 173
 6   26 29 25  ... 172 172 174
 7      ...         ⋱        ...
 8  159 185 157  ... 157 156 153
 9  136 157 187  ... 152 152 150
10  145 130 161  ... 142 143 142
11     ⋮
12
13(1 ,0 ,.,.) =
14   20 17 19  ... 187 176 162
15   22 17 17  ... 195 180 171
16   17 17 18  ... 203 193 175
17      ...         ⋱        ...
18    1 1 1  ... 106 115 119
19    2 2 1  ... 103 111 119
20    2 2 2  ... 99 107 118
21[torch.LongTensor of size 2x1x48x48]
22, 'label':
23 1
24 1
25[torch.LongTensor of size 2]
26}
验证数据管道正常工作后,返回 step_7_fer_simple.py 添加神经网络和优化器。打开 step_7_fer_simple.py。
1nano step_7_fer_simple.py
首先,删除上一次迭代中添加的最后三行:
1[label step_7_fer_simple.py]
2# Delete all three lines
3if __name__ == '__main__':
4    loader = torch.utils.data.DataLoader(trainset, batch_size=2, shuffle=False)
5    print(next(iter(loader)))
取而代之的是定义一个 PyTorch 神经网络,其中包括三个卷积层,然后是三个全连接层。将其添加到现有脚本的末尾:
 1[label step_7_fer_simple.py]
 2class Net(nn.Module):
 3    def __init__(self):
 4        super(Net, self).__init__()
 5        self.conv1 = nn.Conv2d(1, 6, 5)
 6        self.pool = nn.MaxPool2d(2, 2)
 7        self.conv2 = nn.Conv2d(6, 6, 3)
 8        self.conv3 = nn.Conv2d(6, 16, 3)
 9        self.fc1 = nn.Linear(16 * 4 * 4, 120)
10        self.fc2 = nn.Linear(120, 48)
11        self.fc3 = nn.Linear(48, 3)
12
13    def forward(self, x):
14        x = self.pool(F.relu(self.conv1(x)))
15        x = self.pool(F.relu(self.conv2(x)))
16        x = self.pool(F.relu(self.conv3(x)))
17        x = x.view(-1, 16 * 4 * 4)
18        x = F.relu(self.fc1(x))
19        x = F.relu(self.fc2(x))
20        x = self.fc3(x)
21        return x
现在,通过在脚本末尾添加以下代码来初始化神经网络、定义损失函数和优化超参数:
1[label step_7_fer_simple.py]
2net = Net().float()
3criterion = nn.CrossEntropyLoss()
4optimizer = optim.SGD(net.parameters(), lr=0.001, momentum=0.9)
我们将训练两个_epoch_。现在,我们将_epoch_定义为每个训练样本都被精确使用过一次的训练迭代。
首先,从数据集加载器中提取 "图像 "和 "标签",然后用 PyTorch 的 "变量 "对其进行封装。其次,运行前向传递,然后通过损失和神经网络进行反向传播。为此,请在脚本末尾添加以下代码:
 1[label step_7_fer_simple.py]
 2for epoch in range(2):  # loop over the dataset multiple times
 3
 4    running_loss = 0.0
 5    for i, data in enumerate(trainloader, 0):
 6        inputs = Variable(data['image'].float())
 7        labels = Variable(data['label'].long())
 8        optimizer.zero_grad()
 9
10        # forward + backward + optimize
11        outputs = net(inputs)
12        loss = criterion(outputs, labels)
13        loss.backward()
14        optimizer.step()
15
16        # print statistics
17        running_loss += loss.data[0]
18        if i % 100 == 0:
19            print('[%d, %5d] loss: %.3f' % (epoch, i, running_loss / (i + 1)))
现在您的脚本应该是这样的
 1[label step_7_fer_simple.py]
 2from torch.utils.data import Dataset
 3from torch.autograd import Variable
 4import torch.nn as nn
 5import torch.nn.functional as F
 6import torch.optim as optim
 7import numpy as np
 8import torch
 9import cv2
10import argparse
11
12class Fer2013Dataset(Dataset):
13    """Face Emotion Recognition dataset.
14
15    Utility for loading FER into PyTorch. Dataset curated by Pierre-Luc Carrier
16    and Aaron Courville in 2013.
17
18    Each sample is 1 x 1 x 48 x 48, and each label is a scalar.
19    """
20    def __init__(self, path: str):
21        """
22        Args:
23            path: Path to `.np` file containing sample nxd and label nx1
24        """
25        with np.load(path) as data:
26            self._samples = data['X']
27            self._labels = data['Y']
28        self._samples = self._samples.reshape((-1, 1, 48, 48))
29
30        self.X = Variable(torch.from_numpy(self._samples)).float()
31        self.Y = Variable(torch.from_numpy(self._labels)).float()
32
33    def __len__(self):
34        return len(self._labels)
35
36    def __getitem__(self, idx):
37        return {'image': self._samples[idx], 'label': self._labels[idx]}
38
39trainset = Fer2013Dataset('data/fer2013_train.npz')
40trainloader = torch.utils.data.DataLoader(trainset, batch_size=32, shuffle=True)
41
42testset = Fer2013Dataset('data/fer2013_test.npz')
43testloader = torch.utils.data.DataLoader(testset, batch_size=32, shuffle=False)
44
45class Net(nn.Module):
46    def __init__(self):
47        super(Net, self).__init__()
48        self.conv1 = nn.Conv2d(1, 6, 5)
49        self.pool = nn.MaxPool2d(2, 2)
50        self.conv2 = nn.Conv2d(6, 6, 3)
51        self.conv3 = nn.Conv2d(6, 16, 3)
52        self.fc1 = nn.Linear(16 * 4 * 4, 120)
53        self.fc2 = nn.Linear(120, 48)
54        self.fc3 = nn.Linear(48, 3)
55
56    def forward(self, x):
57        x = self.pool(F.relu(self.conv1(x)))
58        x = self.pool(F.relu(self.conv2(x)))
59        x = self.pool(F.relu(self.conv3(x)))
60        x = x.view(-1, 16 * 4 * 4)
61        x = F.relu(self.fc1(x))
62        x = F.relu(self.fc2(x))
63        x = self.fc3(x)
64        return x
65
66net = Net().float()
67criterion = nn.CrossEntropyLoss()
68optimizer = optim.SGD(net.parameters(), lr=0.001, momentum=0.9)
69
70for epoch in range(2):  # loop over the dataset multiple times
71
72    running_loss = 0.0
73    for i, data in enumerate(trainloader, 0):
74        inputs = Variable(data['image'].float())
75        labels = Variable(data['label'].long())
76        optimizer.zero_grad()
77
78        # forward + backward + optimize
79        outputs = net(inputs)
80        loss = criterion(outputs, labels)
81        loss.backward()
82        optimizer.step()
83
84        # print statistics
85        running_loss += loss.data[0]
86        if i % 100 == 0:
87            print('[%d, %5d] loss: %.3f' % (epoch, i, running_loss / (i + 1)))
验证代码后,保存文件并退出编辑器。然后,启动这个概念验证培训:
1python step_7_fer_simple.py
在神经网络训练过程中,你会看到类似下面的输出结果:
 1[secondary_label Output]
 2[0, 0] loss: 1.094
 3[0, 100] loss: 1.049
 4[0, 200] loss: 1.009
 5[0, 300] loss: 0.963
 6[0, 400] loss: 0.935
 7[1, 0] loss: 0.760
 8[1, 100] loss: 0.768
 9[1, 200] loss: 0.775
10[1, 300] loss: 0.776
11[1, 400] loss: 0.767
然后,您可以使用其他一些 PyTorch 实用程序来增强该脚本,以保存和加载模型、输出训练和验证精度、微调学习率计划等。在以 0.01 的学习率和 0.9 的动量训练了 20 个历元后,我们的神经网络达到了 87.9% 的训练准确率和 75.5% 的验证准确率,比迄今为止最成功的最小二乘方法 66.6% 的准确率又提高了 6.8%。我们将在新的脚本中加入这些额外的功能。
创建一个新文件来保存最终的人脸情绪检测器,您的实时摄像头将使用该检测器。该脚本包含上述代码、命令行界面和稍后将使用的简易导入版代码。此外,它还包含提前调整好的超参数,以获得更高精度的模型。
1nano step_7_fer.py
从以下导入开始。这与我们之前的文件一致,但额外包含了 OpenCV,即 import cv2.
 1[label step_7_fer.py]
 2from torch.utils.data import Dataset
 3from torch.autograd import Variable
 4import torch.nn as nn
 5import torch.nn.functional as F
 6import torch.optim as optim
 7import numpy as np
 8import torch
 9import cv2
10import argparse
在这些导入的正下方,重复使用 step_7_fer_simple.py 中的代码来定义神经网络:
 1[label step_7_fer.py]
 2class Net(nn.Module):
 3    def __init__(self):
 4        super(Net, self).__init__()
 5        self.conv1 = nn.Conv2d(1, 6, 5)
 6        self.pool = nn.MaxPool2d(2, 2)
 7        self.conv2 = nn.Conv2d(6, 6, 3)
 8        self.conv3 = nn.Conv2d(6, 16, 3)
 9        self.fc1 = nn.Linear(16 * 4 * 4, 120)
10        self.fc2 = nn.Linear(120, 48)
11        self.fc3 = nn.Linear(48, 3)
12
13    def forward(self, x):
14        x = self.pool(F.relu(self.conv1(x)))
15        x = self.pool(F.relu(self.conv2(x)))
16        x = self.pool(F.relu(self.conv3(x)))
17        x = x.view(-1, 16 * 4 * 4)
18        x = F.relu(self.fc1(x))
19        x = F.relu(self.fc2(x))
20        x = self.fc3(x)
21        return x
再次重复使用 step_7_fer_simple.py 中的人脸情感识别数据集代码,并将其添加到此文件中:
 1[label step_7_fer.py]
 2class Fer2013Dataset(Dataset):
 3    """Face Emotion Recognition dataset.
 4    Utility for loading FER into PyTorch. Dataset curated by Pierre-Luc Carrier
 5    and Aaron Courville in 2013.
 6    Each sample is 1 x 1 x 48 x 48, and each label is a scalar.
 7    """
 8
 9    def __init__(self, path: str):
10        """
11        Args:
12            path: Path to `.np` file containing sample nxd and label nx1
13        """
14        with np.load(path) as data:
15            self._samples = data['X']
16            self._labels = data['Y']
17        self._samples = self._samples.reshape((-1, 1, 48, 48))
18
19        self.X = Variable(torch.from_numpy(self._samples)).float()
20        self.Y = Variable(torch.from_numpy(self._labels)).float()
21
22    def __len__(self):
23        return len(self._labels)
24
25    def __getitem__(self, idx):
26        return {'image': self._samples[idx], 'label': self._labels[idx]}
接下来,定义几个实用程序来评估神经网络的性能。 首先,添加一个 "评估 "函数,将神经网络预测的情感与单张图像的真实情感进行比较:
1[label step_7_fer.py]
2def evaluate(outputs: Variable, labels: Variable, normalized: bool=True) -> float:
3    """Evaluate neural network outputs against non-one-hotted labels."""
4    Y = labels.data.numpy()
5    Yhat = np.argmax(outputs.data.numpy(), axis=1)
6    denom = Y.shape[0] if normalized else 1
7    return float(np.sum(Yhat == Y) / denom)
然后添加一个名为 batch_evaluate 的函数,将第一个函数应用于所有图像:
 1[label step_7_fer.py]
 2def batch_evaluate(net: Net, dataset: Dataset, batch_size: int=500) -> float:
 3    """Evaluate neural network in batches, if dataset is too large."""
 4    score = 0.0
 5    n = dataset.X.shape[0]
 6    for i in range(0, n, batch_size):
 7        x = dataset.X[i: i + batch_size]
 8        y = dataset.Y[i: i + batch_size]
 9        score += evaluate(net(x), y, False)
10    return score / n
现在,定义一个名为 "get_image_to_emotion_predictor "的函数,利用预训练模型接收图像并输出预测的情绪:
 1[label step_7_fer.py]
 2def get_image_to_emotion_predictor(model_path='assets/model_best.pth'):
 3    """Returns predictor, from image to emotion index."""
 4    net = Net().float()
 5    pretrained_model = torch.load(model_path)
 6    net.load_state_dict(pretrained_model['state_dict'])
 7
 8    def predictor(image: np.array):
 9        """Translates images into emotion indices."""
10        if image.shape[2] > 1:
11            image = cv2.cvtColor(image, cv2.COLOR_BGR2GRAY)
12        frame = cv2.resize(image, (48, 48)).reshape((1, 1, 48, 48))
13        X = Variable(torch.from_numpy(frame)).float()
14        return np.argmax(net(X).data.numpy(), axis=1)[0]
15    return predictor
最后,添加以下代码来定义 main 函数,以便利用其他实用程序:
 1[label step_7_fer.py]
 2def main():
 3    trainset = Fer2013Dataset('data/fer2013_train.npz')
 4    testset = Fer2013Dataset('data/fer2013_test.npz')
 5    net = Net().float()
 6
 7    pretrained_model = torch.load("assets/model_best.pth")
 8    net.load_state_dict(pretrained_model['state_dict'])
 9
10    train_acc = batch_evaluate(net, trainset, batch_size=500)
11    print('Training accuracy: %.3f' % train_acc)
12    test_acc = batch_evaluate(net, testset, batch_size=500)
13    print('Validation accuracy: %.3f' % test_acc)
14
15if __name__ == '__main__':
16    main()
该脚本会加载一个预训练的神经网络,并在提供的人脸情感识别数据集上评估其性能。具体来说,该脚本会输出我们用于训练的图像以及我们为测试目的单独留出的一组图像的准确率。
仔细检查您的文件是否与以下内容一致:
  1[label step_7_fer.py]
  2from torch.utils.data import Dataset
  3from torch.autograd import Variable
  4import torch.nn as nn
  5import torch.nn.functional as F
  6import torch.optim as optim
  7import numpy as np
  8import torch
  9import cv2
 10import argparse
 11
 12class Net(nn.Module):
 13    def __init__(self):
 14        super(Net, self).__init__()
 15        self.conv1 = nn.Conv2d(1, 6, 5)
 16        self.pool = nn.MaxPool2d(2, 2)
 17        self.conv2 = nn.Conv2d(6, 6, 3)
 18        self.conv3 = nn.Conv2d(6, 16, 3)
 19        self.fc1 = nn.Linear(16 * 4 * 4, 120)
 20        self.fc2 = nn.Linear(120, 48)
 21        self.fc3 = nn.Linear(48, 3)
 22
 23    def forward(self, x):
 24        x = self.pool(F.relu(self.conv1(x)))
 25        x = self.pool(F.relu(self.conv2(x)))
 26        x = self.pool(F.relu(self.conv3(x)))
 27        x = x.view(-1, 16 * 4 * 4)
 28        x = F.relu(self.fc1(x))
 29        x = F.relu(self.fc2(x))
 30        x = self.fc3(x)
 31        return x
 32
 33class Fer2013Dataset(Dataset):
 34    """Face Emotion Recognition dataset.
 35    Utility for loading FER into PyTorch. Dataset curated by Pierre-Luc Carrier
 36    and Aaron Courville in 2013.
 37    Each sample is 1 x 1 x 48 x 48, and each label is a scalar.
 38    """
 39
 40    def __init__(self, path: str):
 41        """
 42        Args:
 43            path: Path to `.np` file containing sample nxd and label nx1
 44        """
 45        with np.load(path) as data:
 46            self._samples = data['X']
 47            self._labels = data['Y']
 48        self._samples = self._samples.reshape((-1, 1, 48, 48))
 49
 50        self.X = Variable(torch.from_numpy(self._samples)).float()
 51        self.Y = Variable(torch.from_numpy(self._labels)).float()
 52
 53    def __len__(self):
 54        return len(self._labels)
 55
 56    def __getitem__(self, idx):
 57        return {'image': self._samples[idx], 'label': self._labels[idx]}
 58
 59def evaluate(outputs: Variable, labels: Variable, normalized: bool=True) -> float:
 60    """Evaluate neural network outputs against non-one-hotted labels."""
 61    Y = labels.data.numpy()
 62    Yhat = np.argmax(outputs.data.numpy(), axis=1)
 63    denom = Y.shape[0] if normalized else 1
 64    return float(np.sum(Yhat == Y) / denom)
 65
 66def batch_evaluate(net: Net, dataset: Dataset, batch_size: int=500) -> float:
 67    """Evaluate neural network in batches, if dataset is too large."""
 68    score = 0.0
 69    n = dataset.X.shape[0]
 70    for i in range(0, n, batch_size):
 71        x = dataset.X[i: i + batch_size]
 72        y = dataset.Y[i: i + batch_size]
 73        score += evaluate(net(x), y, False)
 74    return score / n
 75
 76def get_image_to_emotion_predictor(model_path='assets/model_best.pth'):
 77    """Returns predictor, from image to emotion index."""
 78    net = Net().float()
 79    pretrained_model = torch.load(model_path)
 80    net.load_state_dict(pretrained_model['state_dict'])
 81
 82    def predictor(image: np.array):
 83        """Translates images into emotion indices."""
 84        if image.shape[2] > 1:
 85            image = cv2.cvtColor(image, cv2.COLOR_BGR2GRAY)
 86        frame = cv2.resize(image, (48, 48)).reshape((1, 1, 48, 48))
 87        X = Variable(torch.from_numpy(frame)).float()
 88        return np.argmax(net(X).data.numpy(), axis=1)[0]
 89    return predictor
 90
 91def main():
 92    trainset = Fer2013Dataset('data/fer2013_train.npz')
 93    testset = Fer2013Dataset('data/fer2013_test.npz')
 94    net = Net().float()
 95
 96    pretrained_model = torch.load("assets/model_best.pth")
 97    net.load_state_dict(pretrained_model['state_dict'])
 98
 99    train_acc = batch_evaluate(net, trainset, batch_size=500)
100    print('Training accuracy: %.3f' % train_acc)
101    test_acc = batch_evaluate(net, testset, batch_size=500)
102    print('Validation accuracy: %.3f' % test_acc)
103
104if __name__ == '__main__':
105    main(
保存文件并退出编辑器。
像以前一样,使用人脸检测器下载预训练模型参数,并使用以下命令将其保存到 "assets "文件夹:
1wget -O assets/model_best.pth https://github.com/alvinwan/emotion-based-dog-filter/raw/master/src/assets/model_best.pth
运行脚本以使用和评估预训练模型:
1python step_7_fer.py
输出结果如下
1[secondary_label Output]
2Training accuracy: 0.879
3Validation accuracy: 0.755
至此,你已经建立了一个相当准确的脸部情绪分类器。从本质上讲,我们的模型十有八九能正确区分快乐、悲伤和惊讶的人脸。这是一个相当不错的模型,所以你现在可以继续使用这个脸部情绪分类器来决定对人脸使用哪种狗面具。
第 8 步 - 完成基于情感的狗狗过滤器
在整合我们全新的面部情绪分类器之前,我们需要挑选动物面具。 我们将使用达尔马犬面具和牧羊犬面具:
斑点狗面具](assets/python3_dogfilter/HveFdkg.png) 牧羊犬面具](assets/python3_dogfilter/E9ax7PI.png)
执行这些命令可将两个掩码下载到 "assets "文件夹:
1wget -O assets/dalmation.png assets/python3_dogfilter/E9ax7PI.png  # dalmation
2wget -O assets/sheepdog.png assets/python3_dogfilter/HveFdkg.png  # sheepdog
现在,让我们在滤波器中使用掩码。首先复制 step_4_dog_mask.py 文件:
1cp step_4_dog_mask.py step_8_dog_emotion_mask.py
打开新的 Python 脚本。
1nano step_8_dog_emotion_mask.py
在脚本顶部插入一行新内容,以导入情感预测器:
1[label step_8_dog_emotion_mask.py]
2from step_7_fer import get_image_to_emotion_predictor
3...
然后,在 main() 函数中找到这一行:
1[label step_8_dog_emotion_mask.py]
2    mask = cv2.imread('assets/dog.png')
将其替换为以下内容,以加载新的掩码并将所有掩码汇总为一个元组:
1[label step_8_dog_emotion_mask.py]
2    mask0 = cv2.imread('assets/dog.png')
3    mask1 = cv2.imread('assets/dalmation.png')
4    mask2 = cv2.imread('assets/sheepdog.png')
5    masks = (mask0, mask1, mask2)
添加换行符,然后添加以下代码来创建情绪预测器。
1[label step_8_dog_emotion_mask.py]
2
3    # get emotion predictor
4    predictor = get_image_to_emotion_predictor()
现在,您的 main 函数应与以下内容相匹配:
 1[label step_8_dog_emotion_mask.py]
 2def main():
 3    cap = cv2.VideoCapture(0)
 4
 5    # load mask
 6    mask0 = cv2.imread('assets/dog.png')
 7    mask1 = cv2.imread('assets/dalmation.png')
 8    mask2 = cv2.imread('assets/sheepdog.png')
 9    masks = (mask0, mask1, mask2)
10
11    # get emotion predictor
12    predictor = get_image_to_emotion_predictor()
13
14    # initialize front face classifier
15    ...
接下来,找到这几行:
1[label step_8_dog_emotion_mask.py]
2
3            # apply mask
4            frame[y0: y1, x0: x1] = apply_mask(frame[y0: y1, x0: x1], mask)
在 "# 应用掩码 "行下面插入以下一行,以使用预测器选择适当的掩码:
1[label step_8_dog_emotion_mask.py]
2            # apply mask
3            mask = masks[predictor(frame[y:y+h, x: x+w])]
4            frame[y0: y1, x0: x1] = apply_mask(frame[y0: y1, x0: x1], mask)
完成后的文件应如下所示:
 1[label step_8_dog_emotion_mask.py]
 2"""Test for face detection"""
 3
 4from step_7_fer import get_image_to_emotion_predictor
 5import numpy as np
 6import cv2
 7
 8def apply_mask(face: np.array, mask: np.array) -> np.array:
 9    """Add the mask to the provided face, and return the face with mask."""
10    mask_h, mask_w, _ = mask.shape
11    face_h, face_w, _ = face.shape
12
13    # Resize the mask to fit on face
14    factor = min(face_h / mask_h, face_w / mask_w)
15    new_mask_w = int(factor * mask_w)
16    new_mask_h = int(factor * mask_h)
17    new_mask_shape = (new_mask_w, new_mask_h)
18    resized_mask = cv2.resize(mask, new_mask_shape)
19
20    # Add mask to face - ensure mask is centered
21    face_with_mask = face.copy()
22    non_white_pixels = (resized_mask < 250).all(axis=2)
23    off_h = int((face_h - new_mask_h) / 2)
24    off_w = int((face_w - new_mask_w) / 2)
25    face_with_mask[off_h: off_h+new_mask_h, off_w: off_w+new_mask_w][non_white_pixels] = \
26         resized_mask[non_white_pixels]
27
28    return face_with_mask
29
30def main():
31
32    cap = cv2.VideoCapture(0)
33    # load mask
34    mask0 = cv2.imread('assets/dog.png')
35    mask1 = cv2.imread('assets/dalmation.png')
36    mask2 = cv2.imread('assets/sheepdog.png')
37    masks = (mask0, mask1, mask2)
38
39    # get emotion predictor
40    predictor = get_image_to_emotion_predictor()
41
42    # initialize front face classifier
43    cascade = cv2.CascadeClassifier("assets/haarcascade_frontalface_default.xml")
44
45    while True:
46        # Capture frame-by-frame
47        ret, frame = cap.read()
48        frame_h, frame_w, _ = frame.shape
49
50        # Convert to black-and-white
51        gray = cv2.cvtColor(frame, cv2.COLOR_BGR2GRAY)
52        blackwhite = cv2.equalizeHist(gray)
53
54        rects = cascade.detectMultiScale(
55            blackwhite, scaleFactor=1.3, minNeighbors=4, minSize=(30, 30),
56            flags=cv2.CASCADE_SCALE_IMAGE)
57
58        for x, y, w, h in rects:
59            # crop a frame slightly larger than the face
60            y0, y1 = int(y - 0.25*h), int(y + 0.75*h)
61            x0, x1 = x, x + w
62            # give up if the cropped frame would be out-of-bounds
63            if x0 < 0 or y0 < 0 or x1 > frame_w or y1 > frame_h:
64                continue
65            # apply mask
66            mask = masks[predictor(frame[y:y+h, x: x+w])]
67            frame[y0: y1, x0: x1] = apply_mask(frame[y0: y1, x0: x1], mask)
68
69        # Display the resulting frame
70        cv2.imshow('frame', frame)
71        if cv2.waitKey(1) & 0xFF == ord('q'):
72            break
73
74    cap.release()
75    cv2.destroyAllWindows()
76
77if __name__ == '__main__':
78    main()
保存并退出编辑器。现在启动脚本:
1python step_8_dog_emotion_mask.py
现在试试看!微笑会被记录为 "快乐",并显示出原始的狗。中性的表情或皱眉会被记录为 "悲伤",并显示出达勒姆犬。惊讶 "的表情会让牧羊犬瞠目结舌。
至此,我们基于情感的狗狗过滤器和对计算机视觉的探索就告一段落了。
结论
在本教程中,您使用计算机视觉构建了人脸检测器和狗过滤器,并使用机器学习模型根据检测到的情绪应用面具。
机器学习应用广泛。不过,在应用机器学习时,从业者需要考虑每种应用所涉及的道德问题。您在本教程中创建的应用程序是一个有趣的练习,但请记住,您是依靠 OpenCV 和现有数据集来识别人脸,而不是提供自己的数据来训练模型。所使用的数据和模型会对程序的运行产生重大影响。
例如,试想一个求职搜索引擎,其模型是根据求职者的种族、性别、年龄、文化、第一语言或其他因素等数据训练出来的。也许开发人员训练了一个强制稀疏性的模型,最终将特征空间缩小到一个子空间,在这个子空间中,性别解释了大部分的方差。结果,该模型主要根据性别来影响候选人的求职,甚至影响公司的选拔过程。现在考虑更复杂的情况,在这种情况下,模型的可解释性较差,而且您不知道特定特征对应的是什么。 您可以在加州大学伯克利分校莫里茨-哈特(Moritz Hardt)教授所著的《机器学习中的机会平等》(Equality of Opportunity in Machine Learning)(http://ai.googleblog.com/2016/10/equality-of-opportunity-in-machine.html) 中了解更多相关信息。
机器学习中可能存在巨大的不确定性。要理解这种随机性和复杂性,你必须培养数学直觉和概率思维能力。作为一名实践者,您需要深入研究机器学习的理论基础。