简介
允许用户登录您的应用程序是您将添加到Web应用程序中的最常见功能之一。您可以使用Flask-Login包为您的FlaskApp添加身份验证。
 的动画gif
在本教程中,您将:
- 使用FlaskLogin库进行会话管理
- 使用内置的Flask实用程序对密码进行哈希处理
- 仅为登录用户向应用程序添加受保护的页面
- 使用FlaskSQLAlChemy创建
User模型 - 创建注册和登录表单,供用户创建帐户和登录
- 当出现问题时,向用户闪回错误消息
- 使用用户帐户中的信息显示在个人资料页面上
您将构建一个允许用户登录和访问受保护页面的注册和登录页面。您将使用User模型中的信息,并在用户登录时将其显示在受保护的页面上,以模拟配置文件的样子。
<$>[注] 注意: 本教程范围有限,不包括高级会话持久化。此外,修改主键的数据类型或迁移到不同数据库系统的注意事项也不在本介绍性教程的范围内。 <$>
此项目的源代码可在GitHub.上找到
前提条件
要完成本教程,您将需要以下内容:
- 对Python.有所了解
- 安装在本地environment.上的Python
- 基本linux导航和文件Management.]知识
下面的图表让您了解在完成本教程后项目的文件结构将是什么样子:
 1.
 2└── flask_auth_app
 3    └── project
 4        ├── __init__.py       # setup the app
 5        ├── auth.py           # the auth routes for the app
 6        ├── db.sqlite         # the database
 7        ├── main.py           # the non-auth routes for the app
 8        ├── models.py         # the user model
 9        └── templates
10            ├── base.html     # contains common layout and links
11            ├── index.html    # show the home page
12            ├── login.html    # show the login form
13            ├── profile.html  # show the profile page
14            └── signup.html   # show the signup form
在完成本教程的过程中,您将创建这些目录和文件。
本教程通过sqlite3v3.36.0、pythonv3.9.8、flaskv2.0.2、flaskloginv0.5.0、flaskSQLachemyv2.5.1进行验证。
第一步-安装包
你的项目需要三个主要的包:
- 烧瓶
- FlASK-Login:在身份验证后处理用户会话
- FlaskSQLAlChemy:表示用户模型和与数据库的接口
您将使用SQLite来避免为数据库安装任何额外的依赖项。
首先,从创建项目目录开始:
1mkdir flask_auth_app
接下来,导航到项目目录:
1cd flask_auth_app
如果没有,您会想要创建一个Python环境。
<$>[注]
注意: venv的设置可以参考本地环境相关教程。
<$>
根据Python在你的机器上的安装方式,你的命令看起来类似于:
1python3 -m venv auth
-m标志用于模块名。该命令将执行模块venv,创建一个名为auth的新虚拟环境。这将创建一个包含bin、clude和lib子目录的新目录。和一个pyvenv.cfg文件。
接下来,运行以下命令:
1source auth/bin/activate
此命令将激活虚拟环境。
从您的虚拟环境运行以下命令以安装所需的程序包:
1pip install flask flask-sqlalchemy flask-login
现在您已经安装了包,您就可以创建主应用程序文件了。
第二步-创建App主文件
让我们首先创建一个project目录:
1mkdir project
第一个文件为工程的__init__.py文件:
1nano project/__init__.py
此应用程序将使用带有蓝图的Flaskapp工厂模式。一个蓝图处理常规路线,其中包括索引和受保护的个人资料页面。另一个蓝图处理与身份验证相关的一切。在一个真正的应用程序中,你可以以任何你喜欢的方式分解功能,但这里介绍的解决方案将在本教程中很好地工作。
该文件将具有创建应用程序的功能,该应用程序将初始化数据库并注册蓝图。目前,这不会做太多,但它将需要为其余的应用程序。
您将需要初始化SQLAlChemy,设置一些配置值,并在此处注册蓝图:
 1[label project/__init__.py]
 2from flask import Flask
 3from flask_sqlalchemy import SQLAlchemy
 4
 5# init SQLAlchemy so we can use it later in our models
 6db = SQLAlchemy()
 7
 8def create_app():
 9    app = Flask(__name__)
10
11    app.config['SECRET_KEY'] = 'secret-key-goes-here'
12    app.config['SQLALCHEMY_DATABASE_URI'] = 'sqlite:///db.sqlite'
13
14    db.init_app(app)
15
16    # blueprint for auth routes in our app
17    from .auth import auth as auth_blueprint
18    app.register_blueprint(auth_blueprint)
19
20    # blueprint for non-auth parts of app
21    from .main import main as main_blueprint
22    app.register_blueprint(main_blueprint)
23
24    return app
现在你有了主应用程序文件,开始添加路线。
第三步-添加路由
对于路线,您将使用两个蓝图。
对于main_Blue print,您将拥有一个主页(/)和一个个人资料页(/profile)。
首先,创建main.py:
1nano project/main.py
然后添加main_blueprint:
 1[label project/main.py]
 2from flask import Blueprint
 3from . import db
 4
 5main = Blueprint('main', __name__)
 6
 7@main.route('/')
 8def index():
 9    return 'Index'
10
11@main.route('/profile')
12def profile():
13    return 'Profile'
对于auth_BluePrint,您将拥有获取登录页面(/login)和注册页面(/signup)的路由。最后,您将拥有一个注销路径(/logout)来注销活动用户。
接下来,创建auth.py:
1nano project/auth.py
然后添加您的auth_Blue print:
 1[label project/auth.py]
 2from flask import Blueprint
 3from . import db
 4
 5auth = Blueprint('auth', __name__)
 6
 7@auth.route('/login')
 8def login():
 9    return 'Login'
10
11@auth.route('/signup')
12def signup():
13    return 'Signup'
14
15@auth.route('/logout')
16def logout():
17    return 'Logout'
暂时定义带文本返回的login、signup、logout。您还将拥有处理来自login和signup的POST请求的路由。稍后您将重新访问此代码,并使用所需的功能对其进行更新。
在终端中,您可以设置FLASK_APP和FLASK_DEBUG值:
1export FLASK_APP=project
2export FLASK_DEBUG=1
FLASK_APP环境变量指示FlASK如何加载应用程序。您可能希望它指向Create_app所在的位置。在本教程中,您将指向project目录。
将FLASK_DEBUG环境变量设置为1即可启用。这将启用调试器,调试器将在浏览器中显示应用程序错误。
请确保您在flaskauth_app目录中,然后运行工程:
1flask run
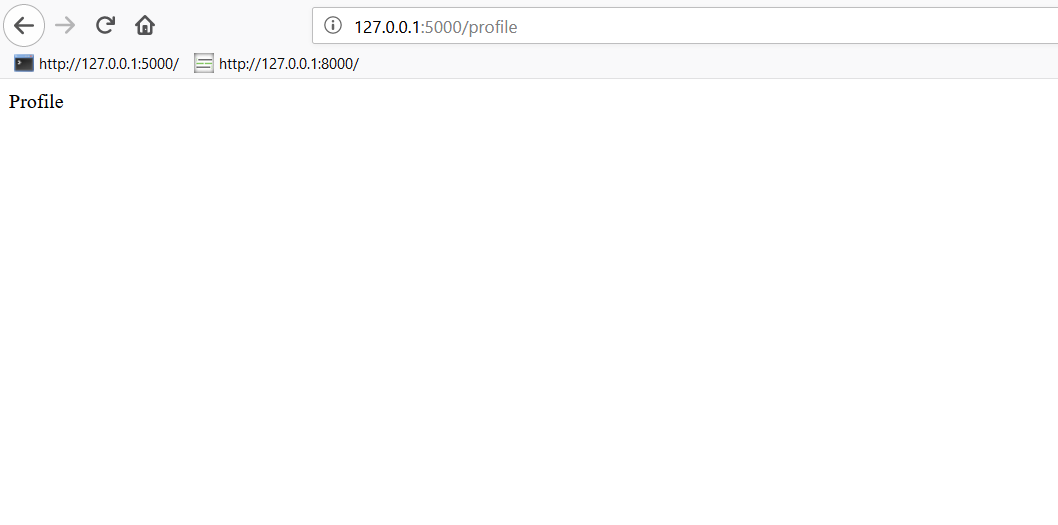
现在,在Web浏览器中,您可以导航到五个可能的URL,并查看在auth.py和main.py中定义的返回文本。
例如,访问localhost:5000/profile会显示:profile:
验证路由是否按预期运行后,即可创建模板。
第四步-创建模板
接下来,创建应用程序中使用的模板。这是实现实际登录功能之前的第一步。
这款应用程序将使用四个模板:
- index.html
- profile.html
- login.html
- signup.html
您还将拥有一个基本模板,其中包含每个页面通用的代码。在这种情况下,基本模板将具有导航链接和页面的常规布局。
首先,在project目录下创建temples目录:
1mkdir -p project/templates
然后创建base.html:
1nano project/templates/base.html
接下来,将以下代码添加到base.html文件中:
 1[label project/templates/base.html]
 2<!DOCTYPE html>
 3<html>
 4
 5<head>
 6    <meta charset="utf-8">
 7    <meta http-equiv="X-UA-Compatible" content="IE=edge">
 8    <meta name="viewport" content="width=device-width, initial-scale=1">
 9    <title>Flask Auth Example</title>
10    <link rel="stylesheet" href="https://cdnjs.cloudflare.com/ajax/libs/bulma/0.7.2/css/bulma.min.css" />
11</head>
12
13<body>
14    <section class="hero is-primary is-fullheight">
15
16        <div class="hero-head">
17            <nav class="navbar">
18                <div class="container">
19                    <div id="navbarMenuHeroA" class="navbar-menu">
20                        <div class="navbar-end">
21                            <a href="{{ url_for('main.index') }}" class="navbar-item">
22                                Home
23                            </a>
24                            <a href="{{ url_for('main.profile') }}" class="navbar-item">
25                                Profile
26                            </a>
27                            <a href="{{ url_for('auth.login') }}" class="navbar-item">
28                                Login
29                            </a>
30                            <a href="{{ url_for('auth.signup') }}" class="navbar-item">
31                                Sign Up
32                            </a>
33                            <a href="{{ url_for('auth.logout') }}" class="navbar-item">
34                                Logout
35                            </a>
36                        </div>
37                    </div>
38                </div>
39            </nav>
40        </div>
41
42        <div class="hero-body">
43            <div class="container has-text-centered">
44               {% block content %}
45               {% endblock %}
46            </div>
47        </div>
48    </section>
49</body>
50
51</html>
此代码将创建一系列菜单链接到应用程序的每个页面。它还建立了一个可以被子模板覆盖的内容块。
<$>[备注] 注意: 本教程使用Bulma来处理样式和布局。要更深入地了解布尔马,请考虑阅读官方布尔马documentation. <$>
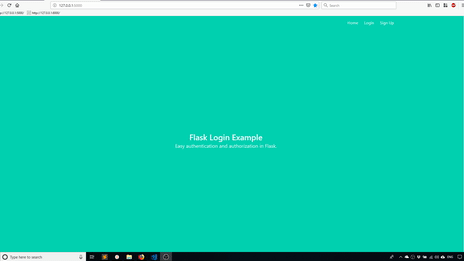
接下来,创建plates/index.html:
1nano project/templates/index.html
将以下代码添加到新创建的文件中,以向页面添加内容:
 1[label project/templates/index.html]
 2{% extends "base.html" %}
 3
 4{% block content %}
 5<h1 class="title">
 6  Flask Login Example
 7</h1>
 8<h2 class="subtitle">
 9  Easy authentication and authorization in Flask.
10</h2>
11{% endblock %}
这段代码将创建一个带有标题和副标题的基本索引页。
接下来,创建plates/login.html:
1nano project/templates/login.html
此代码生成一个登录页面,其中包含电子邮件 和** 密码** 字段。还有一个复选框可用于记住已登录的会话。
 1[label project/templates/login.html]
 2{% extends "base.html" %}
 3
 4{% block content %}
 5<div class="column is-4 is-offset-4">
 6    <h3 class="title">Login</h3>
 7    <div class="box">
 8        <form method="POST" action="/login">
 9            <div class="field">
10                <div class="control">
11                    <input class="input is-large" type="email" name="email" placeholder="Your Email" autofocus="">
12                </div>
13            </div>
14
15            <div class="field">
16                <div class="control">
17                    <input class="input is-large" type="password" name="password" placeholder="Your Password">
18                </div>
19            </div>
20            <div class="field">
21                <label class="checkbox">
22                    <input type="checkbox" name="remember">
23                    Remember me
24                </label>
25            </div>
26            <button class="button is-block is-info is-large is-fullwidth">Login</button>
27        </form>
28    </div>
29</div>
30{% endblock %}
接下来,创建plates/signup.html:
1nano project/templates/signup.html
添加以下代码,创建一个包含email、name和password字段的注册页面:
 1[label project/templates/signup.html]
 2{% extends "base.html" %}
 3
 4{% block content %}
 5<div class="column is-4 is-offset-4">
 6    <h3 class="title">Sign Up</h3>
 7    <div class="box">
 8        <form method="POST" action="/signup">
 9            <div class="field">
10                <div class="control">
11                    <input class="input is-large" type="email" name="email" placeholder="Email" autofocus="">
12                </div>
13            </div>
14
15            <div class="field">
16                <div class="control">
17                    <input class="input is-large" type="text" name="name" placeholder="Name" autofocus="">
18                </div>
19            </div>
20
21            <div class="field">
22                <div class="control">
23                    <input class="input is-large" type="password" name="password" placeholder="Password">
24                </div>
25            </div>
26
27            <button class="button is-block is-info is-large is-fullwidth">Sign Up</button>
28        </form>
29    </div>
30</div>
31{% endblock %}
接下来,创建plates/profile.html:
1nano project/templates/profile.html
添加以下代码以创建一个页面,该页面的标题被硬编码为欢迎Anthony :
1[label project/templates/profile.html]
2{% extends "base.html" %}
3
4{% block content %}
5<h1 class="title">
6  Welcome, Anthony!
7</h1>
8{% endblock %}
稍后,您将重新访问此代码以动态地问候任何用户。
添加模板后,可以更新每个路由中的return语句,以返回模板而不是文本。
接下来,通过修改导入行以及index和profile的路由来更新main.py:
 1[label project/main.py]
 2from flask import Blueprint, render_template
 3...
 4@main.route('/')
 5def index():
 6    return render_template('index.html')
 7
 8@main.route('/profile')
 9def profile():
10    return render_template('profile.html')
现在您将通过修改login和signup的导入行和路由来更新auth.py:
 1[label project/auth.py]
 2from flask import Blueprint, render_template
 3...
 4@auth.route('/login')
 5def login():
 6    return render_template('login.html')
 7
 8@auth.route('/signup')
 9def signup():
10    return render_template('signup.html')
完成这些更改后,如果导航到/signup,注册页面如下所示:
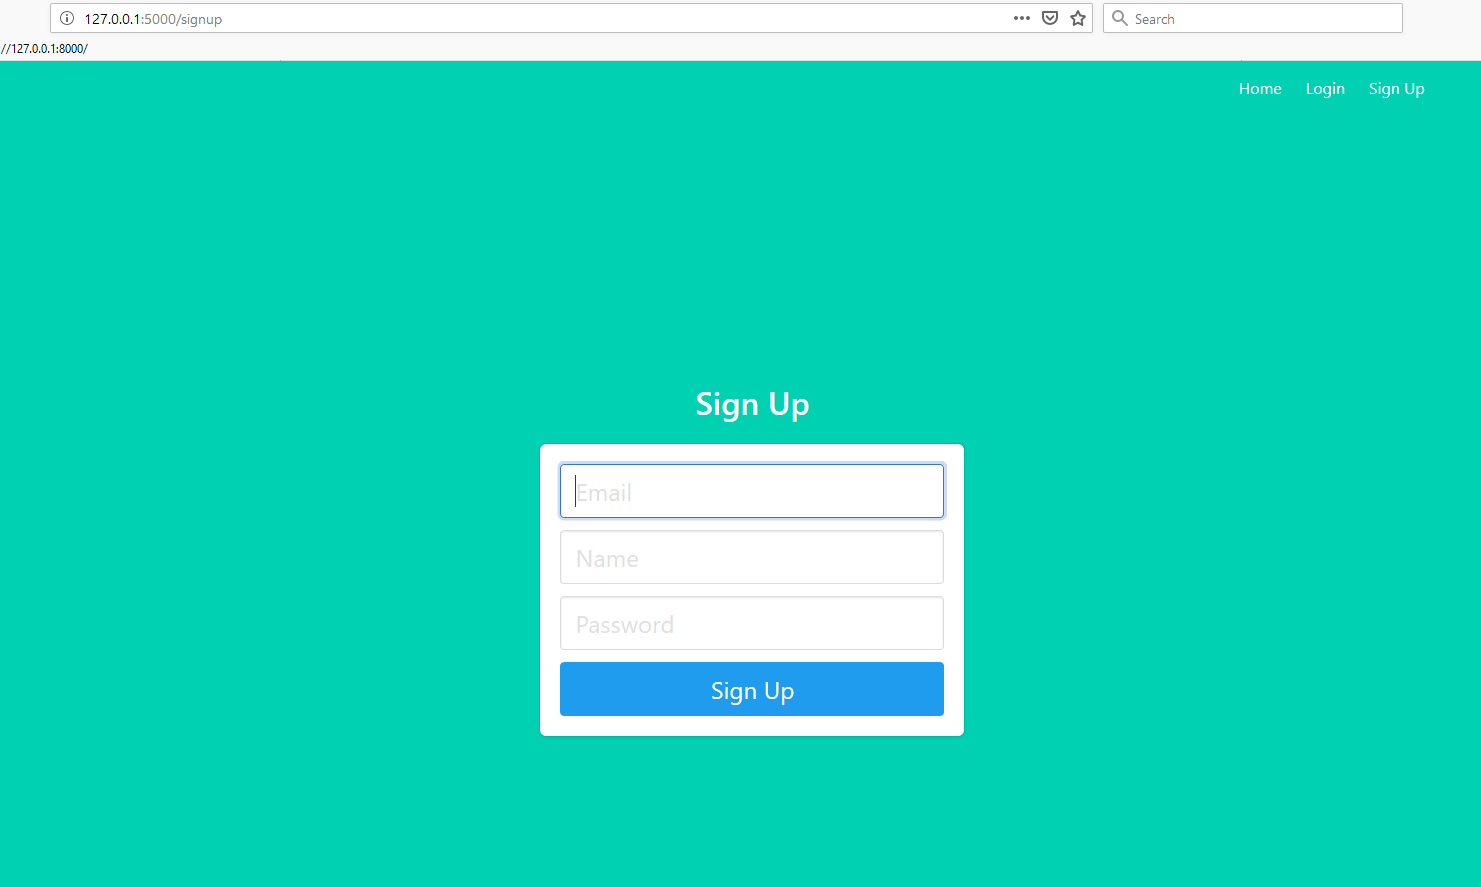 注册页面
注册页面
您也可以导航到/、/login、/profile页面。
暂时不要使用/logout,因为它稍后不会显示模板。
Step 5 -创建用户模型
用户模型代表了应用程序拥有用户意味着什么。本教程需要email地址、password和name字段。在未来的应用程序中,您可能会决定要为每个用户存储更多信息。您可以添加生日、个人资料图片、位置或任何用户首选项等内容。
在FlaskSQLAlChemy中创建的模型由类表示,然后这些类转换为数据库中的表。然后,这些类的属性变成这些表的列。
创建User模型:
1nano project/models.py
定义User模型:
1[label project/models.py]
2from . import db
3
4class User(db.Model):
5    id = db.Column(db.Integer, primary_key=True) # primary keys are required by SQLAlchemy
6    email = db.Column(db.String(100), unique=True)
7    password = db.Column(db.String(100))
8    name = db.Column(db.String(1000))
此代码定义了一个包含id、email、password和name列的User。
现在您已经创建了一个User模型,接下来可以配置您的数据库了。
第六步-配置数据库
您将使用SQLite数据库。您可以自己创建一个SQLite数据库,但让FlaskSQLAlChemy来为您完成。您已经有了在__init__.py文件中指定的数据库的路径,所以您需要告诉flask-SQLAlChemy在[PythonSQL]中创建数据库
确保您仍处于虚拟环境和flaskauth_app目录中。
如果您停止您的应用并打开一个Python REPL,您可以使用db对象上的Create_all方法来创建数据库:
1from project import db, create_app, models
2db.create_all(app=create_app()) # pass the create_app result so Flask-SQLAlchemy gets the configuration.
<$>[备注] 注意: 如果您对使用PYTHON解释器还不熟悉,可以参考官方documentation. <$>
现在,您将在您的项目目录中看到一个db.sqlite文件。该数据库中将包含用户表。
Step 7-设置授权功能
对于注册功能,您将获取用户提交给表单的数据并将其添加到数据库。您需要确保数据库中不存在具有相同电子邮件地址的用户。如果密码不存在,则需要确保在将密码放入数据库之前对其进行哈希处理。
<$>[备注] 注意: 明文存储密码被认为是一种糟糕的安全做法。您通常需要复杂的散列算法和SALT来保护密码的安全。 <$>
让我们首先添加第二个函数来处理POST表单数据。收集从用户传递的数据。
通过修改导入行并实现signup_post来更新auth.py:
 1[label project/auth.py]
 2from flask import Blueprint, render_template, redirect, url_for
 3...
 4@auth.route('/signup')
 5def signup():
 6    return render_template('signup.html')
 7
 8@auth.route('/signup', methods=['POST'])
 9def signup_post():
10    # code to validate and add user to database goes here
11    return redirect(url_for('auth.login'))
创建函数并添加重定向。这将为用户提供成功注册并被定向到登录页面的体验。
现在,让我们添加注册用户所需的其余代码。使用request对象获取表单数据。
通过添加导入并实现signup_post,继续更新auth.py:
 1[label auth.py]
 2from flask import Blueprint, render_template, redirect, url_for, request
 3from werkzeug.security import generate_password_hash, check_password_hash
 4from .models import User
 5from . import db
 6...
 7@auth.route('/signup', methods=['POST'])
 8def signup_post():
 9    # code to validate and add user to database goes here
10    email = request.form.get('email')
11    name = request.form.get('name')
12    password = request.form.get('password')
13
14    user = User.query.filter_by(email=email).first() # if this returns a user, then the email already exists in database
15
16    if user: # if a user is found, we want to redirect back to signup page so user can try again
17        return redirect(url_for('auth.signup'))
18
19    # create a new user with the form data. Hash the password so the plaintext version isn't saved.
20    new_user = User(email=email, name=name, password=generate_password_hash(password, method='sha256'))
21
22    # add the new user to the database
23    db.session.add(new_user)
24    db.session.commit()
25
26    return redirect(url_for('auth.login'))
此代码将检查数据库中是否存在具有相同电子邮件地址的用户。
Step 8-测试注册方法
现在您已经完成了注册方法,您将能够创建一个新用户。让我们测试表单以创建一个用户。
有两种方法可以验证注册是否成功:
- 您可以使用数据库查看器查看添加到表中的行。
- 或者您可以尝试再次使用相同的电子邮件地址注册,如果您收到错误,您就知道第一封电子邮件已正确保存。
让我们添加代码,让用户知道电子邮件已经存在,并指示他们转到登录页面。通过调用flash函数,您可以向下一个请求发送消息,在本例中,该请求是重定向。然后,用户被重定向到的页面将可以访问模板中的该消息。
首先,在重定向到注册页面之前添加flash。
1[label project/auth.py]
2from flask import Blueprint, render_template, redirect, url_for, request, flash
3...
4@auth.route('/signup', methods=['POST'])
5def signup_post():
6    ...
7    if user: # if a user is found, we want to redirect back to signup page so user can try again
8        flash('Email address already exists')
9        return redirect(url_for('auth.signup'))
要在模板中获得闪烁的消息,您可以在表单之前添加此代码。
 1[label project/templates/signup.html]
 2...
 3{% with messages = get_flashed_messages() %}
 4{% if messages %}
 5    <div class="notification is-danger">
 6        {{ messages[0] }}. Go to <a href="{{ url_for('auth.login') }}">login page</a>.
 7    </div>
 8{% endif %}
 9{% endwith %}
10<form method="POST" action="/signup">
此代码将显示消息`电子邮件地址已存在。登录页面``如果电子邮件地址已经在数据库中。
 显示
显示电子邮件地址已存在。请转至登录页的注册框
此时,您可以运行该应用程序并尝试使用已存在的电子邮件地址进行注册。
第九步-添加登录方式
登录方式类似于注册功能。在本例中,您将比较输入的email地址,看看它是否在数据库中。如果是,您将通过散列用户传入的password并将其与数据库中散列的password进行比较来测试用户提供的password。当两个密码匹配时,您将知道用户输入了正确的密码。
一旦用户通过了密码检查,您就会知道他们拥有正确的凭据,您可以使用FlaskLogin让他们登录。通过调用LOGIN_USER,FlaskLogin将为该用户创建一个会话,该会话将在用户保持登录状态时持续存在,这将允许用户查看受保护的页面。
您可以从处理通过POST提交的数据的新路线开始。并在用户成功登录后重定向到个人资料页面:
 1[label project/auth.py]
 2...
 3@auth.route('/login')
 4def login():
 5    return render_template('login.html')
 6
 7@auth.route('/login', methods=['POST'])
 8def login_post():
 9    # login code goes here
10    return redirect(url_for('main.profile'))
现在,您需要验证用户是否具有正确的凭据:
 1[label project/auth.py]
 2...
 3@auth.route('/login', methods=['POST'])
 4def login_post():
 5    # login code goes here
 6    email = request.form.get('email')
 7    password = request.form.get('password')
 8    remember = True if request.form.get('remember') else False
 9
10    user = User.query.filter_by(email=email).first()
11
12    # check if the user actually exists
13    # take the user-supplied password, hash it, and compare it to the hashed password in the database
14    if not user or not check_password_hash(user.password, password):
15        flash('Please check your login details and try again.')
16        return redirect(url_for('auth.login')) # if the user doesn't exist or password is wrong, reload the page
17
18    # if the above check passes, then we know the user has the right credentials
19    return redirect(url_for('main.profile'))
让我们在模板中添加块,以便用户可以看到闪烁的消息:
 1[label project/templates/login.html]
 2...
 3{% with messages = get_flashed_messages() %}
 4{% if messages %}
 5    <div class="notification is-danger">
 6        {{ messages[0] }}
 7    </div>
 8{% endif %}
 9{% endwith %}
10<form method="POST" action="/login">
您现在可以说用户已成功登录,但没有任何内容可供用户登录。
烧瓶-登录可以管理用户会话。首先将UserMixin添加到您的用户模型中。UserMixin将向模型添加FlaskLogin属性,以便FlaskLogin能够使用它。
1[label models.py]
2from flask_login import UserMixin
3from . import db
4
5class User(UserMixin, db.Model):
6    id = db.Column(db.Integer, primary_key=True) # primary keys are required by SQLAlchemy
7    email = db.Column(db.String(100), unique=True)
8    password = db.Column(db.String(100))
9    name = db.Column(db.String(1000))
然后,需要指定_USER加载器_。用户加载器告诉FlaskLogin如何从存储在其会话Cookie中的ID中查找特定用户。在Create_app函数中加上FlaskLogin的init代码:
 1[label project/__init__.py]
 2from flask import Flask
 3from flask_sqlalchemy import SQLAlchemy
 4from flask_login import LoginManager
 5...
 6def create_app():
 7    ...
 8    db.init_app(app)
 9
10    login_manager = LoginManager()
11    login_manager.login_view = 'auth.login'
12    login_manager.init_app(app)
13
14    from .models import User
15
16    @login_manager.user_loader
17    def load_user(user_id):
18        # since the user_id is just the primary key of our user table, use it in the query for the user
19        return User.query.get(int(user_id))
最后,在重定向到创建会话的个人资料页面之前,添加登录_用户函数:
 1[label project/auth.py]
 2from flask_login import login_user
 3from .models import User
 4from . import db
 5...
 6@auth.route('/login', methods=['POST'])
 7def login_post():
 8    ...
 9    # if the above check passes, then we know the user has the right credentials
10    login_user(user, remember=remember)
11    return redirect(url_for('main.profile'))
使用FlaskLogin设置时,请使用/login路径。当一切就绪后,您将看到个人资料页面。
![带有)`的档案页面
此时,您可以运行应用程序并尝试登录。
第十步-保护页面
如果你的名字不是安东尼 ,那么你会看到你的名字在个人资料页面上是错误的。目标是让配置文件在数据库中显示名称。您需要保护页面,然后访问用户数据才能获得name。
为了在使用FlaskLogin时保护页面,可以在路由和函数之间添加@LOGIN_requried修饰符。这将防止未登录的用户看到该路线。如果用户未登录,则根据FlaskLogin配置,用户将被重定向至登录页面。
如果路由使用@LOGIN_REQUIRED修饰符修饰,则可以在函数内部使用Current_User对象。这个Current_User表示数据库中的用户,并为该用户的所有属性提供_点标记_的访问权限。例如,当前用户.email、当前用户.password、当前用户.name和当前用户.id将返回登录用户在数据库中存储的实际值。
让我们使用Current_user的name并将其发送到模板:
1[label project/main.py]
2from flask import Blueprint, render_template
3from flask_login import login_required, current_user
4from . import db
5...
6@main.route('/profile')
7@login_required
8def profile():
9    return render_template('profile.html', name=current_user.name)
然后在profile.html文件中,更新页面显示name值:
1[label project/templates/profile.html]
2...
3<h1 class="title">
4  Welcome, {{ name }}!
5</h1>
一旦用户访问个人资料页面,他们就会得到他们的名字。
 名称的用户欢迎页面
现在,要更新注销视图,请在注销路径中调用logout_user函数:
1[label project/auth.py]
2from flask_login import login_user, login_required, logout_user
3...
4@auth.route('/logout')
5@login_required
6def logout():
7    logout_user()
8    return redirect(url_for('main.index'))
使用@login_required装饰器,因为注销一个没有登录的用户是没有意义的。
用户注销并再次尝试查看配置文件页面后,将向他们显示一条错误消息:
 的消息
的消息
这是因为当不允许用户访问页面时,FlaskLogin会闪烁一条消息。
最后要做的是将if语句放在模板中,以便只显示与用户相关的链接:
 1[label templates/base.html]
 2...
 3<div class="navbar-end">
 4    <a href="{{ url_for('main.index') }}" class="navbar-item">
 5        Home
 6    </a>
 7    {% if current_user.is_authenticated %}
 8    <a href="{{ url_for('main.profile') }}" class="navbar-item">
 9        Profile
10    </a>
11    {% endif %}
12    {% if not current_user.is_authenticated %}
13    <a href="{{ url_for('auth.login') }}" class="navbar-item">
14        Login
15    </a>
16    <a href="{{ url_for('auth.signup') }}" class="navbar-item">
17        Sign Up
18    </a>
19    {% endif %}
20    {% if current_user.is_authenticated %}
21    <a href="{{ url_for('auth.logout') }}" class="navbar-item">
22        Logout
23    </a>
24    {% endif %}
25</div>
在用户登录之前,他们可以选择登录或注册。在他们登录后,他们可以转到他们的个人资料或注销。
 顶部
顶部
这样,您就成功地构建了带身份验证的应用程序。
总结
在本教程中,您使用了FlaskLogin和FlaskSQLAlChemy来构建应用程序的登录系统。您介绍了如何通过首先创建用户模型并存储用户信息来验证用户。然后,您必须通过散列表单中的密码并将其与存储在数据库中的密码进行比较,来验证用户的密码是否正确。最后,您在个人资料页面上使用@LOGIN_REQUIRED修饰符为应用程序添加了授权,这样只有登录的用户才能看到该页面。
您在本教程中创建的内容对于较小的应用程序来说已经足够了,但如果您希望从一开始就拥有更多功能,您可能需要考虑使用FlaskUser或FlaskSecurity库,这两个库都构建在FlaskLogin库之上。