Google Guice 是自动化应用程序中依赖项注入的框架。如果你直接读到这里,我建议你去看看依赖注入Example,在那里我们了解了对象创建的传统方法的问题和依赖注入的实现好处。在上一篇教程中,我们了解了如何在应用程序中手动实现依赖项注入。但是,当应用程序中的类数量增加时,最好是寻找某种框架来自动执行这项任务。Google Guice是领先的框架之一,其主要工作是提供依赖项注入的自动实现。我们将使用上一篇文章中的相同示例,学习如何使用Google Guice自动化依赖项注入的实现过程。Google Guice依赖项在Maven Central上可用,因此对于Maven项目,您可以在下面为其添加依赖项。
1<dependency>
2    <groupId>com.google.inject</groupId>
3    <artifactId>guice</artifactId>
4    <version>3.0</version>
5</dependency>
如果你有一个简单的java应用程序,那么你可以从Google Code上的Google Guice主页下载jar文件。注意,在这种情况下,您还需要在类路径中具有它的传递依赖项,否则您将获得运行时异常。例如,我有一个maven项目,其项目结构如下图所示。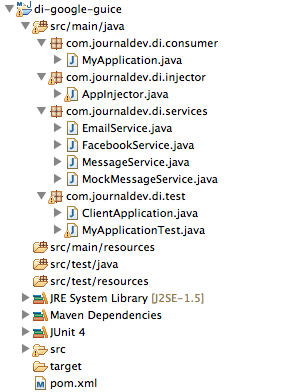 让我们逐一查看每个组件。
服务类
1package com.journaldev.di.services;
2
3public interface MessageService {
4
5    boolean sendMessage(String msg, String receipient);
6}
MessageService接口为服务提供基础合约。
 1package com.journaldev.di.services;
 2
 3import javax.inject.Singleton;
 4
 5//import com.google.inject.Singleton;
 6
 7@Singleton
 8public class EmailService implements MessageService {
 9
10    public boolean sendMessage(String msg, String receipient) {
11    	//some fancy code to send email
12    	System.out.println("Email Message sent to "+receipient+" with message="+msg);
13    	return true;
14    }
15
16}
EmailService是MessageService的实现之一。请注意,类使用@Singleton注释进行了注释。由于服务对象将通过注入器类创建,因此提供此注释是为了让它们知道服务类应该是单例对象。Google Guice 3.0增加了对JSR-330的支持,我们可以使用com.google.input或javax.inint包中的注释。假设我们有另一个服务实现来发送Facebook消息。
 1package com.journaldev.di.services;
 2
 3import javax.inject.Singleton;
 4
 5//import com.google.inject.Singleton;
 6
 7@Singleton
 8public class FacebookService implements MessageService {
 9
10    public boolean sendMessage(String msg, String receipient) {
11    	//some complex code to send Facebook message
12    	System.out.println("Message sent to Facebook user "+receipient+" with message="+msg);
13    	return true;
14    }
15
16}
消费类
由于我们在应用程序中实现依赖项注入,因此不会在应用程序中初始化服务类。Google Guice支持基于setter和基于构造函数依赖注入。我们使用该服务的应用程序类如下所示。
 1package com.journaldev.di.consumer;
 2
 3import javax.inject.Inject;
 4
 5//import com.google.inject.Inject;
 6import com.journaldev.di.services.MessageService;
 7
 8public class MyApplication {
 9
10    private MessageService service;
11
12//	constructor based injector
13//	@Inject
14//	public MyApplication(MessageService svc){
15//		this.service=svc;
16//	}
17
18    //setter method injector
19    @Inject
20    public void setService(MessageService svc){
21    	this.service=svc;
22    }
23
24    public boolean sendMessage(String msg, String rec){
25    	//some business logic here
26    	return service.sendMessage(msg, rec);
27    }
28}
请注意,我已经注释了基于构造函数的注入的代码,当您的应用程序还提供了一些不需要服务类对象的其他功能时,这会很方便。还要注意@Injector注释,Google Guice将使用它来注入服务实现类。如果您不熟悉批注,请查看Java Annotation tutorial 。
绑定服务实现
显然Google Guice不知道要使用哪个服务,我们必须通过扩展AbstractModule抽象class来配置它,并提供CONFigure()方法的实现。
 1package com.journaldev.di.injector;
 2
 3import com.google.inject.AbstractModule;
 4import com.journaldev.di.services.EmailService;
 5import com.journaldev.di.services.FacebookService;
 6import com.journaldev.di.services.MessageService;
 7
 8public class AppInjector extends AbstractModule {
 9
10    @Override
11    protected void configure() {
12    	//bind the service to implementation class
13    	//bind(MessageService.class).to(EmailService.class);
14
15    	//bind MessageService to Facebook Message implementation
16    	bind(MessageService.class).to(FacebookService.class);
17
18    }
19
20}
如您所见,我们可以将任何实现绑定到服务类。例如,如果我们想要更改为EmailService,我们只需要更改绑定。
客户端应用
我们的设置已经准备好了,让我们看看如何在一个简单的Java类中使用它。
 1package com.journaldev.di.test;
 2
 3import com.google.inject.Guice;
 4import com.google.inject.Injector;
 5
 6import com.journaldev.di.consumer.MyApplication;
 7import com.journaldev.di.injector.AppInjector;
 8
 9public class ClientApplication {
10
11    public static void main(String[] args) {
12    	Injector injector = Guice.createInjector(new AppInjector());
13
14    	MyApplication app = injector.getInstance(MyApplication.class);
15
16    	app.sendMessage("Hi Pankaj", "[email protected]");
17    }
18
19}
它的实现非常容易理解。我们需要使用Guice类createInjector()方法创建Injector对象,在该方法中传递我们的注入器类实现对象。然后我们使用注入器来初始化我们的使用者类。如果我们在类之上运行,它将产生以下输出。
1Message sent to Facebook user [email protected] with message=Hi Pankaj
如果我们在AppInjector类中将绑定更改为EmailService,那么它将产生以下输出。
1Email Message sent to [email protected] with message=Hi Pankaj
JUnit测试用例
因为我们要测试MyApplication类,所以不需要创建实际的服务实现。我们可以有一个简单的模拟服务实现类,如下所示。
1package com.journaldev.di.services;
2
3public class MockMessageService implements MessageService{
4
5    public boolean sendMessage(String msg, String receipient) {
6    	return true;
7    }
8
9}
我的JUnit4测试类如下所示。
 1package com.journaldev.di.test;
 2
 3import org.junit.After;
 4import org.junit.Assert;
 5import org.junit.Before;
 6import org.junit.Test;
 7
 8import com.google.inject.AbstractModule;
 9import com.google.inject.Guice;
10import com.google.inject.Injector;
11import com.journaldev.di.consumer.MyApplication;
12import com.journaldev.di.services.MessageService;
13import com.journaldev.di.services.MockMessageService;
14
15public class MyApplicationTest {
16
17    private Injector injector;
18
19    @Before
20    public void setUp() throws Exception {
21    	injector = Guice.createInjector(new AbstractModule() {
22
23    		@Override
24    		protected void configure() {
25    			bind(MessageService.class).to(MockMessageService.class);
26    		}
27    	});
28    }
29
30    @After
31    public void tearDown() throws Exception {
32    	injector = null;
33    }
34
35    @Test
36    public void test() {
37    	MyApplication appTest = injector.getInstance(MyApplication.class);
38    	Assert.assertEquals(true, appTest.sendMessage("Hi Pankaj", "[email protected]"));;
39    }
40
41}
注意,我将MockMessageService类绑定到MessageService,方法是有一个AbstractModule的匿名类实现。这是在测试方法之前运行的setUp()方法中完成的。
这就是Google Guice示例教程。使用Google Guice在应用程序中实现依赖项注入非常简单,而且做得很漂亮。它被用在Google API中,所以我们可以假设它是经过高度测试和可靠的代码。从上面下载该项目,并使用它来了解更多信息。