在上几篇文章中,我们了解了JAVA JAXB以及如何从XSD](/community/tutorials/jaxb2-maven-plugin-xjc-example-generate-java-classes-xsd生成[Java类)。今天,我们将学习如何从Java类生成XSD。
从Java类生成XSD
 我们将在Maven项目中使用JAXB-2 Maven插件 从Java类生成XSD。
- JAXB2 Maven插件使用JAXB SchemaGenerator实用程序从Java类生成XSD。
- Java类应该有JAXB注释,以供此插件使用。
- 所需的最低Java版本为Java 5
首先创建一个新的maven项目,您可以给出您想要的任何名称、组ID和构件ID。一旦我们构建了我们的项目,它将在目标/生成的资源/方案目录中生成XSD类。建成后,我们的项目结构将如下图所示。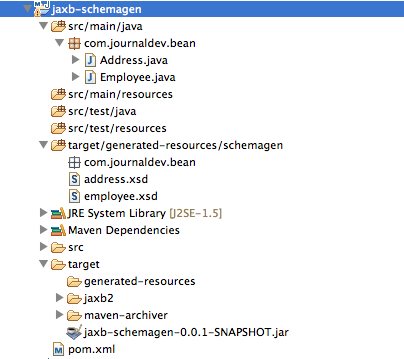 生成xsd这里是我们拥有的最后一个
pom.xml文件:
 1<project xmlns="https://maven.apache.org/POM/4.0.0" xmlns:xsi="https://www.w3.org/2001/XMLSchema-instance"
 2    xsi:schemaLocation="https://maven.apache.org/POM/4.0.0 https://maven.apache.org/xsd/maven-4.0.0.xsd">
 3    <modelVersion>4.0.0</modelVersion>
 4    <groupId>jaxb-schemagen</groupId>
 5    <artifactId>jaxb-schemagen</artifactId>
 6    <version>0.0.1-SNAPSHOT</version>
 7    <dependencies>
 8    	<dependency>
 9    		<groupId>javax.xml.bind</groupId>
10    		<artifactId>jaxb-api</artifactId>
11    		<version>2.1</version>
12    	</dependency>
13    </dependencies>
14
15    <build>
16    	<pluginManagement>
17    		<plugins>
18    			<plugin>
19    				<groupId>org.apache.maven.plugins</groupId>
20    				<artifactId>maven-compiler-plugin</artifactId>
21    				<version>2.5.1</version>
22    			</plugin>
23    		</plugins>
24    	</pluginManagement>
25
26    	<plugins>
27    		<plugin>
28    			<groupId>org.codehaus.mojo</groupId>
29    			<artifactId>jaxb2-maven-plugin</artifactId>
30    			<version>1.5</version>
31    			<executions>
32    				<execution>
33    					<id>schemagen</id>
34    					<goals>
35    						<goal>schemagen</goal>
36    					</goals>
37    				</execution>
38    			</executions>
39
40    			<configuration>
41    				<transformSchemas>
42    					<transformSchema>
43    						<uri>https://www.example.org/employee</uri>
44    						<toPrefix>empns</toPrefix>
45    						<toFile>employee.xsd</toFile>
46    					</transformSchema>
47    					<transformSchema>
48    						<uri>https://www.example.org/address</uri>
49    						<toPrefix>addrns</toPrefix>
50    						<toFile>address.xsd</toFile>
51    					</transformSchema>
52    				</transformSchemas>
53    				<includes>
54    					<include>com/journaldev/bean/*</include>
55    				</includes>
56    				<verbose>true</verbose>
57
58    			</configuration>
59    		</plugin>
60    	</plugins>
61    </build>
62</project>
需要注意的几点是jaxb依赖项、schemagen执行目标和transformSchema配置。transformSchema配置用于指定生成的XSD文件名和要在XSD文件中使用的命名空间前缀。下面是我们拥有的将用于生成XSD的Java类。关于我们
 1package com.journaldev.bean;
 2
 3import javax.xml.bind.annotation.XmlAttribute;
 4import javax.xml.bind.annotation.XmlType;
 5
 6@XmlType(namespace = "https://www.example.org/employee")
 7public class Employee {
 8    private String name;
 9    private int id;
10    private String role;
11    private Address address;
12
13    public String getName() {
14        return name;
15    }
16
17    public void setName(String name) {
18        this.name = name;
19    }
20
21    @XmlAttribute
22    public int getId() {
23        return id;
24    }
25
26    public void setId(int id) {
27        this.id = id;
28    }
29
30    public String getRole() {
31        return role;
32    }
33
34    public void setRole(String role) {
35        this.role = role;
36    }
37
38    public Address getAddress() {
39        return address;
40    }
41
42    public void setAddress(Address address) {
43        this.address = address;
44    }
45}
注意,XmlType注释的命名空间用于类,XmlAttribute用于字段id。一旦我们构建了项目,这个类将生成employee.xsd模式。正如您所看到的,它有一个字段Address,这是另一个自定义类,因此我们还需要注释这个类以成功地生成模式。下面是带有jaxb注释的address类。Address.java
 1package com.journaldev.bean;
 2
 3import javax.xml.bind.annotation.XmlType;
 4
 5@XmlType(namespace = "https://www.example.org/address")
 6public class Address {
 7    private String city;
 8    private int zip;
 9    private String addressLine1;
10    private String addressLine2;
11    public String getCity() {
12        return city;
13    }
14    public void setCity(String city) {
15        this.city = city;
16    }
17    public int getZip() {
18        return zip;
19    }
20    public void setZip(int zip) {
21        this.zip = zip;
22    }
23    public String getAddressLine1() {
24        return addressLine1;
25    }
26    public void setAddressLine1(String addressLine1) {
27        this.addressLine1 = addressLine1;
28    }
29    public String getAddressLine2() {
30        return addressLine2;
31    }
32    public void setAddressLine2(String addressLine2) {
33        this.addressLine2 = addressLine2;
34    }
35
36}
这个类将生成Address.xsd,因为它的名称在pom.xml文件的转换模式中匹配。我们的工程设置已经准备好了,只需使用mvn lean install命令构建工程,就会生成XSD文件。对于我的项目,生成的XSD文件如下所示。ployee.xsd
 1<?xml version="1.0" encoding="UTF-8" standalone="yes"?>
 2<xs:schema xmlns:xs="https://www.w3.org/2001/XMLSchema" xmlns:addrns="https://www.example.org/address" targetNamespace="https://www.example.org/employee" version="1.0">
 3
 4  <xs:import namespace="https://www.example.org/address" schemaLocation="address.xsd"/>
 5
 6  <xs:complexType name="employee">
 7    <xs:sequence>
 8      <xs:element minOccurs="0" name="address" type="ns1:address"/>
 9      <xs:element minOccurs="0" name="name" type="xs:string"/>
10      <xs:element minOccurs="0" name="role" type="xs:string"/>
11    </xs:sequence>
12    <xs:attribute name="id" type="xs:int" use="required"/>
13  </xs:complexType>
14</xs:schema>
Address.xsd
 1<?xml version="1.0" encoding="UTF-8" standalone="yes"?>
 2<xs:schema xmlns:xs="https://www.w3.org/2001/XMLSchema" targetNamespace="https://www.example.org/address" version="1.0">
 3
 4  <xs:complexType name="address">
 5    <xs:sequence>
 6      <xs:element minOccurs="0" name="addressLine1" type="xs:string"/>
 7      <xs:element minOccurs="0" name="addressLine2" type="xs:string"/>
 8      <xs:element minOccurs="0" name="city" type="xs:string"/>
 9      <xs:element name="zip" type="xs:int"/>
10    </xs:sequence>
11  </xs:complexType>
12</xs:schema>
这就是从Java类生成XSD的全部内容。对于Java类到XSD生成来说,这是一种非常简单而伟大的方式。我希望你会发现它是有用的,而且容易理解。