谈论最新的尖端网络技术,你会发现一些令人印象深刻的名字,比如React.js,Vue.js,Next.js等等。他们开辟了新的门户和方法,以建立能够快速向用户提供内容的网站。
一个可以提高整体站点速度和加载时间的框架是Gatsby.js.
快速网站的目标
一个快速加载的网站为开发人员带来了以下福利和好处:
- 流量和参与度 :您可以在快速的站点上获得更多的站点访问者,这将转化为更高的ROI和用户参与度。
- 页面排名 :速度快的网站获得更高的浏览器排名。
利用Gatsby.js和WordPress提升站点速度
Js是一个基于React.js的免费开源框架,帮助开发人员构建网站和应用程序。这是https://jamstack.org/)站点发展趋势的一部分,旨在提高站点的整体速度和加载时间。
但Gatsby与WordPress的契合点是什么呢?WordPress是目前使用最广泛的CMS选项之一。尽管WordPress具有易用性和强大的社区功能,但它可能会对构建现代前端构成挑战,原因如下:
- 更新与变化 :WordPress会定期更新,但仍无法与其他快速变化的前端技术相媲美。与时俱进这些技术为开发人员增加了额外的负担。
- 持续集成与部署 :目前,WordPress生态系统中的持续集成/部署(CI/CD)选项很少。
- 集成成本 :将一些最新的前端技术集成到WordPress应用程序中可能是一项挑战。
使用Gatsby可以解决其中一些限制。在接下来的步骤中,我们将向您展示如何将Gatsby与WordPress集成以充分利用两者。首先,我们将配置一个基本的Gatsby项目设置。然后,我们将使用它从我们的WordPress站点获取数据。
将Gatsby.js与WordPress集成
首先,我们将建立一个演示Gatsby项目。
通过在终端中键入以下命令来安装Gatsby CLI:
1npm install -g gatsby-cli
接下来,使用以下命令创建一个新的Gatsby站点:
1gatsby new site-name
要访问站点文件夹内容,请键入以下内容:
1cd site-name
最后,启动开发服务器开始构建站点:
1gatsby develop
安装gatsby-source-wordpress插件
假设您已经设置了一个WordPress站点,并且希望使用Gatsby.js构建一个前端,那么您所需要做的就是将现有站点数据放入您的静态Gatsby站点。您可以使用gatsby-source-wordpress插件来做到这一点。
本教程使用默认的WordPress rest API站点,),但您也可以自由使用预先存在的WordPress安装程序(如果您有的话)。
在您的终端中,键入以下命令以安装此插件:
1npm install gatsby-source-wordpress
配置插件
在您的gatsby-config.js文件(主要的Gatsby配置文件)中,您将添加一些特定于WordPress的配置选项。这些包括你WordPress站点的plugin](https://www.advancedcustomfields.com/).‘,首选的http协议,以及与[高级定制字段(ACF)BasUrl相关的设置cluddedRoutes字段指定我们要获取的数据。
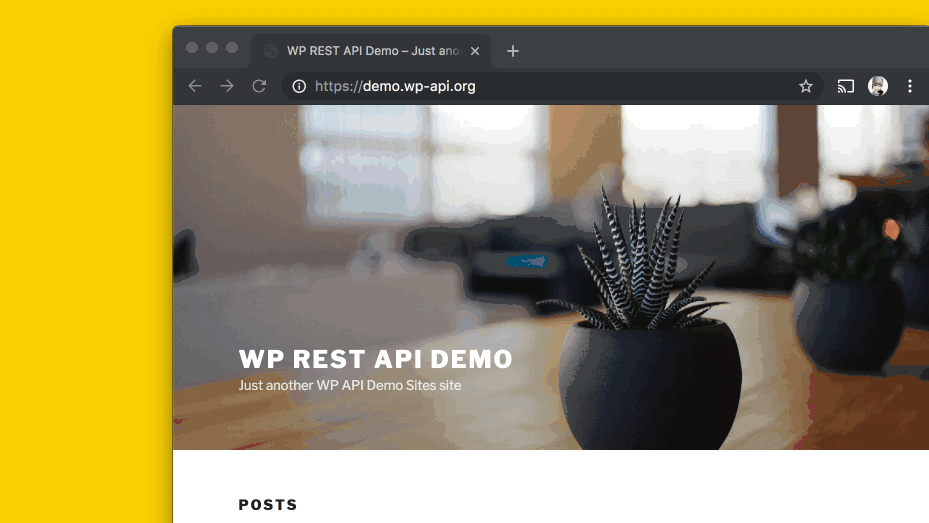
使用上面步骤中的演示WordPress站点,当前前端看起来像这样:
出于本教程的目的,将以下代码添加到名为gatsby-config.js的文件中:
 1module.exports = {
 2  // ...
 3  plugins: [
 4    // ...
 5    {
 6        resolve: `gatsby-source-wordpress`,
 7        options: {
 8            // Your WordPress source.
 9            baseUrl: `demo.wp-api.org`,
10            protocol: `https`,
11            // Only fetches posts, tags and categories from the baseUrl.
12            includedRoutes: ['**/posts', '**/tags', '**/categories'],
13            // Not using ACF so putting it off.
14            useACF: false
15        }
16    },
17  ],
18}
使用抓取的WordPress数据
一旦你的Gatsby站点从你的WordPress源URL获取数据,就可以创建你的站点页面了。这是通过在gatsby-node.js文件中实现createPages接口来实现的,该接口使从GraphQL中获取的数据可用于查询。在构建时,gatsby-source-wordpress插件获取您的数据,并使用它来自动推断GraphQL模式,您可以根据该模式进行查询。
将以下代码添加到名为gatsby-node.js的文件中:
 1/**
 2 * Implement Gatsby's Node APIs in this file.
 3 *
 4 * See: https://www.gatsbyjs.org/docs/node-apis/
 5 */
 6
 7// You can delete this file if you're not using it
 8
 9const path = require(`path`);
10const slash = require(`slash`);
11
12/** STEP #1: Implement the Gatsby API “createPages”. This is
13 * called after the Gatsby bootstrap is finished so you have
14 * access to any information necessary to programmatically
15 * create pages.
16 * Will create pages for WordPress pages (route : /{slug})
17 * Will create pages for WordPress posts (route : /post/{slug})
18 */
19exports.createPages = async ({ graphql, actions }) => {
20    const { createPage } = actions;
21
22    // STEP #2: Query all WordPress Posts Data.
23    /** The “graphql” function allows us to run arbitrary
24     * queries against the local Gatsby GraphQL schema. Think of
25     * it like the site has a built-in database constructed
26     * 	from the fetched data that you can run queries against.
27     */
28    const result = await graphql(`
29    	{
30    		allWordpressPost {
31    			edges {
32    				node {
33    					id
34    					slug
35    					status
36    					template
37    					format
38    				}
39    			}
40    		}
41    	}
42    `);
43
44    // Check for any errors
45    if (result.errors) {
46    	throw new Error(result.errors);
47    }
48
49    // Access query results via object destructuring.
50    const { allWordpressPost } = result.data;
51
52    const postTemplate = path.resolve(`./src/templates/post.js`);
53
54    // STEP #3: Create pages in Gatsby with WordPress Posts Data.
55    /**
56     * We want to create a detailed page for each
57     * post node. We'll just use the WordPress Slug for the slug.
58     * The Post ID is prefixed with 'POST_'
59     */
60    allWordpressPost.edges.forEach(edge => {
61    	createPage({
62    		path: `/${edge.node.slug}/`,
63    		component: slash(postTemplate),
64    		context: {
65    			id: edge.node.id
66    		}
67    	});
68    });
69};
这将遍历现有的WordPress帖子数据。
第四步:创建post.js模板
接下来,我们将为模板创建一个文件夹,您可以在其中添加帖子、页面和布局的文件。目前,我们将创建一个post.js文件来从我们的WordPress站点获取帖子。
将以下代码添加到文件中:
 1import { graphql } from 'gatsby';
 2import PropTypes from 'prop-types';
 3import React, { Component } from 'react';
 4import Layout from '../layouts';
 5
 6class PostTemplate extends Component {
 7    render() {
 8    	const post = this.props.data.wordpressPost;
 9
10    	// STEP #5: Use title and content in Gatsby.
11    	return (
12    		<Layout>
13    			<h1 dangerouslySetInnerHTML={{ __html: post.title }} />
14    			<div dangerouslySetInnerHTML={{ __html: post.content }} />
15    		</Layout>
16    	);
17    }
18}
19
20PostTemplate.propTypes = {
21    data: PropTypes.object.isRequired,
22    edges: PropTypes.array
23};
24
25export default PostTemplate;
26
27// STEP #4: Get current WP Post data via ID.
28export const pageQuery = graphql`
29    query($id: String!) {
30    	wordpressPost(id: { eq: $id }) {
31    		title
32    		content
33    	}
34    }
35`;
查看最终结果
要启动开发服务器并查看最终结果,请在您的终端中键入以下命令:
1npm start
您将获得可以在本地访问站点的链接,以及正在获取的帖子、类别和标签数量等其他详细信息。
下面是一个GIF,它展示了这将是什么样子:
 让我们来看看这个改进的前端,它现在使用Gatsby.js和WordPress后端:
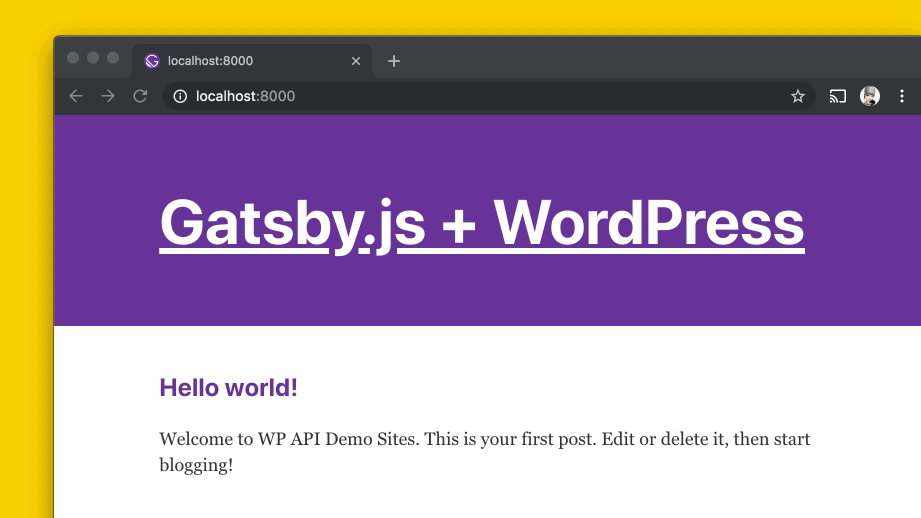
您可以看到我们的应用程序如何只从WordPress站点获取所需的数据。这包括帖子、标签和类别。要检索其他类型的数据,如小部件或注释,您需要将适当的值添加到includedRoutes选项。
结论
通过学习本教程,您现在已经拥有了一个与Gatsby.js前端集成的WordPress应用程序后端。Gatsby提供了快速的网络体验,并带来了额外的好处,可以增强您现有的WordPress网站。现在,您有了一个平台,可以进一步使用Gatsby为您的站点提供支持,