许多Web应用程序都包括应用内通知系统,当有人执行与您或您的帐户相关的操作时,该系统会立即通知您。在Facebook上,当有人喜欢你的状态或有人对你的个人资料发表评论时,你会收到通知。本教程将通过使用Laravel和Pusher.)创建基于Web的通知系统来指导您复制此功能
前提条件
要学习本教程,您需要在您的计算机上安装PHP和Laravel,以及一个Pusher帐户。
我们要建造的
在本教程之后,我们将演示如何让一个小型Web应用程序使用Laravel和Pusher显示通知。这将类似于Facebook等网站显示通知的方式。以下是我们将建设的项目的预览:
 的浏览器的动画gif
设置推流应用
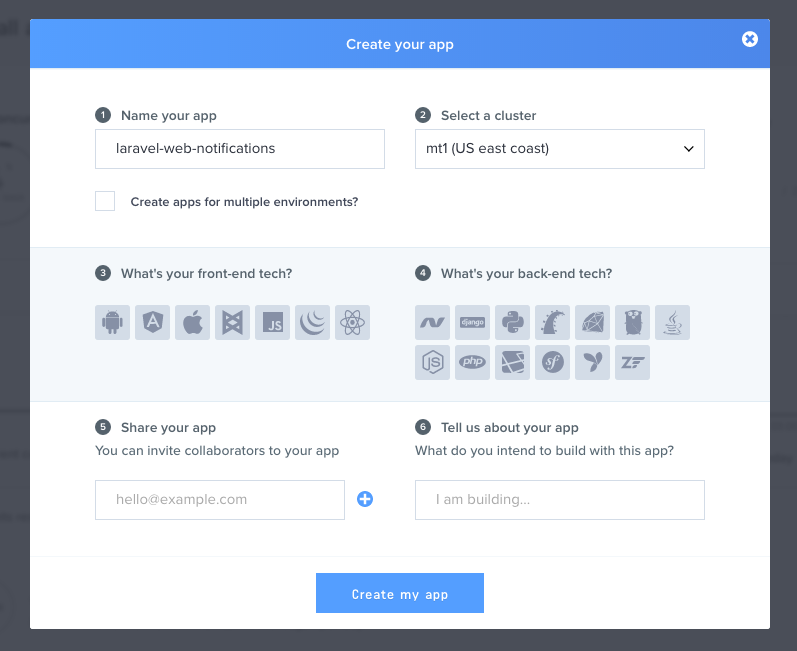
创建推送帐号,,如果您尚未创建推送帐号,然后设置您的应用程序,如下面的截图所示。
设置您的Laravel应用
通过在您的终端中运行以下命令来创建新的Laravel应用程序:
1laravel new laravel-web-notifications
之后,使用Composer安装Pusher PHP SDK。运行以下命令:
1composer require pusher/pusher-php-server
Composer完成后,下一步是配置Laravel使用Pusher作为其广播驱动程序。为此,打开Laravel安装根目录中的.env文件。更新值以匹配以下配置:
1PUSHER_APP_ID=322700
2    BROADCAST_DRIVER=pusher
3
4    // Get the credentials from your pusher dashboard
5    PUSHER_APP_ID=XXXXX
6    PUSHER_APP_KEY=XXXXXXX
7    PUSHER_APP_SECRET=XXXXXXX
重要提示:如果您使用的是EU 或** AP** 集群,请确保更新config/Broadcast ing.php配置中的选项数组,因为Laravel默认使用US服务器。您可以使用Pusher PHP库支持的所有选项。
打开``App\Providers\BroadcastServiceProvider::class./app.php并取消注释
创建Laravel和Pusher应用程序
既然配置步骤已经完成,接下来就可以创建应用程序了。首先创建一个Event类,它将从我们的Laravel应用程序广播到Pusher。可以从应用程序中的任何位置激发事件。
1php artisan make:event StatusLiked
这将在app/Events目录中创建一个新的StatusLiked类。打开该文件的内容并更新为以下内容:
 1<?php
 2
 3namespace App\Events;
 4
 5use Illuminate\Queue\SerializesModels;
 6use Illuminate\Foundation\Events\Dispatchable;
 7use Illuminate\Broadcasting\InteractsWithSockets;
 8use Illuminate\Contracts\Broadcasting\ShouldBroadcast;
 9
10class StatusLiked implements ShouldBroadcast
11{
12    use Dispatchable, InteractsWithSockets, SerializesModels;
13
14    public $username;
15
16    public $message;
17
18    /**
19     * Create a new event instance.
20     *
21     * @return void
22     */
23    public function __construct($username)
24    {
25    	$this->username = $username;
26    	$this->message  = "{$username} liked your status";
27    }
28
29    /**
30     * Get the channels the event should broadcast on.
31     *
32     * @return Channel|array
33     */
34    public function broadcastOn()
35    {
36    	return ['status-liked'];
37    }
38}
ShouldBroadcast接口告诉Laravel这个事件应该使用配置文件中设置的任何驱动程序进行广播。
还有一个构造函数,它接受两个参数:用户名和动词。这些变量被分配给以相同方式命名的类特性。请务必将属性的可见性设置为PUBLIC ;否则,该属性将被忽略。
最后,设置要广播的频道名称。
创建应用程序视图
本教程将使用带有导航栏和通知图标的单个视图。当有新的通知可用时,图标将会更新,而无需刷新页面。在本教程中,通知在设计上是短暂的;如果愿意,您可以扩展该功能,并在页面重新加载后使其持续更长时间。
打开欢迎.blade.php文件,并将其替换为下面的HTML。
  1<!DOCTYPE html>
  2<html lang="en">
  3  <head>
  4    <meta charset="utf-8">
  5    <meta http-equiv="X-UA-Compatible" content="IE=edge">
  6    <meta name="viewport" content="width=device-width, initial-scale=1">
  7    <title>Demo Application</title>
  8    <link rel="stylesheet" href="//maxcdn.bootstrapcdn.com/bootstrap/3.3.7/css/bootstrap.min.css" integrity="sha384-BVYiiSIFeK1dGmJRAkycuHAHRg32OmUcww7on3RYdg4Va+PmSTsz/K68vbdEjh4u" crossorigin="anonymous">
  9    <link rel="stylesheet" type="text/css" href="/css/bootstrap-notifications.min.css">
 10    <!--[if lt IE 9]>
 11      <script src="https://oss.maxcdn.com/html5shiv/3.7.3/html5shiv.min.js"></script>
 12      <script src="https://oss.maxcdn.com/respond/1.4.2/respond.min.js"></script>
 13    <![endif]-->
 14  </head>
 15  <body>
 16    <nav class="navbar navbar-inverse">
 17      <div class="container-fluid">
 18    	<div class="navbar-header">
 19    	  <button type="button" class="navbar-toggle collapsed" data-toggle="collapse" data-target="#bs-example-navbar-collapse-9" aria-expanded="false">
 20    		<span class="sr-only">Toggle navigation</span>
 21    		<span class="icon-bar"></span>
 22    		<span class="icon-bar"></span>
 23    		<span class="icon-bar"></span>
 24    	  </button>
 25    	  <a class="navbar-brand" href="#">Demo App</a>
 26    	</div>
 27
 28    	<div class="collapse navbar-collapse">
 29    	  <ul class="nav navbar-nav">
 30    		<li class="dropdown dropdown-notifications">
 31    		  <a href="#notifications-panel" class="dropdown-toggle" data-toggle="dropdown">
 32    			<i data-count="0" class="glyphicon glyphicon-bell notification-icon"></i>
 33    		  </a>
 34
 35    		  <div class="dropdown-container">
 36    			<div class="dropdown-toolbar">
 37    			  <div class="dropdown-toolbar-actions">
 38    				<a href="#">Mark all as read</a>
 39    			  </div>
 40    			  <h3 class="dropdown-toolbar-title">Notifications (<span class="notif-count">0</span>)</h3>
 41    			</div>
 42    			<ul class="dropdown-menu">
 43    			</ul>
 44    			<div class="dropdown-footer text-center">
 45    			  <a href="#">View All</a>
 46    			</div>
 47    		  </div>
 48    		</li>
 49    		<li><a href="#">Timeline</a></li>
 50    		<li><a href="#">Friends</a></li>
 51    	  </ul>
 52    	</div>
 53      </div>
 54    </nav>
 55
 56    <script src="//cdnjs.cloudflare.com/ajax/libs/jquery/2.1.4/jquery.min.js"></script>
 57    <script src="//js.pusher.com/3.1/pusher.min.js"></script>
 58    <script src="//maxcdn.bootstrapcdn.com/bootstrap/3.3.7/js/bootstrap.min.js" integrity="sha384-Tc5IQib027qvyjSMfHjOMaLkfuWVxZxUPnCJA7l2mCWNIpG9mGCD8wGNIcPD7Txa" crossorigin="anonymous"></script>
 59
 60    <script type="text/javascript">
 61      var notificationsWrapper   = $('.dropdown-notifications');
 62      var notificationsToggle    = notificationsWrapper.find('a[data-toggle]');
 63      var notificationsCountElem = notificationsToggle.find('i[data-count]');
 64      var notificationsCount     = parseInt(notificationsCountElem.data('count'));
 65      var notifications          = notificationsWrapper.find('ul.dropdown-menu');
 66
 67      if (notificationsCount <= 0) {
 68    	notificationsWrapper.hide();
 69      }
 70
 71      // Enable pusher logging - don't include this in production
 72      // Pusher.logToConsole = true;
 73
 74      var pusher = new Pusher('API_KEY_HERE', {
 75    	encrypted: true
 76      });
 77
 78      // Subscribe to the channel we specified in our Laravel Event
 79      var channel = pusher.subscribe('status-liked');
 80
 81      // Bind a function to a Event (the full Laravel class)
 82      channel.bind('App\\Events\\StatusLiked', function(data) {
 83    	var existingNotifications = notifications.html();
 84    	var avatar = Math.floor(Math.random() * (71 - 20 + 1)) + 20;
 85    	var newNotificationHtml = `
 86    	  <li class="notification active">
 87    		  <div class="media">
 88    			<div class="media-left">
 89    			  <div class="media-object">
 90    				<img src="https://api.adorable.io/avatars/71/`+avatar+`.png" class="img-circle" alt="50x50" style="width: 50px; height: 50px;">
 91    			  </div>
 92    			</div>
 93    			<div class="media-body">
 94    			  <strong class="notification-title">`+data.message+`</strong>
 95    			  <!--p class="notification-desc">Extra description can go here</p-->
 96    			  <div class="notification-meta">
 97    				<small class="timestamp">about a minute ago</small>
 98    			  </div>
 99    			</div>
100    		  </div>
101    	  </li>
102    	`;
103    	notifications.html(newNotificationHtml + existingNotifications);
104
105    	notificationsCount += 1;
106    	notificationsCountElem.attr('data-count', notificationsCount);
107    	notificationsWrapper.find('.notif-count').text(notificationsCount);
108    	notificationsWrapper.show();
109      });
110    </script>
111  </body>
112</html>
这是一个很大的代码去了,但重要的部分是JavaScript部分。包括Pusher JavaScript库,然后是推送通知的javascript块。以下是JavaScript代码块中的重要代码片段:
 1// Enable pusher logging - don't include this in production
 2// Pusher.logToConsole = true;
 3
 4// Initiate the Pusher JS library
 5var pusher = new Pusher('API_KEY_HERE', {
 6    encrypted: true
 7});
 8
 9// Subscribe to the channel we specified in our Laravel Event
10var channel = pusher.subscribe('status-liked');
11
12// Bind a function to a Event (the full Laravel class)
13channel.bind('App\\Events\\StatusLiked', function(data) {
14    // this is called when the event notification is received...
15});
<$>[备注] 注意: :默认情况下,Laravel会使用事件的类名来广播事件。但是,您可以通过在事件上定义广播AS方法来自定义广播名称:
1public function broadcastAs() {
2  return 'event-name';
3}
<$>
上面的代码初始化Pusher JS库并订阅一个频道。然后,当在该频道上接收到广播的事件时,它设置一个回调来调用。
测试设置
最后,要测试此设置,请创建一个手动调用该事件的路由。如果一切正常,则每当到达该路由时都会出现新的通知。让我们添加新的路由:
1Route::get('test', function () {
2    event(new App\Events\StatusLiked('Someone'));
3    return "Event has been sent!";
4});
现在使用Laravel启动一个PHP服务器,以测试代码是否正常工作:
1$ php artisan serve
结论
在本教程中,您利用Pusher的强大功能,用相对较少的代码创建了一个现代的Web通知系统。这个功能是使用Pusher可以完成的许多事情中的一个小示例。这个示例是您可以使用Pusher构建的许多可能的工具之一。
代码可在GitHub.上找到