连接池是指连接对象池。连接池基于对象池设计模式。当创建新对象的成本(时间和资源,如CPU、网络和IO)较高时,使用对象池设计模式。根据对象池设计模式,应用程序预先创建一个对象并将其放置在Pool或Container中。每当我们的应用程序需要这样的对象时,它都会从池中获取它们,而不是创建新的对象。
使用连接池策略的应用程序已经有了可以重用的DB连接对象。因此,当需要与数据库交互时,应用程序从Pool获取连接实例。连接池提高了与数据库交互的应用程序性能。

我们可以创建自己的连接池实现。任何连接池框架都需要完成三项任务。
- 创建连接对象
- 管理已创建对象的使用并验证它们
- 释放/销毁对象
有了Java,我们就有了一套现成的库。我们只需要配置几个属性就可以使用它们。
Java应用中的连接池
让我们来看看下面的库:
- ApacheCommons DBCP 2
- HikariCP
- C3P0
让我们逐一看看下面的例子。出于演示目的,我们将使用MySQL数据库和Eclipse IDE。我们还将使用JDK 1.8创建基于Maven的简单Java项目。
- 数据库脚本
 1create database empdb;
 2
 3use empdb;
 4
 5create table tblemployee(
 6                    empId integer AUTO_INCREMENT primary key,
 7                    empName varchar(64),
 8                    dob date,
 9                    designation varchar(64)
10);
11
12insert into tblemployee(empId,empName,dob,designation) values (default,'Adam','1998-08-15','Manager');
13insert into tblemployee(empId,empName,dob,designation) values (default,'Smith','2001-01-11','Clerk');
14insert into tblemployee(empId,empName,dob,designation) values (default,'James','1996-03-13','Officer');
示例项目
按照以下步骤创建新项目。
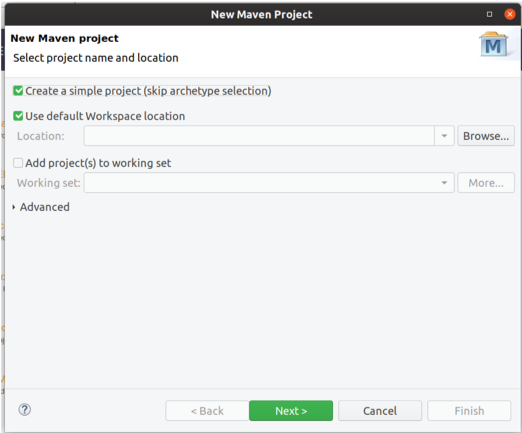
1.打开Eclipse IDE。 2.点击[文件]菜单,选择[新建]->[Maven项目 3.将显示以下屏幕。选择Create a Simple Project选项并单击Next按钮。

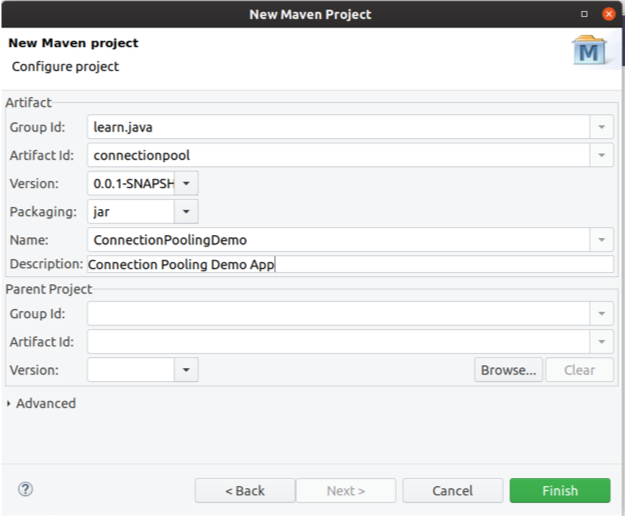
4.输入任意组ID、组ID、名称和说明。

单击完成按钮。
5.在您的pom.xml中为MySQL添加以下依赖项。
1<dependency>
2    <groupId>mysql</groupId>
3    <artifactId>mysql-connector-java</artifactId>
4    <version>5.1.49</version>
5</dependency>
6.右击项目,选择Maven->更新项目->确定。它将下载所有依赖项。
1)APACHE Commons DBCP 2
DBCP来自ApacheCommon Project。DBCP 2.7需要Java 8。要使用DBCP 2,您需要在项目中添加以下依赖项。
1<dependency>
2    <groupId>org.apache.commons</groupId>
3    <artifactId>commons-dbcp2</artifactId>
4    <version>2.7.0</version>
5</dependency>
ApacheDBCP 2.0提供了两种类型的数据源(BasicDataSource和PoolingDataSource)。
BasicDataSource: 顾名思义,简单,适用于最常见的用例。它在内部为我们创建了PoolingDataSource。
让我们来看一下初始化连接池的以下步骤。
1.创建BasicDataSource的实例 2.指定JDBC URL、数据库用户名和密码 3.指定空闲连接的最小数量(任何时候需要保留在池中的最小连接数量) 4.指定最大空闲连接数(池中最大空闲连接数) 5.指定最大连接总数。
 1package com.journaldev.example;
 2
 3/**
 4 * Java JDBC Connection pool using Apache commons DBCP2 example program
 5 *
 6 * @author pankaj
 7 */
 8
 9import java.sql.Connection;
10import java.sql.ResultSet;
11import java.sql.SQLException;
12import java.sql.Statement;
13
14import org.apache.commons.dbcp2.BasicDataSource;
15
16public class DBCP2Demo {
17
18    private static BasicDataSource dataSource = null;
19
20    static {
21    	dataSource = new BasicDataSource();
22    	dataSource.setUrl("jdbc:mysql://localhost:3306/empdb?useSSL=false");
23    	dataSource.setUsername("root");
24    	dataSource.setPassword("root");
25
26    	dataSource.setMinIdle(5);
27    	dataSource.setMaxIdle(10);
28    	dataSource.setMaxTotal(25);
29
30    }
31
32public static void main(String[] args) throws SQLException {
33    	Connection connection = null;
34    	Statement statement = null;
35    	ResultSet resultSet = null;
36    	try {
37    		connection = dataSource.getConnection();
38    		statement = connection.createStatement();
39    		resultSet = statement.executeQuery("select * from tblemployee");
40    		while (resultSet.next()) {
41    			System.out.println("empId:" + resultSet.getInt("empId"));
42    			System.out.println("empName:" + resultSet.getString("empName"));
43    			System.out.println("dob:" + resultSet.getDate("dob"));
44    			System.out.println("designation:" + resultSet.getString("designation"));
45    		}
46    	} finally {
47
48    		resultSet.close();
49    		statement.close();
50    		connection.close();
51    	}
52    }
53
54}
输出:
 1empId:1
 2empName:Adam
 3dob:1998-08-15
 4designation:Manager
 5empId:2
 6empName:Smith
 7dob:2001-01-11
 8designation:Clerk
 9empId:3
10empName:James
11dob:1996-03-13
12designation:Officer
PoolingDataSource: 提供更大的灵活性。您只需更改创建数据源的代码。代码的其余部分将保持不变。
让我们来看看初始化连接池的以下步骤:
1.使用JDBC URL创建ConnectionFactory实例。 2.使用在步骤1中创建的ConnectionFactory实例创建PoolableConnectionFactory实例 3.创建GenericObjectPoolConfig的实例,并设置最大空闲、最小空闲和最大连接属性 4.现在使用在步骤2和步骤3中创建的实例初始化对象池 5.现在将池设置为PoolableConnectionFactory的实例 6.最后,初始化DataSource的实例
 1private static DataSource dataSource = null;
 2
 3    static {
 4
 5    	Properties properties = new Properties();
 6    	properties.setProperty("user", "root");
 7    	properties.setProperty("password", "root");
 8
 9    	ConnectionFactory connectionFactory = new DriverManagerConnectionFactory("jdbc:mysql://localhost:3306/empdb",
10    			properties);
11
12    	PoolableConnectionFactory poolableConnectionFactory = new PoolableConnectionFactory(connectionFactory, null);
13
14    	GenericObjectPoolConfig<PoolableConnection> config = new GenericObjectPoolConfig<>();
15    	config.setMaxTotal(25);
16    	config.setMaxIdle(10);
17    	config.setMinIdle(5);
18
19    	ObjectPool<PoolableConnection> connectionPool = new GenericObjectPool<>(poolableConnectionFactory, config);
20    	poolableConnectionFactory.setPool(connectionPool);
21
22    	dataSource = new PoolingDataSource<>(connectionPool);
23
24    }
2)HikariCP
HikariCP快速、可靠、简单。它是连接池的首选解决方案之一。像Spring Boot2.x这样的框架使用它作为默认的连接管理器。
要使用HikariCP,请在我们项目的pom.xml中添加以下依赖项。
1<dependency>
2    <groupId>com.zaxxer</groupId>
3    <artifactId>HikariCP</artifactId>
4    <version>3.4.5</version>
5</dependency>
HikariCP配置 :
我们可以使用如下示例程序中所示的基于Java的配置,也可以使用属性文件来配置HikariCP。让我们来看看下面的属性。
- idleTimeout :连接对象可以空闲在池中的时间,单位为毫秒。支持** 最小空闲** 和** 最大池大小** 属性。在指定时间之后,将释放连接对象。
- ConnectionTimeout :客户端等待来自Pool的连接对象的时间,单位为毫秒。如果达到时间限制,则会抛出SQL异常。
- AutoCommit :我们可以指定TRUE或FALSE,如果设置为TRUE,它将自动提交您执行的每条SQL语句;如果设置为FALSE,则需要手动提交SQL语句
- cachePrepStmts:启用准备语句缓存
- minumIdle:任何时候需要在池中保留的连接对象的最小数量。
- MaximumPoolSize :池中最大可驻留连接数。
 1package com.journaldev.example;
 2
 3/**
 4 * Java JDBC Connection pool using HikariCP example program
 5 *
 6 * @author pankaj
 7 */
 8
 9import java.sql.Connection;
10import java.sql.ResultSet;
11import java.sql.SQLException;
12import java.sql.Statement;
13
14import com.zaxxer.hikari.HikariConfig;
15import com.zaxxer.hikari.HikariDataSource;
16
17public class HikariCPDemo {
18
19    private static HikariDataSource dataSource = null;
20
21    static {
22    	HikariConfig config = new HikariConfig();
23    	config.setJdbcUrl("jdbc:mysql://localhost:3306/empdb");
24    	config.setUsername("root");
25    	config.setPassword("root");
26    	config.addDataSourceProperty("minimumIdle", "5");
27    	config.addDataSourceProperty("maximumPoolSize", "25");
28
29    	dataSource = new HikariDataSource(config);
30    }
31
32    public static void main(String[] args) throws SQLException {
33    	Connection connection = null;
34    	Statement statement = null;
35    	ResultSet resultSet = null;
36    	try {
37    		connection = dataSource.getConnection();
38    		statement = connection.createStatement();
39    		resultSet = statement.executeQuery("select * from tblemployee");
40    		while (resultSet.next()) {
41    			System.out.println("empId:" + resultSet.getInt("empId"));
42    			System.out.println("empName:" + resultSet.getString("empName"));
43    			System.out.println("dob:" + resultSet.getDate("dob"));
44    			System.out.println("designation:" + resultSet.getString("designation"));
45    		}
46    	} finally {
47    		resultSet.close();
48    		statement.close();
49    		connection.close();
50    	}
51    }
52}
产出:
 1empId:1
 2empName:Adam
 3dob:1998-08-15
 4designation:Manager
 5empId:2
 6empName:Smith
 7dob:2001-01-11
 8designation:Clerk
 9empId:3
10empName:James
11dob:1996-03-13
12designation:Officer
3)C3P0
C3P0是最古老的图书馆之一。通常,它与休眠一起使用。要使用C3P0,我们需要向项目添加以下依赖项。
1<dependency>
2    <groupId>com.mchange</groupId>
3    <artifactId>c3p0</artifactId>
4    <version>0.9.5.5</version>
5</dependency>
我们可以使用C3P0配置以下属性。
*driverClass :首选JDBC驱动 *jdbcUrl :数据库的JDBC URL。
- initialPoolSize:启动时在池中创建的连接数。
- acquireIncrement:当前大小不够时需要创建的新连接数。 *maxIdleTime :连接在池中不被使用的秒数。 *maxPoolSize :池中最大连接数。
- minPoolSize:任何时候需要保留在池中的连接对象的最小数量。
 1package com.journaldev.example;
 2
 3/**
 4 * Java JDBC Connection pool using C3PO example program
 5 *
 6 * @author pankaj
 7 */
 8
 9import java.sql.Connection;
10import java.sql.ResultSet;
11import java.sql.SQLException;
12import java.sql.Statement;
13
14import com.mchange.v2.c3p0.ComboPooledDataSource;
15
16public class C3P0Demo {
17
18    static ComboPooledDataSource comboPooledDataSource = null;
19
20    static {
21    	comboPooledDataSource = new ComboPooledDataSource();
22
23    	comboPooledDataSource.setJdbcUrl("jdbc:mysql://localhost:3306/empdb?useSSL=false");
24    	comboPooledDataSource.setUser("root");
25    	comboPooledDataSource.setPassword("root");
26
27    	comboPooledDataSource.setMinPoolSize(3);
28    	comboPooledDataSource.setAcquireIncrement(3);
29    	comboPooledDataSource.setMaxPoolSize(30);
30
31    }
32
33public static void main(String[] args) throws SQLException {
34    	Connection connection = null;
35    	Statement statement = null;
36    	ResultSet resultSet = null;
37    	try {
38    		connection = comboPooledDataSource.getConnection();
39    		statement = connection.createStatement();
40    		resultSet = statement.executeQuery("select * from tblemployee");
41    		while (resultSet.next()) {
42    			System.out.println("empId:" + resultSet.getInt("empId"));
43    			System.out.println("empName:" + resultSet.getString("empName"));
44    			System.out.println("dob:" + resultSet.getDate("dob"));
45    			System.out.println("designation:" + resultSet.getString("designation"));
46    		}
47    	} finally {
48    		resultSet.close();
49    		statement.close();
50    		connection.close();
51    	}
52    }
53
54}
产出:
 1Aug 29, 2020 8:59:05 PM com.mchange.v2.c3p0.impl.AbstractPoolBackedDataSource
 2INFO: Initializing c3p0 pool... com.mchange.v2.c3p0.ComboPooledDataSource [ acquireIncrement -> 3, acquireRetryAttempts -> 30, acquireRetryDelay -> 1000, autoCommitOnClose -> false, automaticTestTable -> null, breakAfterAcquireFailure -> false, checkoutTimeout -> 0, connectionCustomizerClassName -> null, connectionTesterClassName -> com.mchange.v2.c3p0.impl.DefaultConnectionTester, contextClassLoaderSource -> caller, dataSourceName -> 1hge9kqacgbp7hjpftse6|77a567e1, debugUnreturnedConnectionStackTraces -> false, description -> null, driverClass -> null, extensions -> {}, factoryClassLocation -> null, forceIgnoreUnresolvedTransactions -> false, forceSynchronousCheckins -> false, forceUseNamedDriverClass -> false, identityToken -> 1hge9kqacgbp7hjpftse6|77a567e1, idleConnectionTestPeriod -> 0, initialPoolSize -> 3, jdbcUrl -> jdbc:mysql://localhost:3306/empdb?useSSL=false, maxAdministrativeTaskTime -> 0, maxConnectionAge -> 0, maxIdleTime -> 0, maxIdleTimeExcessConnections -> 0, maxPoolSize -> 30, maxStatements -> 0, maxStatementsPerConnection -> 0, minPoolSize -> 3, numHelperThreads -> 3, preferredTestQuery -> null, privilegeSpawnedThreads -> false, properties -> {user=******, password=******}, propertyCycle -> 0, statementCacheNumDeferredCloseThreads -> 0, testConnectionOnCheckin -> false, testConnectionOnCheckout -> false, unreturnedConnectionTimeout -> 0, userOverrides -> {}, usesTraditionalReflectiveProxies -> false ]
 3
 4empId:1
 5empName:Adam
 6dob:1998-08-15
 7designation:Manager
 8empId:2
 9empName:Smith
10dob:2001-01-11
11designation:Clerk
12empId:3
13empName:James
14dob:1996-03-13
15designation:Officer
这就是JDBC连接池示例教程,我希望这里没有遗漏任何重要的东西。
参考资料 :HikariCP,APACHE Commons DBCP,C3P0