简介
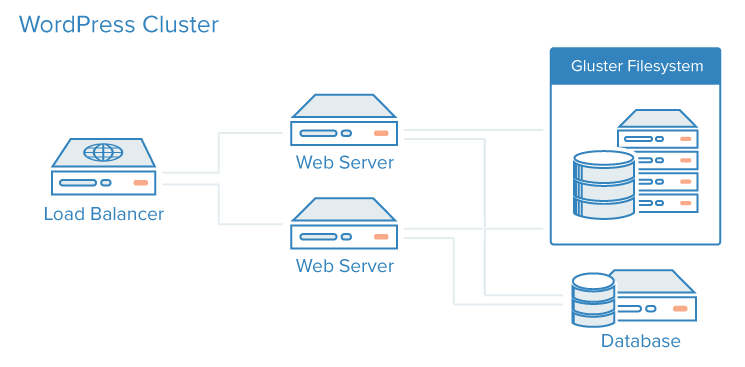
在本指南中,我们将创建和部署一个可伸缩的WordPress实例,该实例由MySQL数据库服务器、GlusterFS分布式文件系统、Nginx Web服务器和Nginx负载均衡器组成。通过使用user-data和Droplet meta-data,,我们将自动部署我们的站点。最后,我们将提供一个Ruby脚本,它将自动化整个过程,并简化可伸缩WordPress站点的创建。通过本教程,您将了解用户数据和Dropt元数据在DigitalOcean上部署服务时的强大功能和灵活性。
第一步-规划我们的部署
我们在本教程中创建的部署将由一台MySQL数据库服务器、集群中的多台GlusterFS服务器、多台Nginx Web服务器和一台Nginx负载均衡器组成。
在开始之前,我们应该知道:
- 我们将为MySQL服务器使用多大的水滴
- 我们将创建多少个GlusterFS节点
- 我们的GlusterFS节点将有多大
- 我们需要多少个Web服务器节点
- 我们将为我们的Web服务器使用多大的水滴
- 我们的负载均衡器将使用多大小的水滴
- 我们将为新站点使用的域名
如果以后需要,我们可以添加其他节点或扩展我们创建的节点。一旦我们确定了这些细节,我们就可以开始部署我们的站点了。
第二步-部署MySQL
我们将从部署MySQL服务器开始。 为此,我们将使用以下用户数据创建一个默认的Ubuntu 14.04 x64 Droplet。
 1#!/bin/bash
 2export DEBIAN_FRONTEND=noninteractive;
 3export PUBLIC_IP=$(curl -s http://169.254.169.254/metadata/v1/interfaces/public/0/ipv4/address)
 4export PRIVATE_IP=$(curl -s http://169.254.169.254/metadata/v1/interfaces/private/0/ipv4/address)
 5apt-get update;
 6apt-get -y install mysql-server;
 7mysqladmin -u root create wordpress;
 8mysqladmin -u root password "mysql_password";
 9sed -i.bak "s/127.0.0.1/$PRIVATE_IP/g" /etc/mysql/my.cnf;
10service mysql restart;
11mysql -uroot -pmysql_password -e "CREATE USER 'wordpress'@'%' IDENTIFIED BY 'mysql_password'";
12mysql -uroot -pmysql_password -e "GRANT ALL PRIVILEGES ON wordpress.* TO 'wordpress'@'%'";
此用户数据脚本将在我们的新Drop上执行以下功能:
首先,我们导出一个变量,告诉apt-get我们正在非交互模式下运行,以防止它在安装包时提示任何输入。
1export DEBIAN_FRONTEND=noninteractive;
接下来,我们使用Droplet元数据来获取Droplet的公有和私有IP地址,并将它们分配给变量:
1export PUBLIC_IP=$(curl -s http://169.254.169.254/metadata/v1/interfaces/public/0/ipv4/address)
2export PRIVATE_IP=$(curl -s http://169.254.169.254/metadata/v1/interfaces/private/0/ipv4/address)
1Note: Droplet Meta-Data is not available in NYC1, NYC2, and AMS1 at this time.
然后使用apt安装MySQL服务器。
1apt-get update;
2apt-get -y install mysql-server;
现在我们需要创建一个名为WordPress 的新数据库。
1mysqladmin -u root create wordpress;
然后,我们为MySQL根用户设置密码。
1mysqladmin -u root password "mysql_password";
因为我们的MySQL服务器将接受来自Web服务器的查询,所以我们需要让它监听私有IP地址,而不是只监听本地主机‘。为此,我们将使用sed`通过查找和替换来更新MySQL配置文件,然后重启服务。
1sed -i.bak "s/127.0.0.1/$PRIVATE_IP/g" /etc/mysql/my.cnf;
2service mysql restart;
最后,我们将创建一个名为WordPress 的新MySQL用户,并授予其访问_WordPress_数据库的权限。
1mysql -uroot -pmysql_password -e "CREATE USER 'wordpress'@'%' IDENTIFIED BY 'mysql_password'";
2mysql -uroot -pmysql_password -e "GRANT ALL PRIVILEGES ON wordpress.* TO 'wordpress'@'%'";
通过使用这个用户数据脚本部署我们的新Droplet,我们将拥有一个配置好的MySQL服务器,它监听它的私有IP地址,并拥有我们配置好的数据库和用户,而不需要通过SSH或控制台登录。
第三步-部署GlusterFS
在部署GlusterFS集群之前,我们需要决定要部署多少个节点。有两个变量将影响这一决定。首先,我们需要确定需要多少空间,然后需要确定要使用的副本设置。Replica设置告诉GlusterFS要存储多少个文件副本。例如,副本设置为2将意味着至少在2台服务器上复制每个文件。这将使我们的可用存储空间减半,因为我们保留了每个文件的两个副本,但将提供更好的冗余。我们创建的GlusterFS节点数必须是副本设置的倍数。对于副本设置为2的集群,我们需要以2的倍数创建节点(因此可以使用2、4、6或8个节点)。
在本例中,我们将使用副本设置2部署一个4节点GlusterFS集群。
对于前3个节点,我们将使用以下user-data脚本:
1#!/bin/bash
2export DEBIAN_FRONTEND=noninteractive;
3apt-get update;
4apt-get install -y python-software-properties;
5add-apt-repository -y ppa:gluster/glusterfs-3.5;
6apt-get update;
7apt-get install -y glusterfs-server;
同样,我们首先设置了DEBIAN_FRONTEND变量,以便apt知道我们正在非交互模式下运行:
1export DEBIAN_FRONTEND=noninteractive;
然后更新我们的apt数据库,安装添加GlusterFS的PPA所需的python-soft-Properties。
1apt-get update;
2apt-get install -y python-software-properties;
接下来,我们将添加GlusterFS PPA,以便获取我们的Deb包。
1add-apt-repository -y ppa:gluster/glusterfs-3.5;
然后,我们将再次更新我们的apt数据库并安装lusterfs-server。
1apt-get install -y glusterfs-server;
对于我们的前三个节点,这就是我们需要做的全部工作。记下分配给每个新Drop的专用IP地址,因为我们在创建最终的GlusterFS节点和创建卷时将需要它们。
对于我们的最后一个节点,我们将使用以下用户数据脚本:
 1#!/bin/bash
 2export DEBIAN_FRONTEND=noninteractive;
 3export PRIVATE_IP=$(curl -s http://169.254.169.254/metadata/v1/interfaces/private/0/ipv4/address)
 4apt-get update;
 5apt-get install -y python-software-properties;
 6add-apt-repository -y ppa:gluster/glusterfs-3.5;
 7apt-get update;
 8apt-get install -y glusterfs-server;
 9sleep 30;
10gluster peer probe node1_private_ip;
11gluster peer probe node2_private_ip;
12gluster peer probe node3_private_ip;
13gluster volume create file_store replica 2 transport tcp node1_private_ip:/gluster node2_private_ip:/gluster node3_private_ip:/gluster $PRIVATE_IP:/gluster force;
14gluster volume start file_store;
1Note: If you do not want to enable replication you should not include the "replica" setting in your "volume create" command.
这个用户数据脚本的第一部分与我们在其他GlusterFS节点上使用的脚本非常相似,尽管我们将新Droplet的私有IP分配给$PRIVATE_IP变量。但是,一旦安装了lusterfs-server,我们就需要做一些额外的工作。
首先,我们的脚本将等待30秒,等待新的lusterfs-服务器启动并可用。
1sleep 30
然后,我们探测前面创建的三个GlusterFS液滴,以便将所有四个液滴添加到一个集群中。
1gluster peer probe node1_private_ip;
2gluster peer probe node2_private_ip;
3gluster peer probe node3_private_ip;
接下来,我们将创建名为FILE_STORE的GlusterFS卷,副本设置为2,包括所有四个节点。由于我们还不知道最新节点的IP地址,因此我们将对其使用$PRIVATE_IP变量。
1gluster volume create file_store replica 2 transport tcp node1_private_ip:/gluster node2_private_ip:/gluster node3_private_ip:/gluster $PRIVATE_IP:/gluster force;
最后,我们将启动新卷以使其可从我们的客户端访问:
1gluster volume start file_store;
我们现在有了一个分布式文件系统,我们可以在其中保存WordPress文件,所有Web服务器节点都可以访问这些文件。
第四步-部署Nginx Web服务器
现在我们已经设置了数据库服务器和分布式文件系统,我们可以部署我们的Web服务器了。我们将使用以下用户数据脚本来部署我们的第一个Nginx Web服务器节点,并在GlusterFS卷中配置我们的WordPress安装。
 1#!/bin/bash
 2export DEBIAN_FRONTEND=noninteractive;
 3export PRIVATE_IP=$(curl -s http://169.254.169.254/metadata/v1/interfaces/private/0/ipv4/address)
 4apt-get update;
 5apt-get -y install nginx glusterfs-client php5-fpm php5-mysql;
 6sed -i s/\;cgi\.fix_pathinfo\=1/cgi\.fix_pathinfo\=0/g /etc/php5/fpm/php.ini;
 7mkdir /gluster;
 8mount -t glusterfs gluter_node_private_ip:/file_store /gluster;
 9echo "gluster_node_private_ip:/file_store /gluster glusterfs defaults,_netdev 0 0" >> /etc/fstab;
10mkdir /gluster/www;
11wget https://raw.githubusercontent.com/ryanpq/do-wpc/master/default -O /etc/nginx/sites-enabled/default;
12service nginx restart;
13# Get Wordpress Files
14wget https://wordpress.org/latest.tar.gz -O /root/wp.tar.gz;
15tar -zxf /root/wp.tar.gz -C /root/;
16cp -Rf /root/wordpress/* /gluster/www/.;
17cp /gluster/www/wp-config-sample.php /gluster/www/wp-config.php;
18sed -i "s/'DB_NAME', 'database_name_here'/'DB_NAME', 'wordpress'/g" /gluster/www/wp-config.php;
19sed -i "s/'DB_USER', 'username_here'/'DB_USER', 'wordpress'/g" /gluster/www/wp-config.php;
20sed -i "s/'DB_PASSWORD', 'password_here'/'DB_PASSWORD', 'mysql_password'/g" /gluster/www/wp-config.php;
21sed -i "s/'DB_HOST', 'localhost'/'DB_HOST', 'mysql_private_ip'/g" /gluster/www/wp-config.php;
22chown -Rf www-data:www-data /gluster/www;
这个脚本比我们前面的脚本稍微复杂一些,所以让我们一步一步地来分析它。
首先,我们将再次设置DEBIAN_FRONTEND变量,就像我们在以前的脚本中一样,并填充我们的$PRIVATE_IP变量。
1export DEBIAN_FRONTEND=noninteractive;
2export PRIVATE_IP=$(curl -s http://169.254.169.254/metadata/v1/interfaces/private/0/ipv4/address)
接下来,我们将更新我们的apt数据库,并安装我们需要的Nginx、Glusterfs客户端和php库。
1apt-get update;
2apt-get -y install nginx glusterfs-client php5-fpm php5-mysql;
然后,我们将使用sed‘S查找和替换功能来更新我们的php.ini文件,并将cgi.fix pathinfo变量设置为0。
1sed -i s/\;cgi\.fix_pathinfo\=1/cgi\.fix_pathinfo\=0/g /etc/php5/fpm/php.ini;
现在,我们将在磁盘镜像的根目录下创建一个名为/luster的文件夹,并在那里挂载我们的GlusterFS卷。然后,我们将创建一个fstab条目,以便在Drop引导时自动挂载我们的GlusterFS卷。
1mkdir /gluster;
2mount -t glusterfs gluter_node_private_ip:/file_store /gluster;
3echo "gluster_node_private_ip:/file_store /gluster glusterfs defaults,_netdev 0 0" >> /etc/fstab;
然后,我们将在GlusterFS卷中创建一个名为www的文件夹。此文件夹将作为我们的Web根目录。
1mkdir /gluster/www;
接下来,我们将从远程服务器获取一个新的Nginx配置文件。该文件会将我们的Web根目录设置为/luster/www,并确保将Nginx配置为使用PHP。您可以查看此配置文件here.一旦我们替换了我们的Nginx配置文件,我们将重新启动服务以使此更改生效。
1wget https://raw.githubusercontent.com/ryanpq/do-wpc/master/default -O /etc/nginx/sites-enabled/default;
2service nginx restart;
现在我们将获取最新版本的WordPress副本,将其解压缩并将其内容复制到新的Web根目录。
1wget https://wordpress.org/latest.tar.gz -O /root/wp.tar.gz;
2tar -zxf /root/wp.tar.gz -C /root/;
3cp -Rf /root/wordpress/* /gluster/www/.;
接下来,我们将复制示例WordPress配置文件到wp-config.php。
1cp /gluster/www/wp-config-sample.php /gluster/www/wp-config.php;
并更新其变量以匹配我们的新环境,再次使用sed‘S查找和替换函数。
1sed -i "s/'DB_NAME', 'database_name_here'/'DB_NAME', 'wordpress'/g" /gluster/www/wp-config.php;
2sed -i "s/'DB_USER', 'username_here'/'DB_USER', 'wordpress'/g" /gluster/www/wp-config.php;
3sed -i "s/'DB_PASSWORD', 'password_here'/'DB_PASSWORD', 'mysql_password'/g" /gluster/www/wp-config.php;
4sed -i "s/'DB_HOST', 'localhost'/'DB_HOST', 'mysql_private_ip'/g" /gluster/www/wp-config.php;
最后,我们将确保Web根目录中的文件归www-data 用户所有,我们的nginx进程将以该用户身份运行。
1chown -Rf www-data:www-data /gluster/www;
现在,我们的第一个Web服务器节点已经全部设置好,可以接收请求了。
由于我们的每个Web服务器节点共享相同的GlusterFS卷用于存储,因此我们创建的每个额外节点的步骤较少。对于其他节点,我们将使用以下用户数据脚本:
 1#!/bin/bash
 2export DEBIAN_FRONTEND=noninteractive;
 3export PRIVATE_IP=$(curl -s http://169.254.169.254/metadata/v1/interfaces/private/0/ipv4/address)
 4apt-get update;
 5apt-get -y install nginx glusterfs-client php5-fpm php5-mysql;
 6sed -i s/\;cgi\.fix_pathinfo\=1/cgi\.fix_pathinfo\=0/g /etc/php5/fpm/php.ini;
 7mkdir /gluster;
 8mount -t glusterfs gluster_node_private_ip:/file_store /gluster;
 9echo "gluster_node_private_ip:/file_store /gluster glusterfs defaults,_netdev 0 0" >> /etc/fstab;
10mkdir /gluster/www;
11wget https://raw.githubusercontent.com/ryanpq/do-wpc/master/default -O /etc/nginx/sites-enabled/default;
12service nginx restart;
对于额外的Web节点,我们仍然需要安装相同的包、挂载GlusterFS卷并替换Nginx配置文件,但我们不需要对WordPress实例进行任何设置,因为我们在创建第一个节点时就这样做了。
第五步-部署我们的负载均衡
此部署的最后一步是创建负载均衡器。为此,我们将使用另一台Nginx服务器。要设置该节点,我们将使用以下用户数据脚本:
 1#!/bin/bash
 2export DEBIAN_FRONTEND=noninteractive;
 3apt-get update;
 4apt-get -y install nginx;
 5lbconf="
 6server {
 7    listen 80 default_server;
 8    listen [::]:80 default_server ipv6only=on;
 9
10    root /usr/share/nginx/html;
11    index index.php index.html index.htm;
12
13    location / {
14      proxy_pass http://backend;
15      include proxy_params;
16    }
17
18}
19
20upstream backend  {
21    ip_hash;
22    server web_node_1_private_ip
23    server web_node_2_private_ip
24}
25"
26echo $lbconf > /etc/nginx/sites-enabled/default;
27service nginx restart;
对于负载均衡器的用户数据脚本,我们将直接在该脚本中构建我们的Nginx配置。我们一开始就像处理其他水滴一样,确保`apt‘知道我们在非交互模式下运行。
1export DEBIAN_FRONTEND=noninteractive;
然后我们将安装Nginx:
1apt-get update;
2apt-get -y install nginx;
接下来,我们将在名为lbconf的变量中创建新的Nginx配置。在_upstream backend_部分中为我们的每个Web服务器添加一个条目。
 1lbconf="
 2server {
 3    listen 80 default_server;
 4    listen [::]:80 default_server ipv6only=on;
 5
 6    root /usr/share/nginx/html;
 7    index index.php index.html index.htm;
 8
 9    location / {
10      proxy_pass http://backend;
11      include proxy_params;
12    }
13
14}
15
16upstream backend  {
17    ip_hash;
18    server web_node_1_private_ip
19    server web_node_2_private_ip
20}
21"
然后,我们将把lbcon变量写入我们的Nginx配置文件,替换它的当前内容。
1echo $lbconf > /etc/nginx/sites-enabled/default;
最后,我们将重启Nginx以使此配置生效。
1service nginx restart;
第六步-设置DNS
现在,在我们通过浏览器访问新的WordPress站点之前,我们应该为它设置一个域名系统条目。我们将通过控制面板完成此操作。
在DigitalOcean控制面板中,点击域名 。在** 添加域名** 表单中,输入您的域名,从下拉菜单中选择您的负载均衡Drop,然后单击** 创建域名** 。
为了将www 子域用于您的站点,您需要在此新域中创建另一个记录。
点击[添加记录],选择[CNAME]记录类型。在名称字段中输入www ,在主机名字段中输入** @** 。这会将对www子域的请求定向到与您的主域相同的位置(您的负载均衡器Drop)。
第七步-配置WordPress
现在我们已经启动了所有的Droplets并配置了我们的域,我们可以通过在Web浏览器中访问我们新配置的域来访问我们的新WordPress网站。

我们将在这里被提示创建一个用户帐户,并为我们的新站点命名。一旦我们这样做了,我们的部署就完成了,我们可以开始使用新的站点了。
第八步--流程自动化
现在我们可以创建我们的wordpress部署,而不需要ssh到一个Drop中,我们可以更进一步,使用DigitalOcean API.]自动化这个过程
基于本教程创建了一个样例Ruby脚本,它将提示用户提供相关细节,然后自动部署一个新的可伸缩WordPress实例。您可以在giHub上.)找到此脚本
结论
我们现在有了一个可扩展的WordPress部署,但我们还可以采取其他步骤来确保我们的新站点是安全和稳定的。