Formly一直是AngularJS的一个流行库,用于帮助表单创建和操作。现在,我们也可以使用@ngx-formly在Angular 2+中享受Formly。它为我们提供了一些模块,使我们可以使用简单的JSON对象轻松定义几乎任何类型的响应式表单。
<$>[注意]如果您刚接触角度形式,您可能想要阅读here以了解我们对反应形式的介绍。<$>
让我们简单介绍一下如何使用Formly。
设置
Formly可以与角度Material或Bootstrap,一起使用,这里我们将与角度材质一起使用。
让我们首先使用NPM或Yarn安装必要的包:
1$ npm install @ngx-formly/core @ngx-formly/material
2
3# or, using Yarn:
4$ yarn add @ngx-formly/core @ngx-formly/material
然后我们将为材料设置一个单独的模块,其中包含我们需要的组件模块:
 1[label material.module.ts]
 2import { NgModule } from '@angular/core';
 3
 4import {
 5  MatButtonModule,
 6  MatInputModule,
 7  MatFormFieldModule,
 8  MatCheckboxModule,
 9  MatSelectModule
10} from '@angular/material';
最后,在我们的应用程序模块中,让我们导入自定义材质模块和Formly所需的模块:
 1[label app.module.ts]
 2import { BrowserModule } from '@angular/platform-browser';
 3import { NgModule } from '@angular/core';
 4
 5import { MaterialModule } from './material.module';
 6import { BrowserAnimationsModule } from '@angular/platform-browser/animations';
 7import { ReactiveFormsModule } from '@angular/forms';
 8import { FormlyModule } from '@ngx-formly/core';
 9import { FormlyMaterialModule } from '@ngx-formly/material';
10import { AppComponent } from './app.component';
最后,除非您使用的是自定义材质theme,],否则请确保在全局样式文件中导入一个预构建的主题:
1[label styles.css]
2@import '~https://fonts.googleapis.com/icon?family=Material+Icons';
3@import '~@angular/material/prebuilt-themes/indigo-pink.css';
使用方法
在我们的应用程序模块中导入了所有正确的模块后,我们就可以开始使用Formly及其格式组件了。
我们可以使用两个简单对象在一个组件中定义一个表单:一个模型为每个表单域都有一个键,另一个对象具有一组FormlyFieldConfig类型的对象,其中包含模型中每个键的配置。
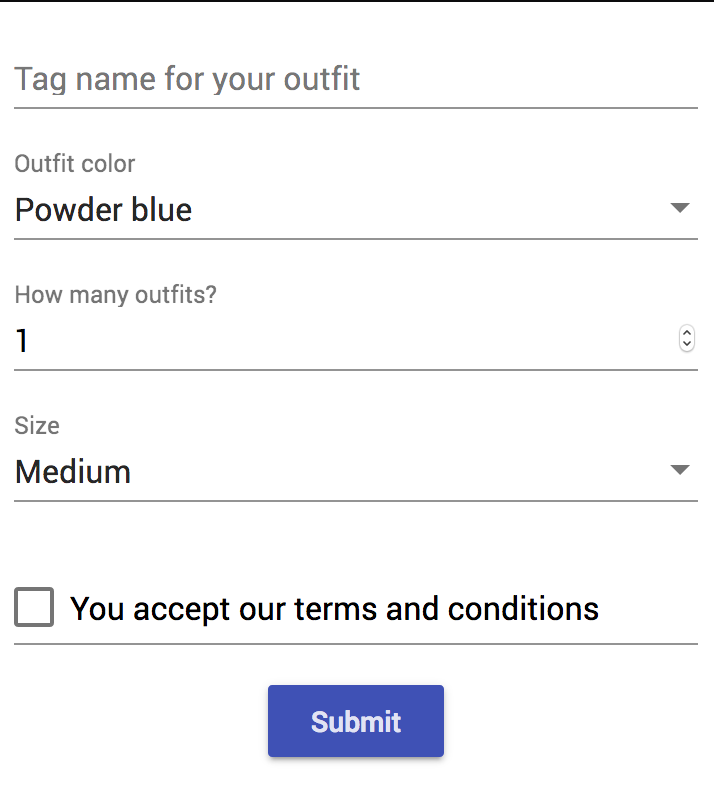
让我们创建一个简单的马戏团服装订购表单来演示如何设置表单:
 1[label app.module.ts]
 2import { Component } from '@angular/core';
 3
 4import { FormGroup } from '@angular/forms';
 5import { FormlyFieldConfig } from '@ngx-formly/core';
 6@Component({ ... })
 7export class AppComponent {
 8  orderForm = new FormGroup({});
 9  // our model:
10  order = {
11    tagName: '',
12    color: 'powder-blue', // will default to this value
13    quantity: 1,
14    size: 'M',
15    terms: false
16  };
17  // our field configuration. Keys should match our model:
18  orderFields: FormlyFieldConfig[] = [
19    {
20      key: 'tagName',
21      type: 'input', // input type
22      templateOptions: {
23        type: 'text',
24        label: 'Tag name for your outfit',
25        placeholder: 'tag name'
26      },
27      validation: {
28        messages: {
29          maxLength: 'Tag name is too long'
30        }
31      },
32      validators: {
33        // limit to 25 characters
34        maxLength: ({ value }) => {
35          return value.length <= 25;
36        }
37      }
38    },
39    {
40      key: 'color',
41      type: 'select',
42      templateOptions: {
43        label: 'Outfit color',
44        options: [
45          { label: 'Powder blue', value: 'powder-blue' },
46          { label: 'Orange crush', value: 'orange-crush' },
47          { label: 'Purple haze', value: 'purple-haze' }
48        ]
49      }
50    },
51    {
52      key: 'quantity',
53      type: 'input',
54      templateOptions: {
55        type: 'number',
56        label: 'How many outfits?',
57        placeholder: 'quantity',
58        required: true
59      }
60    },
61    {
62      key: 'size',
63      type: 'select',
64      defaultValue: 'M',
65      templateOptions: {
66        label: 'Size',
67        options: [
68          { label: 'Small', value: 'S' },
69          { label: 'Medium', value: 'M' },
70          { label: 'Large', value: 'L' }
71        ]
72      }
73    },
74    {
75      key: 'terms',
76      type: 'checkbox',
77      templateOptions: {
78        label: 'You accept our terms and conditions',
79        required: true
80      }
81    }
82  ];
配置可能很快就会变得很长,但一切都保持非常简单和声明性。上面的例子演示了如何做一些非常有用的事情:
- 定义默认值。
- 自定义验证和验证错误消息。
- 将字段标记为必填。
- 在选择字段的情况下指定字段类型和选项。
最后,组件模板中表单的标记再简单不过了。我们只需将我们的反应形式包装在一个形式形式的组件周围,然后为模型 和** 字段配置** 对象添加输入:
1[label app.component.html]
2<form [formGroup]="orderForm" (ngSubmit)="onSubmit(order)">
3  <formly-form [model]="order" [fields]="orderFields">
4    <button mat-raised-button color="primary" type="submit">
5      Submit
6    </button>
7  </formly-form>
8</form>
当组件初始化时,Form-Form组件将动态创建我们配置的所有表单域。下面是我们的示例表单:
🎪,这就是我们的小介绍!有关使用Formly可以完成哪些操作的更多示例,请查看官方website]。