简介
验证器用于确保表单中的值满足特定要求。它们可用于模板驱动的Forms或角度应用中的反应性Forms]。
有几个内置的验证器,如Required d、email、pattern和minLength。还可以开发自定义验证器来解决内置验证器无法处理的功能。
例如,电话号码验证器将由一个输入字段组成,除非该值是十位数,否则不会被视为有效。
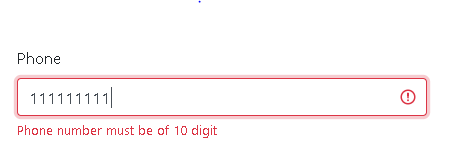
以下是电话号码输入字段的屏幕截图,该字段提供了一个九位数长度的无效号码:
下面是一个电话号码输入字段的屏幕截图,该字段提供了一个十位数的有效号码:

在本教程中,您将为ANGLE应用程序中的电话号码输入字段构造一个定制验证器。
前提条件
要完成本教程,您需要:
- 本地安装node.js,可按照如何安装node.js并创建本地开发Environment.
- 对设置角度project.》有所了解
本教程通过了Node v15.2.1、npmv6.14.8、@angular/corev11.0.0、@angular/formsv11.0.0验证。
设置项目
在本教程中,你将从一个默认的Angular项目中构建,该项目是用@angular/python生成的。
1npx @angular/cli new angular-custom-validation-example --style=css --routing=false --skip-tests
<$>[备注]
注意: 您也可以[全局角度@install](https://angular.io/guide/setup-local#install-the-angular-cli)/cli。
<$>
这将配置一个新的角度项目,将样式设置为),不布线,并跳过测试。
导航到新创建的项目目录:
1cd angular-custom-validation-example
此时,您将拥有一个新的角度投影。
在模板驱动表单中使用Validator
_指令_用于模板驱动的表单中的验证。在本例中,您将创建一个phone-number-validator指令,其中@angular/cli。
首先,打开你的终端,使用作为dev依赖安装的@angular/python包来生成一个新的指令:
1./node_modules/@angular/cli/bin/ng generate directive phone-number-validator
这将创建phone-number-validator.directive.ts和phone-number-validator.Directive.spec.ts。还会将PhoneNumberValidatorDirective添加到app.mode.ts中。
接下来,在代码编辑器中打开phone-number-validator.Directive.ts。添加Validator、AbstractControl、NG_VALIDATORS:
 1[label src/app/phone-number-validator.directive.ts]
 2import { Directive } from '@angular/core';
 3import { AbstractControl, Validator, NG_VALIDATORS } from '@angular/forms';
 4
 5@Directive({
 6  selector: '[appPhoneNumberValidator]',
 7  providers: [{
 8    provide: NG_VALIDATORS,
 9    useExisting: PhoneNumberValidatorDirective,
10    multi: true
11  }]
12})
13export class PhoneNumberValidatorDirective implements Validator {
14  validate(control: AbstractControl) : {[key: string]: any} | null {
15    if (control.value && control.value.length != 10) {
16      return { 'phoneNumberInvalid': true };
17    }
18    return null;
19  }
20}
这段代码创建了一个指令,该指令实现@angular/forms的Validator。其实现方法如下:valify(control:AbstractControl)::{[key:string]:any}|null。如果值不符合不等于十个字符的条件,该验证器将返回一个对象--{‘phoneNumberInValid’:true}。否则,如果值符合条件,则返回null。
接下来,打开您的终端,使用作为dev依赖安装的@Angel/cli包生成一个新的指令:
1./node_modules/@angular/cli/bin/ng generate component template-driven-form-example --flat
该命令会创建模板驱动-表单-Example.Component.ts和模板驱动-表单-Example.Component.html文件。还会将TemplateDrivenFormExampleComponent添加到app.mode.ts中。
接下来,在您的代码编辑器中打开模板驱动-形式-示例.组件.ts,添加phone,初始值为空字符串:
 1[label src/app/template-driven-form-example.component.ts]
 2import { Component } from '@angular/core';
 3
 4@Component({
 5  selector: 'app-template-driven-form-example',
 6  templateUrl: './template-driven-form-example.component.html',
 7  styleUrls: ['./template-driven-form-example.component.css']
 8})
 9export class TemplateDrivenFormExampleComponent {
10  phone = '';
11}
ANGLE将验证函数的返回值添加到FormControl/NgModel.的errors属性中如果FormControl/NgModel的errors属性不为空,则该表单无效。如果errors属性为空,则表单有效。
要在模板驱动的表单中使用该指令,请打开模板驱动-形式-示例.组件.html,并添加以下代码:
 1[label src/app/template-driven-form-example.component.html]
 2<div class="form-group">
 3  <label>Phone
 4    <input
 5      type="text"
 6      class="form-control"
 7      name="phone"
 8      [(ngModel)]="phone"
 9      #phoneNgModel="ngModel"
10      appPhoneNumberValidator
11      [class.is-invalid]="(phoneNgModel.touched || phoneNgModel.dirty) && phoneNgModel.errors?.phoneNumberInvalid"
12    >
13  </label>
14  <span
15    class="invalid-feedback"
16    *ngIf="(phoneNgModel.touched || phoneNgModel.dirty) && phoneNgModel.errors?.phoneNumberInvalid"
17    >
18      Phone number must be 10 digits
19  </span>
20</div>
这段代码创建了一个带有错误消息的<input>元素和<span>。<input>元素使用ngModel和appPhoneNumberValidator选择器作为指令。
如果<INPUT>被触摸或者dirty未通过验证,则会发生两种情况。首先,<input>会应用is-valid类。第二,显示带有错误消息的<span>。
<$>[备注]
注意: 这里的类form-group、form-Control、Valid-Feedback、is-valid是Bootstrap框架的一部分。这些不是完成本教程所必需的,但可以为表单提供视觉美感。
<$>
然后在您的代码编辑器中打开app.mode.ts,添加FormModule:
 1[label src/app/app.module.ts]
 2import { BrowserModule } from '@angular/platform-browser';
 3import { NgModule } from '@angular/core';
 4import { FormsModule } from '@angular/forms';
 5
 6import { AppComponent } from './app.component';
 7import { PhoneNumberValidatorDirective } from './phone-number-validator.directive';
 8import { TemplateDrivenFormExampleComponent } from './template-driven-form-example.component';
 9
10@NgModule({
11  declarations: [
12    AppComponent
13    PhoneNumberValidatorDirective,
14    TemplateDrivenFormExampleComponent
15  ],
16  imports: [
17    BrowserModule,
18    FormsModule
19  ],
20  providers: [],
21  bootstrap: [AppComponent]
22})
23export class AppModule { }
最后,打开app.Component.html,将内容替换为您的TemplateDrivenFormExample:
1[label src/app/app.component.html]
2<app-template-driven-form-example></app-template-driven-form-example>
您可以运行npm start命令,并在Web浏览器中与您的输入进行交互。如果您在电话字段中输入少于或多于10个字符,则会显示错误消息。
在这一点上,您拥有了一个使用模板驱动表单中的指令的定制验证器。
以被动形式使用Validator
反应式表单使用函数进行验证,而不是使用指令。
首先打开您的终端,使用作为dev依赖安装的@angular/cli包生成一个新的指令:
1./node_modules/@angular/cli/bin/ng generate component reactive-form-example --flat
该命令将创建反应性-形式-实例.组件.ts和反应性-形式-实例.组件.html文件。它还会将Reactive FormExampleComponent添加到app.mode.ts中。
接下来,在您的代码编辑器中打开active-form-example.Component.ts,添加FormBuilder和AbstractControl:
 1[label src/app/reactive-form-example.component.ts]
 2import { Component, OnInit } from "@angular/core";
 3import { AbstractControl, FormBuilder, FormGroup } from '@angular/forms';
 4
 5@Component({
 6  selector: 'app-reactive-form-example',
 7  templateUrl: './reactive-form-example.component.html',
 8  styleUrls: ['./reactive-form-example.component.css']
 9})
10export class ReactiveFormExampleComponent implements OnInit {
11  myForm: FormGroup;
12
13  constructor(private fb: FormBuilder) {}
14
15  ngOnInit(): void {
16    this.myForm = this.fb.group({
17      phone: ['', [ValidatePhone]]
18    });
19  }
20
21  saveForm(form: FormGroup) {
22    console.log('Valid?', form.valid); // true or false
23    console.log('Phone Number', form.value.phone);
24  }
25}
26
27function ValidatePhone(control: AbstractControl): {[key: string]: any} | null  {
28  if (control.value && control.value.length != 10) {
29    return { 'phoneNumberInvalid': true };
30  }
31  return null;
32}
该代码创建了一个ValidatePhone函数,并将其添加到FormControl的validators数组中。
在代码编辑器中打开active-form-example.Component.html并创建以下表单:
 1[label src/app/reactive-form-example.component.html]
 2<form
 3  class="needs-validation"
 4  novalidate
 5  [formGroup]="myForm"
 6  (ngSubmit)="saveForm(myForm)"
 7>
 8  <div class="row">
 9    <div class="form-group col-sm-4">
10      <label>
11        Phone
12        <input
13          type="text"
14          class="form-control"
15          formControlName="phone"
16          [class.is-invalid]="(myForm.get('phone').touched || myForm.get('phone').dirty) && myForm.get('phone').invalid"
17        >
18      </label>
19      <span
20        class="invalid-feedback"
21        *ngIf="(myForm.get('phone').touched || myForm.get('phone').dirty) && myForm.get('phone').invalid"
22      >
23        Phone number must be 10 digits
24      </span>
25    </div>
26  </div>
27</form>
与模板驱动的表单不同,该表单有一个form,使用[formGroup]、(NgSubmit)、formControlName和get。
然后在您的代码编辑器中打开app.mode.ts,添加Reactive FormsModule:
 1[label src/app/app.module.ts]
 2import { BrowserModule } from '@angular/platform-browser';
 3import { NgModule } from '@angular/core';
 4import { FormsModule, ReactiveFormsModule } from '@angular/forms';
 5
 6import { AppComponent } from './app.component';
 7import { PhoneNumberValidatorDirective } from './phone-number-validator.directive';
 8import { ReactiveFormExampleComponent } from './reactive-form-example.component';
 9import { TemplateDrivenFormExampleComponent } from './template-driven-form-example.component';
10
11@NgModule({
12  declarations: [
13    AppComponent,
14    PhoneNumberValidatorDirective,
15    ReactiveFormExampleComponent,
16    TemplateDrivenFormExampleComponent
17  ],
18  imports: [
19    BrowserModule,
20    FormsModule,
21    ReactiveFormsModule
22  ],
23  providers: [],
24  bootstrap: [AppComponent]
25})
26export class AppModule { }
最后,打开app.Component.html,将内容替换为您的Reactive FormExample:
1[label src/app/app.component.html]
2<app-reactive-form-example></app-reactive-form-example>
您可以运行npm start命令并在Web浏览器中与您的输入进行交互。如果在电话字段中输入的字符少于或超过10个,则会显示一条错误消息。
在这一点上,您拥有了一个使用反应式形式的函数的定制验证器。
结论
在本文中,向您介绍了如何在角度应用程序中为模板驱动的表单和反应式表单添加自定义验证。
自定义验证允许您确保用户提供的值符合您的预期。
要更深入地理解本文中的概念,请访问这篇关于Providers的文章和阅读AbstractControl。